7
1
2
3
4
5
6
7
8
9
10
GUIDE D’UTILISATION RAPIDE (FRANÇAIS)
oVeuillez vous assurer que les articles suivants sont dans la boîte: VERTICAL VINYL, 4 piles de format AA,
adaptateur 45 t/min, guide d’utilisation rapide, le livret des consignes de sécurité et des informations concernant
la garantie
oVEUILLEZ LIRE LE LIVRET DES CONSIGNES DE SÉCURITÉ AVANT D'UTILISER LE PRODUIT.
oAllez à http://www.ionaudio.com pour enregistrer le produit.
Installation murale du VERTICAL VINYL : Le VERTICAL VINYL dispose de deux trous sur le panneau arrière afin
que vous puissiez l’installer sur votre mur. Procédez de la même manière que pour accrocher un tableau lourd. Nous
vous recommandons de visser les vis dans les montants de cloison, que vous pouvez trouver à l’aide d’un détecteur
de montant standard.
Lecture d’un disque :
1. Desserrez et retirez le capuchon de plastique du plateau en le tournant dans le sens des aiguilles d’une montre.
2. Placez le disque sur le plateau.
3. Replacez le capuchon de plastique sur le plateau en le vissant dans le sens contraire des aiguilles d’une
montre, puis serrez-le afin de maintenir le disque en place.
4. Mettre l’appareil sous tension en tournant le bouton du volume dans le sens des aiguilles d’une montre jusqu’à
ce qu’un clic se fasse entendre. (La DEL au dessus du bouton s’allume lorsque l’appareil est mis sous tension.)
5. Sélectionnez la vitesse de lecture appropriée à l’aide du sélecteur (33 ou 45 t/min).
6. Retirez le serre-bras du bras de lecture, puis posez le bras de lecture sur le disque. Ajustez le volume selon vos
préférences.
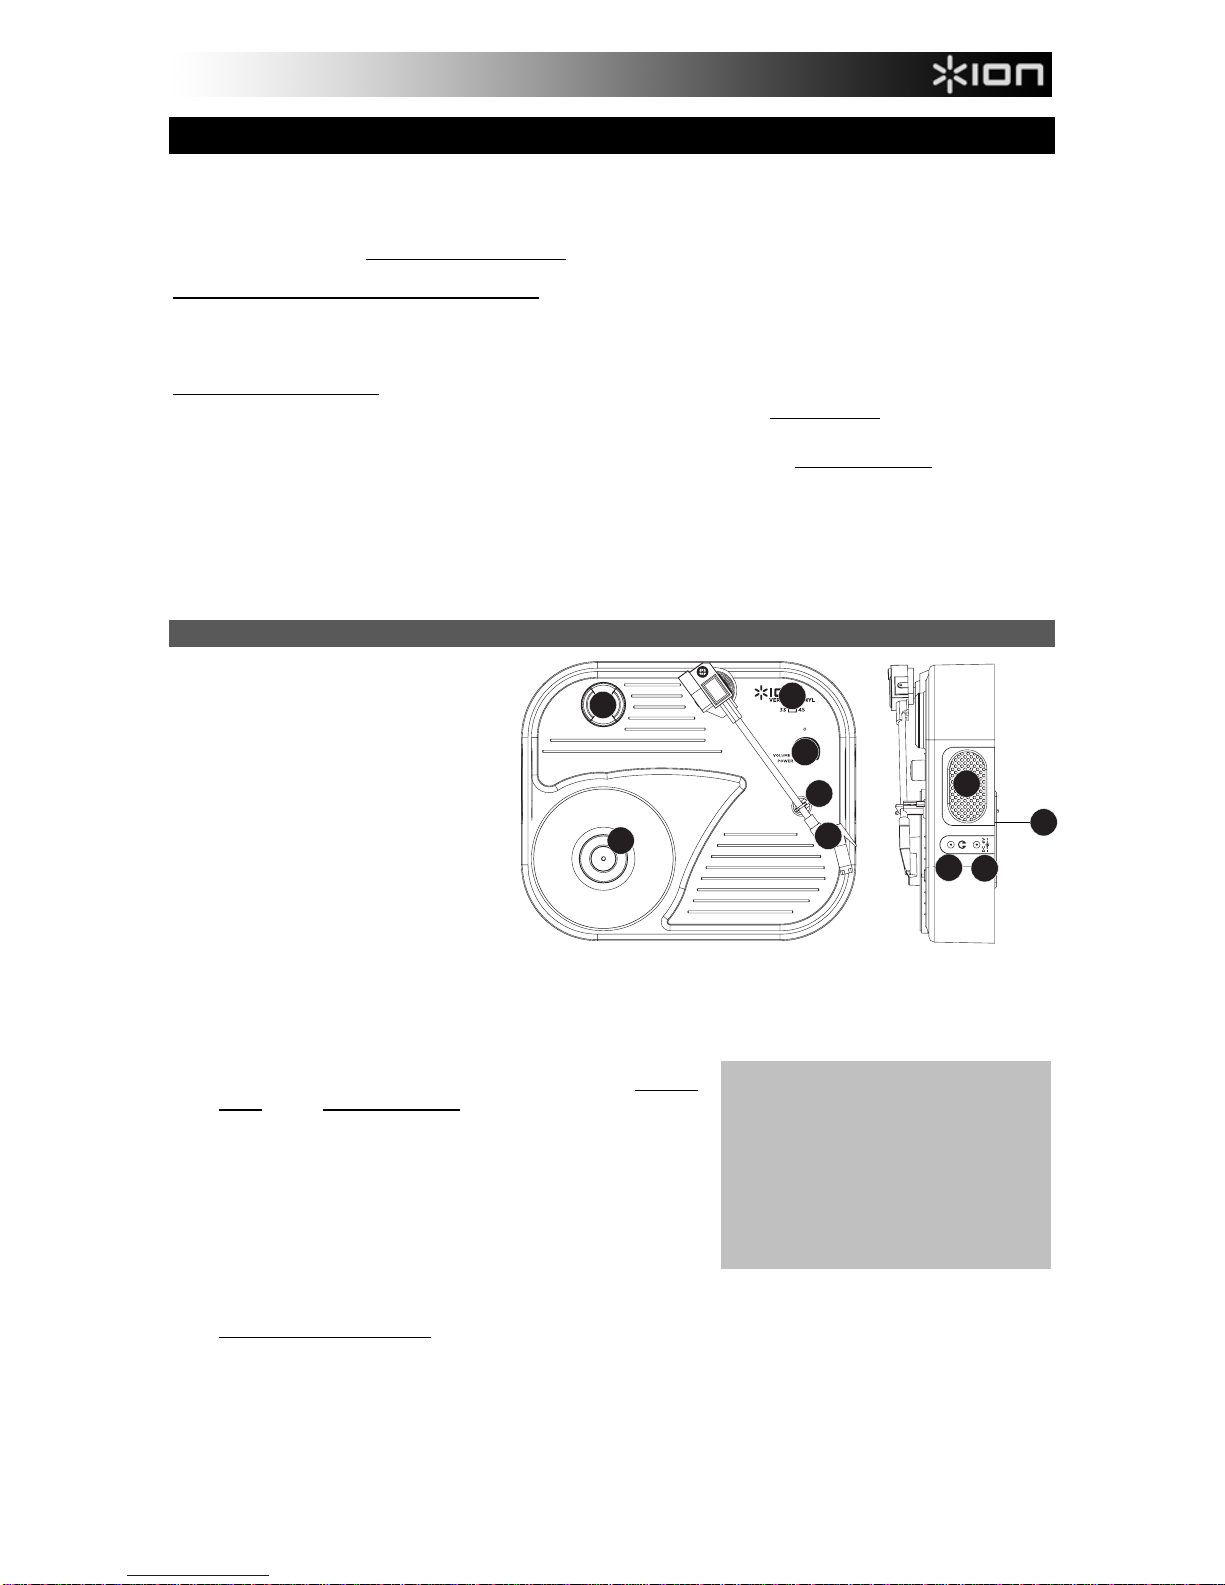
CARACTÉRISTIQUES
1. COMPARTIMENT DES PILES –
Retirez le couvercle et insérez 4 piles
de type AA dans le compartiment.
Assurez-vous d'insérer les piles en
respectant les polarités.
2. ENTRÉE D’ALIMENTATION – Si
vous préférez alimenter le
VERTICAL VINYL à partir d’une
prise secteur au lieu de piles, vous
pouvez brancher un adaptateur
d’alimentation 6 V CC, 500 mA (non
inclus) à cette entrée, puis dans la
prise secteur.
3. HAUT-PARLEUR – Le signal audio
provenant du disque se joué par ce
haut-parleur intégré.
4. INTERRUPTEUR DE MISE EN MARCHE/ARRÊT/VOLUME – Afin de mettre VERTICAL VINYL sous tension,
tournez ce bouton dans le sens des aiguilles d’une montre jusqu’à ce qu’un clic se fasse entendre. Lorsqu’il est
sous tension, utilisez ce bouton pour régler le volume. Afin de mettre le VERTICAL VINYL hors tension, veuillez
tourner ce bouton dans le sens antihoraire jusqu’à ce qu’un clic se fasse entendre.
5. PLATEAU – Veuillez placer le disque sur ce plateau en le
serrant avec le capuchon en plastique. (Desserrez le capuchon
de plastique en le tournant dans le sens des aiguilles d’une
montre et serrez-le dans le sens contraire des aiguilles d’une
montre.)
6. SERRE-BRAS – Le serre-bras est conçu spécialement pour
maintenir le bras de lecture en place.
7. BRAS DE LECTURE – Le VERTICAL VINYL est doté d’un bras
de lecture équilibré et d’une cartouche. Le BRAS DE LECTURE
peut être levé. Veuillez noter que le BRAS DE LECTURE doit
être déplacé du support (sur le SERRE-BRAS) afin que le
moteur de la table tournante soit activé. Lorsque le BRAS DE
LECTURE est à nouveau sur le support, le moteur se désactive.
Remarque : Vous pouvez remplacer le stylus avec le ION iCT05RS disponible au www.ionaudio.com/ict05rs.
8. SÉLECTEUR DE VITESSES DE LECTURE 33/45 (t/min) – Ce sélecteur contrôle nombre de tours/minute du
plateau du tourne-disque
9. EMPLACEMENT DE L’ADAPTATEUR 45 TR/MIN – Permet de ranger l’adaptateur pour disques 45 tr/min.
Lorsqu’il n’est pas utilisé, veuillez mettre l'adaptateur dans cet emplacement.
10. Les téléphones - Connectent 1/8 "le casque à écouteurs stéréo ici (non inclus). L'orateur(le locuteur) que la
production arrête de jouer audio une fois le casque à écouteurs est connecté.
IMPORTANT: Assurez-vous que le tapis
est toujours placé sur le plateau lors de
l’utilisation du tourne-disque. À défaut de
respecter cette condition, vous pourriez
endommager le support ainsi que le
tourne-disque.
Assurez-vous de retirer le protège-
cartouche en plastique (protège-aiguille)
avant de faire fonctionner le tourne-
disque.