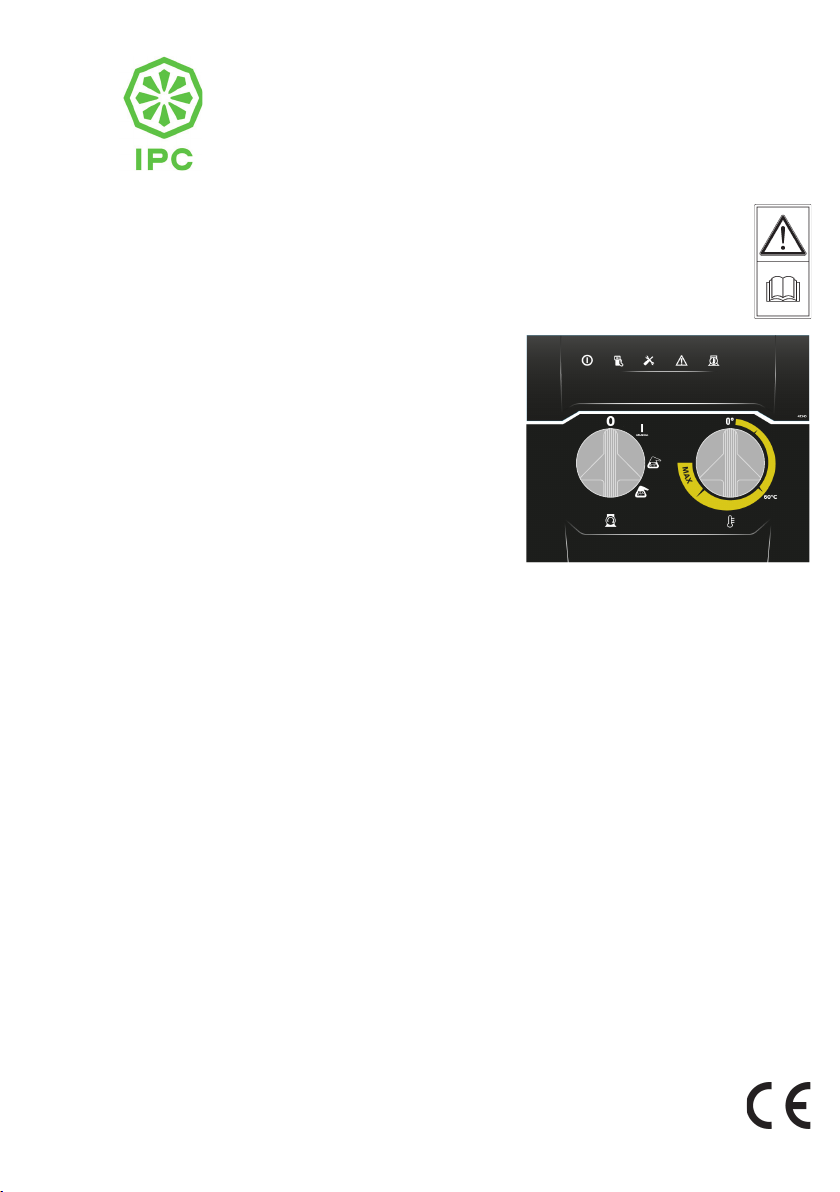
IPC Golden-H User manual

PW-H61 PW-H101
Golden-H Mistral-H
Mod. Value
MANUALE ISTRUZIONI
INSTRUCTIONS MANUAL
MANUEL D’ INSTRUCTIONS
BEDIENUNGSANLEITUNG
MANUAL DE INSTRUCCIONES
MANUAL DE INSTRUÇÕES
GEBRUIKERSHANDLEIDING
BRUGERVEJLEDNING
INSTRUTIONSBOK
BRUKERVEILEDNING
KÄYTTÖOPAS
NAVODILA ZA UPORABO
ΟΔΗΓΙΕΣ ΧΡΗΣΗΣ
PANNELLO COMANDI - FUNZIONI CONTROLLO
CONTROL PANEL - CONTROL FUNCTIONS
TABLEAU DE COMMANDES - FONCTIONS CONTRÔLE
BEDIENFELD - STEUERFUNKTIONEN
CUADRO DE MANDOS - FUNCIONES DE CONTROL
PAINEL DE COMANDOS - FUNÇÕES DE CONTROLO
ПАНЕЛЬ УПРАВЛЕНИЯ - ФУНКЦИИ КОНТРОЛЯ
BEDIENINGSPANEEL - REGELFUNCTIES
STYREPANEL - STYREFUNKTIONER
MANÖVERPANEL - KONTROLLFUNKTIONER
KONTROLLPANEL - KONTROLLFUNKSJONER
SÄÄTÖTAULU - OHJAUSTOIMINNOT
UPRAVLJALNA PLOŠČA - UPRAVLJALNE FUNKCIJE
ΠΙΝΑΚΑΣ ΧΕΙΡΙΣΤΗΡΙΩΝ - ΛΕΙΤΟΥΡΓΙΕΣ ΕΛΕΓΧΟΥ

Italiano ..................................... Page 3
English .....................................Page 7
Français ................................... Page 11
Deutsch ................................... Page 15
Español ....................................Page 19
Português ................................ Page 23
Русский ................................... Page 27
Nederlands .............................. Page 31
Dansk ..................................... Page 35
Svenska ................................... Page 39
Norsk ..................................... Page 43
Suomi ..................................... Page 47
Slovenščina ..............................Pag. 51
Ελληνικά ................................... Page 55

Italiano
- 3 -
Complimenti! Desideriamo ringraziarLa
per l'acquisto di questa idropulitrice, Lei ha dimostrato di non accettare compromessi: Lei vuole il meglio.
Abbiamo preparato questo manuale per consentirLe di apprezzare appieno le qualità e le elevate prestazioni che questa idro-
pulitrice Le ore.
Le raccomandiamo di leggerlo in tutte le sue parti prima dell'utilizzo.
Il marchio CE sulla Sua idropulitrice, dimostra la conformità del prodotto alle Normative Europee in ambito di Sicurezza.
PANNELLO COMANDI
Continuare la lettura del presente libretto senza collegare l' idropulitrice alla rete elettrica ed idrica.
ISTRUZIONI ORIGINALI
Il testo è stato attentamente controllato tuttavia, eventuali errori di stampa dovranno essere comunicati al costruttore
Si riserva inoltre allo scopo di migliorare il prodotto, il diritto di apportare modiche per l' aggiornamento
di questa pubblicazione senza preavviso.
E' inoltre vietata qualsiasi riproduzione, anche parziale del presente libretto, senza l'autorizzazione del costruttore.
A B
C D E F G

Italiano
- 4 -
DESCRIZIONE SIMBOLI SULL' IDROPULITRICE
INDICAZIONE ANOMALIE.
INDICAZIONE INTERVEN-
TO PROTEZIONE TERMICA
MOTORE.
ACCENSIONE MOTORE
POMPA.
SELETTORE EROGAZIONE
SOLUZIONE DETERGENTE.
ACCENSIONE BRUCIATO-
RE / REGOLATORE TEMPE-
RATURA.
PRESENZA RETE.
LIVELLO CARBURANTE.
SCADENZA INTERVALLO
MANUTENZIONE PRO-
GRAMMATA.

Italiano
- 5 -
PANNELLO COMANDI
A - Interruttore di accensione.
B - Accensione Bruciatore / Regolatore di temperatura.
C - Spia Presenza Rete.
D - Spia Livello Gasolio.
E - Manutenzione.
F - Spia Segnalazione Anomalie
G - Spia Intervento protezione termica Motore.
USO DELLA IDROPULITRICE
Avviare l'idropulitrice ruotando l'interruttore di accensione "A"
in pos. "I".
In questa posizione è possibile regolare la temperatura
dell'acqua dalla temperatura minima alla max. per mezzo del
regolatore "B".
Attenzione
Il getto d'acqua in alta pressione genera una forza di reazione
sulla lancia. Tenere ben salde le impugnature della lancia.
Posizionando l'interruttore "A" sulla pos. II "Chem 50%" si
attiva l'erogazione della soluzione detergente al 50% della
portata massima.
La temperatura dell'acqua può essere impostata tramite il
regolatore "B", ad un valore consiglato di 60°C.
Posizionando l'interruttore "A" sulla pos. III "Chem 100%" si
attiva l'erogazione della soluzione detergente al 100% della
portata massima.
La temperatura dell'acqua può essere impostata tramite il
regolatore "B", ad un valore consiglato di 60°C.
VISUALIZZAZIONE SEGNALAZIONI ED ANOMALIE.
Spia C): Presenza rete con accensione ssa della Spia (In-
terruttore "A" in pos. I), con Spia lampeggiante idropulitrice
in stato "TSI".
Led Accesi Idropulitrice in funzione, led in scoring quando in
attesa, led lampeggianti in stato "TSI".
Spia D): Livello carburante, con Spia accesa livello insu-
ciente.
Spia E): Intervallo di Manutenzione Programmata scaduta a
200h. La spia si spegnerà in seguito all' intervento del Centro
di Assistenza Autorizzato.
Spia F): Segnalazione Anomalie:
- 2 lampeggi, Allarme microperdite.
- 3 lampeggi, Allarme mancanza acqua.
- 5 lampeggi, Stato "TSI" a ripristino automatico.
- 6 lampeggi, Allarme guasto sonda NTC temperatura.
- 7 lampeggi, Allarme antiallagamento (1h funzionamento).
Spia G): Allarme intervento protezione termica del motore.
ARRESTO DELL' IDROPULITRICE - POSSIBILI
ANOMALIE
1) Idropulitrice non utilizzata per più di 20 min., idropulitrice in
Blocco Totale "TSI".
Lo stato viene segnalato dal lampeggio della Spia C).
2) Livello del carburante insuciente: il bruciatore si arresta e
non vi è erogazione di acqua calda.
L' anomalia viene segnalata dall' accensione della Spia D).
3) Intervallo di Manutenzione Programmata scaduta a 200h.
La spia si spegnerà in seguito all' intervento del Centro di
Assistenza Autorizzato.
L' anomalia viene segnalata dall' accensione della Spia E).
4) Rilievo Micro Perdite o Ugello Acqua intasato: l' idropulitrice
si arresta.
L' anomalia viene segnalata dal lampeggio della Spia F).
5) Rilievo Mancanza Acqua: Dopo 3 min. di funzionamento in
mancanza acqua l' idropulitrice si arresta.
L' anomalia viene segnalata dal lampeggio della Spia F).
6) Intervento Protezione Termica del Motore: l' idropulitrice si
arresta.
L' anomalia viene segnalata dal lampeggio della Spia G).
N.B. Per azzerare le segnalazioni ruotare l’ interruttore
generale “A” in pos.“0” e successivamente in pos.“I”.
In caso di ulteriore intervento consultare l' assistenza
tecnica.
!

Italiano
- 6 -
INCONVENIENTI - RIMEDI
Prima di qualsiasi operazione scollegare l' idropulitrice dalla rete elettrica mediante l'interruttore omnipolare
o scollegando la spina dalla presa di corrente, ed idrica.
CAUSE
Assenza di collegamento elettrico.
(Spia "C" Spenta).
Intervento protezione termica.
(Spia "G" lampeggia).
Filtro alimentazione acqua intasato.
Collegamento rete idraulica difettoso.
Rubinetto di rete chiuso.
Perdite dal circuito alta pressione.
Filtro alimentazione acqua intasato.
Collegamento rete idraulica difettoso.
Valvola di regolazione pressione impo-
stata su minimo.
Ugello lancia usurato.
Valvole sporche o usurate.
Dispositivi regolazione pressione sulla
lancia aperto (se presente).
Ugello intasato o deformato.
Aimentazione insuciente.
Micro perdite di acqua dal circuito alta
pressione.
L’ idropulitrice è inutilizzata da almeno 20
min. ed è in stato di blocco totale. (TSI)
Mancanza gasolio.
Senso di Rotazione del motore errato sui
modelli Trifase.
Bruciatore in Blocco.
Posizione Regolatore temperatura.
Filtri intasati.
Serpentina caldaia intasata dal calcare.
Liquido anticalcare esaurito.
RIMEDI
Controllare la tensione di rete.
(vedere caratteristiche tecniche).
Ripristinare. (In caso di ulteriore inter-
vento consultare l' assistenza tecnica).
Pulirlo.
Controllare.
Aprirlo.
Richiedere intervento Centro di assistenza.
Pulirlo.
Controllare.
Regolare.
Richiedere intervento Centro di assi-
stenza.
Richiedere intervento Centro di assi-
stenza.
Chiuderlo.
Pulirlo o richiedere intervento Centro di
Assistenza.
Controllare.
Richiedere intervento Centro di Assi-
stenza.
Riavviare ruotando l’ interruttore gene-
rale “A” in pos. “0” e successivamente
in pos. “I”.
Vericare il livello gasolio nel serbatoio e
controllare se vi è presenza di acqua nel
circuito aspirazione combustibile.
Richiedere intervento del Centro di
Assistenza.
Richiedere intervento del Centro di
Assistenza.
Controllare.
Pulire o sostituire.
Richiedere intervento centro di assi-
stenza.
Riempire il serbatoio anticalcare.
INCONVENIENTI
Ruotando l'interruttore l' idropulitrice
non parte.
Non c’ è erogazione del getto o vi è una
perdita dal circuito acqua alta pressione;
dopo 3 min. l’ idropulitrice si arresta e la
spia “F” lampeggia.
La pompa gira ma non raggiunge la
pressione nominale.
A lancia aperta la pressione scende e
sale. Dopo 10 impulsi l’ idropulitrice si
arresta e la spia “F” lampeggia.
In fase by-pass o total stop l'idropulitrice
si arresta e la spia "F" lampeggia.
L’ idropulitrice, dopo una fase di total
stop, non si avvia e la spia "C" lam-
peggia.
Portando il regolatore di temperatura
nella posizione desiderata, non si ha l’
accensione della caldaia.
La spia “D” si accende.
Acqua non sucientemente calda.
l’ idropulitrice si arresta
N.B. Per azzerare le segnalazioni ruotare l’ interruttore generale “A” in pos.“0” e successivamente in pos.“I”.
IMPORTANTE
Per la manutenzione e/o riparazione utilizzare solo ricambi originali che orono le maggiori caratteristiche di qualità,
adabilità e sicurezza. Il mancato uso di ricambi originali libera il costruttore da ogni responsabilità.

English
- 7 -
Congratulations! We wish to thank you
for having purchased this high pressure washer. By doing so, you have shown you are unwilling to compromise: you only want
the best.
We have prepared this manual so that you can fully appreciate the quality and high performance oered by this high pressure
washer.
You should read the complete manual before using the high pressure washer.
The CE mark on your high pressure washer shows that it complies to European safety standards.
CONTROL PANEL
Continue reading this manual without connecting the high pressure washer to the mains electricity and water sup-
plies.
TRANSLATION OF ORIGINAL INSTRUCTIONS
The text has been carefully checked. Nonetheless, please notify the manufacturer of any printing errors.
For the purpose of improving the product, the manufacturer reserves the right to update this publication, without
prior notice.
Whole or partial reproduction of this manual is prohibited without prior authorisation from the manufacturer.
A B
C D E F G

English
- 8 -
DESCRIPTION OF THE SYMBOLS ON THE HIGH PRESSURE WASHER
FAULT INDICATOR.
MOTOR THERMAL PRO-
TECTION INDICATOR.
SWITCHING OF THE PUMP
MOTOR.
DETERGENT SOLUTION
DELIVERY SELECTOR.
LIGHTING THE BURNER /
TEMPERATURE
ADJUSTMENT.
MAINS POWER.
FUEL LEVEL.
PROGRAMMED MAINTE-
NANCE INTERVAL EXPI-
RED.

English
- 9 -
CONTROL PANEL
A - On/o switch.
B - Lighting the Burner / Temperature adjustment.
C - Power indicator light.
D - Diesel level indicator light.
E - Maintenance indicator light.
F - Fault indicator light.
G - Motor Thermal indicator light.
USING THE CLEANER
Start the cleaner by turning the selector switch "A" to pos. "I".
In this position, you can control the water temperature from
minimum to maximum, by using regulator "B".
Warning
The high pressure water jet generates a reaction force in the
lance. Keep a rm grip on the lance handle.
By positioning switch "A" on pos. II "Chem 50%", it activates
the supply of the detergent solution at 50% of the full capacity.
The water temperature can be set using regulator "B" at a
recommended degree of 60°C.
By positioning switch "A" on pos. III "Chem 100%", it activates
the supply of the detergent solution at 100% of the full capacity.
The water temperature can be set using regulator "B" at a
recommended degree of 60°C.
SIGNALS AND FAULTS DISPLAYED.
Indicator light C): Power is on when the indicator light is on
steady (switch “A” in pos. I); when the indicator light is ashing,
the high pressure washer is in “TSI” status.
Led Lights pressure washer running, led in scoring when wai-
ting, led ashing in "TSI" status.
Indicator light D): Fuel level; the light on indicates low fuel level.
Indicator light E): 200h programmed maintenance interval
expired. The light will go o following maintenance by the
authorised service centre.
Indicator light F): Fault indicator:
- 2 ashes, Micro-leak alarm.
- 3 ashes, no water alarm.
- 5 ashes, Auto-reset "TSI" status
- 6 ashes, Temperature NTC probe failure alarm.
- 7 ashes, Anti-ood alarm (1h operation).
Indicator light G): Motor thermal protector activated.
HIGH PRESSURE WASHER SHUTDOWN - POSSI-
BLE FAULTS
1) High pressure washer not used for more than 20 min., high
pressure washer in total stop mode (TSI).
This is signalled by indicator light C) ashing.
2) Low fuel level: the burner shuts down and not hot water is
delivered.
The fault is signalled by indicator light D) on steady.
3) 200h programmed maintenance interval expired. The light
will go o following maintenance by the authorised service
centre.
The fault is signalled by indicator light E) on steady.
4) Micro-leaks detected or water nozzle clogged: the high
pressure washer shuts down.
The fault is signalled by indicator light F) ashing.
5) No water: After 3 minutes of operation with no water detected,
the high pressure washer shuts down.
The fault is signalled by indicator light F) ashing.
6) Motor thermal protector activated: the high pressure washer
shuts down.
The fault is signalled by indicator light G) ashing.
N.B. To reset the fault signals, turn main switch “A” to
pos.”0” and then back to pos. “I”.
For further assistance, contact the technical service centre.
!

English
- 10 -
TROUBLESHOOTING
Before proceeding, disconnect the high pressure washer from the mains power supply via the disconnect switch or
by unplugging the cable from the power socket, and turn o the water supply.
CAUSE
No electrical connection.
(Indicator light “C” o).
Thermal cutout has tripped.
(Indicator light “G” ashing).
Water supply lter clogged.
Incorrect connection to the mains water
supply.
Mains tap closed.
Leaks from the high pressure circuit.
Water supply lter clogged.
Incorrect connection to the mains water
supply.
Pressure regulation valve set to mini-
mum.
Lance nozzle worn.
Dirty or worn valves.
Detergent tap open.
Lance pressure adjustment devices
open (if featured).
Nozzle clogged or distorted.
Insucient water supply.
Detergent tap open.
Micro-leaks of water from the high pres-
sure circuit.
The high pressure washer is not used for
at least 20 minutes and goes into total
stop mode. (TSI)
No diesel fuel.
Direction of motor rotation incorrect on
three-phase model.
Burner lockout. (Indicator light “G” On)
Temperature adjustment position.
Filters clogged.
Boiler coil fouled by scale.
Descaler liquid nished.
REMEDY
Check mains voltage.
(See technical specications).
Reset. (For further assistance, contact
the technical service centre).
Clean.
Check.
Open.
Contact a technical service centre.
Clean.
Check.
Adjust.
Contact a technical service centre.
Close it.
Close it.
Clean or contact a technical service
centre.
Check.
Close it.
Contact a technical service centre.
Restart by turning main switch “A” to pos.
“0” and then back to pos. “I”.
Check the diesel level in the tank and
check if there is water in the fuel intake
circuit.
Contact a technical service centre.
Check.
Clean or replace.
Contact a technical service centre.
Fill the descaler tank.
PROBLEM
When the switch is turned, the high
pressure washer does not start.
No water jet is produced or there is a
leak from the high pressure water cir-
cuit; after 3 minutes the high pressure
washer shuts down and indicator light
“F” ashes.
The pump functions but does not reach
the rated pressure.
With the lance open, the pressure rises
and falls. After 10 pulses, the high pres-
sure washer shuts down and indicator
light “F” ashes.
In bypass or total stop mode, the high
pressure washer shuts down and indi-
cator light “F” ashes.
Following a total stop, the high pressure
washer fails to start and indicator light
“C” ashes.
Setting the temperature adjustment to
the desired position, the burner fails
to ignite.
Indicator light “D” comes on.
Water not hot enough.
The high pressure washer shuts down.
N.B. To reset the fault signals, turn main switch “A” to pos.”0” and then back to pos. ”I”.
IMPORTANT
During maintenance and/or repairs, use original spare parts only as these guarantee greater quality, reliable and
safety characteristics. Failure to use original spare parts absolves the manufacturer of all liability.

Français
- 11 -
Félicitations! Nous vous remercions
d'avoir acheté ce nettoyeur, vous avez démontré que vous n'acceptez aucun compromis: Vous voulez le meilleur.
Nous avons préparé ce manuel pour vous permettre d'apprécier pleinement les qualités et les performances de ce nettoyeur.
Nous vous recommandons de le lire entièrement avant d'utiliser l'appareil.
Le marquage CE sur le nettoyeur atteste que l'appareil est conforme aux Normes Européennes en matière de Sécurité.
TABLEAU DE COMMANDES
Continuer la lecture de cette notice sans brancher le nettoyeur sur le réseau électrique ni sur le réseau d'eau.
TRADUCTION DU MODE D’EMPLOI ORIGINAL
Le texte a été contrôlé attentivement, cependant il peut contenir des erreurs typographiques qui devront être com-
muniquées au fabricant.
En outre le fabricant se réserve le droit d'améliorer le produit, de modier et mettre à jour ce livret sans préavis.
Toute reproduction, totale ou partielle, de cette notice est interdite sans l'autorisation du fabricant.
A B
C D E F G

Français
- 12 -
DESCRIPTION DES PICTOGRAMMES PLACÉS SUR LE NETTOYEUR
SIGNALISATION ANOMA-
LIES
SIGNALISATION DE DÉ-
CLENCHEMENT DE LA PRO-
TECTION THERMIQUE DU
MOTEUR.
DÉMARRAGE MOTEUR
POMPE
SÉLECTEUR DE DISTRI-
BUTION DE SOLUTION DÉ-
TERGENTE.
ALLUMAGE DU BRÛLEUR /
RÉGULATEUR DE TEMPÉ-
RATURE.
SOUS TENSION
NIVEAU CARBURANT
ÉCHÉANCE D'ENTRETIEN
PROGRAMMÉ

Français
- 13 -
TABLEAU DE COMMANDES
A - Bouton de mise en marche
B - Allumage du brûleur / Régulateur de température
C - Voyant Sous tension
D - Voyant niveau gasoil
E - Entretien.
F - Voyant de signalisation anomalies
G - Voyant de déclenchement de la protection thermique du
moteur
UTILISATION DU NETTOYEUR
Mettre le nettoyeur en marche en tournant l’interrupteur d'allu-
mage « A » sur « I ».
Dans cette position, la température de l'eau peut être réglée du
minimum au maximum à l'aide du régulateur « B ».
Attention
Le jet d'eau à haute pression exerce une force de recul sur la
lance. Tenir fermement les poignées de la lance.
Positionner l’interrupteur « A » sur II « Chem 50% » pour ac-
tiver la distribution de la solution détergente à 50 % du débit
maximum.
La température de l’eau peut être réglée à l’aide du régulateur
« B » à une valeur conseillée de 60 °C.
Positionner l’interrupteur « A » sur III « Chem 100% » pour
activer la distribution de la solution détergente à 100 % du
débit maximum.
La température de l’eau peut être réglée à l’aide du régulateur
« B » à une valeur conseillée de 60 °C.
AFFICHAGE SIGNALISATIONS ET ANOMALIES.
Voyant C): Voyant allumé xe : sous tension (interrupteur « A »
sur I) ; voyant clignotant nettoyeur en « TSI ».
LED allumées nettoyeur en marche, LED en achage score
pendant l’attente, LED clignotantes en « TSI ».
Voyant D): Niveau carburant, voyant allumé: niveau insusant
Voyant E): Échéance d'entretien atteinte à 200h . Le voyant
s'éteint après l'intervention du Centre assistance agréé.
Voyant F): Signalisation anomalies :
- 2 clignotements, Alarme microfuites
- 3 clignotements Alarme manque d'eau
- 5 clignotements, état « TSI » à rétablissement automatique.
- 6 clignotements, alarme panne sonde NTC température.
- 7 clignotements, alarme anti-inondation (1 h de fonctionne-
ment).
Voyant G): Alarme déclenchement protection thermique du
moteur.
ARRÊT DU NETTOYEUR - ANOMALIES POS-
SIBLES
1) Nettoyeur pas utilisé pendant plus de 20 min, nettoyeur en
Arrêt Total « TSI ».
L'état est signalé par le voyant C) qui clignote.
2) Niveau du carburant insusant : le brûleur s'arrête et il n'y a
plus de production d'eau chaude.
L'anomalie est signalée par le voyant D) qui s'allume.
3) Échéance d'entretien atteinte à 200 h. Le voyant s'éteint
après l'intervention du Centre assistance agréé.
L'anomalie est signalée par le voyant E) qui s'allume.
4) Détection microfuites ou Buse bouchée : le nettoyeur s'arrête.
L'anomalie est signalée par le voyant F) qui clignote.
5) Détection manque d'eau : Après 3 min de fonctionnement
sans eau le nettoyeur s'arrête.
L'anomalie est signalée par le voyant F) qui clignote.
6) Déclenchement protection thermique du moteur : le nettoyeur
s'arrête.
L'anomalie est signalée par le voyant G) qui clignote.
N.B. Pour réinitialiser les signalisations tourner l'interrup-
teur général « A » sur « 0 » puis sur « I ».
En cas de nouveau déclenchement consulter l'assistance
technique.
!

Français
- 14 -
INCONVÉNIENTS - REMÈDES
Avant toute opération éteindre l'appareil à l'aide de l'interrupteur omnipolaire
ou le débrancher de la prise de courant, et couper l'alimentation en eau.
CAUSES
Absence de branchement électrique
(Voyant « C » éteint).
Déclenchement de la protection ther-
mique (Voyant « G » clignote).
Filtre alimentation eau colmaté.
Raccordement réseau eau défectueux.
Robinet d'alimentation fermé.
Fuites dans le circuit haute pression.
Filtre alimentation eau colmaté
Raccordement réseau eau défectueux.
Vanne de réglage pression réglée sur
minimum.
Buse lance usée.
Vannes sales ou usées.
Dispositif de régulation pression sur la
lance ouvert (si présent).
Buse bouchée ou déformée.
Alimentation insusante.
Micro-fuites d'eau du circuit haute
pression.
Le nettoyeur est inutilisé depuis au moins
20 min et il est en état d'arrêt total. (TSI).
Manque gasoil
Sens de rotation du moteur erroné sur
modèles Triphasé.
Brûleur arrêté.
Position Réglage de la température
Filtres encrassés.
Serpentin chaudière entartré.
Liquide anticalcaire épuisé.
REMÈDES
Contrôler la tension de réseau.
(voir caractéristiques techniques).
Réarmer (en cas de nouveau déclenche-
ment consulter l'assistance technique).
Le nettoyer.
Contrôler.
L'ouvrir.
Demander l'intervention du Centre
d'Assistance.
Le nettoyer.
Contrôler.
Régler.
Demander l'intervention du Centre
d'Assistance.
Demander l'intervention du Centre
d'Assistance.
Le fermer.
Le nettoyer ou demander l'intervention
du Centre d'Assistance.
Contrôler.
Demander l'intervention du Centre
d'Assistance.
Redémarrer en mettant l’interrupteur
général « A » sur « 0 » puis sur « I ».
Vérier le niveau de gasoil dans le ré-
servoir et contrôler qu'il n'y ait pas d'eau
dans le circuit d'aspiration combustible.
Demander l'intervention du Centre
d'Assistance
Demander l'intervention du Centre
d'Assistance
Contrôler
Nettoyer ou remplacer.
Demander l'intervention du Centre
d'Assistance
Remplir le réservoir anticalcaire.
INCONVÉNIENTS
Quand on tourne l'interrupteur le net-
toyeur ne se met pas en marche.
Pas de jet ou fuite du circuit eau haute
pression; après 3 min le nettoyeur s'ar-
rête et le voyant « F » clignote.
La pompe fonctionne mais n'atteint pas
la pression nominale.
Lorsque la lance est ouverte la pression
monte et descend. Au bout de 10 impul-
sions le nettoyeur s'arrête et le voyant
« F » clignote.
En phase by-pass ou total stop le net-
toyeur s'arrête et le voyant « F » clignote.
Le nettoyeur, après une phase de total
stop, ne se met pas en route et le voyant
« C » clignote.
Quand on met le régulateur de tempéra-
ture sur la position voulue la chaudière
ne se met pas en marche.
Le voyant « D » s'allume.
Eau pas susamment chaude.
Le nettoyeur s'arrête
N.B. Pour réinitialiser les signalisations tourner l'interrupteur général « A » sur « 0 » puis sur « I ».
IMPORTANT
Pour l'entretien et/ou réparation utiliser uniquement des pièces détachées d'origine qui orent les meilleures
caractéristiques de qualité, abilité et sécurité. La non utilisation de pièces d'origine dégage le fabricant de toute
responsabilité.

Deutsch
- 15 -
Glückwunsch! Wir möchten Ihnen danken,
dass Sie sich für diesen Hochdruckreiniger entschieden haben, Sie haben bewiesen, dass Sie keine Kompromisse schließen:
Nur das Beste ist Ihnen gut genug.
Wir haben diese Bedienungsanleitung abgefasst, damit Sie die Qualität und die optimalen Betriebseigenschaften dieses Hoch-
druckreinigers umfassend nutzen können.
Bitte lesen Sie die gesamte Bedienungsanleitung vor dem Gebrauch durch.
Die CE-Kennzeichnung auf Ihrem Hochdruckreiniger bestätigt, dass die Sicherheitsanforderungen der Europäischen Richtlinien
erfüllt werden.
BEDIENFELD
Lesen Sie diese Bedienungsanleitung weiter durch, ohne den Hochdruckreiniger an die Strom- und Wasserversor-
gung anzuschließen.
ÜBERSETZUNG DER ORIGINAL-BEDIENUNGSANLEITUNG
Der Text wurde aufmerksam überprüft, dennoch sind Druckfehler nicht ausgeschlossen; melden Sie diese bitte dem
Hersteller.
Im Zuge der Produktverbesserung behalten wir uns das Recht auf Änderungen zur Aktualisierung vor.
Jede Vervielfältigung, auch teilweise, dieser Bedienungsanleitung ist ohne die Zustimmung des Herstellers verboten.
A B
C D E F G

Deutsch
- 16 -
BESCHREIBUNG DER SYMBOLE AUF DEM HOCHDRUCKREINIGER
STÖRUNGSANZEIGE.
ANZEIGE MOTORSCHUTZ-
SCHALTER HAT AUSGE-
LÖST.
PUMPENMOTOR EINGE-
SCHALTET.
WAHLSCHALTER FÜR REI-
NIGUNGSMITTELABGABE
BRENNER / TEMPERATUR-
REGLER EINSCHALTEN
SPANNUNG VORHANDEN.
KRAFTSTOFFSTAND.
FÄLLIGKEIT DER PRO-
GRAMMIERTEN WARTUNG.

Deutsch
- 17 -
BEDIENFELD
A - Einschalter.
B - Brenner / Temperaturregler einschalten.
C - Kontrolllampe Spannung vorhanden.
D – Kontrolllampe Dieselstand.
E - Wartung.
F - Störleuchte
G - Kontrolllampe Motorschutzschalter hat ausgelöst.
GEBRAUCH DES HOCHDRUCKREINIGERS
Schalten Sie den Hochdruckreiniger ein, indem Sie den Ein-
schalter „A" auf „I" drehen.
In dieser Stellung kann die Wassertemperatur über den Regler
„B" von Mindest- auf Höchsttemperatur verstellt werden.
Achtung
Der Hochdruckwasserstrahl bewirkt eine Reaktionskraft an der
Lanze. Den Gri der Lanze gut festhalten.
Wenn der Schalter „A" auf Pos. III „Chem 50%" gestellt wird,
wird die Abgabe der Reinigungslösung zu 50% eingeschaltet.
Die Wassertemperatur kann über den Regler „B" auf den emp-
fohlenen Wert von 60°C eingestellt werden.
Wenn der Schalter „A" auf Pos. III „Chem 100%" gestellt wird,
wird die Abgabe der Reinigungslösung zu 100% eingeschaltet.
Die Wassertemperatur kann über den Regler „B" auf den emp-
fohlenen Wert von 60°C eingestellt werden.
ANZEIGE VON MELDUNGEN UND STÖRUNGEN.
Kontrolllampe C): Betriebsleuchte bei permanent leuchtender
Kontrolllampe (Schalter „A" auf I), bei blinkender Kontrolllampe
Hochdruckreiniger in Status „TSI".
LEDs eingeschaltet Hochdruckreiniger in Betrieb, LED-Anzeige
wenn er wartet, LEDs blinken in Status „TSI".
Kontrolllampe D): Kraftstostand, bei eingeschalteter Kont-
rolllampe Stand zu niedrig.
Kontrolllampe E): Fälligkeit der programmierten Wartung
nach Ablauf von 200h. Die Anzeige schaltet sich nach dem
Serviceeinsatz des autorisierten Kundendienstzentrums aus.
Kontrolllampe F): Störleuchte:
- zweimal aufblinken, Alarm Mikroleckagen.
- dreimal aufblinken, Alarm Wassermangel.
- fünfmal aufblinken, Status „TSI" mit automatischer Rück-
setzung.
- sechsmal aufblinken, Alarm NTC-Temperaturfühler defekt.
- siebenmal aufblinken, Überutungsalarm (1h Betrieb).
Kontrolllampe G): Alarm Motorschutzschalter hat ausgelöst.
ABSCHALTUNG DES HOCHDRUCKREINIGERS -
MÖGLICHE STÖRUNGEN
1) Der Hochdruckreiniger wurde für mehr als 20 Min. nicht ver-
wendet, Hochdruckreiniger in vollständiger Abschaltung „TSI".
Der Status wird durch Blinken der Kontrolllampe C) angezeigt.
2) Kraftstostand zu niedrig: der Brenner schaltet ab und es
wird kein Heißwasser ausgegeben.
Die Störung wird durch Einschalten der Kontrolllampe D)
angezeigt.
3) Fälligkeit der programmierten Wartung nach Ablauf von
200h. Die Anzeige schaltet sich nach dem Serviceeinsatz des
autorisierten Kundendienstzentrums aus.
Die Störung wird durch Einschalten der Kontrolllampe E)
angezeigt.
4) Feststellung von Mikroleckagen oder verstopfter Wasserdü-
se: der Hochdruckreiniger schaltet ab.
Die Störung wird durch Blinken der Kontrolllampe F) angezeigt.
5) Feststellung von Wassermangel: Nach 3 Min. Betrieb bei
Wassermangel schaltet der Hochdruckreiniger ab.
Die Störung wird durch Blinken der Kontrolllampe F) angezeigt.
6) Der Motorschutzschalter hat ausgelöst: der Hochdruckrei-
niger schaltet ab.
Die Störung wird durch Blinken der Kontrolllampe G) angezeigt.
Hinweis Um die Meldungen zurückzusetzen, den Haupt-
schalter „A" auf „0" und dann auf „I" stellen.
Bei erneutem Auslösen den technischen Kundendienst
anfordern.
!

Deutsch
- 18 -
STÖRUNGEN - ABHILFE
Vor jeder Tätigkeit muss der Hochdruckreiniger über den allpoligen Schalter
oder durch Ziehen des Steckers aus der Steckdose vom Stromnetz, sowie vom Wassernetz getrennt werden.
URSACHEN
Kein elektrischer Anschluss.
(Kontrolllampe „C" ausgeschaltet).
Thermischer Überlastschutz hat ausge-
löst. (Kontrolllampe „G" blinkt).
Wasserzulaulter verstopft.
Anschluss an das Wassernetz defekt.
Netzhahn geschlossen.
Leckagen am Hochdruck-Wasserkreis-
lauf.
Wasserzulaulter verstopft.
Anschluss an das Wassernetz defekt.
Druckregelventil auf Minimum einge-
stellt.
Düse der Lanze verschlissen.
Ventile verschmutzt oder verschlissen.
Druckregeleinrichtungen an der Lanze
oen (falls vorhanden).
Düse verstopft oder verformt.
Versorgung unzureichend.
Mikroleckagen am Hochdruck-Wasser-
kreislauf.
Der Hochdruckreiniger wurde seit min-
destens 20 Min. nicht benutzt und hat
vollständig abgeschaltet. (TSI)
Dieselmangel.
Falsche Drehrichtung des Motors bei
Drehstrommodellen.
Störabschaltung des Brenners.
Position Temperaturregler.
Filter verstopft.
Heizschlange des Kessels durch Kalk
verstopft.
Entkalker leer.
ABHILFEN
Die Netzspannung prüfen.
(siehe technische Eigenschaften).
Rücksetzen. (Bei erneutem Auslösen
den technischen Kundendienst anfor-
dern).
Den Filter reinigen.
Prüfen.
Den Hahn önen.
Den Kundendienst anfordern.
Den Filter reinigen.
Prüfen.
Einstellen.
Den Kundendienst anfordern.
Die Vorrichtung schließen.
Die Düse reinigen oder den Kunden-
dienst anfordern.
Prüfen.
Den Kundendienst anfordern.
Den Hochdruckreiniger wieder einschal-
ten, indem der Hauptschalter „A" auf „0"
und anschließend auf „I” gestellt wird.
Den Dieselstand im Tank prüfen und
kontrollieren, ob im Ansaugkreislauf des
Brennstos Wasser vorhanden ist.
Den Kundendienst anfordern.
Prüfen.
Reinigen oder austauschen.
Den Kundendienst anfordern.
Den Entkalkertank füllen.
STÖRUNGEN
Bei Drehen des Schalters schaltet sich
der Hochdruckreiniger nicht ein.
Der Wasserstrahl tritt nicht aus oder der
Hochdruck-Wasserkreislauf hat eine
Leckage; nach 3 Min. schaltet sich der
Hochdruckreiniger aus und die Kontrolll-
ampe “F” blinkt.
Die Pumpe läuft, erreicht aber nicht den
Nenndruck.
Bei geöneter Lanze sinkt und steigt
der Druck. Nach 10 Impulsen schaltet
sich der Hochdruckreiniger aus und die
Kontrolllampe “F” blinkt.
Der Hochdruckreiniger schaltet sich im
Bypassbetrieb oder bei Total-Stop aus
und die Kontrolllampe “F” blinkt.
Der Hochdruckreiniger schaltet sich
nach Total-Stop nicht mehr ein und die
Kontrolllampe “C” blinkt.
Bei Drehen des Temperaturreglers auf
die gewünschte Position schaltet sich
der Kessel nicht ein.
Die Kontrolllampe „D” schaltet sich ein.
Das Wasser ist nicht heiß genug.
Der Hochdruckreiniger schaltet ab.
Hinweis Um die Meldungen zurückzusetzen, den Hauptschalter „A" auf „0" und dann auf „I" stellen.
WICHTIG
Verwenden Sie für die Wartung und/oder Reparatur nur Original-Ersatzteile, da sie die beste Qualität, Zuverlässigkeit
und Sicherheit bieten. Bei Nichtverwendung von Original-Ersatzteilen ist der Hersteller von jeglicher Haftung befreit.

Español
- 19 -
¡Felicitaciones! Deseamos agradecerle
por haber comprado esta hidrolimpiadora, Usted ha demostrado que no acepta compromisos: Usted quiere lo mejor.
Hemos preparado este manual para que Usted pueda apreciar totalmente la calidad y los altos rendimientos que le ofrece esta
hidrolimpiadora.
Le recomendamos leerlo completamente antes de utilizar la máquina.
La marca CE aplicada en la hidrolimpiadora demuestra la conformidad del producto a las Normativas Europeas en materia de
seguridad.
CUADRO DE MANDOS
Siga leyendo este manual sin conectar la hidrolimpiadora ni a la red eléctrica ni hídrica.
TRADUCCIÓN DE LAS INSTRUCCIONES ORIGINALES
El texto ha sido controlado minuciosamente; de todas maneras, comunique al Fabricante los errores de impresión
que pueda encontrar.
Con la nalidad de mejorar el producto, el Fabricante se reserva el derecho de realizar modicaciones para la actua-
lización de esta publicación sin aviso previo.
También está prohibida la reproducción total o parcial de este manual sin la autorización del fabricante.
A B
C D E F G

Español
- 20 -
DESCRIPCIÓN DE LOS SÍMBOLOS APLICADOS EN LA HIDROLIMPIADORA
INDICACIÓN DE DESPER-
FECTOS.
INDICACIÓN ACTIVACIÓN
PROTECCIÓN TÉRMICA
DEL MOTOR.
ENCENDIDO DEL MOTOR
DE LA BOMBA.
SELECTOR DE LA DISTRI-
BUCIÓN DE LA SOLUCIÓN
DETERGENTE.
ENCENDIDO DEL QUEMA-
DOR / REGULADOR DE
TEMPERATURA.
LLEGADA TENSIÓN.
NIVEL DE COMBUSTIBLE.
VENCIMIENTO DEL INTER-
VALO DEL MANTENIMIEN-
TO PROGRAMADO.
Other manuals for Golden-H
1
This manual suits for next models
3
Table of contents
Languages:
Other IPC Pressure Washer manuals

IPC
IPC PW-C21 I 1508P User manual

IPC
IPC PW-C25 User manual

IPC
IPC Diesel-C User manual

IPC
IPC MODULAR ML 12.100 M User manual

IPC
IPC PW-C22 P User manual

IPC
IPC PW-C25 User manual

IPC
IPC N. Royal Jet User manual

IPC
IPC Portotecnica ML.Compact 1910M User manual

IPC
IPC PW-H10 User manual

IPC
IPC Mistral-E PW-E101 User manual
Popular Pressure Washer manuals by other brands

Kärcher
Kärcher K 7.85 M operating instructions

DeVilbiss Air Power Company
DeVilbiss Air Power Company MPG-1420-A owner's manual

Kärcher
Kärcher 1500 G operating instructions

Kärcher
Kärcher K 3.160 operating instructions

Hamron
Hamron 220-116 operating instructions

Silverline
Silverline 1400W Pressure Washer manual