iRay Technology Tianxuan M300G User manual

Tianxuan M300G&M600G
Handheld Thermal Camera
User Manual V1.0.9
IRay Technology Co., Ltd.
www.infiray.com

Introduction to IRay Technology
IRay Technology Co., Ltd. concentrates on developing infrared thermal imaging technologies and
manufacturing relevant products, with completely independent intellectual property rights. IRay is
committed to providing global customers with professional and competitive infrared thermal imaging
products and solutions. The main products include IRFPA detectors, thermal imaging modules, and
terminal thermal imaging products.
With R&D personnel accounts for 48% of all employees, 787 intellectual property projects in terms of IRay
have been authorized and accepted: 629 patented technologies authorized and accepted in China
(including those for integrated circuit chips, MEMS sensors design and manufacture, Matrix III image
algorithms and intelligent precise temperature measurement algorithms, etc.); 18 patented technologies
authorized and accepted overseas; 101 software copyrights; and 39 integrated circuit layout designs.
(The statistic data is up to August,2021)
IRay products have been applied in various fields, including epidemic prevention and control, industrial
thermography, security and fire control, night vision observation, automatic driving, Internet of Things, AI,
and machine vision.

Tianxuan M Series Handheld Thermal Camera ·User Manual
I
Table of Contents
1.Legal Disclaimer ........................................................................................................................................1
1.1 Legal Disclaimer ............................................................................................................................... 1
1.2 Copyright ...........................................................................................................................................1
1.3 Quality Assurance .............................................................................................................................1
2.Safety Information .....................................................................................................................................2
3.Notice to user ............................................................................................................................................ 4
3.1 Calibration .........................................................................................................................................4
3.2 Accuracy ........................................................................................................................................... 4
3.3 Video Teaching ................................................................................................................................. 4
3.4 Documentation Updates ...................................................................................................................4
3.5 Scope of Application ......................................................................................................................... 4
4.Customer Help ...........................................................................................................................................4
4.1 FAQ ................................................................................................................................................... 4
4.2 Download .......................................................................................................................................... 4
5.Comparison of Functions for Different Models .................................................................................... 5
6.Product Introduction ................................................................................................................................ 6
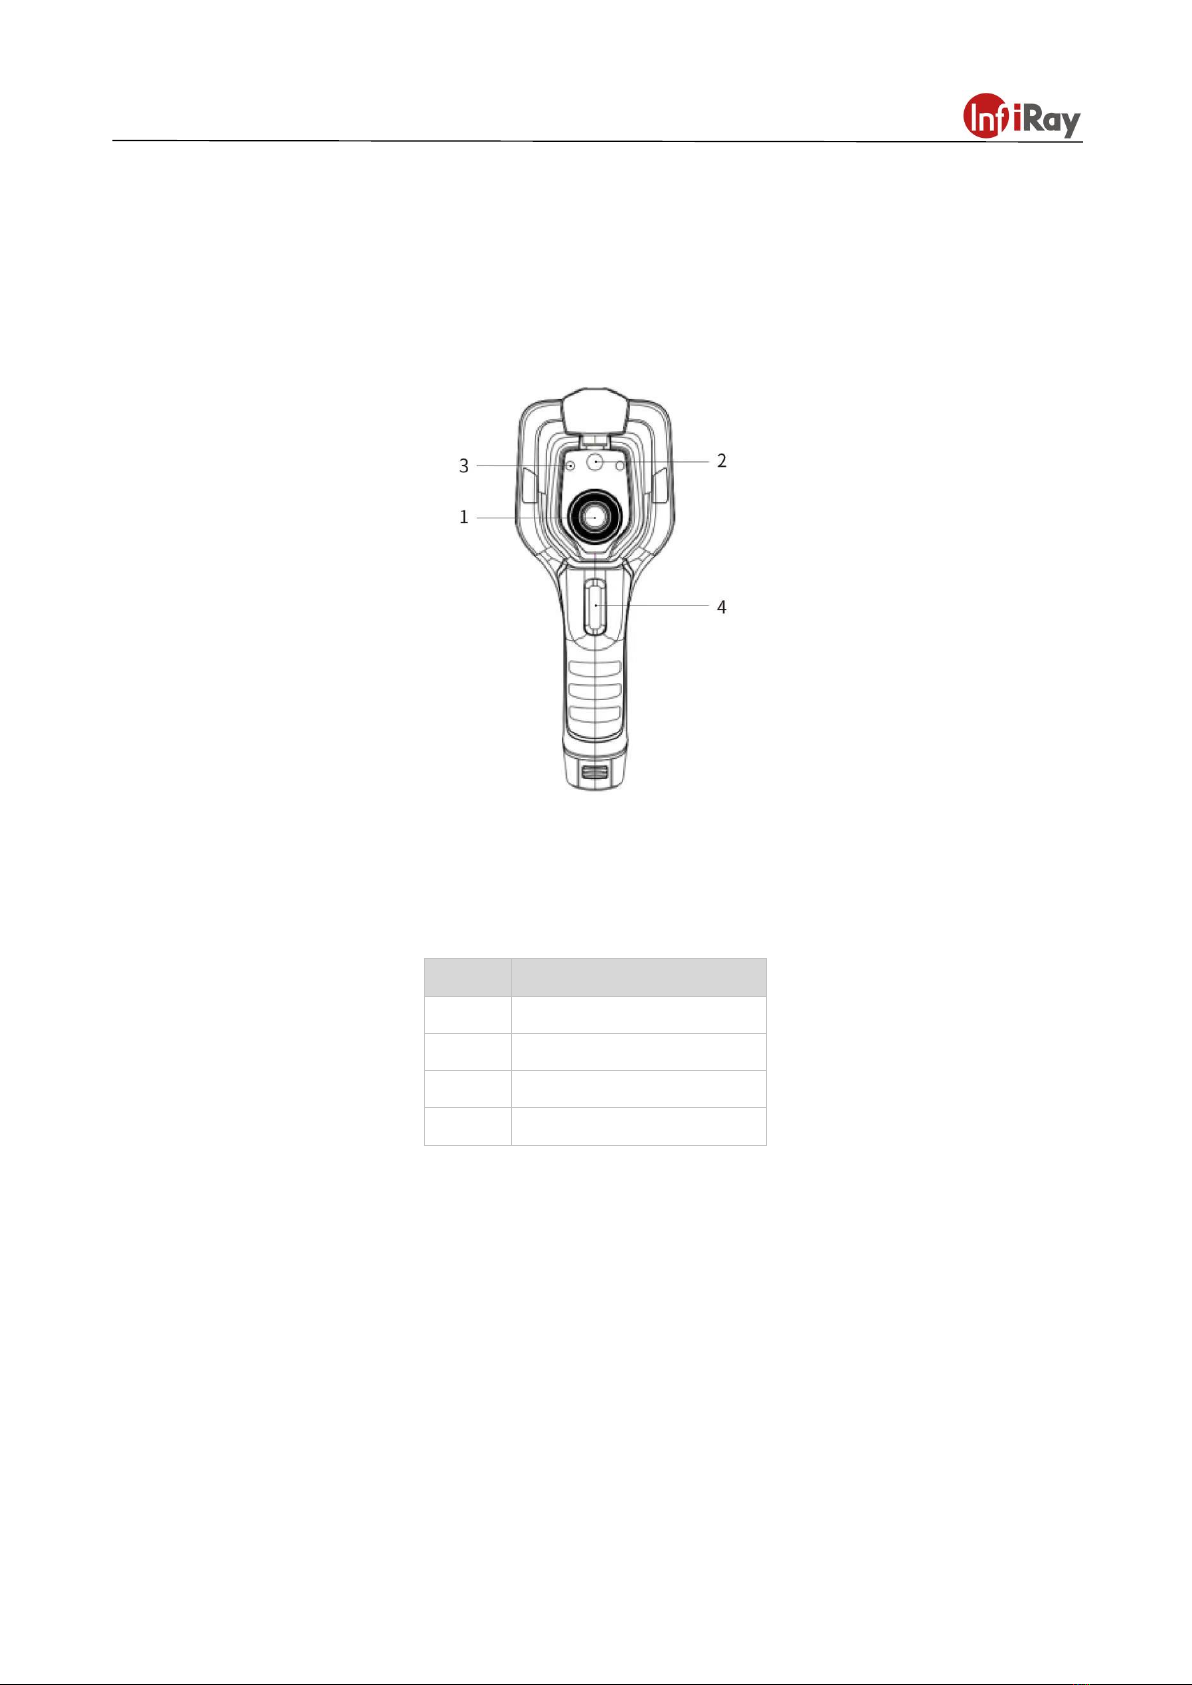
6.1 Camera(View from the front)....................................................................................................... 6
6.2 Buttons(View from the rear).........................................................................................................7
6.3 Connector and Memory Card ...........................................................................................................8
7.Quick Start Guide ......................................................................................................................................9
8.User Interface .......................................................................................................................................... 10
9.Operation Instruction ..............................................................................................................................11
9.1 Charging ..........................................................................................................................................11
9.1.1 Charge with a Power Adapter .............................................................................................. 11
9.1.2 Charge with a Computer ...................................................................................................... 11
9.1.3 Charge with a Charging Base .............................................................................................. 11
9.2 Power On/Off .................................................................................................................................. 11
9.3 Focus Adjustment ........................................................................................................................... 12
Figure 9.1 Focus Adjustment Through Focus Ring ............................................................................. 12
9.4 Images/Videos Capture .................................................................................................................. 12
9.5 View Photos/Videos ........................................................................................................................12
9.6 Measurement Mode ........................................................................................................................13
9.7 Measurement Parameters ..............................................................................................................13
9.8 Palettes ........................................................................................................................................... 14
9.9 Image Mode ....................................................................................................................................14
9.9.1 Image Mode Introduction ..................................................................................................... 14

Tianxuan M Series Handheld Thermal Camera ·User Manual
II
9.9.2 Setting Steps ........................................................................................................................ 14
9.10 Non-uniformity Correction ............................................................................................................ 14
9.10.1 Non-uniformity Correction Introduction ..............................................................................14
9.10.2 Non-uniformity Correction Operations ...............................................................................15
9.11 Contrast Adjustment ..................................................................................................................... 15
9.12 Digital Zoom (This function is only applicable to M600 series) ................................................... 15
9.13 Other Settings ...............................................................................................................................16
9.13.1 Date and Time ....................................................................................................................16
9.13.2 Languages ..........................................................................................................................16
9.13.3 Units of Measurement ........................................................................................................16
9.13.4 Temperature Gear .............................................................................................................. 16
9.13.5 High/ Low Temperature Alarm ........................................................................................... 16
9.13.6 Display Brightness ............................................................................................................. 17
9.13.7 Automatic Power-off ........................................................................................................... 17
9.13.8 WiFi Setting (This function is only applicable to M600 series) ......................................... 17
9.13.9 Device Information ............................................................................................................. 17
9.13.10 Restore Factory Settings ................................................................................................. 17
9.13.11 Formatting the SD Card ................................................................................................... 17
9.13.12 Dual-spectrum Registration ............................................................................................. 18
10.Introduction of Application Scenarios ............................................................................................... 19
10.1 Detecting of Power Distribution Cabinet ...................................................................................... 19
10.2 Liquid Level Detecting of the Storage Tank ................................................................................. 20
10.3 Circuit Board R&D ........................................................................................................................ 20
10.4 Defect Detecting of Refractory Material in Rotary Kiln ................................................................ 21
11.Structural Drawings ..............................................................................................................................22
11.1 M300 ............................................................................................................................................. 22
11.2 M600 ............................................................................................................................................. 23
12.FAQ ......................................................................................................................................................... 24
13.Cleaning Thermal Camera ................................................................................................................... 24
13.1 Cleaning Camera Housing, Cables and Other Items .................................................................. 24
13.2 Cleaning Infrared Lens ................................................................................................................. 25

Tianxuan M Series Handheld Thermal Camera ·User Manual
1
1.Legal Disclaimer
1.1 Legal Disclaimer
The thermal cameras manufactured by IRAY TECHNOLOGY are warranted for a period of two-year and
the accessories are warranted for a period of three-month form the delivery date of the original purchase,
provided such products have been under normal storage, use and maintenance.
This warranty extends only to the original purchaser and is not transferable. It is not applicable to any
product which has be subjected to misuse, neglect, accident or abnormal conditions of operation.
In the case of a defect in a product covered by this warranty the product must not be further used or
maintained in order to prevent additional damage. The purchaser shall promptly report any defect to IRAY
TECHNOLOGY or this warranty will not apply.
IRAY TECHNOLOGY will, at its option, repair or replace any such defective product free of charge if, upon
inspection, the product or accessories prove to be defective, the user can contact with after-sales service
department of IRAY TECHNOLOGY within the said warranty period.
1.2 Copyright
©IRay Technology Co., Ltd. 2020. All rights reserved worldwide. All contents in this manual, including
words, pictures, images, etc., belong to IRAY TECHNOLOGY CO., LTD. (Hereinafter referred to as “THE
COMPANY” or “IRAY TECHNOLOGY”). No part of the manual, in whole or part, may be copied,
photocopied, translated, or transmitted without the prior written permission of IRAY TECHNOLOGY.
This manual is used as a guide. The photos, graphics, diagrams and illustrations provided in the manual
are only used to explain, which may be different from the specific product. The real product shall prevail.
We try our best to make sure the contents in this manual are accurate. We do not provide any
representations or warranties in this manual.
IRAY TECHNOLOGY reserve the right to update the manual. If you need the latest version of this manual,
please contact us. It is recommended that you use this manual with the guidance of professionals.
1.3 Quality Assurance
The Quality Management System under which these products are developed and manufactured has been
certified in accordance with the ISO9001 standard.
We reserve the right to make changes and improvements on any of the products without prior notice.

Tianxuan M Series Handheld Thermal Camera ·User Manual
2
2.Safety Information
WARNING
1. Make sure you read all applicable Material Safety Data Sheets (SDS) and warning
labels on containers before you use a liquid. The liquids can be dangerous. Injury to
persons can occur.
2. It is prohibited to use the product in a high temperature above 85 °C or in a low
temperature below-45 °C.
3. It is forbidden to disassemble or refit the thermal camera at will.
4. Please charge the thermal camera at about 25°C.
WARNING
Applicability: Class A digital devices.
This equipment has been tested and found to comply with the limits for a Class A digital
device, pursuant to part 15 of the FCC Rules. These limits are designed to provide
reasonable protection against harmful interference when the equipment is operated in a
commercial environment. This equipment generates, uses, and can radiate radio
frequency energy and, if not installed and used in accordance with the instruction
manual, may cause harmful interference to radio communications. Operation of this
equipment in a residential area is likely to cause harmful interference in which case the
user will be required to correct the interference at his own expense.
WARNING
Applicability: Digital devices subject to 15.19.
NOTICE: This device complies with Part 15 of the FCC Rules. Operation is subject to
the following two conditions:
1. this device may not cause harmful interference, and
2. this device must accept any interference received, including interference that may
cause undesired operation.
WARNING
Applicability: Digital devices subject to 15.21.
NOTICE: Changes or modifications made to this equipment not expressly approved by
InfiRay may void the FCC authorization to operate this equipment.

Tianxuan M Series Handheld Thermal Camera ·User Manual
3
CAUTION
1. No matter there is a lens cover or not, do not point the infrared thermal camera
towards strong light or equipment with laser radiation. This will affect the accuracy of
the thermal camera and even damage the detector in the thermal camera.
2. Do not use the product under conditions that doesn’t match the environmental
requirements. For specific use environment requirements, see the product parameter
table.
3. Do not apply solvents or equivalent liquids to the camera, the cables, or other
items.
4. Be careful when you clean the infrared lenses. The lens has an anti-reflective
coating which is easily damaged. Damage to the infrared lens can occur with too
much force or cleaning with rough objects such as tissues.

Tianxuan M Series Handheld Thermal Camera ·User Manual
4
3.Notice to user
3.1 Calibration
IRAY TECHNOLOGY recommends that you verify your calibration yearly in order to ensure accuracy. You
can verify the calibration through IRAY TECHNOLOGY or third-party organizations.
3.2 Accuracy
For very accurate results, we recommended that you wait 5 minutes after you have started the camera
before measuring a temperature.
3.3 Video Teaching
You can search for mount and use videos from our website.
3.4 Documentation Updates
Our manuals are updated several times per year, and we also issue product-critical notifications of
changes on a regular basis. Please visit our website to access the latest manuals and notifications.
3.5 Scope of Application
This manual is applicable for all products in a range, which means that parts of the manual may not apply
to a particular model.
4.Customer Help
4.1 FAQ
You can find answers to FAQ about this model on the service support page of our official website.
4.2 Download
You can download the following contents from our website: www.infiray.com
Product Documentation
Client Software
Video Teaching Courses

Tianxuan M Series Handheld Thermal Camera ·User Manual
5
5.Comparison of Functions for Different Models
Function
M300G
M600G
IR Resolution
384×288
640×512
Visual
Resolution
500W
500W
Display
3.5-inch (480×640)
3.5-inch (480×640)
NETD
40mK
40mK
Temperature
Measurement
Range
-20℃~+550℃
-20℃~+550℃
FOV
43.7º×31.9º
48º×38º
Focus Mode
Manual focus
Manual focus
Time-lapse
Snapshot
/
yes
Temperature
Alarm
screen tip
screen tip
Alarm Snapshot
yes
yes
Temperature
Measurement
Mode
8 spots/8 lines/8 regions
USB connection
U disk
U disk, UVC ,support
real-time
temperature
measurement
analysis
Wireless
Hot spot (App)
Hot spot (App)
Battery Life
4h
3h

Tianxuan M Series Handheld Thermal Camera ·User Manual
6
6.Product Introduction
6.1 Camera(View from the front)
Figure6.1 Introduction to Camera Components
No.
Components
1
Infrared Lens
2
Digital Camera
3
Laser Pointer
4
Trigger

Tianxuan M Series Handheld Thermal Camera ·User Manual
7
6.2 Buttons(View from the rear)
Figure6.2 Introduction to Buttons
No.
Components
Function Description
1
Display screen
2
Gallery button
Press to open the gallery. Long press to perform image
uniformity correction.
3
Navigation
button
Make selections for the menu, settings, gallery by clicking
up/down/left/right.
4
Power/Laser
button
Long press to turn on/off. When it is on, click to turn on/off the
laser pointer.
5
Back button
Click to cancel the operation or return to the previous one. Long
press to perform image uniformity correction.
6
Enter button
Click OK to confirm the operation.
7
Microphone
It’s used to record voice notes after shooting.
Table 6.2 Component Introduction (View from the Rear)

Tianxuan M Series Handheld Thermal Camera ·User Manual
8
6.3 Connector and Memory Card
Figure6.3 Illustration of Connector and Memory Card
No.
Name
Description
1
USB Interface
Connect a USB cable with the power adapter for charging.
Connect a USB cable to a computer to charge or transfer
data.
2
SD Card
Standard MicroSD card, standard 32GB,Max 32GB, it can
save 140,000 images at most.
The SD card can be taken out and transfer data to PC or
other devices with a card reader.
Table 6.3 Connector and Memory Card

Tianxuan M Series Handheld Thermal Camera ·User Manual
9
7.Quick Start Guide
Please follow the procedures:
1.Charging
(1) 5V 1A or 5V 2A power adapter and USB cable can be used to charge the device.
(2) You can charge the device by connecting the USB cable in the accessory to the
computer.
Note: This method of charging takes longer time than using the power adapter.
(3) Charging base can also be used to charge the battery.
2.Power on
Long press the power button to start the device.
3.Target Searching
Point the thermal camera at the object of interest.
4.Image Capturing
Click the trigger button to capture the image, and record the video by long pressing the
trigger button.
5.Analysis by PC Software
Run the client after downloading the software to PC, and then use a USB cable or SD
card to import data for further analysis.
Note: Please import the files of the same name with suffixes of jpg and irg together with
the data. The file with the suffix irg contains data related to temperature. If lost, normal
analysis cannot be carried out.
6.Analysis by APP
Download and install the App on the mobile device. Enable hotspot on the thermal
camera to which the mobile device is connected, run the App and import the data for
further analysis.

Tianxuan M Series Handheld Thermal Camera ·User Manual
10
8.User Interface
Figure8.4 User Interface
No.
Name
Description
1
Main Menu
measurement parameters, measurement mode,
image mode, color palettes and other settings
can be set.
2
Sub Menu
specific options can be set, such as a specific
color palette.
3
Temperature measurement
spot
measurements of center spot, high/low
temperature spot tracking, customize spot,
customize line, customize area measurement are
available.
4
Center spot temperature
the temperature of the center spot is displayed.
5
Date and time
date and time are displayed.
6
Battery capacity
the remaining battery capacity is displayed.
7
Temperature range
the temperature range in the current screen can
be displayed.
Table 8.1 Interface Introduction

Tianxuan M Series Handheld Thermal Camera ·User Manual
11
9.Operation Instruction
9.1 Charging
9.1.1 Charge with a Power Adapter
1. Plug the power adapter into the socket.
2. Use a USB cable to connect the adapter and the camera to charge.
Note:It takes about 3h to get the device fully charged.
9.1.2 Charge with a Computer
1. Use a USB cable to connect the thermal camera to the computer to charge.
Note: when charging with a computer, the computer should be turned on, and the charging time is longer
than using an adapter.
9.1.3 Charge with a Charging Base
1. Connect the power adapter and the charging base with a USB cable, and plug the power adapter into
the socket.
2. Take out the battery and place it correctly in the charging base to charge.
Note:When the battery is not placed, the indicator of the charging base flashes; the indicator turns red
when the battery is placed and charging; the indicator becomes green when the battery is fully charged.
9.2 Power On/Off
1. Press the power button continuously to start the device.
2. Press the power button about 3 seconds to turn it off.

Tianxuan M Series Handheld Thermal Camera ·User Manual
12
9.3 Focus Adjustment
Make sure that the device is powered on, align the camera at the measured scene, rotate the focus ring
beside the lens clockwise or counterclockwise, which can make the image clearer via focal length
adjustment, see the following figure for the detailed adjustment method:
Figure 9.1 Focus Adjustment Through Focus Ring
9.4 Images/Videos Capture
1. In the observation interface, adjust the focus ring till the image is clear. Short press the trigger button
to take the photo. Long press the trigger button to start recording video, and finish recording by releasing
the trigger button.
2. Tap the save button on the screen or click OK to save the picture. Tap other buttons on the screen or
use the navigation button + OK to make recording annotation, scan the QR code to name the file, or
cancel saving photos.
9.5 View Photos/Videos
The pictures you took are saved in the SD card, and you can follow the below steps to view them at any
time.
1. Enter the photo gallery by clicking gallery button.
2. Select the picture or video you want to view by pressing the navigation button or screen.
3. Press OK or click the picture or video to view it in full screen. Select the delete option and then confirm

Tianxuan M Series Handheld Thermal Camera ·User Manual
13
to delete the current item. Select the rename option and confirm to rename the current item.
4. When in the preview interface, click the multiple button in the upper right corner of the screen, then
select the picture or video to be deleted, and delete the selected items by pressing the delete button.
5. Return to observation interface by clicking the gallery button, back button or touching the screen.
9.6 Measurement Mode
In the observation interface, press OK shortly to enter the main menu, and select "Measurement Settings"
with the navigation button. Press OK again to enter the secondary menu, select different measurement
modes by shifting left or right on the navigation button, and press OK to save your option.
In the observation interface, click anywhere on the screen to enter the main menu. Then click
"Measurement Settings" to select the desired measurement mode, and make it effective by clicking the
screen area.
9.7 Measurement Parameters
In the observation interface, press OK to enter the main menu, use the navigation button to select the
"parameter setting", then press OK again to enter the secondary menu. Select different temperature
measurement parameters by shifting left or right, and press the enter button to parameterize. After setting,
press OK again to save your option.
In the observation interface, click anywhere on the screen to enter the main menu. Click "Parameter
Setting" to set the parameter. After finishing the setting, click the screen area to take effect.
Emissivity: in order to obtain more accurate measurement results, you need to set the emissivity
according to the target to be measured before each measurement, instead of using the default
configuration. Emissivity refers to the ratio of the radiant ability of an object to the radiant ability of a
blackbody at the same temperature, which is relative to the reflectivity of the object. The lower the
emissivity, the higher the proportion of energy being reflected. The higher the emissivity, the lower the
proportion of energy being reflected. For example, the emissivity of human skin is 0.98, and the
emissivity of printed circuit boards is 0.91. For more information on emissivity, you can refer to the
quick start guide in the package or inquire from other sources.
Ambient temperature: the reflection temperature of the object surface will affect the measurement
result, especially when the object emissivity is low or the object temperature and the reflection
temperature differ greatly, this effect will increase. So the result needs to be compensated to
eliminate influences of the surface reflection temperature. However, it is usually difficult to determine
the reflected temperature of an object. The ambient temperature can be used to replace the reflected
temperature in actual measurement.
Distance: distances have effects on the measurement results. In order to get accurate measurement,
distance information of the object is necessary for the thermal camera to compensate the result.

Tianxuan M Series Handheld Thermal Camera ·User Manual
14
9.8 Palettes
In the observation interface, short press OK to enter the main menu, and select "palette setting" with the
navigation button. Press OK again to enter the sub menu, select different palettes by shifting left and right
on the navigation button, and then press the enter button to save your option.
In the observation interface, click anywhere on the touch screen to enter the main menu. Click "palette
setting" to choose a palette and save your option by clicking the screen area.
9.9 Image Mode
9.9.1 Image Mode Introduction
Four image modes are available.
Thermal Fusion: an image fused to a certain scale between an infrared image and a visible image
PIP: infrared image superimposed at the center of the visible image
Thermal imaging: infrared images
Digital camera: visible images
Note: For better dual-light image effects, when in PIP or thermal fusion modes, you need to set the actual
distance, that is, the approximate distance from the thermal camera to the object. If the preset registration
parameters cannot meet the requirements, you can also manually perform fusion registration in the
settings.
9.9.2 Setting Steps
In the observation interface, press OK shortly to enter the main menu, and select "image mode" through
the navigation button. Then press OK again to enter the secondary menu, there different image mode can
be selected by shifting left or right on the navigation button. Save your option by pressing enter button.
In the observation interface, click any place on the screen to enter the main menu. Click "image mode"
and select the desired image mode, and then click on the screen area. The option is saved.
9.10 Non-uniformity Correction
9.10.1 Non-uniformity Correction Introduction
Non-uniformity correction is used to compensate for non-uniformity of detector pixels or non-uniformity
caused by other optical interference. When there are more noise in the image, non-uniformity correction is
needed, which is common when the ambient temperature changes rapidly.

Tianxuan M Series Handheld Thermal Camera ·User Manual
15
9.10.2 Non-uniformity Correction Operations
In the imaging interface, press the back button or the gallery button continuously to perform
non-uniformity correction.
9.11 Contrast Adjustment
In the observation interface, the contrast of the infrared image can by adjusted by sliding up and down the
arrow button on the "temperature range " on the right side of the screen.
Press "A" in the upper right corner of the interface to return to auto-contrast mode.
9.12 Digital Zoom (This function is only applicable to M600 series)
In observation interface, press navigation button to perform Max. 8×digital zoom.
Note: this function is only enabled under infrared mode or visible mode.

Tianxuan M Series Handheld Thermal Camera ·User Manual
16
9.13 Other Settings
Other settings include date and time, unit, language and other items.
1)In the observation interface, press OK shortly to enter the main menu, and select "Settings" to enter
other settings.
2)In the observation interface, tap anywhere on the screen to enter the main menu, and tap "Settings" to
enter other settings.
9.13.1 Date and Time
9.13.2 Languages
Simplified Chinese
English
9.13.3 Units of Measurement
Temperature unit: switchable among Celsius, Fahrenheit, and Kelvin
Distance unit: switchable between meters and feet
9.13.4 Temperature Gear
-20~150℃: the image details are better in this gear, and the maximum temperature measured is
150℃.
100~550℃: the image details are slightly worse in this gear, and the maximum temperature
measured is 550℃.
9.13.5 High/ Low Temperature Alarm
High temperature alarm switch: click to turn on or off the function of high temperature alarm.
Temperature setting for high temperature alarm: click on the pop-up keyboard and set the alarm
temperature.
Low temperature alarm switch: click to turn on or off the function of low temperature alarm. Function.
Temperature setting for low temperature alarm: click on the pop-up keyboard and set the alarm
temperature.
This manual suits for next models
1
Table of contents
Other iRay Technology Thermal Camera manuals

iRay Technology
iRay Technology AT31 User manual

iRay Technology
iRay Technology Saim SCL Series User manual

iRay Technology
iRay Technology MATE MAL25 User manual

iRay Technology
iRay Technology G600 User manual

iRay Technology
iRay Technology HT Series User manual

iRay Technology
iRay Technology AT20 User manual

iRay Technology
iRay Technology AT30 User manual

iRay Technology
iRay Technology InfiRay Jerry-F User manual

iRay Technology
iRay Technology M200 Series User manual

iRay Technology
iRay Technology SCL35W User manual