Operating manual for Pumphead 380 AD
(for the MCP and BVP drives)
Betriebsanleitung für Pumpenkopf 380 AD
(zu den Antrieben MCP oder BVP)
2 OF 2
Learn more about the Ismatec®product line by visiting: www.ismatec.com
©2015 COLE-PARMER INSTRUMENT COMPANY, LLC. 14-025, REV. C
For ordering and technical support, please contact:
North America sales@ismatec.com | 1-800-323-4340 | 1-847-549-7600
Europe sales.europe@ismatec.com | +49 (0) 9377 9203-0
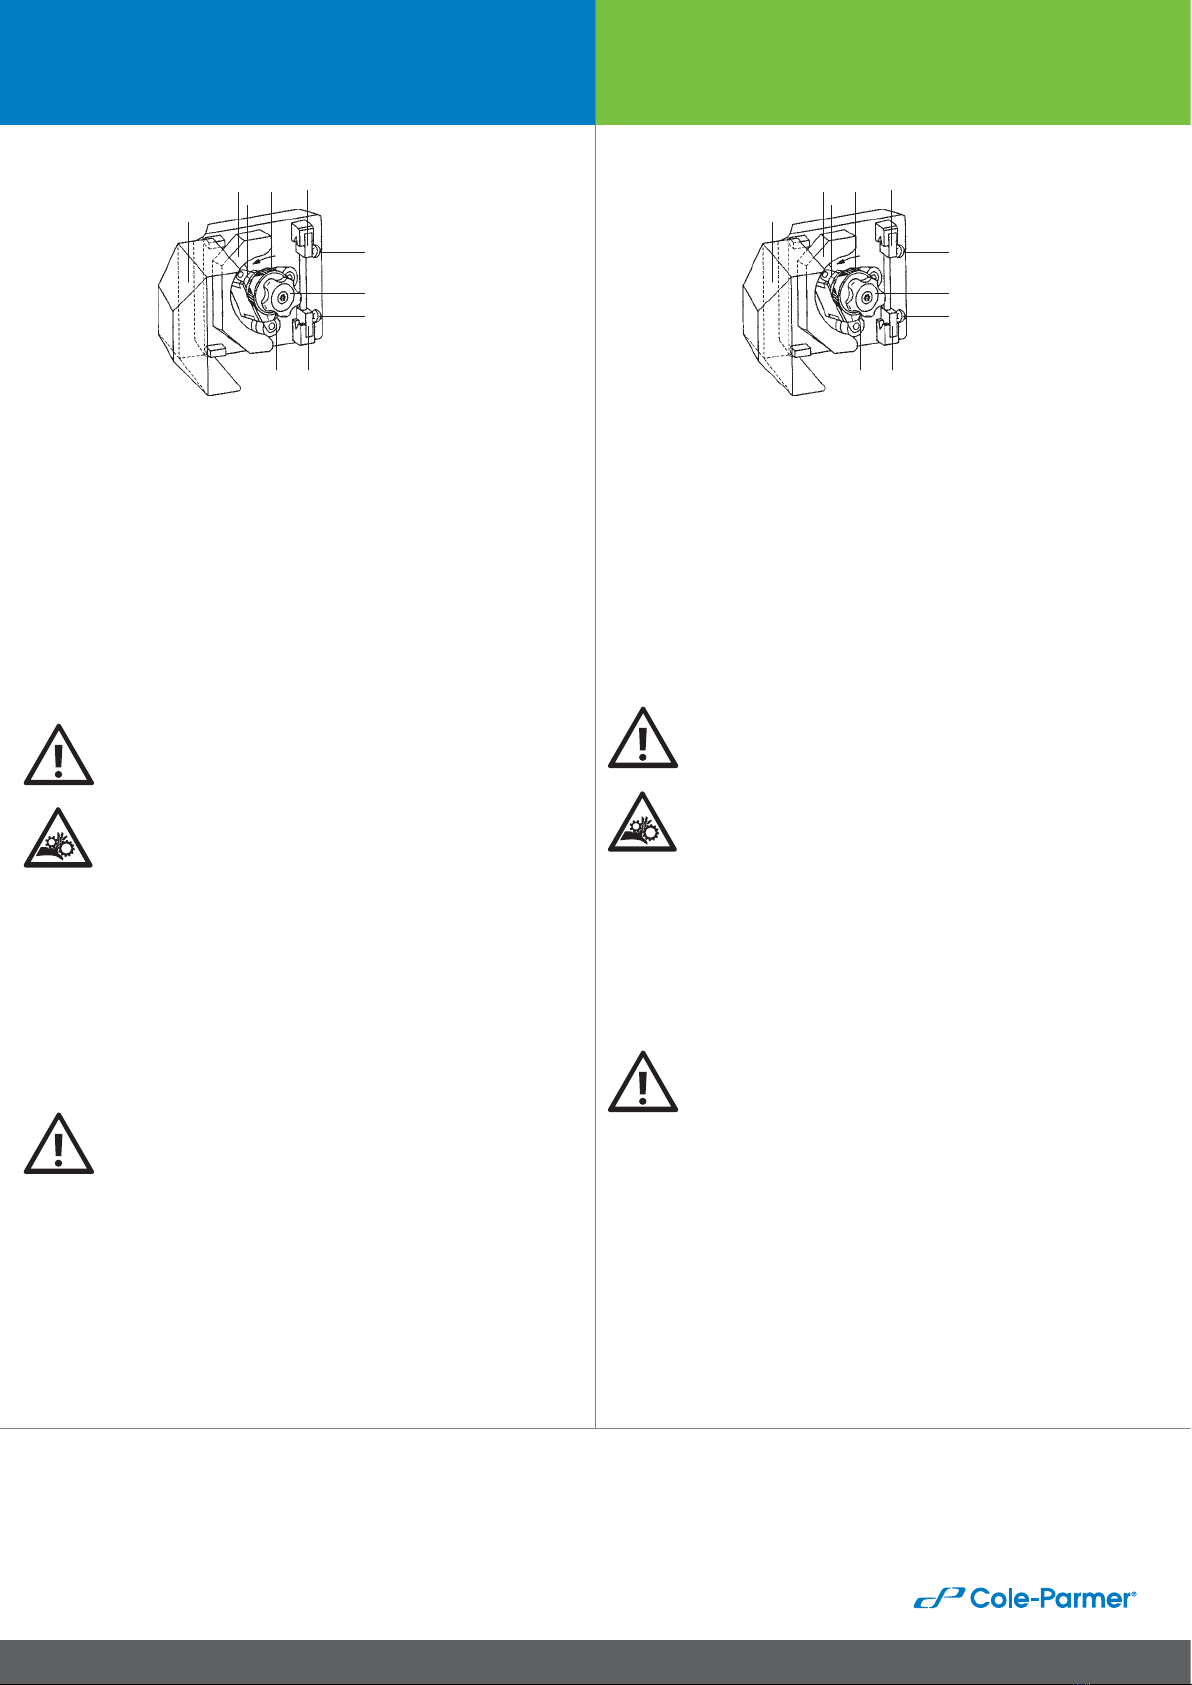
Loading the tubing
Open the pumphead cover (1)
Load the pump tubing as follows:
Press the ball handle (6a) down with your thumb
Insert the tubing with your free hand into the opening of the tubing retainer prism (5a)
Release the ball handle (6a)
the tubing is now clamped in the tubing retainer prism (5a)
Insert the tubing into the tube-bed (2) by turning the rotor with
the pump rollers (8) in the counter-clockwise direction
the tubing must be well aligned with the tube-bed (2) and centred by the rollers (8)
Now lift the ball handle (6b) with your thumb and clamp the
tubing in the lower tubing retainer prism (5b)
Start-up procedure
Before switching the drive on, the pumphead cover
must be closed (1)! Danger of injury!
Caution: The rotating pumphead creates a pinch and crush hazard.
Before starting the operation of your pump system, ensure that the tubing
lies correctly in the tube-bed (not twisted) and that the tubing tension is
correct. The appropriate tubing tension can be adjusted as follows:
When pumping in the clockwise direction (*) press down the upper ball handle (6a)
With your other hand pull slightly on the tubing so that a weak tension is achieved
Release the ball handle (6a)
*) When pumping in the counter-clockwise direction, lift the
lower ball handle (6b) and adjust the tubing tension.
MCP pumphead identification
ID Code 380A. Must be entered for each of the
4 programs using this pumphead.
Please refer to the drive Operating Manual.
6a
2
85b
7
4
3
1
5a
6b
Schlauch einlegen
Öffnen Sie die Abdeckhaube (1)
Montieren Sie den Pumpenschlauch wie folgt:
drücken Sie den Knopfgriff (6) mit dem Daumen nach unten
legen Sie den Schlauch mit der freien Hand in die Öffnung des Schlauchhalteprismas (5)
lassen Sie den Knopfgriff (6) wieder los
der Schlauch ist nun beim Schlauchhalteprisma (5) eingeklemmt
legen Sie den Schlauch ins Schlauchbett (2), indem Sie den
Rotor mit den Pumprollen (8) nach links drehen
der Schlauch muss dem Schlauchbett (2) entlang gut
anliegen und durch die Rollen (8) zentriert sein
nun drücken Sie den Knopfgriff (6b) mit dem Daumen nach oben und
fixieren Sie den Schlauch auch im unteren Schlauchhalteprisma (5b)
Inbetriebnahme des Pumpsystems
Vor dem Einschalten des Antriebs unbedingt die
Abdeckhaube (1) schließen! Verletzungsgefahr!
Auhtung: Bei Berührung des rotierenden Pumpenkopfes
besteht Quetsch- /Verletzungsgefahr.
Vor der Inbetriebnahme des Pumpsystems vergewissern Sie sich,
dass der Schlauch richtig im Schlauchbett liegt (nicht verdreht)
und die Zugspannung des Schlauches korrekt eingestellt ist. Die
richtige Zugspannung kann wie folgt eingestellt werden:
Beim Pumpen im Uhrzeigersinn (*) drücken Sie den oberen Knopfgriff (6a) nach unten
Ziehen Sie mit der anderen Hand nur gering am Schlauch,
damit sich eine schwache Zugspannung ergibt
Lassen Sie den Knopfgriff (6a) wieder los
*) Beim Pumpen entgegen dem Uhrzeigersinn ziehen Sie den unteren
Knopfgriff (6b) nach oben und justieren Sie die Zugspannung.
MCP Pumpkopf-Identifikation
ID Code 380A. Muss in allen mit diesem Pumpkopf
verwendeten Programmen eingegeben werden.
Vorgehen siehe Betriebsanleitung zum Antrieb.
6a
2
85b
7
4
3
1
5a
6b


