ISOtunes LINK User manual


Table of Contents
English (EN)
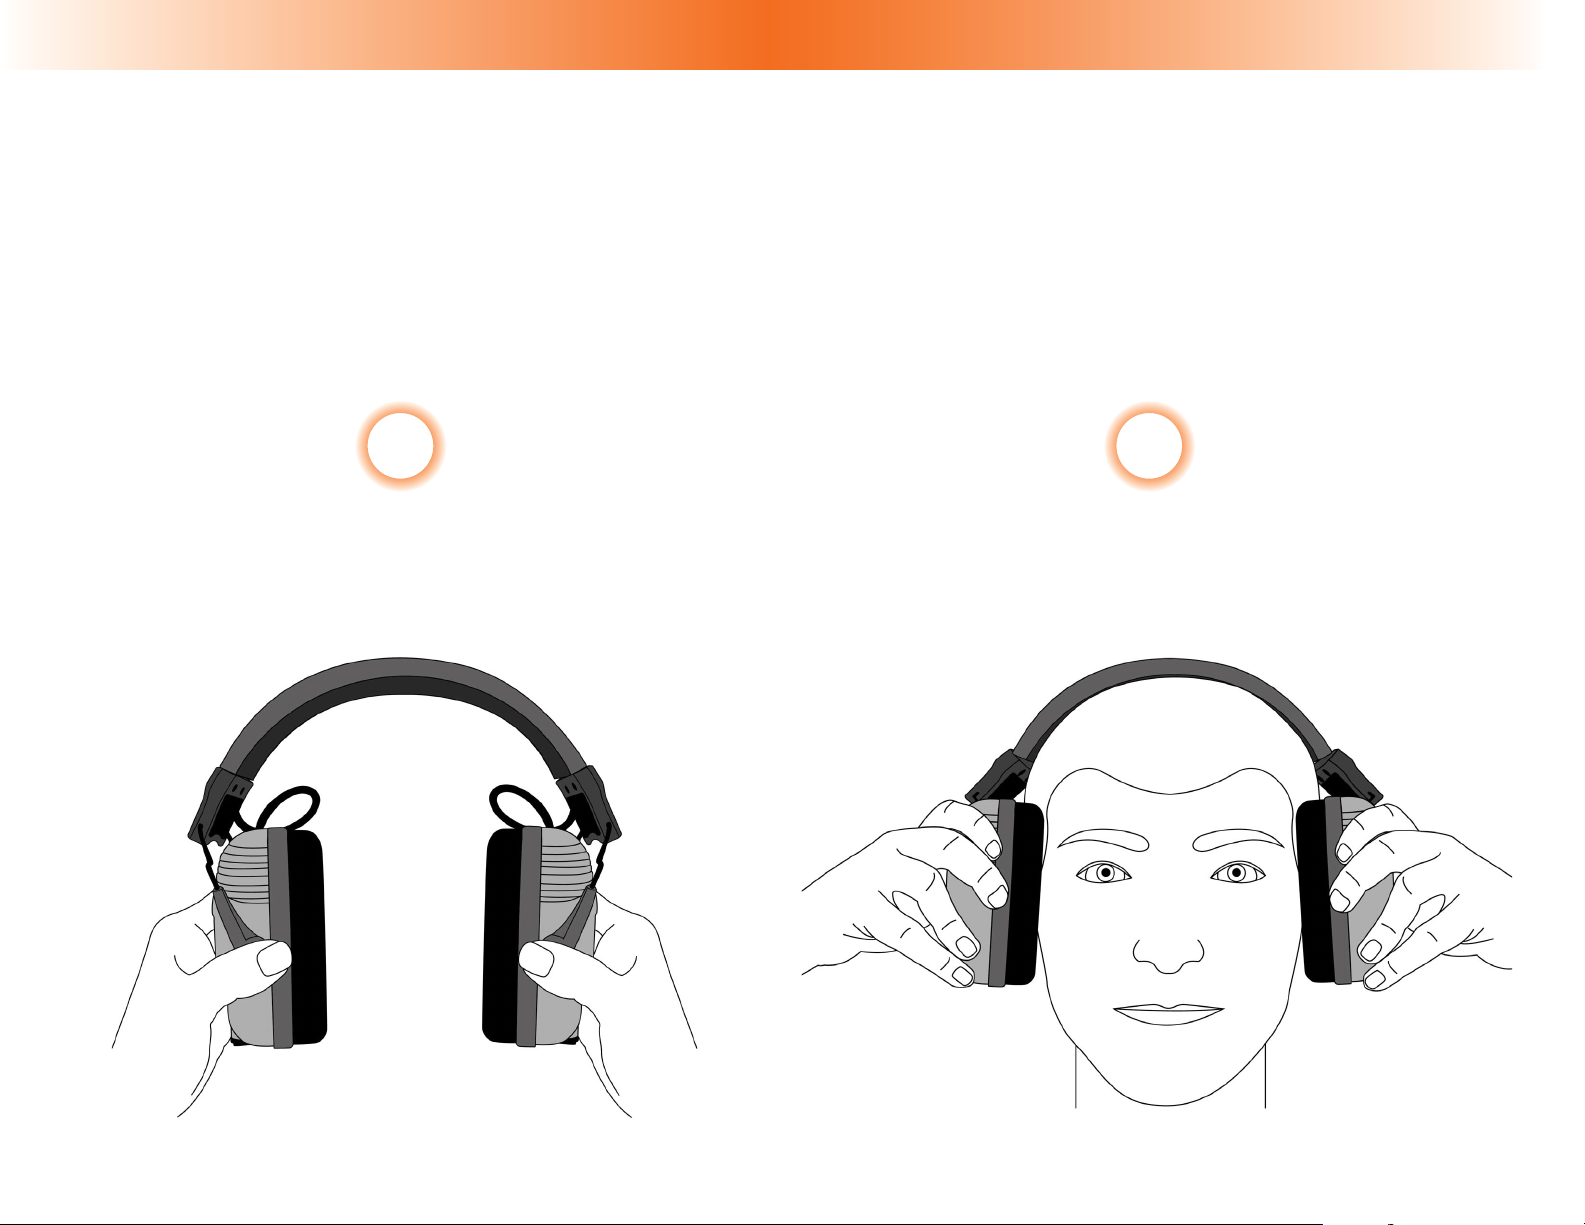
Fitting....................................................3
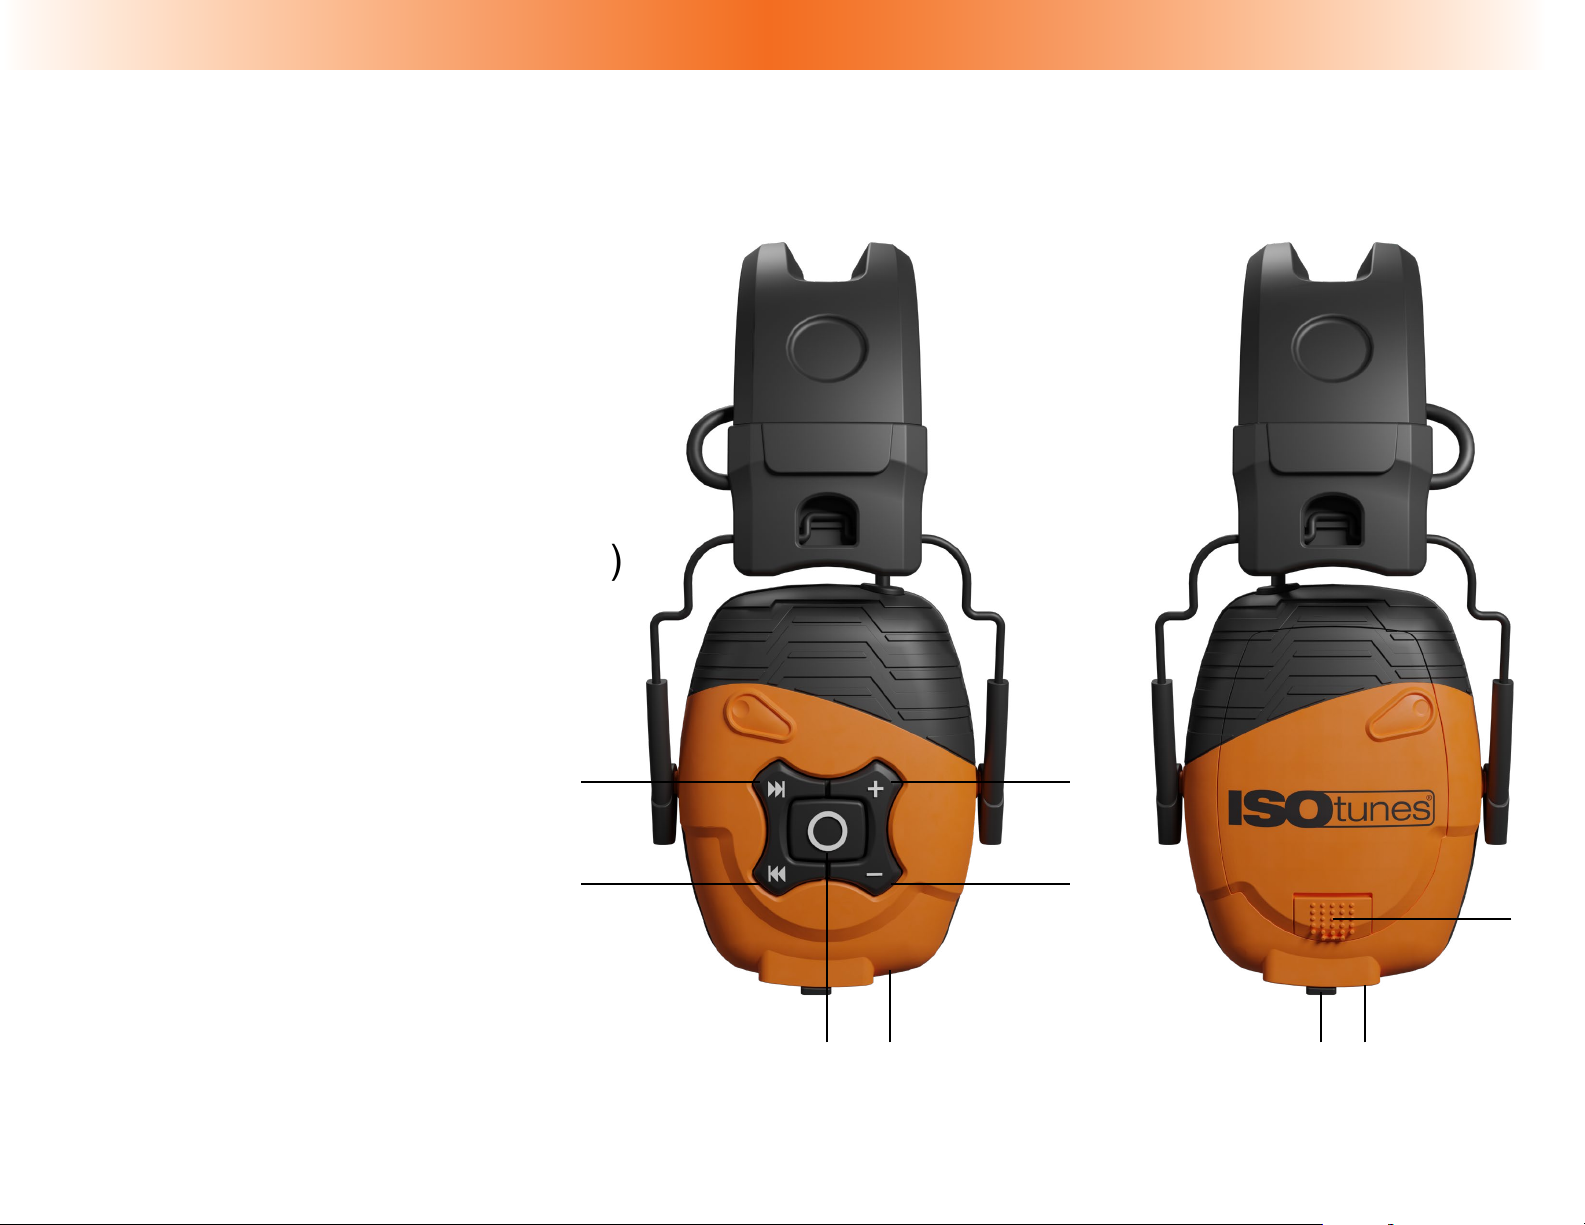
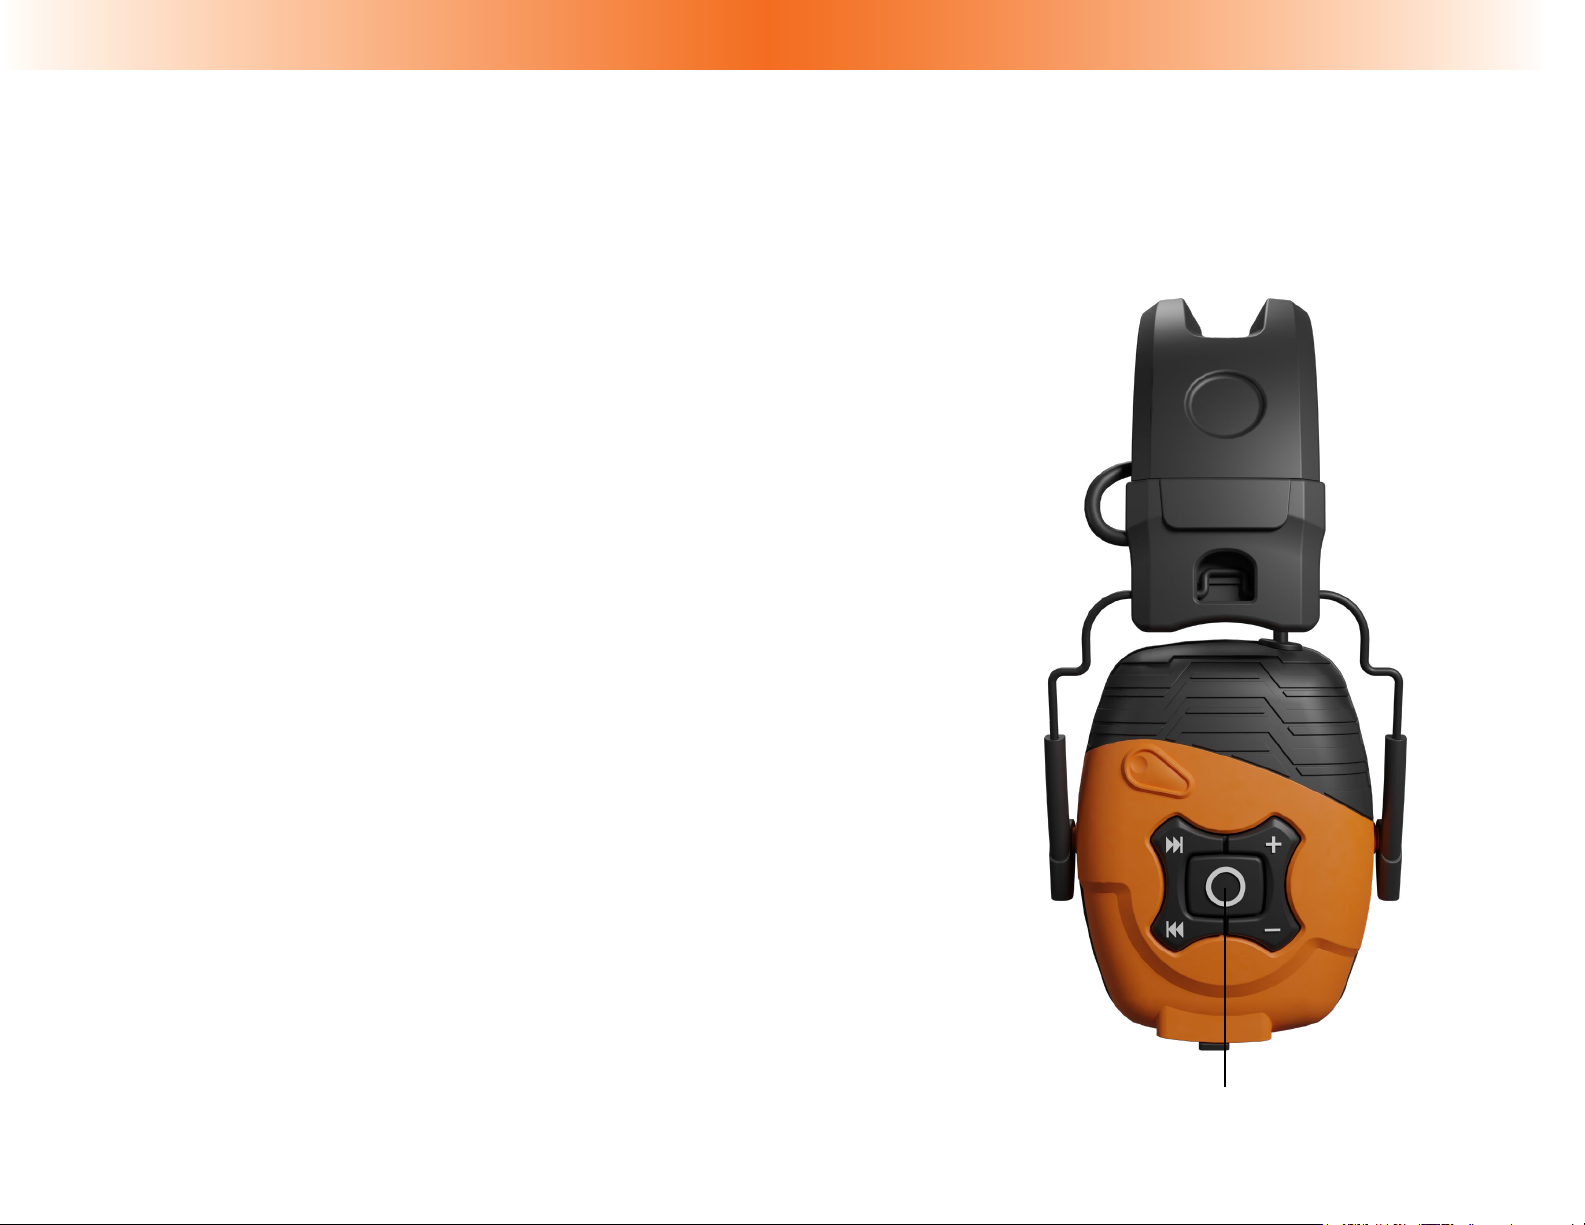
Location of Controls.............................5
Charging...............................................6
Batteries...............................................8
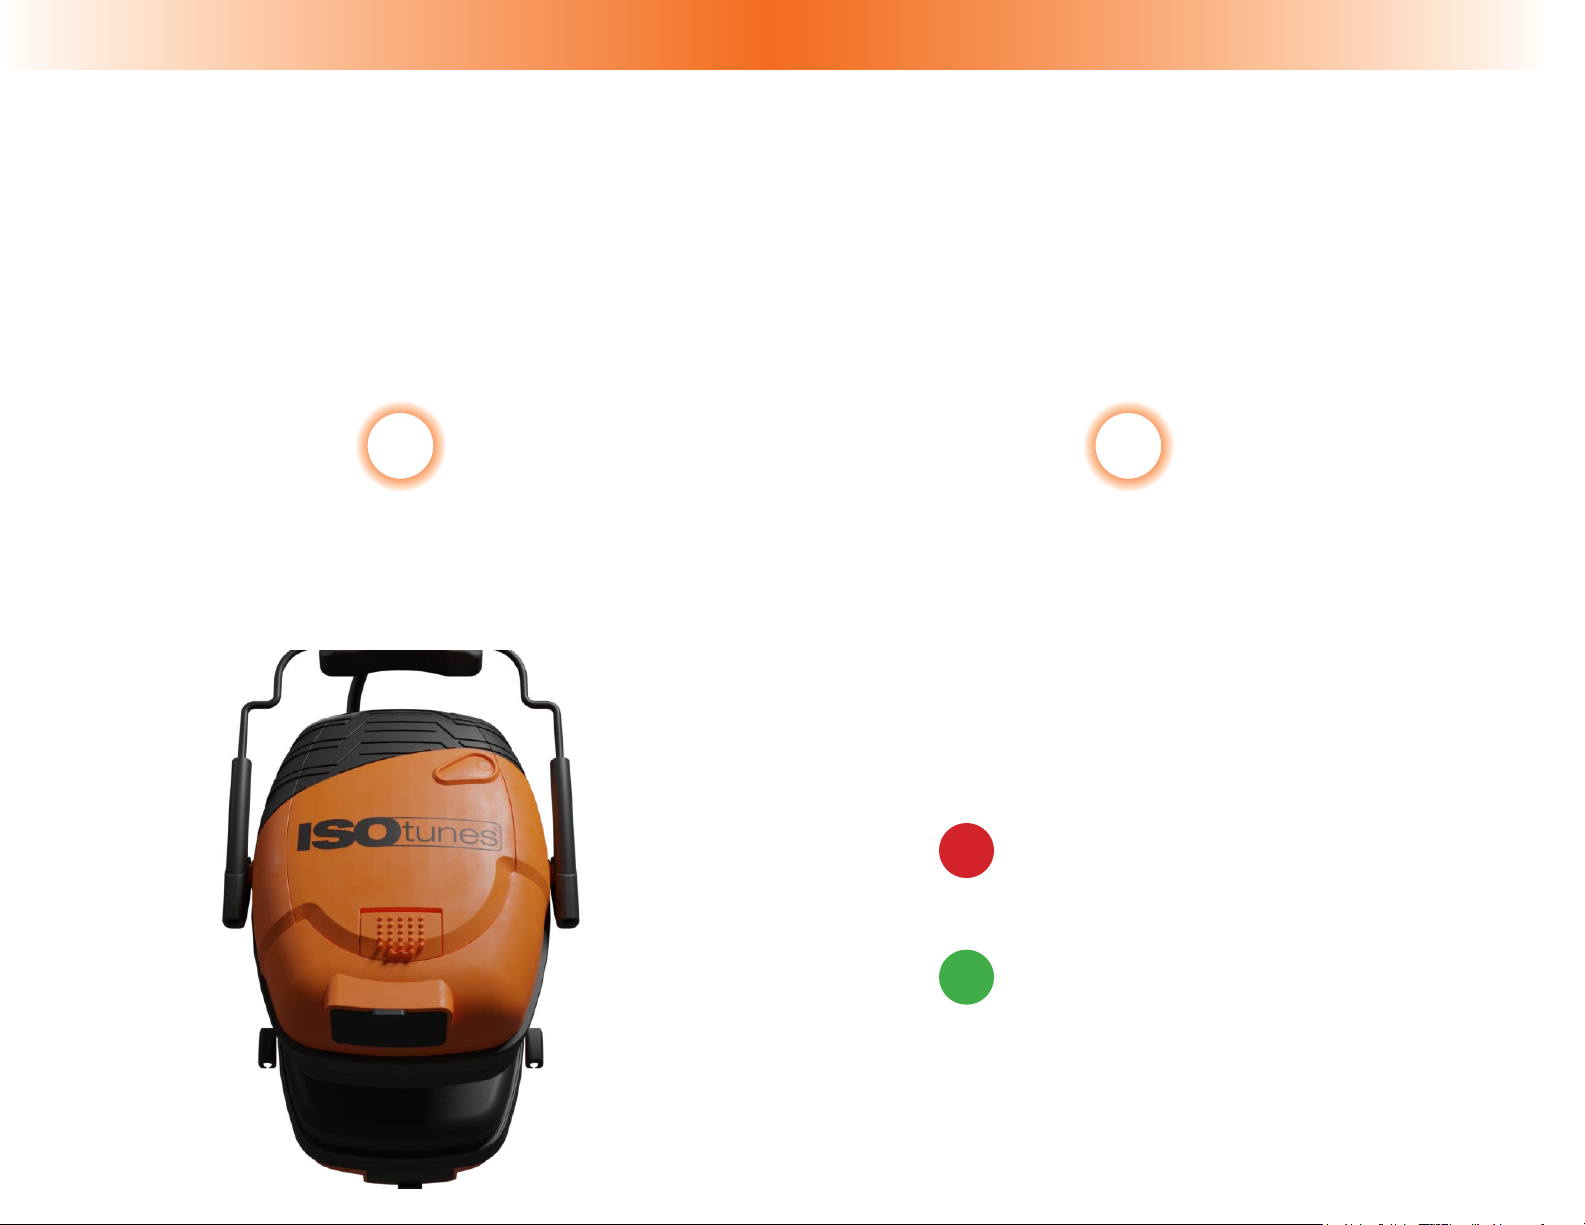
Power On/O.......................................9
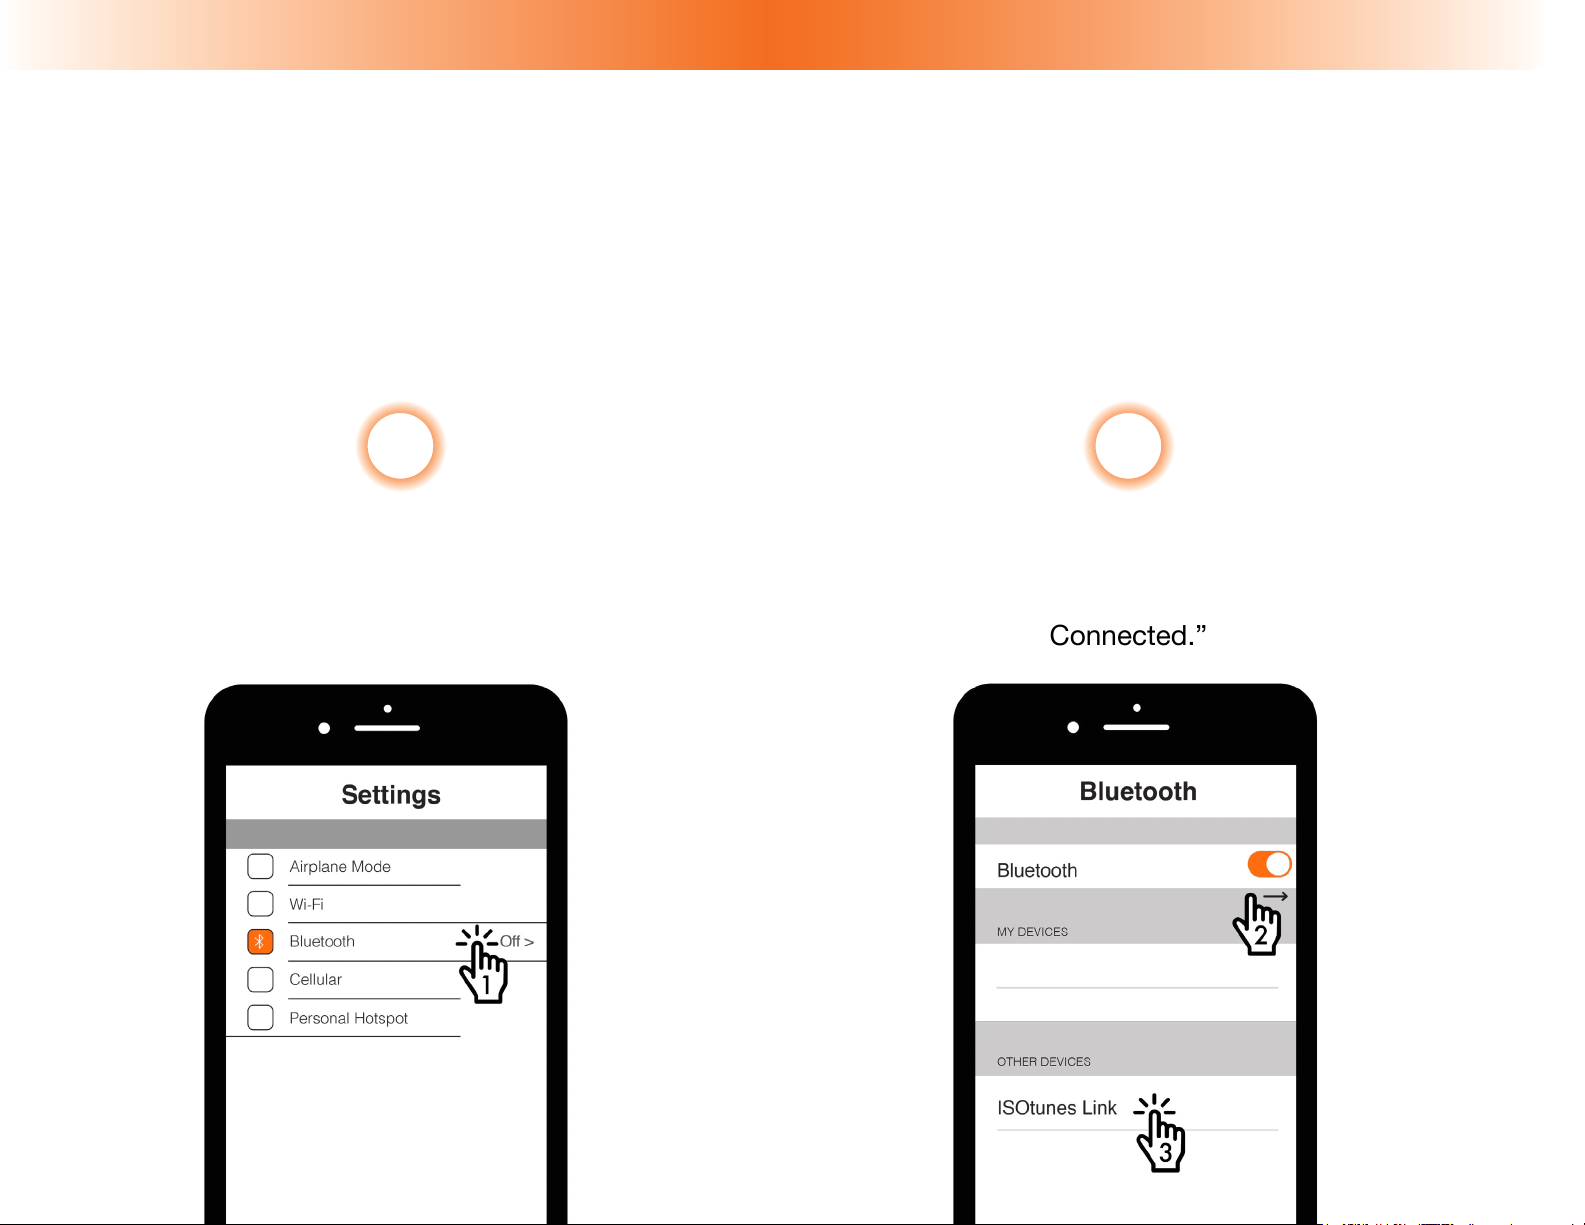
Bluetooth Pairing ..............................10
Dual Connection Mode......................11
Pairing Reset......................................11
Music..................................................12
Phone Calls........................................13
Siri/Google Assistant..........................13
Legalities............................................14
Español (ES)
Adecuado...........................................18
Ubicación de los Controles................20
Recarga..............................................21
Baterías..............................................23
Encender/Apagar................................24
Emparejamiento con Bluetooth..........25
Modo de Conexión Dual....................26
Restablecimiento del
Emparejamiento.................................26
Música................................................27
Llamadas Telefónicas.........................28
Asistente Siri / Google........................28
Legalidades........................................29
Français (FR)
Raccord..............................................34
Lieu des contrôles..............................36
Chargement........................................37
Batteries.............................................39
Mise sous/hors tension......................40
Couplage Bluetooth ..........................41
Mode de connexion double...............42
Réinitialisation du couplage...............42
Musique..............................................43
Appels téléphoniques.........................44
Siri/Google Assistant..........................44
Légalités.............................................45
Deutsche (DE)
Anpassung.........................................49
Position der Bedienelemente.............51
Laden..................................................52
Batterien.............................................54
Ein-/Ausschalten................................55
Bluetooth-Kopplung ..........................56
Dual-Verbindungsmodus....................57
Kopplung zurücksetzen......................57
Musik..................................................58
Anrufe.................................................59
Siri/Google Assistent..........................59
Legalitäten..........................................60
Italiano (IT)
Fissaggio............................................65
Posizione dei comandi.......................67
Caricamento.......................................68
Batterie...............................................70
Accensione/Spegnimento...................71
Accoppiamento Bluetooth..................72
Modalità Dual Connect.......................73
Ripristino dell’abbinamento................73
Musica................................................74
Chiamate............................................75
Siri / Assistente Google......................75
Aspetti Legali......................................76
Svenska (SV)
Passform.............................................80
Kontrollernas placeringar....................82
Laddning.............................................83
Batterier..............................................85
Power On/O......................................86
Bluetooth-parning...............................87
Dubbelt anslutningsläge.....................88
Parning återställ..................................88
Musik..................................................89
Samtal.................................................90
Siri / Google Assistant........................90
Laglighet..............................................91
Dansk (DA)
Montering...........................................95
Placering af kontrolfunktioner.............97
Opladning...........................................98
Batterier............................................100
Power On/O....................................101
Bluetooth-Parring.............................102
Dual Connect Mode..........................103
Parring Reset....................................103
Musik................................................104
Opringning........................................105
Siri / Google Assistant......................105
Legaliteter.........................................106
Suomen kieli (FI)
Asennus............................................110
Säätöjen sijainti.................................112
Lataus...............................................113
Akut..................................................115
Virta päällä/pois päältä.....................116
Bluetooth-paritus..............................117
Kaksoiskytkentätila...........................118
Parinmuodostuksen nollaus.............118
Musiikki.............................................119
Puhelut..............................................120
Siri / Google Assistant......................120
Laillisuus...........................................121
Nederlands (NL)
Gebruik.............................................125
Locatie van bedieningselementen....127
Opladen............................................128
Batterijen..........................................130
Voeding On/O.................................131
Bluetooth-koppeling.........................132
Dubbele verbindingsmodus..............133
Koppelen Reset................................133
Muziek..............................................134
Telefoongesprekken.........................135
Siri / Google Assistent......................135
Wettigheid.........................................136
Norsk (NO)
Montering..........................................140
Bruk av kontroller..............................142
Lader.................................................143
Batterier ...........................................145
Strøm på / av....................................146
Bluetooth-paring ..............................147
Dobbel paringsmodus .....................148
Tilbakestilling av parring...................148
Musikk..............................................149
Telefonsamtaler ...............................150
Siri / Google Assistent......................150
Lovligheter.........................................151

EN |3
Fitting
The headset is labeled and adjustable for your convenience.
Remove the white foam padding
from each earcup.
1 2
Check the earcups for Right
and Left labels.

EN |4
Fitting
The headset is labeled and adjustable for your convenience.
Adjust the earcups, headband, and
wires for a snug but comfortable t.
3 4
Make sure the earcup labels
correspond to the sides of your head
and place on your ears.

EN |5
Location of Controls
1. Next Track
2. Previous Track
3. Volume Up
4. Volume Down
5. Multi-Function Button (MFB)
6. Bluetooth Mic
7. Charge Port
8. LED Charging Indicator
9. Battery Cover Latch 1 3
2 4 9
5 76 8

EN |6
Charging
The Lithium Battery Pack comes fully installed. Please make sure the Battery Pack Cable
is plugged in to the Battery Pack Port (2).
The Lithium Battery Pack holds a 14+ hour charge.
Slide the Battery Cover Latch (9)
“up” towards the headband to
release the Battery Cover.
1 2
When using the Lithium Pack, always make
sure the Battery Pack’s cable is plugged
into the Battery Pack Port in the battery
compartment (please note, the battery
comes fully installed).

EN |7
Charging
The headset can be powered by the included rechargeable Lithium Battery Pack.
The Lithium Battery Pack holds a 14+ hour charge.
Please charge with the included cable
by plugging it into the Charging Port (7).
*Charging voltage should not exceed 5v.
3 4
While the cable is plugged into the Charging
Port (7), LED Charging Indicators (8) will let
you know how charged the Lithium Battery
is.
LED Charging Indicators
Solid Red = Charging
(Cable Plugged In)
Solid Green = Fully Charged
(Cable Plugged In)

EN |8
Batteries
The headset can also be powered by 3 AAA Batteries (not included).
3 AAA Batteries hold a 24+ hour charge and will need to be replaced.
Slide the Battery Cover Latch (9)
“up” towards the headband to
release the Battery Cover.
1 2
Remove the Lithium Battery Pack and place
your 3 AAA Batteries. When using AAA
batteries, please ensure you have properly
oriented the batteries.

EN | 9
Power On/O
5
Power On: Press and hold MFB (5) for 3 seconds
(you will hear “Power On”)
Power O: Press and hold MFB (5) for 3 seconds
(you will hear “Power O”)

EN |10
Bluetooth Pairing
Open your Bluetooth settings on
your device.
1 2
Search “ISOtunes Link.”
Pair and connect.
Once connected you will hear “Bluetooth
Connected.”
After powering on, the headphones will automatically enter Pairing Mode.
(you will hear “Bluetooth Pairing Mode”)

EN |11
Dual Connect Mode
This product can connect to two devices at the same time such as your phone
and your computer.
1. Pair and Connect to your rst device as
described in Bluetooth Pairing on page 6.
This will be device A.
2. Press and Hold the MFB (5) for 7 seconds
until you hear “Bluetooth Pairing Mode”
(you will hear Power O, keep holding the
button until you hear “Bluetooth Pairing
Mode”)
3. Pair and Connect to the 2nd device as
described in Bluetooth Pairing on page 6.
This will be device B.
4. On Device A, go to the Bluetooth menu and
manually connect to ISOtunes Link.
5. Both devices are now connected.
Pairing Reset
Press and Hold the Volume Up (3) and
the Volume Down (4) for 4 seconds.
The product will enter pairing mode.

EN |12
Music
Play/Pause: Short single press MFB (5)
Next Track: Short single press Next Track (1)
Previous Track: Short single press Previous Track (2)
Volume Up: Short single press Volume Up (3)
Volume Down: Short single press Volume Down (4)
1 3
2 4
5

EN |13
Phone Calls
Answer/End Call: Short single press MFB (5)
Reject Call: Press and hold MFB (5) for 1 second
1 3
2 4
5
Siri / Google Assistant
Press and hold MFB (5) for 1 second

EN |14
Fitting
ANSI S3.19-1974 Table (NRR Table)
EN 352-1:2002 Table (SNR Table)
B5: SNR=30dB H=34dB M=27dB L=21dB APVf=MF-SF (dB)
Audio Input (EN 352-6)
Bluetooth (HFP): The maximum SPL is 76.4 dB(A) at -14 dBFS
Entertainment (EN 352-8)
Bluetooth (A2DP): The maximum SPL is 77.1 dB(A) at -10 dBFS
Important
Please read, understand, and follow all safety information.
Fitting
1. Remove the white foam inserts from each earcup
2. Pull the earcups apart
3. Place the product on your head
4. Adjust the earcup position by extending the headband to ensure a good
t around the ears
Introduction
Thank you for purchasing ISOtunes® LINK Professional Noise Isolating
Earmus. These earmus have been specically designed for use in noisy
environments – allowing you to block out much of the surrounding noise so
that you can listen to your music or talk on the phone with less interruption.
This product has been tested and meets the European Safety Standard
EN 352-1:2002, EN 352-6:2002, EN 352-8:2008, RED directive 2014/53/EU,
harmonized standard EN 60065-2014+A11-2017, EN 62479:2020, ETSI EN
300 328 V2.1.1, ETSI EN 301 489-1 V2.1.1,ETSI EN 301 489-17 V3.1.1and the
ANSI standards for a hearing protector, with a Single Number Rating (SNR)
of 30 dB with a Noise Reduction Rating (NRR) of 25 dB. Full testing details
are available in the Noise Attenuation section of this booklet.
Noise Attenuation
APPROVAL: ISOtunes® LINK is tested and approved in accordance with
ANSI S3.19-1974 Specications and the European Safety Standard EN 352-
1:2002, EN 352-6:2002, and EN 352-8:2008.
ANSI
S3.19-1974
The level of noise entering a person’s ear, when ISOtunes® LINK head-
phones are worn as directed, is closely approximated by the dierence
between the A-weighted environmental noise level and the Noise Reduc-
tion Rating (NRR). Improper t of this device will reduce its eectiveness in
attenuating noise. Consult the enclosed instructions for proper tting.
A1: Frequency (Hz)
A2: Mean Attenuation (dB)
A3: Standard Deviation (dB)
Example:
1. The surrounding noise level measured at the ear is 100 dB.
2. The NRR of ISOtunes® LINKis 25 dB.
3. The noise level entering the ear is approximately equal to 75dB.
Please note that the NRR is based on the attenuation of continuous noise
and may not be an accurate indicator of the protection attainable against
impulsive noise, such as gunre.
EN 352
IT-31 ISOtunes LINK EN 352 is certied according to the product standards
EN 352-1:2002, EN 352-6:2002, and EN 352-8:2008.
Frequency (Hz) 125 250 500 1000 2000 4000 8000
Mf (dB) 17.5 21.4 26.6 29.3 37.6 46.4 39.6
sf (dB) 4.5 2.5 2.6 2.3 3.7 4.6 6.8
APVf 13.0 18.9 24.0 27.0 33.9 41.8 32.8
B1:
B2:
B3:
B4:
Frequency, Hz 125 250 500 1000 2000 3150 4000 6300 8000 NRR
Grand Mean Attenuation, dB 19.9 22.3 27.8 30.8 38.8 44.3 50.0 46.3 42.4
Standard Deviation, dB 3.7 2.9 2.4 2.3 3.8 3.9 3.8 3.1 4.3
25
A1:
A2:
A3:

EN |15
Haven Technologies, INC. hereby declares that IT-31 ISOtunes LINK EN 352
conforms to the regulation (EU) 2016/425 and the directive RED 2014/53/
EU, which can be accessed at www.isotunes.co.uk/EU-declaration-of-con-
formity.
B1: Frequency (Hz)
B2: Mean Attenuation (dB)
B3: Standard Deviation (dB)
B4: Assumed Protection Value (APV) (dB)
B5:
H = Hearing protection estimation for high frequency sounds
(f ≥ 2000Hz)
M = Hearing protection estimation for medium frequency sounds
(500 Hz < f < 2000Hz)
L = Hearing protection estimation for low frequency sounds (f ≤ 500Hz)
SafeMax™ Technology
ISOtunes® LINK incorporates SafeMax™ Technology, therefore its volume
output has been limited to 85 decibels (IT-30) and 79 decibels (IT-31). ISO-
tunes® devices with SafeMax™ Technology are OSHA and ANSI compliant
and, when designated, meet the European Safety Standard EN352.
Cleaning and Maintenance
• Clean your ISOtunes Link by gently wiping them with a clean, damp
cloth with mild soap.
• Do not immerse the hearing protector in water.
• Do not use abrasive cleaning solvents to clean the hearing protector.
If the hearing protector gets wet from sweat or rain, please discontinue use
and turn the earmu outwards and allow to dry.
The ear cushions and foam liners should be regularly inspected for deterio-
ration, cracking, or other damage.
Materials:
• Ear Cushion: PU + Memory Foam
• Casing: ABS
• Key Pad: Silicon
• Headband: Stainless Steel + TPE
• Headband Bracket: ABS
This product comes with a Lithium Battery Pack. The Battery Pack can be
recharged by plugging the one end of the included cable into a USB outlet
and the other end into the product’s charging port located underneath the
rubber cover on the bottom of the left earcup.
The batteries can be checked by removing the battery cover. Slide the
latch to release the door.
The lithium battery pack can be removed from the product and replaced.
Lift the battery out. Unplug the battery pack cable. To reinstall, put the
battery pack into the compartment and plug in the Battery pack cable into
the battery pack port. Ensure the battery pack cable is plugged into the
battery pack cable port for proper product performance.
Alternatively, three AAA batteries can power the device. Completely re-
move the Lithium Battery Pack from the product and install the AAA batter-
ies as indicated on the product. Do not attempt to use the Lithium Battery
Pack and AAA batteries at the same time.
Automatic Power O
ISOtunes® LINK will turn o automatically after 4 hours of use.
WARNINGS
Performance may deteriorate with battery use. The typical period of contin-
uous use that can be expected from ear-mu battery is 14 hours.
ISOtunes® LINK does an excellent job of blocking outside noise. As such,
ISOtunes® LINK should NOT be used in environments where users need to
be fully aware of their surroundings for personal safety reasons. For exam-
ple, do NOT use them while driving a car or riding a motorcycle. Similarly,
do NOT use them when riding a bicycle outside. The user is solely respon-
sible for ensuring that ISOtunes® LINK is used ONLY in safe environments.
This earmus are intended to protect your ears against hazard noise.
The output of the electrical audio circuit of this hearing protector may ex-
ceed the daily limit sound level.
The audibility of warning signals at a specic workplace may be impaired
while using the entertainment facility.
This product may be adversely aected by certain chemical substances.
Further information may be sought from the manufacturer.

EN |16
The tting of hygiene covers to the cushions may aect the acoustic perfor-
mance of the ear-mus.
Recommendations
The wearer should ensure the product is properly cleaned and dry before
and after use. Storage should be in a clean and dry location between -20
°C and 50 °C. The battery should not be fully discharged before long term
storage.
The wearer should ensure that:
• The hearing protector is tted, adjusted, and maintained in accordance
with the manufacturer’s instructions.
• The hearing protector is worn at all times in noisy surroundings.
• The hearing protector is regularly inspected for serviceability.
If these recommendations are not adhered to, the protection aorded by
the hearing protector will be severely impaired.
The size range for the earmu is S M L.
The mean mass of the product is 430g.
Date of Obsolescence: 3 years from purchase date.
Not to be used in Explosive Atmospheres.
Additional Notes
ISOtunes® LINK is compliant with Bluetooth® V4.2. We do not guarantee
compatibility of all functions on every Bluetooth®-enabled device. Please
check your device’s user manual for compatibility and functionality.
Please note, the hearing protector provides an electrical audio facility. The
ear-mu provides audio signal sound pressure level limitation which limits
the entertainment audio signal to 82 dB(A) eective to the ear. This limit is
maintained for bluetooth signal inputs which are standard to the Bluetooth
A2DP, HFP, and HSP specications. There is no analog line input on this
product.
This earmu is provided with electrical audio input. The wearer should
check correct operation before use. If distortion or failure is detected, the
wearer should refer to the manufacturer’s advice.
For additional information about ISOtunes LINK, please visit
www.ISOtunes.com/Link-Manual. For additional information or questions
about ISOtunes® products or spares and accessories, please contact our
support team.
Replacement Parts: Hygiene Kit (ear-cushions and foam inserts) Model
Number: IT-83
Replace ear cushions:
1. Put your nger between the ear cushions and foam.
2. Pull the Foam Ear cushion away from the earcup.
3. Remove the foam inserts in the earcup.
4. Install the new foam inserts
5. Snap the new ear-cushion in place on the earcup
The following information shall be available from the manufacturer on re-
quest:
a) results of tests performed in accordance with this standard;
b) the name and country of the test laboratory which performed the tests
specied and the date of the tests.
FCC
Caution: The user is cautioned that changes or modications not expressly
approved by the party responsible for compliance could void the users’
authority to operate the equipment.
Note: This equipment has been tested and found to comply with the limits
for a Class B digital device, pursuant to part 15 of the FCC Rules. These
limits are designed to provide reasonable protection against harmful inter-
ference in a residential installation. This equipment generates, uses and can
radiate radio frequency energy and, if not installed and used in accordance
with the instructions, may cause harmful interference to radio communica-
tions. However, there is no guarantee that interference will not occur in a
particular installation. If this equipment does cause harmful interference to
radio or television reception, which can be determined by turning the equip-
ment o and on, the user is encouraged to try to correct the interference by
one or more of the following measures:
• Reorient or relocate the receiving antenna.
• Increase the separation between the equipment and receiver.
• Connect the equipment into an outlet on a circuit dierent from that to
which the receiver is connected.
• Consult the dealer or an experienced radio/TV technician for help.

EN |17
This equipment complies with FCC‘s RF radiation exposure limits set forth
for an uncontrolled environment. End users must follow the specic oper-
ating instructions for satisfying RF exposure compliance. This transmitter
must not be co-located or operating in conjunction with any other antenna
or transmitter.
UK & Europe
uk-eurosupport@isotunesaudio.com
North America
support@isotunesaudio.com
1-844-396-3737
Monday-Friday 9-5 ET

ES |18
Adecuado
El auricular está etiquetado y es ajustable para su conveniencia.
Retire el relleno de espuma blanca
de cada auricular.
1 2
Compruebe los auriculares
para el derecho y etiquetas de la
izquierda.

ES | 19
Adecuado
El auricular está etiquetado y es ajustable para su conveniencia.
Ajuste los cascos, la diadema y los
cables para un ajuste ceñido pero
cómodo. y etiquetas de la izquierda.
3 4
Asegúrese de que las etiquetas de los
cascos correspondan a los lados de
su cabeza y colóquelas en sus oídos.

ES |20
Ubicación de los Controles
1. Siguiente Pista
2. Pista Anterior
3. Subir Volumen
4. Bajar Volumen
5. Botón Multifunción (BMF
6. Micrófono Bluetooth
7. Puerto de Carga
8. Indicador de Carga LED
9. Pasador Tapa
de la Batería
1 3
2 4 9
5 76 8
Other manuals for LINK
1
This manual suits for next models
3
Table of contents
Languages:
Other ISOtunes Safety Equipment manuals
Popular Safety Equipment manuals by other brands

ASO Safety Solutions
ASO Safety Solutions Sentir Safety Contact Bumper instruction manual

fadini
fadini VIGILO 2250 instruction manual

KStrong
KStrong AFA930552 User instruction manual

SECUMAR
SECUMAR 9 S Instructions for use

Capital Safety
Capital Safety DBI SALA PROTECTA EN361 Instructions for use and maintenance

Guardian Fall Protection
Guardian Fall Protection Beamer 2000 instruction manual