ITC KuDos HYCP-240R Manual

KuDos Mechanical
Safe Operation & Maintenance Instructions
Hydraulic
Compression
Tool
HYCP-240R
Version: 2018/09
Hydraulic Compression Tools are carefully inspected for quality
and tested for safety. We follow
ISO 9001: 2015/ ISO 14001: 2015/ IECQ QC
080001/ OHSAS 18001: 2007, CE
Standards & UVDB
ATTENTION!
Safe Operation & Maintenance Instructions must be followed.

Table of Contents
Table of Contents………….…………………………………….1
Safety Instructions………………………………………………2
Product Description…………..…………….…………………...3
Maintenance’………………….…………………………………4
Operating Instructions…………….………….…………………5
Dies………………………………….………….…………………8
Compression Diagram….………….………….…………………9
Trouble–Shooting……………….……………..………………10
Diagram of Components (HYCP-240R).…………………….12
Table of Components (HYCP-240R)….………………………13
Limited Lifetime Warranty……..………………………………14
Manufacture & Quality Certificate
KuDos Mechanical 1

Safety Instructions
■Follow ALL instructions to ensure safety.
WARNING
ATTENTION
2 KuDos Mechanical
Thank you for using KuDos® products. This manual must be read
carefully prior to operating this product. Special attention should be paid
to the section “Safety Instructions”. Damages and injuries caused by
improper use of this product are NOT included in our warranty. We would
like to remind you to work safely and to keep this manual on hand.
Work safely. Use both hands to
firmly grip the tool handles. Keep
hands off the compression section.
Do not use this tool on glass, plastic,
wood or any other materials which
could shatter. Do not exceed the
equipment ratings.
Always wear safety goggles when
operating this product. Projectiles or
hydraulic fluid can cause serious
injuries.
This product is not fully insulated.
Proper equipment must be used to
avoid electrical shock.

Oil Reservoir
Bung (inside)
Product Description
■Subassembly
■Specifications & Functions
HYCP-185
Length: 373 mm
Weight: 2.1 kg
Max. Pressure: 550 bar
Oil Required: 16 cc
Max Output: 5.3 ton
•Light-weight, compact and slim design
•Accepts BEKU type dies
•Latch type head for easy die changes and removal of connectors
•Built-in bypass relief valve for constant compression
•Adjustable ram stroke, 10-15 mm to minimize pumping action
•Spring loaded pump handle allows one-handed pumping
•Small handle spread of 210mm for close quarter work
•Dies are sold seperately. Stock dies are for Din 46235 terminals
Release Lever
Piston Set
Tool Head
Cylinder Body
Moving
Handle
Fixed Handle
Latch
HYCP-240R
Length: 377 mm
Weight: 2.4 kg
Max. Pressure: 550 bar
Oil Required: 23 cc
Max Output: 5.3 ton
Die seat / Die
KuDos Mechanical 3

Maintenance
■Keep the tool head free of dirt and metal chips. Use a lubricant to clean the
tool when necessary.
■Routine application of rust preventive oil to the product is needed. Avoid
bringing the tool into contact with water or solvents.
■Do NOT keep this product in places with high temperatures, high humidity,
or direct sunlight.
■Suggested working temperatures:-10°C ~ 40°C.
■Hydraulic fluid temperatures over 65°C might cause damages
to components sealed inside the product.
■The hydraulic fluid pressure should be adjusted only by KuDos® service
representatives.
■Inform KuDos® authorized distributors in case of any abnormalities or
malfunctions of the product.
■DO NOT DISASSEMBLE OR ATTEMPT TO REPAIR THIS TOOL.
4 KuDos Mechanical

Operating Instructions
■Before operation:
1. Make sure all parts of the product are clean and rustless, and that no loose
parts exist.
2. Check that no leakage occurs while the tool is resting or while the product is
tested without cables
■ATTENTION!
!!
!Do not build up the hydraulic tool when the tool head jaws
are closed and the dies are not in place.
■ATTENTION!
!!
!Oversized fittings will not allow the tool head frame of the
tool to close completely, causing damage to the tool head frame.
■During operation:
1. Do NOT operate the product without the dies or a connector in place. It
may damage the piston or tool head or the injure the operator.
2. Operation with dies in accordance with the specifications in this handbook is
required. Always keep the fitting centered on the tool die and do not use
over- specification materials.
3. Stop operating immediately in case of any abnormalities. Refer to the
Trouble- Shooting section of this manual, if:
a) Compression of lugs cannot be implemented.
b) Dies cannot be set in place or removed.
c) Piston is stuck or unable to retract after operation.
.
■After operation:
1. Clean the product and ensure that all pieces are in working condition.
2. Apply rust preventive oil on a regular basis.
3. Always store this tool in the case with the cylinder piston fully retracted.
KuDos Mechanical 5

Operating Instructions
1. Press the release switch to release the
hydraulic pressure in the tool.
When the piston returns to the starting
position the tool is ready to operate.
2. Pull back the latch to open the head,
The head will spring open.
3. Slide the dies into the open head.
Make sure the dies are matching
and seated correctly.
6 KuDos Mechanical

Operating Instructions
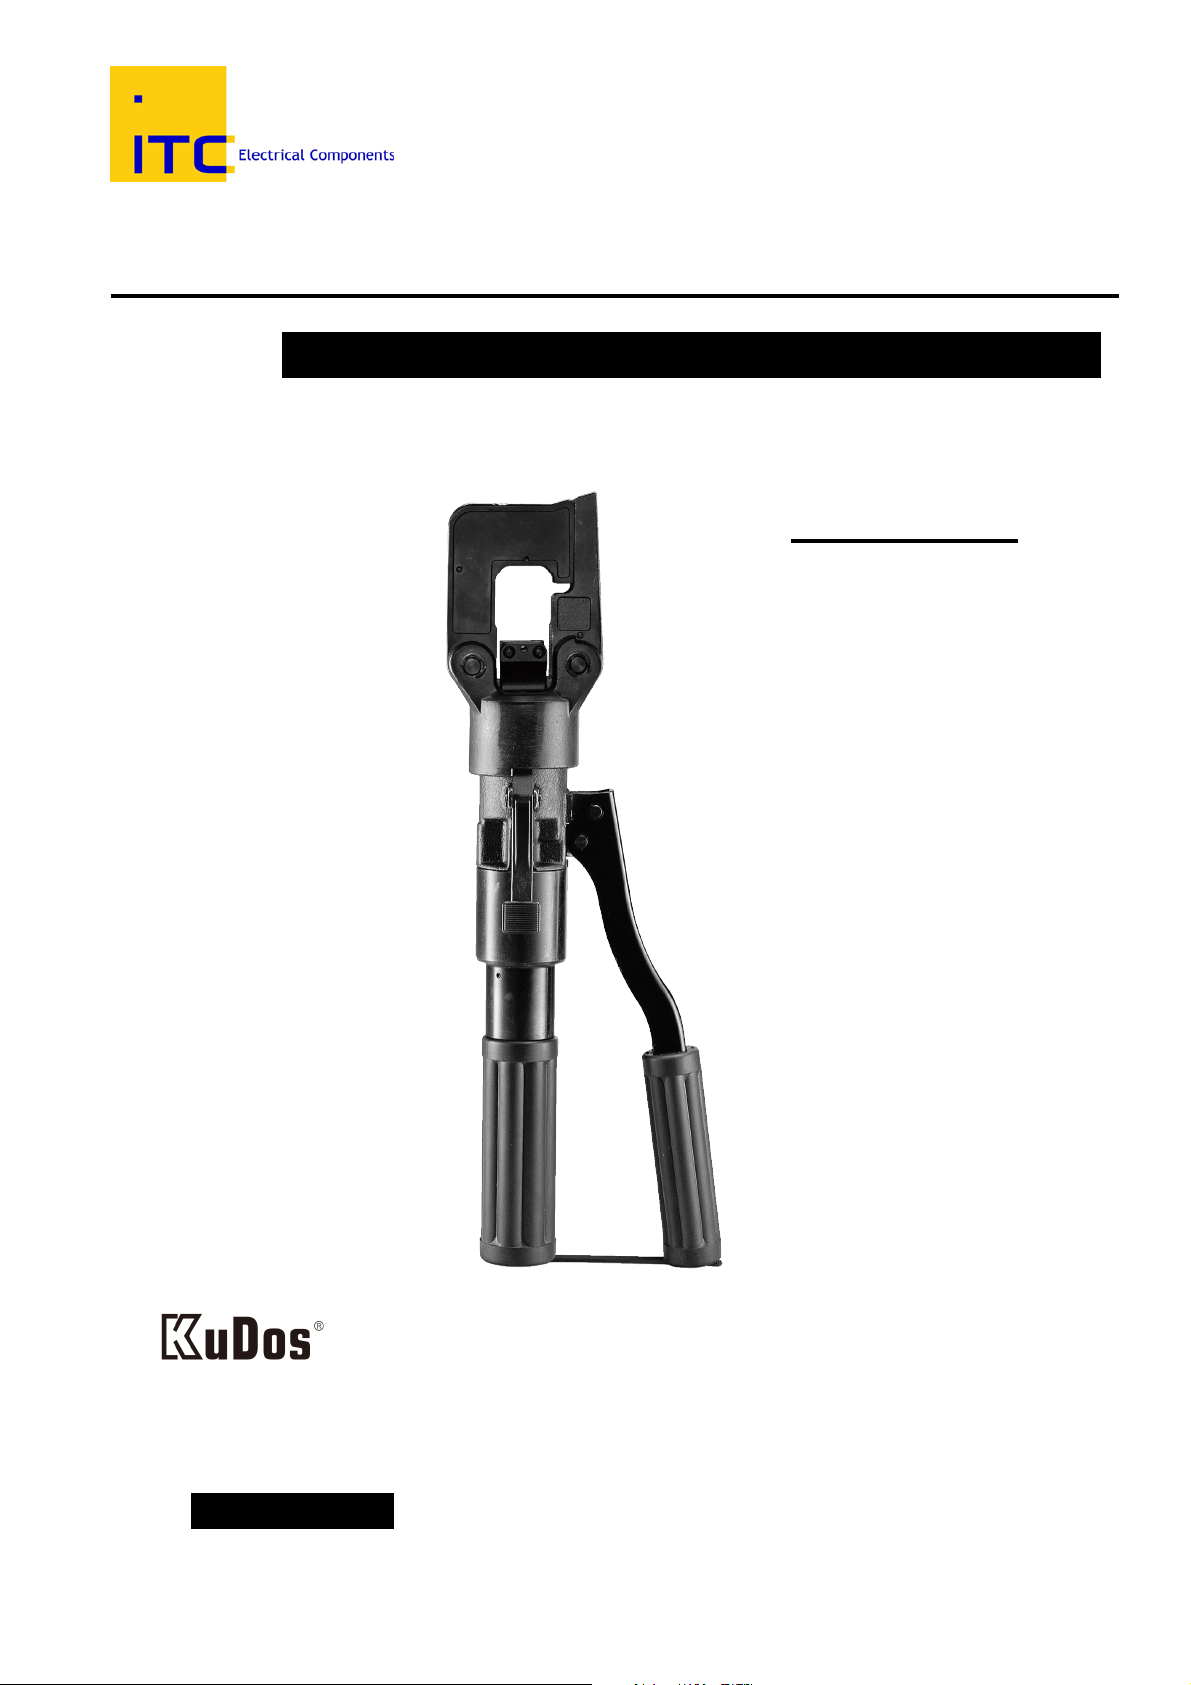
4. Place the cable and fitting into the opening of the tool head frame. The
cable and fitting must be positioned at the CENTER of the open top to
balance the compression. If put off-center, the dies may be damaged or
the tool head frame deformed.
5. Release the handle catch. The moving handle will spring open.
6. Follow connector specifications and apply the necessary number of crimps.
See the diagrams on page 9 for the crimping sequence.
7. Pump the moving handle to advance the lower die forward. When the
lower die makes contact with the fitting, ensure the tool is at a 90°angle to
the fitting.
8. Continue pumping until both dies are touching. Operation is complete
when the hydraulic pressure reaches 550 bar, and the relief valve
releases the internal pressure.
9. Press the release lever to retract the piston. Open the tool head and
remove the fitting –OR-- reposition the fitting and compress again
according to your operation specifications.
10. Clean the product and dies after use. Apply rust preventive oil to the
product and dies before putting them back in the carrying case.
**IMPORTANT**
**Under any operation, the piston MUST BE FULL RETRACTED
to keep the tool in good condition.
**Do not test the crimper without dies to avoid damage head.
KuDos Mechanical 7
For model HYCP 240R: Once the upper and lower dies are tightly
pressed, the rapid motion of the piston with low hydraulic pressure will
convert to a slow motion with high pressure.

Dies HYCP-185 / HYCP-240R
Die No. Side
A B C
A CU10 5.45 2.3 12
AHE-1016 B CU16 6.8 2.85 12
A CU25 8.35 3.5 9
AHE-2535 B CU35 9.4 4 9
A CU50 11.35 4.8 9
AHE-5070 B CU70 13.8 6.05 9
A CU95 16.17 6.9 9
AHE-95120
B CU120 18.05 7.6 9
AHE-150 A CU150 20.15 8.55 6
AHE-185 A CU185 22.15 9.35 6
AHE-240 A CU240 25.6 11.1 6
8 KuDos Mechanical

Compression Diagrams
■Sleeve Fittings
Direction of Compression: Single-sided / Outward
■Terminal Fittings
Direction of Compression: Outward
KuDos Mechanical 9

Trouble–Shooting
Air in the Hydraulic System:
■Air in the hydraulic system may cause the lower blade from advancing or
cause it to advance slowly. To eject the air bubble from the hydraulic
circuit:
1. Position the tool upside-down in a vice with the pump handle in the open
position.
2. Unscrew the main handle from the body, then remove the reservoir filler
cap (HYCP-185, #55 / HYCP-240R. #45).
3. Pump the moving handle a few times to advance the ram.
4. Rotate the pump handle and close it to release the pressure in the
hydraulic circuit until the piston is fully retracted and the oil has returned
completely into the reservoir.
5. Repeat the process several times to assure that all air bubbles are
ejected.
6. Close the rubber reservoir and insert the the reservoir filler cap.
Reassemble the main handle.
Oil Refilling:
■Check the oil reservoir every six months and make sure the reservoir is
full. To refill the oil reservoir, follow the steps above to disassemble the
tool. Do not use restored, used oil, or mix different kinds of oil.
10 KuDos Mechanical

Trouble-Shooting
■Compression of lugs cannot be completed:
A. Applied cables or terminals are over-specification.
B. Operation instructions were not followed. The product or dies have
been already damaged.
C. Internal leakage: Contact your KuDos® service representatives.
■Dies can not be set in place or can not be removed:
A. Deformed tool head or dies. Contact KuDos® service representatives.
B. Clean the grooves on the tool head to remove impediments.
C. Clean the die seats on the tool head to remove impediments.
■The piston is stuck or is unable to retract after operation:
The piston may have been deformed by uneven stress distribution when
the product was operated with off-centered fittings. Contact KuDos®
service representatives.
■
Replace any worn or damaged parts immediately. Do not use
parts not supplied by KuDos.
■Contact KuDos® service representatives to request parts or for
problems not shown above.
■Do NOT attempt to disassemble or repair the product.
■
KuDos hydraulic tools must be serviced by a qualified technician.
KuDos Mechanical 11

Diagram of Components HYCP-240R
12 KuDos Mechanical

Table of Components HYCP-240R
No. Parts Q'ty No. Parts Q'ty
Latch 1 29 RELEASE VALVE STEM 1
1,2,6 Yoke 1 30 O-RING 1
Pin 1 31 COMPRESSION SPRING 1
3 DIE SIZING LOCK PIN 1 32 BALL 2
4 BALL PLUNGER 4 33 COMPRESSION SPRING 1
5 SCREW 1 34 VALVE SCREW 1
7 TORSIONAL SPRING 2 35 O-RING 1
8 DIE HOLDER 1 36 O-RING 1
9 CRESCENT 4 37 BACK-UP RING 1
10 HINGE PIN 2 38 O-RING 1
11 SPINDLE HUB 1 39 COPPER WASHER 1
12 COMPRESSION SPRING 1 40 BALL 1
13 MAIN PISTON 1 41 COMPRESSION SPRING 1
14 BACK UP RING 1 42 SOLID FILTER 1
15 O-RING 1 43 OIL SCREEN 1
16 CYLINDER 1 44 OIL RESERVOIR 1
17 COMPRESSION SPRING 1 45 FILLER CAP 1
18 VALVE SCREW 1 46 MAGNETIC BAR 1
19 TORSIONAL SPRING 1 47 EXTENSION TUBE 1
20 O RING 1 48 SPRING PIN 1
21 BACK-UP RING 1 49 FIBER GLASS PIPE 1
22 DUST SEAL 1 50 HANDLE GRIP 1
23 PUMP PISTON 1 51 HOLDING BAND 1
24 HINGE PIN 2 52 SCREW 1
25 CRESCENT 4 53 SCREEN HOLDER 1
26 PUMP HANDLE 1 54 SPRING PIN 1
27 HANDLE GRIP 1 55 COMPRESSION SPRING 1
28 RELEASE LEVER 1
KuDos Mechanical 13
This manual suits for next models
1
Table of contents
Other ITC Tools manuals
Popular Tools manuals by other brands

SUHNER ABRASIVE
SUHNER ABRASIVE LWG12 manual

Major tech
Major tech MT173 user manual

microjig
microjig Matchfit DOVETAIL CLAMP PRO instruction manual

SNOWJOE
SNOWJOE Aquajoe FIBERJACKET AJFJH100-58-PRO-RM quick guide

Matco Tools
Matco Tools BRK4T Operating instructions & parts manual

Draper
Draper BC1000 instructions