IVT AY-XP09DR-N User manual

ENGLISH
AY-XP09DR-N
AY-XP09DR-N
SPLIT TYPE
ROOM AIR CONDITIONER
OPERATION MANUAL
•UsesozonelayerfriendlyrefrigerantR410A.
INDOOR UNIT AE-X09DR-N
OUTDOOR UNIT
AY-XP09DR-N_Eng P6.5 04.3.18, 4:45 PM1

AY-XP09DR-N_Eng P6.5 04.3.18, 4:45 PM2

ENGLISH
E-1
ENGLISH
• PRECAUTIONS ........................................E-1
•PART NAMES...........................................E-3
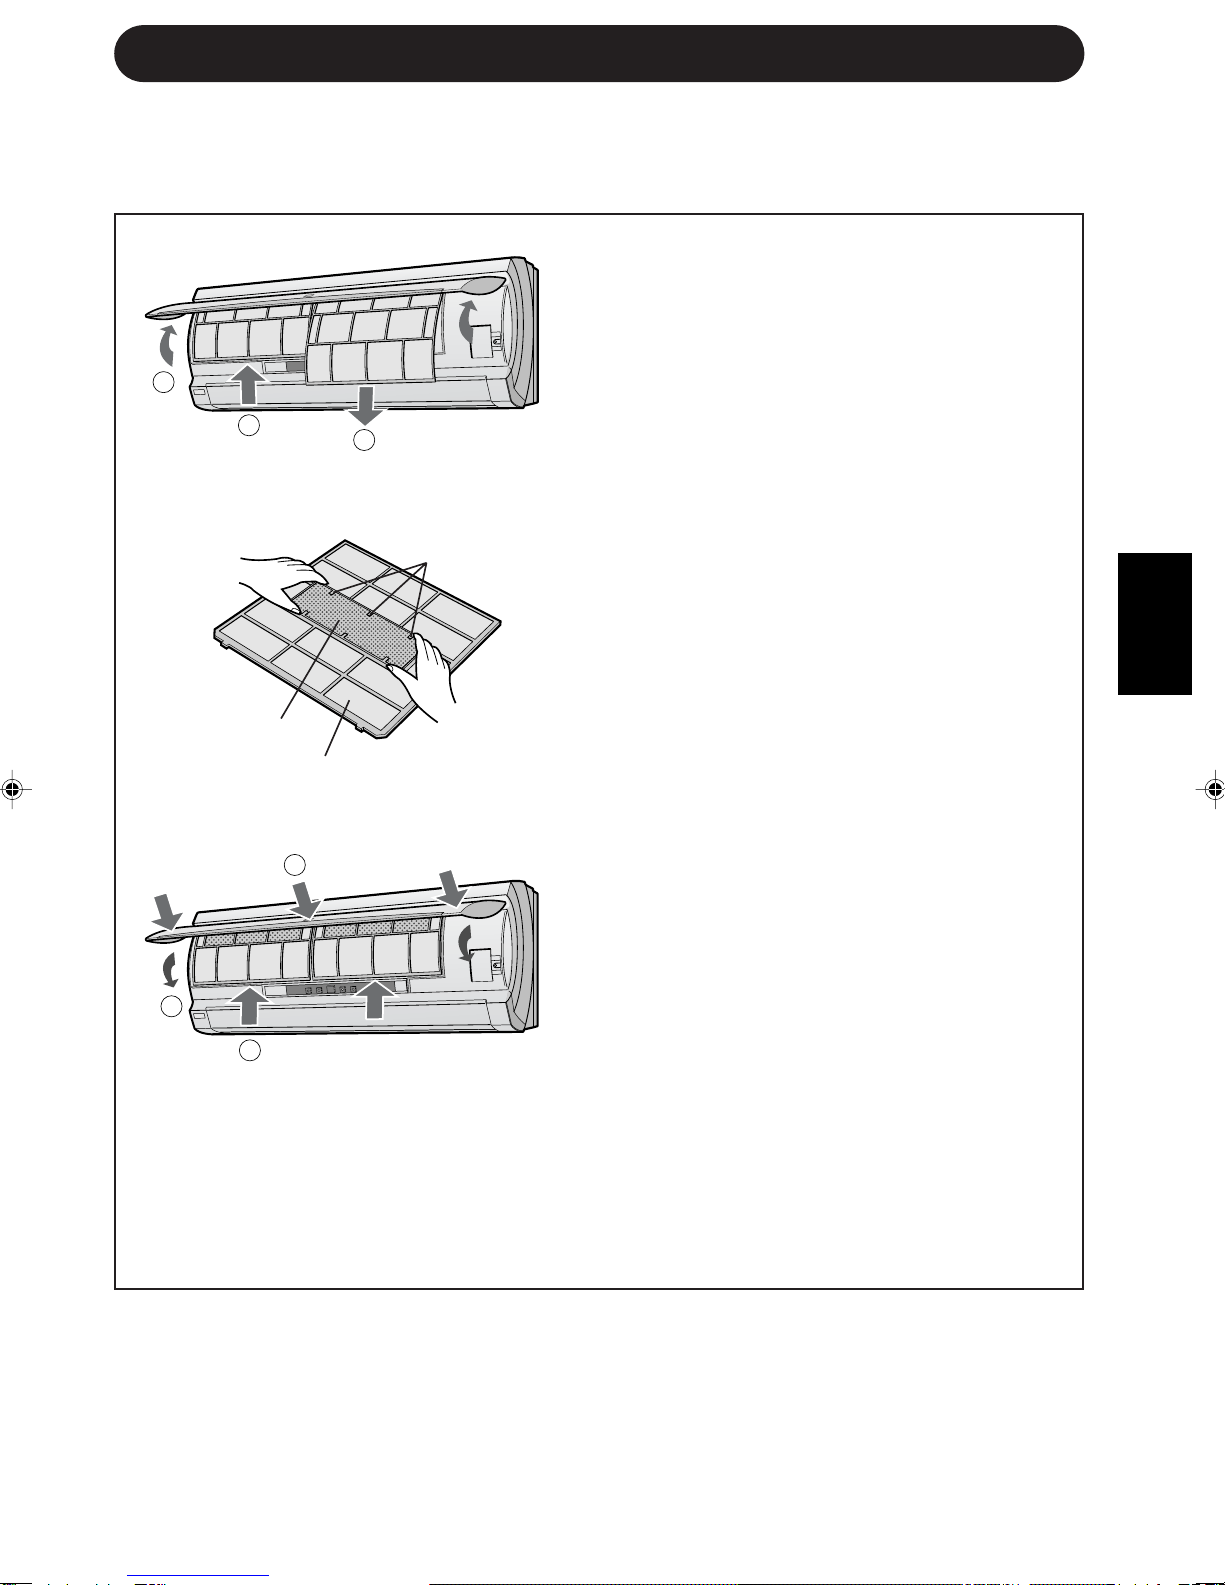
•SETTING DEODORANT DUST
COLLECTING FILTER..............................E-5
•USING THE REMOTE CONTROL ...........E-6
•BASIC OPERATION .................................E-8
•
ADJUSTING THE AIR FLOW DIRECTION .....
E-10
•10°C OPERATION....................................E-11
•FULL POWER OPERATION ....................E-11
•ONE-HOUR OFF TIMER ..........................E-12
CONTENTS
•TIPS ABOUT PLASMACLUSTER
OPERATION........................................ E-12
•PLASMACLUSTER OPERATION ....... E-13
•SELF CLEAN OPERATION................. E-13
•TIMER OPERATION............................ E-14
•AUXILIARY MODE .............................. E-16
• MAINTENANCE ................................... E-16
•
ADDITIONAL NOTES ON OPERATION .....
E-19
•TIPS ON SAVING ENERGY................ E-19
•BEFORE CALLING FOR SERVICE .... E-20
WARNINGS FOR USE
1Donotpullordeformthepowersupplycord.Pullingandmisuseofthepowersupplycord
can result in damage to the unit and cause electrical shock.
2Be careful not to expose your body directly to the outlet air for a long time. It may affect
your physical conditions.
3Whenusingtheairconditionerforinfants,children,elderly,bedridden,ordisabledpeople
make sure the room temperature is suitable for those in the room.
4Never insert objects into the unit. Inserting objects can result in injury due to the high
speed rotation of internal fans.
5Ground the air conditioner without fail. Do not connect the grounding wire to gas pipe,
waterpipe,lightningrodortelephonegroundingwire. Incompletegroundingmaycause
electric shock.
6If anything is abnormal with the air conditioner (ex. a burning smell), stop the operation
immediately and turn the circuit breaker OFF.
7Theapplianceshallbeinstalledinaccordancewithnationalwiringregulations.Improper
cable connection can cause the power supply cord, plug and the electrical outlet to
overheat and cause fire.
8Ifthesupplycordisdamaged,itmustbereplacedbythemanufactureroritsserviceagent
or a similarly qualified person in order to avoid a hazard. Use only the manufacture-
specified power cord for replacement.
WARNINGS FOR INSTALLATION / REMOVAL / REPAIR
•Donotattempttoinstall/remove/repairtheunitbyyourself.Incorrectworkwillcauseelectric
shock, water leak, fire etc. Consult your dealer or other qualified service personnel for the
installation/removal/repair of the unit.
This equipment complies with the requirements of Directives 89/336/EEC and 73/23/
EEC as amended by 93/68/EEC.
PRECAUTIONS
AY-XP09DR-N_Eng P6.5 04.3.18, 4:45 PM3

PRECAUTIONS
CAUTIONS FOR USE
1Open a window or door periodically to ventilate the room, especially when using gas
appliances. Insufficient ventilation may cause oxygen shortage.
2Do not operate the buttons with wet hand. It may cause electric shock.
3For safety, turn the circuit breaker off when not using the unit for an extended period of
time.
4Check the outdoor unit mounting rack periodically for wear and to make sure it is firmly
in place.
5Do not put anything on the outdoor unit nor step on it. The object or the person may fall
down or drop, causing injury.
6This unit is designed for residential use. Do not use for other applications such as in a
kennel or greenhouse to raise animals or grow plants.
7Do not place a vessel with water on the unit. If water penetrates into the unit, electrical
insulations may deteriorate and cause electric shock.
8Do not block the air inlets nor outlets of the unit. It may cause insufficient performance
or troubles.
9Be sure to stop the operation and turn the circuit breaker off before performing any
maintenance or cleaning. A fan is rotating inside the unit and you may get injured.
10
Do not splash or pour water directly on the unit. Water can cause electrical shock or
equipment damage.
11
This appliance is not intended for use by young children or infirm persons without
supervision.
Young children should be supervised to ensure that they do not play with the appliance.
CAUTIONS FOR LOCATION / INSTALLATION
•Make sure to connect the air conditioner to power supply of the rated voltage and
frequency.
Use of a power supply with improper voltage and frequency can result in equipment
damage and possible fire.
•Do not install the unit in a place where inflammable gas may leak. It may cause fire.
Install the unit in a place with minimal dust, fumes and moisture in the air.
•Arrangethedrainhosetoensuresmoothdrainage. Insufficientdrainagemaycausewetting
of the room, furniture etc.
•Make sure a leak breaker or a circuit breaker is installed, depending on the installation
location, to avoid electrical shock.
E-2
AY-XP09DR-N_Eng P6.5 04.3.18, 4:45 PM4

ENGLISH
PART NAMES
1Inlet (Air)
2PLASMACLUSTER Lamp
(blue, green)
3DEODORANT DUST COL-
LECTION FILTER
(non-washable)
4Open Panel
5Air Filters
6AUX. Button
7Indicator
8Power Supply Cord
9Vertical Adjustment Louvres
0Horizontal Adjustment
Louvres
qOutlet (Air)
wRECEIVER Window
eRemote Control
rOUTDOOR Temp. Lamp
(green )
tROOM Temp. Lamp
(green )
yTEMPERATURE INDICATOR
uTIMER Lamp (orange )
iOPERATION Lamp (red )
OUTDOOR UNIT
NOTE: Actual units might vary slightly from those shown above.
INDOOR UNIT
oInlet (Air)
pRefrigerant Tube and
Interconnecting Cord
aDrainage Hose
sOutlet (Air)
E-3
1
2
3
4
5
6
7
8
9
0
q
w
e
r
t
y
u
i
(Open Panel Closed)
o
p
a
s
AY-XP09DR-N_Eng P6.5 04.3.18, 4:45 PM5

REMOTE CONTROL
1TRANSMITTER
2DISPLAY (Liquid Crystal Display)
3PLASMACLUSTER Button
4DISPLAY Button
5ON/OFF Button
6THERMO. (Thermostat) Button
7FULL POWER Button
8MODE Button
9ONE-HOUR OFF TIMER Button
0TIMER ON Button (for setting the timer)
qTIMER OFF Button (for setting the timer)
wSELF CLEAN Button
eTIME ADVANCE Button
rTIME REVERSE Button
t10°C Button
yTIMER SET/CANCEL Button
uIndicates BATTERY COMPARTMENT is
below this mark
iCLOCK Button
oFAN Button
pSWING Button
lTIMER ON INDICATOR/CLOCK
Indicates the on timer preset time or current
time.
;TIMER OFF INDICATOR
Indicates the preset time for off timer or one-
hour off timer.
E-4
aSELF CLEAN SYMBOL
sPLASMACLUSTER SYMBOL
dMODE SYMBOLS
: AUTO : DRY
: HEAT : COOL
fTHERMOSTAT SETTING FOR AUTO AND
DRY MODES
gTEMPERATURE INDICATOR
hTRANSMITTING SYMBOL
jFULL POWER SYMBOL
kFAN SPEED SYMBOLS
: AUTO : LOW
: HIGH : SOFT
L.C.D. REMOTE CONTROL DISPLAY
PART NAMES
1
2
3
4
5
6
7
8
9
0
q
w
e
r
t
y
u
i
o
p
a
s
d
SWING
CLEAN
FAN
MODE
SET/C
1h
DISPLAY
f
g
h
j
k
l
;
AY-XP09DR-N_Eng P6.5 04.3.18, 4:45 PM6

ENGLISH
SETTING DEODORANT DUST COLLECTION FILTER
The deodorant dust collection filters are packed as accessory of this unit. During
operation of the air conditioner, the filters remove dust and tobacco smoke from the
air and discharges clean air.
1Take out the air filters.
1Open the open panel.
2Push the air filters up slightly to
unlock them.
3Pull the air filters down to remove
them.
2Set the deodorant dust collection filter
under the filter stoppers located on
the air filter.
3Reinstall the air filters
1Reinstall the air filters in the origi-
nal positions.
2Close the open panel.
3Push the arrow-marked of the
panel firmly to lock it in place.
Precautions
•The filters are sealed in a plastic bag to keep their dust collection effect.
Do not open the bag until using the filters. (Otherwise the filters life may get shorter.)
•Do not expose the filters to direct sunlight. (Otherwise they may deteriorate.)
Filter stopper
E-5
Deodorant dust
collection filterAir filter
3
1
2
3
1
2
AY-XP09DR-N_Eng P6.5 04.3.18, 4:45 PM7

1Remove the remote control
cover.
2Insert batteries in the compart-
ment, making sure the ±and
—polarities are correctly
aligned.
•The display indicates "AM
6:00" when batteries are prop-
erly installed.
3Reinstall the cover.
USING THE REMOTE CONTROL
E-6
NOTES:
•The battery life is approximately one year in normal use.
•When you replace the batteries, always change both batteries, and make sure
they are the same type.
•If the remote control does not operate properly after replacing the batteries, take
out the batteries and reinstall them again after 30 seconds.
•If you will not be using the unit for a long time, remove the batteries from the
remote control.
Point the remote control towards
the unit’s signal receiver window
and press the desired button. The
unit generates a beep when it re-
ceives the signal.
•Make sure there is no curtain or other
object between the remote control and the
unit.
•The remote control can send signals from
up to 7 metres away.
LOADING BATTERIES Use two size-AAA (R03) batteries.
HOW TO USE THE REMOTE CONTROL
Remote control
cover
+
-
+
-
AY-XP09DR-N_Eng P6.5 04.3.18, 4:45 PM8

ENGLISH
E-7
CAUTION
•Do not allow the signal receiver window to receive strong direct sunlight, since it can
adversely affect its operation. If the signal receiver window is exposed to direct sunlight,
close a curtain to block the light.
•Using a fluorescent lamp with a quick starter in the same room may interfere with
transmission of the signal.
•The unit can be affected by signals transmitted from the remote control of a television,
VCR or other equipment used in the same room.
•Do not leave the remote control in direct sunlight or near a heater. Also, protect the unit
and remote control from moisture and shock which can discolour or damage them.
SET CURRENT CLOCK TIME
There are two clock modes:
12-hour mode and 24-hour
mode.
1To set to the 12-hour mode, press the
CLOCK button once in the first step.
To set to the 24-hour mode, press the
CLOCK button twice in the first step.
2Press the TIME ADVANCE or REVERSE
button to set the current time.
•Keep the button pressed to advance or
reverse the time display quickly.
3Press the SET/C button.
•The colon (:) blinks to indicate that the
clock is functioning.
NOTE:
•The current time cannot be set when the
timer is operating.
1
2
3
Example: 5 o'clock in the afternoon
Clock Display
12-hour mode PM 5:00
24-hour mode 17:00
SWING
CLEAN
FAN
MODE
SET/C
1h
AY-XP09DR-N_Eng P6.5 04.3.18, 4:45 PM9

SWING
CLEAN
FAN
MODE
SET/C
1h
DISPLAY
Press the THERMO. button to set the de-
sired temperature.
•In the AUTO and
DRY mode, the tem-
perature can be
changed in 1°C incre-
ments within the
range of 2°C higher
to 2°C lower from the
temperature auto-
matically determined
by the air conditioner.
•In the COOL and
HEAT modes, the
temperature can be
set within the range
of 18 to 32°C
1
E-8
BASIC OPERATION
2Press the ON/OFF button to start opera-
tion.
•The red OPERATION lamp ( ) on the unit
will light.
3
4
1
4
5
2
3
Press the MODE button to select the op-
eration mode.
AUTO HEAT COOL DRY
5
•In the DRY mode, the fan speed is preset to
AUTO and cannot be changed.
To turn off the unit, press the ON/OFF but-
ton again.
•The red OPERATION lamp ( ) on the unit
will turn off.
Press the FAN button to set the desired fan
speed. AUTO SOFT LOW HIGH
(Example: 1°C higher)
(Example: 2°C lower)
C
C
AY-XP09DR-N_Eng P6.5 04.3.18, 4:45 PM10

ENGLISH
E-9
During operation, if the outdoor temperature changes, the temperature settings will automati-
cally slide as shown in the chart.
TIPS ABOUT AUTO MODE
In the AUTO mode, the temperature setting and mode are automatically selected according to
the room temperature and outdoor temperature when the unit is turned on.
Modes and Temperature Settings
TIPS ABOUT INDICATOR PANEL
The indicator panel will change each time you press
the DISPLAY button in the following manner.
The room tem-
perature is dis-
played.
The outdoor
temperature is
displayed.
No display.
NOTES:
•The displayed temperatures are rough estimates and may vary from the actual temperatures.
•Temperature display ranges
Room temperature: 0°C ~ 40°C ( is displayed when less than 0°C and when higher
than 40°C)
Outdoor temperature: -9°C ~ 45°C ( is displayed when less than -9°C and when higher
than 45°C)
•is displayed during the first 60 seconds of operation while the temperatures are being
detected.
•Only the room temperature can be displayed for 5 seconds when the unit is not in operation.
the figures in ( ) are temperature settings
DISPLAY
Room Temp.
Lamp
Outdoor Temp.
Lamp
temperature
Indiactor
temperature
Indiactor
AY-XP09DR-N_Eng P6.5 04.3.18, 4:45 PM11

COOL and DRY modes Horizontal air flow
HEAT mode Diagonal air flow
E-10
ADJUSTING THE AIR FLOW DIRECTION
VERTICAL AIR FLOW DIRECTION
The air flow direction is automatically preset in each mode as follows for optimum
comfort:
HOW TO ADJUST THE AIR FLOW DIRECTION
COOL and DRY modes HEAT mode
Hold the horizontal adjustment
louvre as shown in the diagram
and adjust the air flow direction.
Press the SWING button on the
remote control once.
•The vertical adjustment louvre
will change its angle continu-
ously.
Press the SWING button again
when the vertical adjustment
louvre is at the desired position.
•The louvre will stop moving within
the range shown in the diagram.
•The adjusted position will be
memorized and will be automati-
cally set to the same position
when operated the next time.
Adjustment range
CAUTION
Never attempt to adjust the vertical adjustment louvres manually.
•Manual adjustment of the vertical adjustment louvre can cause the unit to malfunction
when the remote control is used for the adjustment.
•When the vertical adjustment louvre is positioned at the lowest position in the COOL or
DRY mode for an extended period of time, condensation may result.
Do not adjust the horizontal adjustment louvre extremely to the right or left when operating
the air conditioner with fan speed "SOFT" for an extended period of time.
Condensation may form on the louvres.
HORIZONTAL AIR FLOW DIRECTION
AY-XP09DR-N_Eng P6.5 04.3.18, 4:45 PM12

ENGLISH
E-11
FULL POWER OPERATION
In this operation, the air conditioner works at maximum power to makes the room
cool or warm so rapidly that you can use it just after you come home.
1To activate the FULL POWER operation, press the
FULL POWER button during operation.
•The remote control will display .
•The temperature display will go off.
TO CANCEL
Press the FULL POWER button again.
•FULL POWER operation will also be cancelled when
the operation mode is changed, or when the unit is
turned off.
NOTE:
•You can not set the temperature and fan speed during
the FULL POWER operation.
1
DISPLAY
AM
10°C OPERATION
Heating operation with 10°C set temperature will be performed.
1Press the MODE button and select HEAT mode.
2Press the ON/OFF button to start HEAT operation.
3Press the 10°C button.
•The remote control will display 10°C .
TO CANCEL
Press the 10°C button again.
•10°C operation will also be cancelled when the
operation mode is changed, or when the unit is
turned off.
NOTE:
•10°C operation will not be available with heating
operation automatically selected by AUTO mode.
1
SWING
CLEAN
FAN
MODE
SET/C
1h
AM
DISPLAY
AY-XP09DR-N_Eng P6.5 04.3.18, 4:45 PM13

E-12
TIPS ABOUT PLASMACLUSTER OPERATION
Plasmacluster Ion generator
Plasmacluster ions
AIR CLEAN OPERATION
Plasmacluster ions released into the air will reduce
airborne mold fungus.
ION BALANCE OPERATION
It is said that plenty of negative ions exist in places such as waterfalls or waterside in natural
environment.Inthisoperationmode,negativeionswillbereleasedinanincreasedrate,inorder
to bring the room air close to this condition.
SELF CLEAN OPERATION
Plasmacluster Operation will be performed with FAN or HEAT mode, in order to reduce the
growth of mold fungus, and dry inside of the air conditioner unit.
Utilize the operation at seasonal change over terms.
Mold fungus already grown can not be eliminated by this operation.
The Plasmacluster Ion generator inside the air
conditioner will release Plasmacluster ions, which
are collective mass of positive and negative ions,
into the room.
ThePlasmaclusterionsreduceairbornemoldfungus.
1Press the ONE-HOUR OFF TIMER button.
•The remote control displays “ ”.
•The orange TIMER lamp ( ) on the unit will light up.
•The unit will stop operating after one hour.
TO CANCEL
Press the TIMER CANCEL (SET/C) button.
•The orange TIMER lamp ( ) on the unit will turn off.
Or, turn the unit off by pressing the ON/OFF button.
•The red OPERATION lamp ( ) and the orange
TIMER lamp ( ) on the unit will turn off.
1
When the ONE-HOUR OFF TIMER is set, the unit will stop operating after one hour.
ONE-HOUR OFF TIMER
NOTES:
•The ONE-HOUR OFF TIMER operation has priority over TIMER ON and TIMER OFF
operations.
•When the ONE-HOUR OFF TIMER is set while the unit is not operating, the unit will
operate for an hour with the formerly set condition.
•If you wish to operate the unit for another hour before the ONE-HOUR OFF TIMER
activates, press the ONE-HOUR OFF TIMER button again during operation.
•If TIMER ON and/or TIMER OFF are set, TIMER CANCEL button cancels every setting.
CLEAN
FAN
MODE
1h
AY-XP09DR-N_Eng P6.5 04.3.18, 4:45 PM14

ENGLISH
E-13
1Press the SELF CLEAN button when the unit is not
operating.
•The remote control displays " ".
•The red OPERATION lamp ( ) and the blue
PLASMACLUSTER lamp on the unit will light up.
•The unit will stop operation after forty minutes.
•The remaining operation time will be indicated on the
TEMPERATUREINDICATORoftheindoorunitinminute
decrements.
TO CANCEL
Press the SELF CLEAN button.
Or, turn the unit off by pressing the ON/OFF button.
•The red OPERATION lamp ( ) and the blue
PLASMACLUSTER lamp on the unit will turn off.
You can choose AIR CLEAN OPERATION or ION BALANCE OPERATION
1Duringoperation,pressthePLASMACLUSTERbutton
to select the mode.
AIR CLEAN ION BALANCE CANCEL
•IntheAIRCLEANoperation,thebluePLASMACLUSTER
lamp on the unit will light up.
•In the ION BALANCE operation, the green
PLASMACLUSTER lamp on the unit will light up.
TO CANCEL
Press the PLASMACLUSTER button until
PLASMACLUSTER symbol on the remote control
display goes off.
•The PLASMACLUSTER lamp on the unit will turn off.
1
SELF CLEAN OPERATION
NOTE:
•Youcannotsetthetemperature,fanspeed,airflowdirectionortimersettingduringtheSELF
CLEAN operation.
PLASMACLUSTER OPERATION
NOTES:
•Setting of the PLASMACLUSTER operation will be memorized and will operate in the same
mode, the next time you turn on the air conditioner.
• To turn off the PLASMACLUSTER lamp, press the DISPLAY button.
•When the PLASMACLUSTER button is pressed while the unit is not operating, the
PLASMACLUSTERoperationwillbeperformedwithoutaccompanyingairconditioningmode
(eg, HEATING or COOLING).
The mode symbol of the remote control will go off and the fan speed can not be set AUTO.
1
REMOTECONTROL
DISPLAY
PLASMACLUSTER
lamp on the unit BLUE lamp light up GREEN lamp light up Lamp goes off
CLEAN
FAN
MODE
1h
DISPLAY
AY-XP09DR-N_Eng P6.5 04.6.17, 11:36 AM15

1Press the TIMER OFF ( ) button.
2The TIMER OFF indicator will blink; press the
TIME ADVANCE or REVERSE buttons to set
the desired time. (The time can be set in 10-
minute increments.)
3Point the remote control at the signal receiver
window on the unit and press the TIMER SET
(SET/C) button.
•The orange TIMER lamp ( ) on the unit will
light.
•The unit will generate a beep when it receives the
signal.
NOTE:
Before setting the timer, make sure the clock is properly set with the current time.
TIMER OPERATION
TIMER OFF
Cancel the TIMER setting first, then set it
again.
TO CHANGE TIME SETTING
TO CANCEL TIMER MODE
Press the TIMER CANCEL (SET/C) button.
•The orange TIMER lamp ( ) on the unit will
turn off.
•The current clock
time will be dis-
played on the re-
mote control.
TIPS ABOUT TIMER OFF OPERATION
When the TIMER OFF mode is set, the
temperature setting is automatically
adjusted to prevent the room from
becoming excessively hot or too cold
while you sleep. (Auto Sleep function)
COOL/DRY MODE:
•One hour after the time operation begins,
the temperature setting rises 1°C higher
than the original thermostat setting.
HEAT MODE:
•One hour after the timer operation begins,
the temperature setting drops 3°C lower
than the original thermostat setting.
2
3
1
NOTE:
•If any TIMER ON, TIMER OFF and ONE-HOUR
OFF TIMER are set, the TIMER CANCEL but-
ton cancels all settings.
E-14
SWING
CLEAN
FAN
MODE
SET/C
1h
DISPLAY
SWING
CLEAN
FAN
MODE
SET/C
1h
AY-XP09DR-N_Eng P6.5 04.3.18, 4:45 PM16

ENGLISH
SWING
CLEAN
FAN
MODE
SET/C
1h
DISPLAY
1Press the TIMER ON ( ) button.
2The TIMER ON indicator will blink; press the
TIME ADVANCE or REVERSE buttons to set
the desired time. (The time can be set in 10-
minute increments.)
3Point the remote control at the signal receiver
window on the unit and press the TIMER SET
(SET/C) button.
•The orange TIMER lamp ( ) on the unit will light.
•The unit will generate a beep when it receives the
signal.
4Select the operation condition.
•The unit will turn on prior to the set time to allow
the room to reach the desired temperature by the
programmed time. (Awaking function)
Example:
To stop operation at 11:00 p.m. and resume opera-
tion (With the same mode and temperature settings)
to bring the room temperature to the desired level
by 7:00 a.m.
1Set the TIMER OFF to 11:00 p.m. during opera-
tion.
2Set the TIMER ON to 7:00 a.m.
The arrow ( or ) between the TIMER ON
indicator and the TIMER OFF indicator shows which
timer will activate first.
E-15
NOTES:
•You cannot programmed the ON-TIMER and OFF-TIMER to operate the unit at different
temperatures or other settings.
•Either timer can be programmed to activate prior the other.
You can use the ON and OFF timers in combination.
COMBINED USE OF ON AND OFF TIMERS
2
1
3
TIMER ON
AY-XP09DR-N_Eng P6.5 04.3.18, 4:45 PM17

E-16
AUXILIARY MODE
Use this mode when the remote control is not available.
TO TURN ON
Lift the front panel of the indoor unit and press the AUX.
button on the operation panel.
•The red OPERATION lamp ( ) on the unit will light and the
unit will start operating in the AUTO mode.
•The fan speed and temperature setting are set to AUTO.
TO TURN OFF
Press the AUX. button on the operation panel again.
•The red OPERATION lamp ( ) on the unit will turn off.
NOTE:
If the AUX. button is pressed during normal operation, the unit will turn off.
MAINTENANCE
Be sure to disconnect the power cord from the wall outlet or turn off the circuit
breaker before performing any maintenance.
CLEANING THE FILTERS The air filters should be cleaned every two weeks.
1TURN OFF THE UNIT
2REMOVE THE FILTERS
1Lift the open panel.
2Push the air filters up slightly to unlock them.
3Pull the air filters down to remove them.
3TAKE OFF THE DEODORANT DUST
COLLECTION FILTERS FROM THE AIR
FILTERS
4CLEAN THE FILTERS
Use a vacuum cleaner to remove dust. If the
filters are dirty, wash them with warm water
and a mild detergent. Dry filters in the shade
before reinstalling.
5REINSTALL THE DEODORANT DUST
COLLECTION FILTERS
6REINSTALL THE FILTERS
1Reinstall the filters in the original positions.
2Close the front panel.
3Push the arrow-marked of the panel firmly
to lock it in place.
3
1
2
3
1
2
AY-XP09DR-N_Eng P6.5 04.3.18, 4:45 PM18

ENGLISH
CLEANING THE UNIT AND THE REMOTE CONTROL
•Wipe them with a soft cloth.
•Do not directly splash or pour water on them. We can cause electrical shock or
equipment damage.
•Do not use hot water, thinner, abrasive powders or strong solvents.
MAINTENANCE AFTER AIR
CONDITIONER SEASON
1Operate the unit in the SELF
CLEAN OPERATION to allow the
mechanism to thoroughly dry.
2Stop the operation and unplug the
unit. Turn off the circuit breaker, if
you have one exclusively for the
air conditioner.
3Clean the filters, then reinstall
them.
MAINTENANCE BEFORE
AIR CONDITIONER SEASON
MAINTENANCE
1Make sure that the air filters are
not dirty.
2Make sure that nothing obstructs
the air inlet or outlet.
3Check the outdoor mounting rack
periodically for wear and to make
sure it is firmly in place.
CHANGING THE DEODORANT DUST COLLECTION FILTER
The filter should be changed every 3~6 months
1REMOVE THE AIR FILTER
2CHANGE THE DEODORANT DUST
COLLECTION FILTER
1Take off the old deodorant dust collection
filter from the air filter.
2Set the new deodorant dust collection fil-
ter, under the filter stoppers located on the
air filter.
3REINSTALL THE AIR FILTER
NOTE:
•The dirty deodorant dust collection filter is not washable for reuse.
The new filter is available at your nearest dealer.
Replacement filter: Type AZ-F900DN
E-17
Filter stopper
AY-XP09DR-N_Eng P6.5 04.3.18, 4:45 PM19

22
1
MAINTENANCE
1Be sure to disconnect the power
cord from the wall outlet or turn
off the circuit breaker.
2REMOVE THE VERTICAL
ADJUSTMENT LOUVRE
1Pull the left cover open.
2Open the lower louver slightly
and rotate the upper louvre un-
til it stops.
3Hold the left side of the lower
louvre and pull it frontward.
Remove it to the lower left di-
rection.
NOTE:
Only the lower louvre can be re-
moved.
3CLEAN THE INTERIOR OF THE
AIR CONDITIONER UNIT
make sure the fan inside is not
rotating.
Remove the dust using a vacuum
cleaner or wipe with dry cloth.
4REINSTALL THE VERTICAL
ADJUSTMENT LOUVRE
1Insert the shaft at the right of
the louvre into the hole of the
unit.
2Put the shaft at the left of the
louvre in the shaft receiver of
the unit.
Make sure the shaft at the cen-
ter of the louvre is placed in the
center shaft receiver of the air
outlet.
3Close the left cover until it
clicks.
5Connect the power cord to the
wall outlet or turn on the circuit
breaker.
CLEANING THE INTERIOR OF AIR CONDITIONER UNIT
E-18
Left Cover
1
2
2
Vertical Adjustment Louvre
(Upper side)
Vertical Adjustment Louvre
(Lower side)
3
3
Shaft
Shaft Receiver
Shaft
Hole
Cover
1
Shaft Receiver
AY-XP09DR-N_Eng P6.5 04.3.18, 4:45 PM20
This manual suits for next models
1
Table of contents
Other IVT Air Conditioner manuals