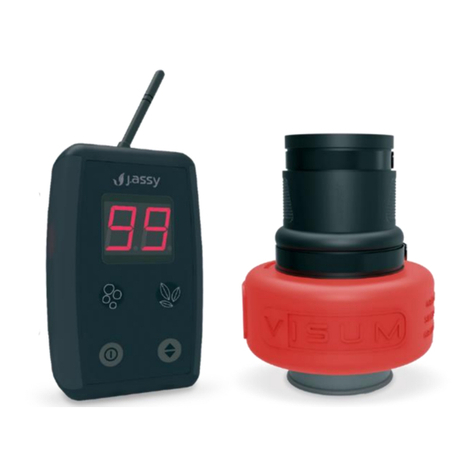
J.ASSY VISUM Monitor User manual

OPERATOR’S
MANUAL

This device contains FCC ID 2AD66-RF2401F20
This device complies with Part 15 of the FCC Rules.
Operation is subject to the followingtwo conditions:
(1) This device may not cause harmful interference, and
(2) This device must accept any interference received,
includinginterferencethatmaycauseundesiredoperation.
For further information, please visit www.fcc.gov.
This device contains IC ID 21278- RF2401F20
IC compliance
ThisdevicecomplieswithIndustryCanadalicense-exempt
RSS standard(s).
Operation is subject to the followingtwo conditions:
(1) This device may not cause interference, and
(2) This device must accept any interference, including
interference that may cause undesired operationof
the device.
Conformité aux normes d’IC
Cet appareil est conforme à la(aux) norme(s) RSS
sanslicence d’Industry Canada.
Son utilisation est soumiseaux deux conditions suivantes:
(1) Cet appareil ne doit pas causer d’interférences et
(2) Il doit accepter toutes interférences reçues, y compris
celles susceptibles d’avoir des effets indésirables
surson fonctionnement.
VISUM
v.4.3
January 2022

Table of
Contents
Specifications ................................................................................... 04
Visum Fertilizer...............................................................................04
J.Assy Monitor................................................................................04
J.Assy ECU.....................................................................................04
Installation Visum............................................................................. 05
Installation Monitor...........................................................................07
Power Connection ..........................................................................08
Network ID..........................................................................................10
Operation ............................................................................................12
Functions description..........................................................................14
F1 | Reading sensor status........................................................14
F2 | Changing the monitor volume ............................................15
F3 | Changing the Screen Brightness........................................15
F4 | Check sensor ID.................................................................16
F5 | Address sensors.................................................................17
F6 | Display the monitor ID ........................................................18
F7 | Customize the Maneuver beep time...................................19
Troubleshooting .............................................................................20
Installation ECU ................................................................................ 22
Requirements .................................................................................22
Steps...............................................................................................23
Network ID......................................................................................24
Adjusting the language...................................................................26
Functions description......................................................................28
J.ASSY Screen ..........................................................................28
Alarm when in another screen...................................................29
Settings......................................................................................30
Deactivate a sensor.................................................................30
Access settings........................................................................31
Set number of rows..................................................................32
Add sensors.............................................................................32
Setting maneuver alarm display ..............................................34
Change password....................................................................36
Troubleshooting table.....................................................................38
Cleaning and Storage.......................................................................41
Warranty ............................................................................................41
Discarding .........................................................................................42

4 | J.ASSY
Specifications
Resistant to dust and water jet.
Radiofrequency communication at 2.4GHz.
GFSK Modulation.
Internal antenna.
Dimension: 71mm (A) x 89mm
(L).Weight: 245g.
Power: 2,5mW to 3,6mW
Internal diameter of the sensor: 45mm.
Wear protection: Stainless Steel.
Outer diameter of the hose:
from 1 1⁄4 to 2 1⁄16”.
Specifications
Radiofrequency communication at 2.4GHz.
GFSK Modulation.
Omni-directional antenna, 5dBi, 50 Ohms.
SMA connector.
Supply voltage: 10Vdc to 30Vdc.
Power: 4 W to 12 W.
Display with 2 character, 7 segments.
2 Red/Green/Flashing Blue LEDs.
Resistant to dust and water splash.
Specifications
Operation Instructions
Radiofrequency communication at 2.4GHz.
GFSK Modulation.
Omni-directional antenna, 5dBi, 50 Ohms,
SMA connector.
Supply voltage: 10Vdc to 30Vdc.
Resistant to dust and water splash.
CAN communication, protocol ISO
11783 (ISOBUS)

VISUM | 5
Installation | Visum
TIP:
•Do not install the sensor
flat. This will cause sensor
wake up issues.
Thesensoris installedbetweenthediffuser/airreleaseandthe
fertilizeroutlethose:
4”
2”
3 4”
2 16”
Choosethecorrectinletandoutletcoupler
for the hose and diffuser diameters.
ASSEMBLY
1. Cut a piece of the hose at the diffuser side with the
length of the sensor-coupler assembly, so that the total
length will be the same as the original hose.
2. Place the sensor with the
internal antenna facing “up”
or “skyward”. The internal
antenna is located to the left
of the square patch with “P”
and “L” between the “J” and
“A” of the word J. Assy. See
illustration.
TIP:
•Do not bend the couplers to install
in your system. That can increase
cloggingor releaseduring use.

6 | J.ASSY
Sensor Assembly
1 2 3 4 5
1.Diffuser,2. Inletcoupler, 3. Outlet coupler,4. Metalclamps,5. Hose.
3. Securelyfastentherubbercouplerswiththemetalclamps1.
Do not “overtighten”. Check the hose clamps after 10
minutes of field operation to ensure everything is snugand
maintaining good connections.
11, 75 em - 2, 75 em x 0312 em x 0021 in.
Recommendations
TIP:
•Do not point or align the sensor antenna
toward a metal barrier, that could degrade the
communication efficiency from the sensor to
the monitor.
ATTENTION:
•Do not install the sensor upside down.
Installation must match the orientation in the
pictures below.
Flow Direction Flow Direction

VISUM | 7
Installation | Monitor
1. Disassemble the Monitor bracket by removing the two side
nuts.
2. Cleantheinstallationsurfacewithaclothandalcohol.
3. Removethefilm fromthedouble-sided tape and fasten the
brackettothesurfaceby pressingthewholeareaof thetape.
4. Wait for 15 minutes and then mount the Monitor on the
bracketwiththetwosidenuts.
5. If you install the bracket on a glass surface, putthe anti-UV
tape on the opposite side of the glass in order to protectthe
double-sidedtapefromthesun.
6. Press the button to turn on the Monitor and hold it for5
secondsto turnitoff.
Alternatively, the tape may be removed to mount the bracket
withscrewsorattachedtoa barwithclampsorRAMMountkit
(notincluded).
ATTENTION:
TheMonitorshould be installed with the antenna
in a vertical line and avoid putting theantenna in
the horizontal position.
The Monitor should be installed with the best
possible line of sight to the sensors in order to
avoidcommunicationproblems.
Avoid installing the monitor close to the cab
ROPS column. Keep a minimum distance of
12 in.between monitorand column.

8 | J.ASSY
1a.
1b.
The power cable must be connected to 12Vdc to 24Vdc
power source.
CONNECTING TO A POWER PLUG INSIDE THE
TRACTOR CAB
The installation kit will
not be used, but rather a
manufacturer harness (not
included) will be needed.
Cut the power cable
excessand mend the wires
with the manufacturer
harness.
CONNECTING TO THE TRACTOR BATTERY
•Use the included installation kit detailed below.
Power Connection
2a
2b
2c
2d

VISUM | 9
•Theredconnectormustbeprotectedwithself-fusingtape.
•Preferably,thepowercableshouldbeconnecteddirectly
to the battery terminals.
ATTACH THE ANTENNA
•You will find the antenna inside your
Monitors box.
•Attach it to the back of the Monitor by
threading on the connection. Do not
“over-tighten”.
•Position the antenna so that it is in
a vertical orientation.
ATTENTION:
•Do not disconnect any other cables attachedto
the tractor battery. It may affect the
functionalityofotherelectronics.

10 | J.ASSY
All sensors must be configured with the network ID in
order to communicate with the Monitor. The network ID
can be found on the back of the Monitor or can be extract
ed thru operation software. The sensor configuration can
be done with a Visum Monitor. Check how it can be done
in this manual.
The following steps must be done:
2. Wake up the sensor by shaking it.
3. Place the magnet on the address indicator
(make circular movement to easily turn on the
internal switch).
4. Wait for the confirmation beep or message.
5. Fillthe address indicator with the number of
the implement and row.
Network ID
1. Find the address indicator onthe rubber cover.
ATTENTION:
Never configure two sensors at the same time,
even with two different devices, because the
connectionsmaycrosseachother.
TIP:
1.
In order to change the address ofanysensor,
just follow the steps again, before doing the
sensor “addressing procedure”.
2.When installing the sensors on your machine
initially, we recommend you “address” the
sensors to the monitor on your workbench
first before installing the sensors on the
toolbar row units.

VISUM | 11
TIP:
4. Line up all your sensors on the workbench
and write the row number on each first.
Then add all the couplers and hose clamps.
5. Then you can either power up the monitor at
the workbench with a 12V battery to
complete the “Addressing” procedure, or
carry the sensors to your tractor cab where
you have installed the Monitor to complete
the “Addressing” procedure.
6. After that install the sensors on the
toolbar/row unit at the air diffuser/airrelease.
We recommend you install with the row
numbers running from the left to theright
(standing behind the toolbar facingthe tractor
cab) beginning with 1 to 99,ormanyrowsyou
havetomonitor.
7. Do not mount the monitor in the cab using a
large high-powered magnet mounting kit or
place a magnet near the monitor as it can
cause the monitor to fail.
This is the areawhere you“ADDRESS” the sensor with the
magnet that is included with the sensor.

12 | J.ASSY
•The Visum Monitor communicates
with the flow sensors, indicating the
presence or absence / blockage
offlow.
•When you turn on the monitor the
monitor should display a “00“on
display and both LEDs should be
OFF, indicating thatno sensor has
communicatedwith the monitor. That
will happen every time that you turn
on your monitor.
•Under normal conditions (sensors
communicating and indicating flow),
the display should show two dashes
and the LEDs of respected function
(fertilizeror seed) will show green,
indicatingthat everything is Ok.
•The Monitor communicates only with
sensors assigned to its ID, which is
on a label on the back oftheMonitor.
•In case of flow failure (absence or
blockage), the Monitor will beep and
the display will show the row number.
The LED related to the product flow
(seed or fertilizer) will
turn red.
Operation

VISUM | 13
•If the sensor loses communication
for more than 5 minutes themonitor
will indicate missing sensor. In that
case the monitor will beep and the
display will show the row number.
Also, the LED related to the
product flow (seed or fertilizer) will
blinkblue.
•In case ofMANEUVER2,a light will be whirling onthe
display and the LED related to the flow product (seed
or fertilizer) will turn green.
•The monitor willenter MANEUVER state if 75% of the
rows (or more than 8 sensors, if the implement has
morethan12rows)indicatingno flowatthesametime
•The Monitor will exit maneuver state when more than
50%of the sensors indicate the presence offlow.
•Toextend the life ofthe internal batteries, flow sensors
are “sleeping” when they are not used. They wake up
only when they detect motion, like when the
implement moves, and the Monitor is on.
*The VERSION is shown every time that you turn your Monitor
ON.
2MANEUVER state is typically when you are maneuvering on the
headlands making turns or similar maneuvering situations when
the fertilizer is not expected to be flowing. It can be detected as
MANEUVER state if you turn off one section.
TIP:
Each timethatthe monitoristurned on,checkif
all the sensors are present after 2 minutes of
use.Usefunction F1 to do this.
ATTENTION:
If the monitor enters the MANEUVER state
during field operation check if there is a problem
with the whole section.

14 | J.ASSY
F1 | Reading sensor status
When entering the screen, it shows which
sensors are present and the rows with
their respective state.
The monitor should present on the screen
the ordered listof rows and their connected
sensors starting with the lowest number
and the time between the increment of the
row information should be shown in 2 seconds. All states
shown must be the sensors BEFORE switching state.
When increasing the row number, the monitorshould show
the corresponding state of the fertilizer or seed row on the
respective LEDs. If the monitor does not have a seed or
fertilizer sensoron the row, the LEDs should be off, otherwise
itshould follow the following logic:
Green
Sensor
with flow
Red
Sensor with
flow failure/
blockage
Flashing
BlueSensor
Missing3
3 Missing sensor is when the monitor does not receive a signal from that
sensor for more than 5 minutes.
Functions description
OUTPUT CONDITIONS:
The user can cancel the process at any time
by pressing for 5 seconds. After listing all
sensors, the function automatically returns to
the device’s operation screen.

VISUM | 15
F2 | Changing the monitor volume
Upon entering the screen, itshows the current volume
level and allows change.
The monitor should show the current volume level and
allow adjustments when clicking
When clicking on the user will switch between the
available levels and ateach change a triple beep will be
triggered to present the chosen volume.
The confirmation of a new selected level is made after
the user clicks the . After the confirmation click, the
monitor should present the selection confirmation by
presenting the text “OK” and going to the initial screen.
Volumechanges can be made between the options
below:
A1: Mute - no beep to present to the user
A2: Low level
A3: Medium level (factory default
value)
A4: High level
F3 | Changing the Screen Brightness
Upon entering the screen, it shows the current brightness
level and allows change.
The monitor should show the current brightness level and
allowyou to change itby clicking
When clicking on the user will switch between the
available levels and with each change the brightness on
the screen will be updated.
OUTPUT CONDITIONS:
The user can cancel the process at any time by
pressing for 5 seconds.
If the user does not choose or cancel the
function, it will exit automatically in 60 seconds
andmaintainthepreviousadjustment.

16 | J.ASSY
The confirmation of a new selected level is made after the
user clicks
After the confirmation click, the monitor should present
the selection confirmed by presenting the text “OK”and
going to the initial screen.
When changing the brightness, the monitor will show
the selected LED brightness showing the fertilizer
LED in Green and the seed LED in Red.
Brightness changes can be made thru the options
below:
B1: Lowlevel
B2: Medium level (factory default value)
B3: High level
F4 | Check sensor ID
When entering the screen, the two decimal points on
the display will show and the two LEDs in white will
be lit, after 1 second the display will blink and the
central segments of the two displays willblinkevery 1
second: “-“and “-”, both LEDs remain litin white.
When entering the function, the monitor should start the
process of requesting a radio ID, asking for the ID every
1 second.
In this mode, the user needs to bring the magnet closer
to the sensor to perform the reading.
OUTPUT CONDITIONS:
The user can cancel the process at any time by
pressing for 5 seconds.
If the user does not choose or cancel the
function, it will exit automatically in 60 seconds
andmaintainthepreviousadjustment.

VISUM | 17
Upon receiving the message that sensor was
addressed, the monitor should turn on the GREEN
LED corresponding to the and present the information
on thedisplay as follows (with a 1 second interval
betweenthem):
The sensor IDwill bedisplayed three times.
F5 | Address sensors
Entering the function allows you to add a new sensor to
your sensor list.
Using , the row number is increased, the user must
select the row number to be added, the monitor will
present the row number that will be addressed with the
LEDs off. The monitor should also have a rapid increment
if is pressed for more than 1 second, until it is
released, with an increase of 5 positions persecond.
When selecting the row number to be addressed, the
user must press to confirm the selection.
During addressing, theLEDs should flash in white, while
the DISPLAY displays the row number to be addressed
statically.
In this mode, the user needs to bring the magnet to the
sensor in a circular manor to perform the addressing.
OUTPUT CONDITIONS:
After presenting the data, the monitor should
exit the function.
Theusercancancel theprocess at any timeby
pressing for 5 seconds.
The maximum time to remain within this
function is 60 seconds.

18 | J.ASSY
After addressing the sensor, the monitor shows the
message “Ok” on the display and turns on the LED
corresponding to the sensor type in green, the user
needs to confirm the addressing by clicking .
When the addressing is successful, the monitor will go
to the row selection with the incremented value of 1,that
is, if the addressing of row 3 was successful, it will now
be ready to address row 4, waiting only for the user’s
confirmation by same procedure.
F6 | Display the monitor ID
Upon entering the function, the monitor willbegin the
process of presenting the ID.
Upon entering the function, the monitor willshow its own
ID.
On this screen, the monitor will keep the two LEDs off
andpresent ID information on the display, with an
interval of 1 second, in the form:
OUTPUT CONDITIONS:
The user can cancel the addressing process
at any time by pressing the for 5 seconds,
and the monitor will return to the row selection
screen, if is pressed again for 5 seconds
the monitor returns to the device’s operation
screen.
OUTPUT CONDITIONS:
After presenting the data, the monitor should
exit the function.
Theusercancancel theprocessat any timeby
pressing for 5 seconds.
The maximum time to remain within this
function is 60 seconds.

VISUM | 19
F7 | Customize the Maneuver beep time
When entering the function, the monitor will present the
current maneuver beep time on the display.
The user will beable to increase the value by pressing
if it remains pressed for more than 1 second, it should
increase rapidly at the rate of 5 per second, until the
buttonisreleased. The increment ofthis time is from 1 to
99 seconds. When the value reaches 99 it should turn to
1 again.
Toconfirm the selected value, press
OUTPUT CONDITIONS:
After confirming theselected time, the monitor
will exit the function.
Theusercancancel theprocessat any timeby
pressing for 5 seconds.

20 | J.ASSY
Symptom
Possible Cause
Monitor doesn’t turn on.
Badpower supply.
No soundfromMonitor.
Wrong configuration.
Weak numberson display.
Wrong configuration.
Nocommunicationfromone
sensor(notshownonF1listand/
oralarmwithorangeLED).
Sensor is not on thenetwork.
No communication from
severalsensors
(not shown on F1 list
and/oralarm with orange
LED).
Bad network signal.
No antenna is attached to
the Monitor.
Maneuver state occurs
during normal operation.
Several sensors informed no
flowstatus.
If you need more assistance please contact our
technical team to help you.
Troubleshooting table
Other manuals for VISUM Monitor
5
Table of contents
Other J.ASSY Farm Equipment manuals