Jabbla Tellus 5 User manual

Tellus 5

© Copyright Jabbla
All rights reserved. No part of this publication may be reproduced, transmitted, transcribed, stored in an automated retrieval system or translated into
any language or computer language in any form or by any means, either electronically, mechanically, optically, chemically, manually or in any other
way without the prior written consent from Jabbla.
This document is a translation of the originalDutchuser manual.
Version 20180521

Tellus 5
Content
A Introduction 3
1 Introduction.............................................................................................................................................................4
2 Intended use............................................................................................................................................................4
3 Prohibited use......................................................................................................................................................... 4
4 Service life............................................................................................................................................................... 4
5 The type plate......................................................................................................................................................... 4
6 Technical data......................................................................................................................................................... 4
B Description and operation 6
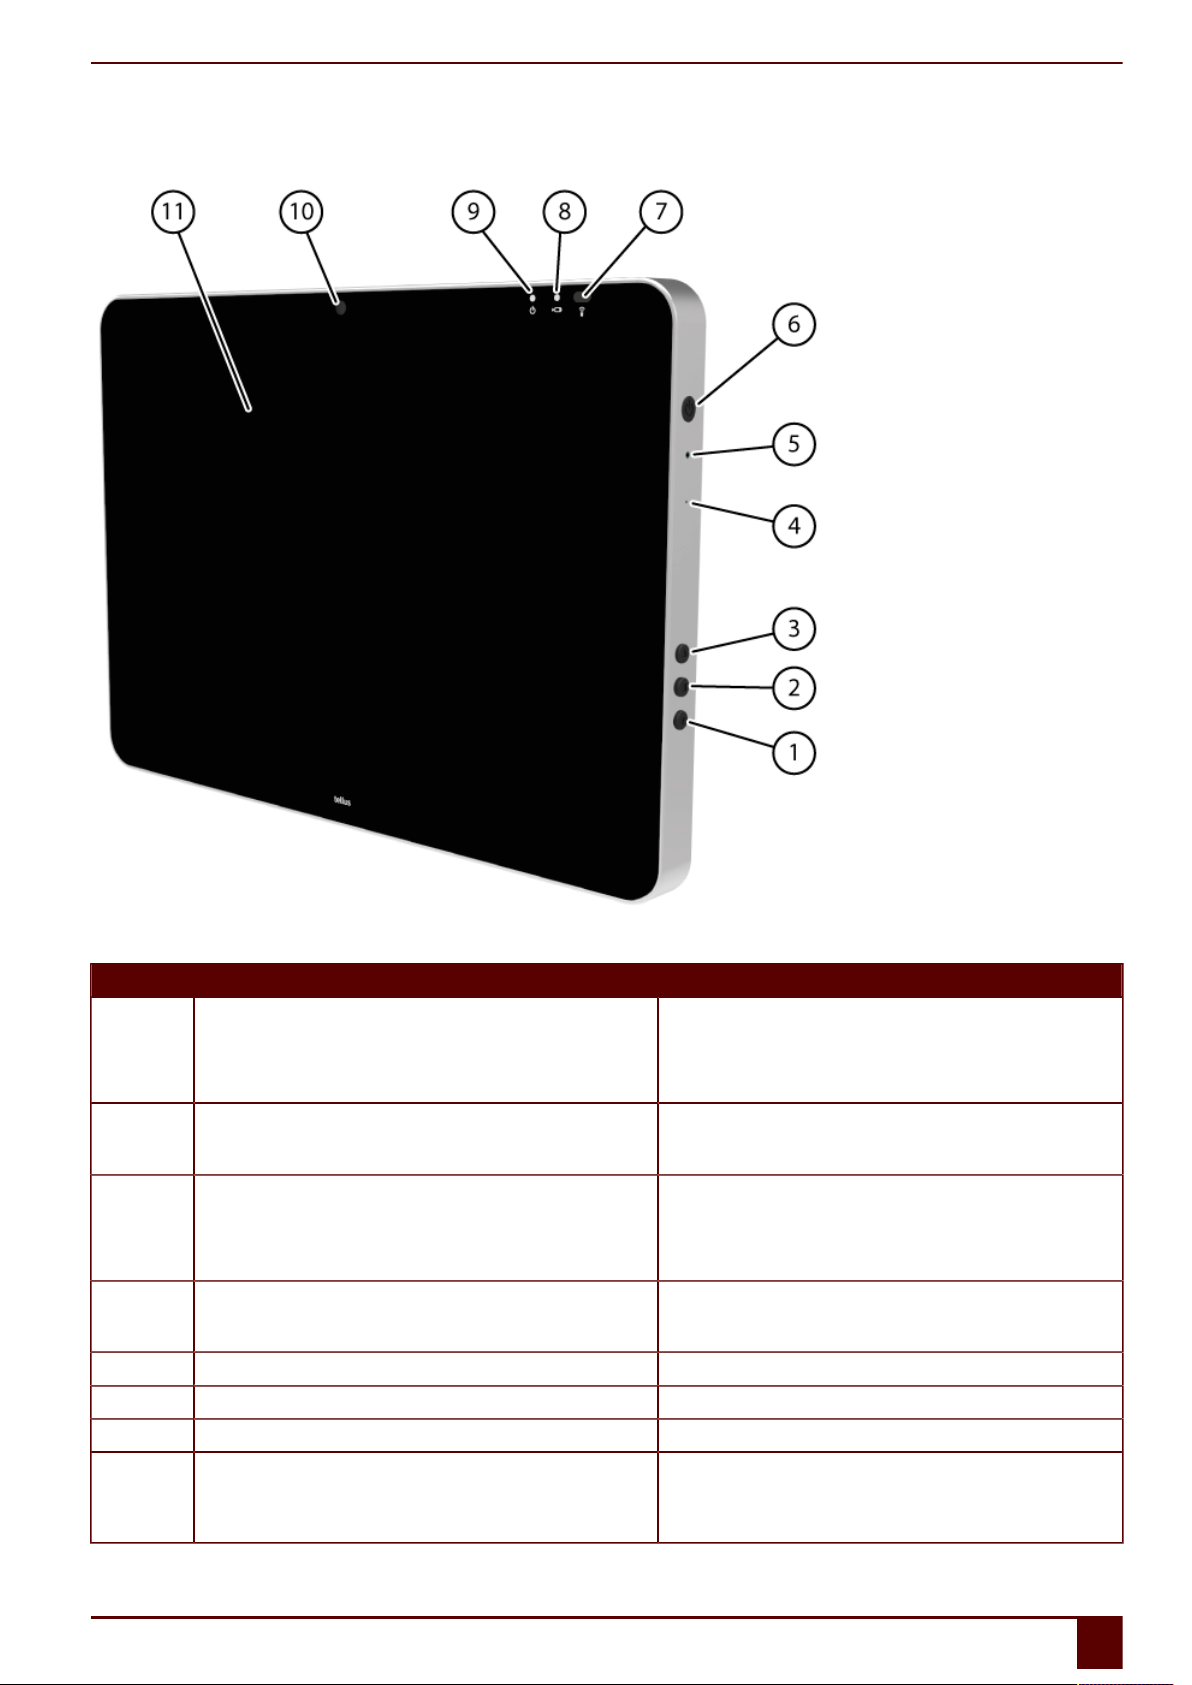
1 Introducing the Tellus 5......................................................................................................................................... 7
2 Operation.................................................................................................................................................................9
3 Accessories and options.........................................................................................................................................9
C Safety 10
1 Safety..................................................................................................................................................................... 11
D Getting started 12
1 What's in the box?................................................................................................................................................ 13
2 First use..................................................................................................................................................................13
3 Storing the device for an extended period........................................................................................................13
E Control 15
1 Starting up the device..........................................................................................................................................16
2 Charging the device............................................................................................................................................. 16
3 Viewing the power status.................................................................................................................................... 16
4 Control options..................................................................................................................................................... 17
4.1 Touch-screen control...........................................................................................................................................................................................................................17
4.2 Mouse control........................................................................................................................................................................................................................................18
4.3 Scan control............................................................................................................................................................................................................................................18
4.4 Keyboard control.................................................................................................................................................................................................................................. 18
4.5 Using the on-screen keyboard........................................................................................................................................................................................................ 18
4.6 Eye control...............................................................................................................................................................................................................................................19
5 Making calls and sending and receiving text messages with the Tellus 5...................................................... 19
5.1 Making a call with the Tellus 5....................................................................................................................................................................................................... 19
5.2 Sending and receiving text messages with the Tellus 5....................................................................................................................................................... 19
5.3 Making calls / sending text messages with the Tellus 5 via an external telephone................................................................................................... 19
5.4 Making calls with the Tellus 5 via the internal telephone....................................................................................................................................................19
5.5 Sending text messages with the Tellus 5 via the internal telephone.............................................................................................................................. 20
5.6 Using the sample le for phone.....................................................................................................................................................................................................20
5.7 Using the sample le for SMS messages.....................................................................................................................................................................................21
5.8 Setting the Tellus 5 phone options (external telephone).....................................................................................................................................................22
5.9 Setting the Tellus 5 phone options (internal telephone)......................................................................................................................................................23
5.10 Connecting the external phone to the Tellus 5....................................................................................................................................................................... 23
5.11 Determining the Android version of your smartphone........................................................................................................................................................ 23
5.12 Downloading and installing the Jabbla BT app....................................................................................................................................................................... 23
6 Linking the Eddy to the Tellus 5......................................................................................................................... 24
7 Using the environmental control of the Tellus 5 (optional)............................................................................. 24
8 Putting the Tellus 5 in sleep mode..................................................................................................................... 24
1

Tellus 5
9 Waking the Tellus 5 from sleep mode................................................................................................................ 25
10 Resetting the Tellus 5...........................................................................................................................................25
11 Shutting down the Tellus 5..................................................................................................................................26
F Settings 27
1 Setting the side buttons...................................................................................................................................... 28
2 Switching the speakers on or off........................................................................................................................ 28
3 Setting the speaker volume................................................................................................................................ 28
4 Switching the headphones on or off.................................................................................................................. 29
5 Switching the microphone on or off...................................................................................................................29
6 Setting the microphone volume......................................................................................................................... 29
7 Starting up the device using a switch................................................................................................................ 29
8 Setting up the switches....................................................................................................................................... 30
9 Putting the device into ight mode................................................................................................................... 30
10 Enabling wireless Internet................................................................................................................................... 30
11 Enabling Bluetooth...............................................................................................................................................30
12 Enabling a mobile phone.....................................................................................................................................30
13 Automatically disabling the USB ports in sleep mode..................................................................................... 31
14 Disabling sleep mode...........................................................................................................................................31
15 Testing the switches............................................................................................................................................. 31
16 Setting the language of the Tellus menu...........................................................................................................32
17 Shutting down the Tellus menu.......................................................................................................................... 32
18 Activating the Tellus menu..................................................................................................................................32
19 Show or hide Tellus icons in the system tray.....................................................................................................32
20 The battery alarm settings.................................................................................................................................. 32
21 Inserting a SIM card (optional)............................................................................................................................33
G Maintenance and troubleshooting 35
1 Maintenance..........................................................................................................................................................36
1.1 Repairs.......................................................................................................................................................................................................................................................36
1.2 Cleaning the device.............................................................................................................................................................................................................................36
1.3 Replacing the battery......................................................................................................................................................................................................................... 36
2 Troubleshooting....................................................................................................................................................37
2.1 Finding the device serial number.................................................................................................................................................................................................. 37
2.2 Finding the Tellus menu version.................................................................................................................................................................................................... 37
2.3 Finding the PIC version......................................................................................................................................................................................................................37
2.4 Checking the version and serial number of Mind Express...................................................................................................................................................37
2.5 Showing the battery info.................................................................................................................................................................................................................. 38
2.6 Troubleshooting.................................................................................................................................................................................................................................... 38
H Decommissioning and disposal 39
1 Decommissioning..................................................................................................................................................40
2 Disposal..................................................................................................................................................................40
Index 41
2

Tellus 5
A Introduction
3

Tellus 5
1 Introduction
The Tellus 5 is a versatile, symbol supported communication tool based on the Mind Express graphic communication program. The Tellus 5 runs on the
Windows 10 operating system.
TIP
If you are not familiar with Windows, we advise that you only perform the actions described in this user guide and in the user guide of the Mind Express
program.
The Tellus 5 has a bright 13.3 inch display with high resolution and a capacitive touch screen. Switches can be connected directly, and the JabblaIR IR remote
control is an option. During the development of the Tellus 5, a lot of attention was paid to the casing. Not only is the screen area waterproof, but the design
guarantees optimum acoustics and robust protection of the internal computer platform. Additional USB ports can be found at the rear and bottom of the device.
To make optimal use of the Tellus 5, we recommend that you read this user guide carefully before using the device. A basic knowledge of the Mind Express
program is recommended. The Tellus 5 user guide regularly refers to the use of Mind Express.
2 Intended use
The device has a communication supporting function. This device is intended for general use in everyday life for people (from the age of 3) with a
communication disorder (who are not able to speak or cannot speak clearly). Users must have adequate motor and mental abilities to use the device.
3 Prohibited use
The device must not be used for clinical, therapeutic or diagnostic purposes.
4 Service life
The expected service life of the device is 5 years.
5 The type plate
You will find the type plate with the serial number of the device on the rear panel.
6 Technical data
Specication Explanation
Processor Intel® Core™ i5-4300U
Operating system Microsoft Windows® 10
Hard drive 240 GB SSD
Internal memory 4 GB DDR3
Screen Bright 13.3 inch WXGA LED touch screen display
•1280 x 800 pixels
USB 3 x USB 2.0
Battery Li-Ion battery
Weight 2,750 g (6.06 lbs)
Dimensions •Width: 33.02 cm (13 inch)
•Height: 24.13 cm (9.5 inch)
•Depth: 2 cm - 3.81 cm (0.79 - 1.5 inch)
Webcam Integrated in the screen.
Mounting Mounting plate for DAESSY mounting system, VESA 75 compatible.
Connectivity WLAN, Bluetooth
A Introduction
41 Introduction

Tellus 5
Specication Explanation
Audio •1 integrated microphone
•2 integrated speakers
Switches 2 (programmable)
A Introduction
6 Technical data 5

Tellus 5
B Description and operation
6

Tellus 5
1 Introducing the Tellus 5
Figure 1: Tellus 5 front view
N° Identication Explanation
1 Bottom button This button is programmable. A standard, the following function is
programmed:
•Short press and hold: the Windows function Master Volume
Down
2 Middle button This button is NOT programmable, but can be disabled. Press this
button briefly to simulate a rightclick at the next touch off the screen.
Press and hold this button for 1.5 seconds to simulate an ESCAPE.
3 Top button This button is programmable. A standard, the following function is
programmed:
•Short press and hold: the Windows function Master Volume
Up
4 Microphone opening This is the microphone opening which is used for sound to reach
the device's internal microphone when recording. The Tellus 5 has 1
integrated microphone.
5 Reset This button is used to reset the device.
6 On/off button This allows you to switch the device on/off or revert to sleep mode.
7 Infrared receiver The infrared receiver is used to record the infrared codes.
8 Battery charge indicator The battery charge indicator lights up as soon as the device is
connected to the mains through the supplied power adapter. The
indicator is amber while charging. The indicator changes to green as
soon as the battery is charged.
B Description and operation
1 Introducing the Tellus 5 7

Tellus 5
N° Identication Explanation
9 On/off indicator The on/off indicator shows the status of the device:
•no indicator light showing: device is switched off
•red: battery capacity below 20%
•amber: battery capacity is between 20% and 50%
•green: battery capacity is higher or equal to 50%
10 Webcam The device has a camera for taking photos and videos.
11 Touch screen The device has a 13.3 inch touch screen.
Figure 2: Tellus 5 rear view
N° Identication Explanation
12 Connection to power supply This connection is to charge the device using the power adapter
included.
13 Connection switch 1 This input is for connecting switch 1.
14 Connection switch 2 This input is for connecting switch 2.
15 Tray stand The Tellus 5 has a folding stand. The stand is designed so that
the device can be ergonomically supported on a tray. In its folded
configuration, the stand is securely held in place by a magnet.
16 USB 2.0 The USB port allows you to connect USB-compatible devices and
peripherals such as a mouse, keyboard, printer, ...
17 Mounting plate Mounting plate for DAESSY mounting system, VESA 75 compatible.
18 Jack for headphones This output is for connecting headphones to the Tellus 5. The speakers
are not automatically disabled when you connect the headphones.
Headphones and speakers are controlled through the software.
19 USB 2.0 The USB port allows you to connect USB-compatible devices and
peripherals such as a mouse, keyboard, printer, ...
20 USB 2.0 The USB port allows you to connect USB-compatible devices and
peripherals such as a mouse, keyboard, printer, ...
21 Speakers The device has a number of powerful loudspeakers.
B Description and operation
81 Introducing the Tellus 5

Tellus 5
N° Identication Explanation
22 Fan vent This opening is for additional cooling to the Tellus 5. Be sure to keep
this opening unobstructed!
23 Infrared transmitter This transmits infrared signals to other devices.
2 Operation
The Tellus i5 is a versatile, symbol supported communication tool based on the Mind Express graphic communication program. Thanks to the Mind Express,
voice messages can be created by selecting images and/or symbols. Selection is done by:
•touch screen
•mouse
•keyboard
•switches
•eye control
•head control
The Tellus i5 has a clear 13.3" high resolution touch screen.
The Tellus i5 runs on the Windows 10 operating system.
TIP
If you are not familiar with Windows 10, we advise that you only perform the actions described in this user guide and in the user guide of the Mind Express
program.
The device is equipped with an infrared receiver and an infrared transmitter. This enables you to control devices such as televisions, radios, DVD players using
infrared codes.
3 Accessories and options
•Making calls via SIM card
•Infrared receiver and transmitter
B Description and operation
2 Operation 9

Tellus 5
C Safety
10

Tellus 5
1 Safety
CAUTION
When mounting the device to a wheelchair, ensure that the unit is securely fastened and additionally locked, so that it cannot accidentally fall at the
slightest shock or impact.
NOTE
The device uses a Li-ion battery. Do not dispose of the battery in the usual way when replacing it. Keep to the waste regulations that apply in your region.
You can always return the battery to your supplier.
NOTE
If you are not using the device for a longer period of time, always store it with the battery fully charged. Ensure that the unit is switched off.
CAUTION
Avoid heat sources in the vicinity of the device, or areas that may become particularly hot. For example, in summer it can become very hot in a car.
Temperatures that are too high may adversely affect the performance of the battery life.
CAUTION
The device is not watertight, but it has been designed in such a way that the screen area is splash-proof. At the rear there are openings for the
loudspeakers that could allow moisture or dirt to enter. This may affect the quality of the loudspeakers. Always try and avoid situations that could cause
moisture or dirt to enter the loudspeaker openings. Also take precautions when cleaning the device and always follow the cleaning instructions.
CAUTION
Do not use the tray stand as a handle for carrying the device! By using the tray stand as a carrying handle, it may detach from the device, causing the
device to fall and possibly sustain damage.
The Tellus 5 is equipped with WLAN and Bluetooth. Please observe the following safety precautions:
CAUTION
Do not use the device on a plane. Switch off the device.
CAUTION
Do not use the device in the hospital in the vicinity of medical electronic devices. The transmitted radio waves may affect the equipment.
CAUTION
Do not use the device in an environment where flammable gases are present (such as gas stations).
C Safety
1 Safety 11

Tellus 5
D Getting started
12

Tellus 5
1 What's in the box?
The device is supplied with the following parts:
•carry case
•power supply with plug and cable
•USB input panel
•USB mouse
•USB stick
•operating instructions
•Mind Express (2 software licenses + Quick Start Guide)
2 First use
1. Connect the supplied power adapter between the device (12) and the power supply.
The battery charge indicator (8) will light up and remain amber while charging. As soon as the battery is fully charged, the indicator light changes to green.
Figure 3: The battery charge indicator
2. If the device is equipped with the functionality to make calls via the internal telephone (option), you must insert the SIM card. See Inserting a SIM card
(optional) on page 33.
3. Start the device. Press the on/off button (6).
Figure 4: On/off button
During the device startup the on/off indicator will light briefly at one second intervals. Once the device has started up and is ready for use, the on/off
indicator will stay on.
3 Storing the device for an extended period
1. Shut down the device.
NOTE
The device must not be in sleep mode! In sleep mode the on/off indicator lights briefly every 4 seconds.
D Getting started
1 What's in the box? 13

Tellus 5
2. Fully charge the device.
3. Place the device in the carry case.
4. Store the device with carry case in a dry place at room temperature (20 °C / 68 °F).
5. Fully charge the battery every 6 months.
If you allow the battery to get empty, the device will no longer start.
D Getting started
14 3 Storing the device for an extended period

Tellus 5
E Control
15

Tellus 5
1 Starting up the device
Press the on/off button (6) of the device.
If the device was in sleep mode, it can be used immediately. If the device was switched off, then Windows must be started first.
See also
Shutting down the Tellus 5 on page 26
Resetting the Tellus 5 on page 25
2 Charging the device
The amount of time you can use your device without needing to charge it depends greatly on how you use it:
•the audio volume
•the time set before the device reverts to sleep mode
•your Bluetooth and WLAN use
If the device is used a lot, it is recommended to recharge the device daily. To do this, use only the supplied power adapter. The device can still be used while
charging.
1. Check the power status. See Viewing the power status on page 16.
2. Connect the supplied power adapter between the device (12) and the power supply.
The battery charge indicator (8) will light up and remain amber while charging. As soon as the battery is fully charged, the indicator light changes to green.
Figure 5: The battery charge indicator
See also
Viewing the power status on page 16
The battery alarm settings on page 32
Replacing the battery on page 36
Showing the battery info on page 38
E Control
16 1 Starting up the device

Tellus 5
3 Viewing the power status
1. View the on/off indicator (9) on the device.
2. The on/off indicator may show the following colors:
Color of indicator Explanation
Green Battery capacity is higher or equal to 50%
Amber Battery capacity between 20% and 50%
Red Battery capacity is below 20%
NOTE
To obtain a quick view of the remaining battery capacity, move the mouse pointer over the battery icon in the system tray. The remaining
percentage is displayed.
See also
Charging the device on page 16
The battery alarm settings on page 32
Replacing the battery on page 36
Showing the battery info on page 38
4 Control options
4.1 Touch-screen control
The way to make a selection on the screen can be customized by the user. See Help in Mind Express.
NOTE
Check that the protective film has been removed from the device.
CAUTION
Do not use sharp tools, to prevent scratching the touch screen.
NOTE
Tap with your finger, not with your fingernail!
CAUTION
Make sure the touch screen does not come into contact with water.
Use the following techniques to operate the touch screen:
Action Technique
Left click Tap once on the object with your finger.
Double-click Give two short,quick taps on the object with your finger.
Dragging To move a (draggable) object, touch the object and drag it to the desired
location.
Right-click •Touch the object and continue to hold that position until a circle
appears around the object. Then release the object to generate the
rightclick.
E Control
4 Control options 17

Tellus 5
Action Technique
•Press the center button on the side and then touch the object. After
selecting, the left mouse button is active again. This does not work if
the center button is disabled.
See Setting the side buttons on page 28.
NOTE
The option to drag in communication grids, can be set in Mind Express.
See also
Mouse control on page 18
Scan control on page 18
Keyboard control on page 18
Using the on-screen keyboard on page 18
4.2 Mouse control
The Tellus 5 can be operated with a mouse (or via head control, eye control). The device has several USB ports for connecting a USB-compatible mouse.
To activate the mouse control, select Mind Express Edit > Mouse.
To change the mouse control settings, select Mind Express Tools > Mouse selection....
TIP
For more information on activating and setting up the mouse control in Mind Express, see Help in Mind Express.
See also
Touch-screen control on page 17
4.3 Scan control
The Tellus 5 can be operated in Mind Express by scanning. In Mind Express, you can specify how you want to scan. For scanning, 1 or 2 switches that are
directly connected to the Tellus 5 (13) (14) can be used.
To activate scan control, select Mind Express Edit > Scanning.
To edit the scanning settings, select Mind Express Tools > Scanning selection....
TIP
For more information on activating and setting up the scanning control in Mind Express, see Help in Mind Express.
NOTE
To exit scan mode, you need to hold and press the middle button (2) for 1.5 sec. Or you can use the ESC key on a connected input panel.
See also
Touch-screen control on page 17
Mouse control on page 18
Keyboard control on page 18
Using the on-screen keyboard on page 18
4.4 Keyboard control
The device has several USB ports for connecting a USB-compatible keyboard. The Tellus 5 also features an on-screen keyboard.
See also
Touch-screen control on page 17
Mouse control on page 18
Scan control on page 18
Using the on-screen keyboard on page 18
4.5 Using the on-screen keyboard
In addition to a USB compatible keyboard, you can choose to use the on-screen keyboard.
1. Do one of the following:
▪Tap the screen. Along the left border of the screen, the edge of the on-screen keyboard will appear. Swipe the edge of the on-screen keyboard
towards the center of the display.
E Control
18 4 Control options
Other manuals for Tellus 5
1
Table of contents
Other Jabbla Conference System manuals