Jackery Explorer 2000 Plus User manual

Version: JAK-UM-V1.0
Model: JE-2000C
Contact us:
1-888-502-2236(US)
USER MANUAL
Jackery Explorer 2000 Plus


Congratulations on your new Jackery Explorer 2000 Plus. Please read this manual carefully before
using the product, particularly the relevant precautions to ensure proper use. Keep this manual in an
accessible place for frequent reference.
In compliance with laws and regulations, the right of final interpretation of this document and all
related documents of this product resides with the Company.
Please kindly notice that no further notifications will be given in case of any update, revision or
termination.
TECHNICAL SPECIFICATIONS
01
※USB Type-C and USB-C are registered trademarks of USB Implementers Forum.
※Qualcomm Quick Charge is a product of Qualcomm Technologles,Inc. and/or its subsidiaries.
Qualcomm and Quick Charge are trademarks or registered trademarks of Qualcomm Incorporated.
® ®
CERTIFICATIONS
4x AC Output
1x AC Output
AC Total Output
1x AC Expansion Port
1x DC Expansion Port
2x USB-C Output
2x USB-A Output
1x Car Port
120V~ 60Hz, 20A Max
120V~ 60Hz, 25A Max
3000W Max, 6000W surge peak
120V~ 60Hz, 25A Max
32.2V-50.4V⎓97A Max
100W Max, 5V⎓3A, 9V⎓3A, 12V⎓3A, 15V⎓3A, 20V⎓5A
Quick Charge 3.0, 18W Max, 5-6V⎓3A, 6-9V⎓2A, 9-12V⎓1.5A
12V⎓10A Max
GENERAL INFO
Product Name
Model No.
Capacity
Weight
Dimensions
Cycle Life
Jackery Explorer 2000 Plus
JE-2000C
Lithium-ion 45.6Ah/ 44.8V DC (2042.8Wh)
About 61.5 lbs/ 27.9 kg
18.6 x 14.1 x 14.7 in/ 47.3 x 35.94 x 37.36 cm
4000 cycles to 70%+ capacity
OUTPUT PORTS
INPUT PORTS
Charge mode AC input
Bypass mode AC input/output
DC Input
120V~ 60Hz, 15A Max
120V~ 60Hz, 12A Max
2x DC 8mm Ports: 11-17.5V (Working Voltage)⎓8A Max,
Double to 8A Max;
17.5-60V (Working Voltage)⎓12A Max, Double to 24A/1400W Max
0~45°C (32~113 °F)
-10~45°C (14~113°F)
ENVIRONMENTAL OPERATING TEMPERATURE
Charge Temperature
Discharge Temperature

MODIFICATION: Any changes or modifications not expressly approved by the grantee of this
device could void the user’s authority to operate the device.
PACKAGE LIST
02
GET TO KNOW YOUR GEAR
Product Appearance
AC Output
AC Output
AC Button
DC Button
Main Power Button
USB-C Output
USB-A Output
DC Input
AC Input
AC Input Reset Button DC Expansion Port
(Connect to Battery Pack)
AC Expansion Port
(Connect to another
Explorer 2000 Plus)
(Press the button on the retractable
handle and pull to extend)
Car Port
Version:JAK-UM-V1.0
Model:JE-2000C
Contactus:
1-888-502-2236(US)
USER MANUAL
Jackery Explorer 2000 Plus
Retractable Handle
Jackery Explorer
2000 Plus
1
User
Manual
Accessories
Bag
5 6
AC Charge
Cable
32
Car Charge
Cable
DC7909 to DC8020
Adaptor x 2
4

03
Battery Power Indicator
When the product is being charged, the orange circle around the battery percentage will
light up in sequence. When charging other devices, the indicator will show the battery level.
Low Battery Indicator
When the battery is less than 20%, the Low Battery Indicator will stay on. When less than
5%, the Low Battery Indicator will flash. When it is being charged, the Indicator will be o.
Energy Saving Mode
To avoid forgetting to turn o the output which results in battery consumption, the product
turns the Energy Saving Mode on by default. This occurs when no device is connected or
the connected device is less than or equal to a certain value. (Refer to the table below for
more details), the device will automatically turn o all outputs after 12 hours.
Battery Saving Mode: When this feature is enabled, it limits the battery charging capacity to 85%
and the discharging capacity to 15%, and the battery will only be charged when the capacity is
below 80% to extend the battery life. Use the Jackery App for settings of this function.
Quiet Charging Mode: noise ≤ 30dB in this charging mode, you can set this function in Jackery App.
LCD DISPLAY
AC Expansion Indicator
1
7
4
WiFi
Solar Charging Indicator
Remaining Charge Time
Battery Saving Mode
10
13 Remaining Battery Percentage
AC Wall Charging Indicator
Bluetooth
Battery Power Indicator
2
5
8
11
14 Error Code
16 Low Temperature Warning 17 Energy Saving Mode
19 Output Power 20 Remaining Discharge Time 21 Battery Pack Indicator and
Connected Quantity
18 AC Power Indicator
3
6
9
12
15
Quiet Charging Mode
Input Power
Car Charging Indicator
Low Battery Indicator
High Temperature Warning
13
6
8
14 17
18
19
7
11
1 2
20
12
5
10 21 15 169
3 4

04
BASIC OPERATIONS
Output On/O
Main power on/o: Press the "Main Power Button" and the working indicator lights up and the LCD
display is illuminated. When this product does not have any operation for 2 minutes, the product will
enter the hibernation state and the display will turn o automatically. If you need to turn o the main
power, please press and hold the "Main Power Button" until the working indicator turns o. The default
standby time of this product is 2 hours. If the other power output switch is not turned on, and the
product does not have any load input, the product will automatically shut down after 2 hours. The
automatic shutdown time can be set on the Jackery App.
AC Output On/O: Ensure that the main power supply is turned on. Press the AC Button, the AC
Output operation indicator lights up. Then you can connect the equipment that needs AC charging.
Press the AC Button again to turn o the AC Output.
USB/Car Port Output On/O: Ensure that the main power supply is turned on. Press the DC Button,
the DC Output operation indicator lights up. Then USB/Car Port Output Ports can be connected to
external load devices. Press the DC Button again to turn o the USB/ Car Port Output.
Output Output Power Defaults
AC Output
All outputs turned o automatically after 12 hours
≤25W
≤2W
≤2W
USB Output
Car Output
To turn o the Energy Saving Mode
Long press the AC Button and Main Power Button until the Energy Saving Mode icon
disappears. In Non-Energy Saving Mode, please remember to turn o the products to
avoid battery consumption.
To turn on the Energy Saving Mode
Long press the AC Button and Main Power Button until the Low Power Mode icon lights up
on the screen.
High-temperature warning
If it appears on the screen, do not worry, the battery will restore automatically after cooling.
Low-temperature Warning
If it is displayed on the screen, do not worry. It will automatically restore after the ambient
temperature is restored.
AC Expansion Indicator
Double the power by connecting another Jackery Explorer 2000 Plus through the Jackery
Connector (sold separately). Please refer to the Jackery Connector manual for details
Fault code
In order to respond to the feedback quickly, we set up common fault codes F0-FE in the
system: If the F8 code appears, please remove the load or unplug the charging plug, the
product can restore by itself, if not, please contact after-sales service; If the F9 code
appears, please remove the load and the product can recover by itself, if not, please
contact after-sales service. In case of any other code appears, please contact our
after-sales service.

This product can support up to 5 battery packs to meet the need for large power capacity. For details
on how to use it, please refer to the Jackery Battery Pack 2000 Plus User Manual.
EPS: Emergency Power System.
Once you have connected the mains and the AC input port of the EPS via the AC charger cable, you
can use the AC output port of the EPS to power your unit (at this point the AC power comes from the
mains, not the EPS battery). In the event of a sudden loss of mains power, the EPS can automatically
switch to battery mode within 20ms. Since this is a non-professional UPS function, it does not support
0ms switching. Do not connect to equipment with high uninterruptible power requirements such as
data servers and workstations. Please test several times to confirm compatibility before use and it is
recommended to connect to only one device. Do not use more than one unit at a time to avoid
triggering the overload protection. Failure to follow these instructions may result in equipment failure or
loss of data for which we cannot be held responsible.
This product supports the connection of Jackery App for intelligent control and operation. Users can
download the Jackery App through App Store or Android application markets. Please refer to the User
Manual for Jackery App for detailed connection instructions.
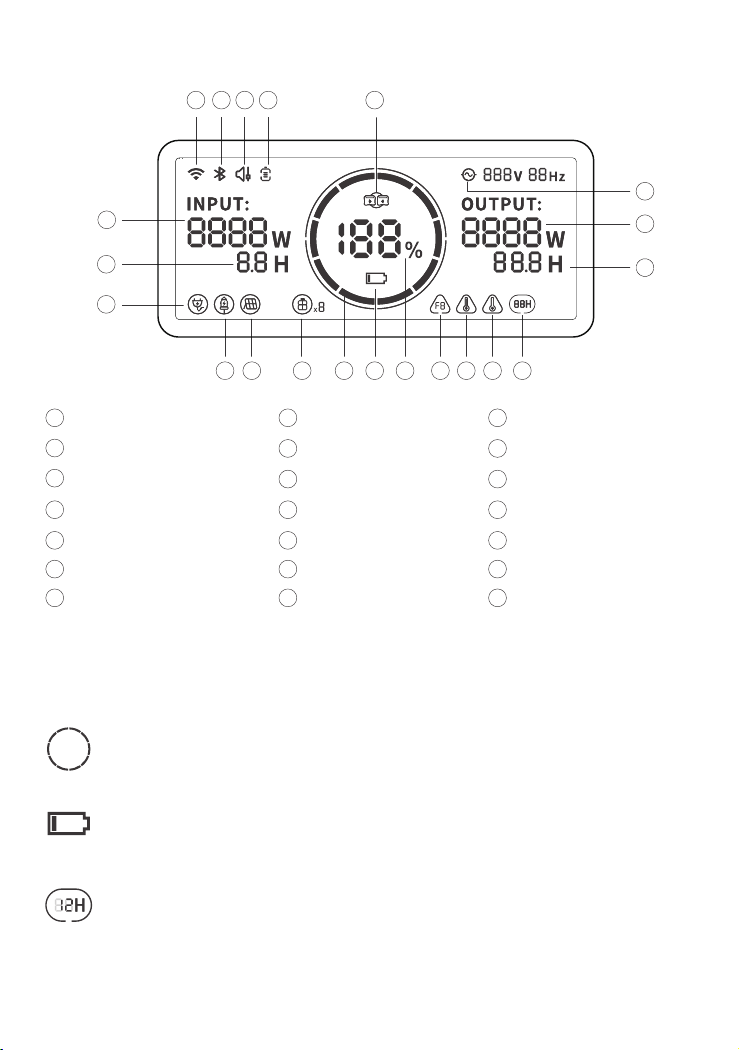
To turn on, press the Main Power Button or when there’s a charging input, the screen display will light
up automatically. To turn off, press the Main Power Button again and the screen display will turn off. Or,
if there is no operation in 2 minutes, the product will enter a sleep state and the screen display will
automatically turn off.
To get the screen always-on (under charging or discharging state), follow these steps: After the
display screen lights up, double-click the Main Power Button and the mode of Always-On Display will be
on.
To turn off Always-On Display, follow these steps: Press the Main Power Button and the screen will be
turned off in 2 minutes.
Tip: During Always-On mode, the screen automatically turns off after 2 hours without charging or
discharging.
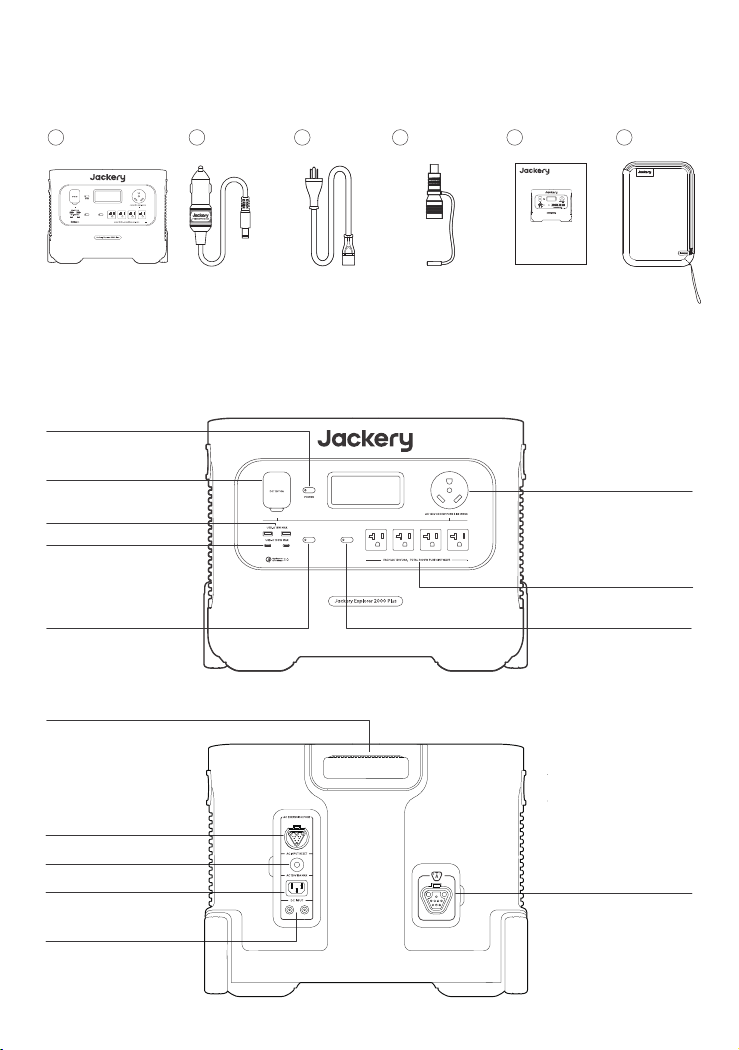
AC Output Reset Button: When the Reset Button pops up, you need to remove the load and press the
Reset Button to reset.
AC Input Reset Button: When the Reset Button pops up, you need to remove AC charge cable and
press the Reset Button to reset.
LCD Screen On/O
05
USE WITH BATTERY PACK (SOLD SEPARATELY)
When using the retractable handle to move the Jackery Explorer 2000 Plus, please do not stack or
place other objects on top of it to prevent falling o and causing injury.
When using the battery pack, please do not stack more than two battery packs on top of the Jackery
Explorer 2000 Plus to prevent it from falling o and causing injury.
SAFETY PRECAUTIONS WHEN USING
APP CONNECTION

06
CHARGING YOUR JACKERY EXPLORER 2000 PLUS
Green energy first: We advocate to use the green energy first. This product supports two modes of
charging at the same time: solar charging and AC wall charging.
When AC wall charging and solar charging are turned on at the same time, the product will give
priority to solar charging and both methods will be used to charge the battery at the maximum
permissible power.
SOLAR CHARGING
If one or two solar panels are connected, you can directly connect the DC8020 port of the solar
panel to the DC8020 port of Jackery Explorer 2000 Plus for charging. If three or four solar panels are
connected, please refer to the method shown in the following figure to charge through the solar
series connector. (Note: The solar series connector is not in standard configuration, so you need to
purchase it separately. Please refer to the detailed operation instructions of the solar series
connector before using it.)
CHARGING FROM THE WALL
Please use the AC cable included in the package.
Explorer 2000 Plus
AC Charger
Jackery SolarSaga 200 or 100 or 60 Solar Panel Connection Guide
SolarSaga ×3
Explorer 2000 Plus
SolarSaga×2 SolarSaga×2Explorer 2000 Plus

07
Caution: When the two inputs are used at the same time, please make sure to use the same type of
solar panel and the number of solar panels in the two inputs must be the same to avoid damage or
charging problems of the equipment due to inconsistent voltages of the two channels.
SolarSaga×3 SolarSaga ×3
Explorer 2000 Plus
The following way of connections are prohibited to charge this product:
SolarSaga×3 SolarSaga×1Explorer 2000 Plus
SolarSaga×3 SolarSaga×2Explorer 2000 Plus
SolarSaga×2 SolarSaga×1Explorer 2000 Plus

08
All of our solar panels on sale have been upgraded to include a DC7909 to DC8020 adapter. If you
have purchased a Jackery solar panel without a DC7909 to DC8020 adapter, you can charge your
Jackery Explorer 2000 Plus by following the connection instructions below.
DC7909 Male
DC8020 Female
Explorer 2000 Plus
DC7909 to DC8020 Adaptor Operation Guide
Users who have purchased Jackery SolarSaga 80 can charge the product by referring to the
connection mode shown below. The Jackery SolarSaga 80 supports the parallel connection or the
parallel and then series connections to charge the product. The single input port of the Jackery
Explorer 2000 Plus supports the input of up to six pieces of SolarSaga 80 solar panels, and two input
ports support the input to up to 12 pieces of SolarSaga 80 solar panels. (When the power is
connected with six solar panels in a single input port, the solar panels shall be divided into two
groups, and each group of three solar panels shall be self-connected in parallel and then connected
to Jackery Explorer 2000 Plus through the solar series connector. The solar series connector needs to
be purchased separately.)
For detailed operation instructions on the self-parallel connection of the Jackery SolarSaga 80 solar
panel, please refer to the user manual.
Jackery SolarSaga 80 Solar Panel Connection Guide
Tip: Users can enter the number of solar panels in their own combination according to the number of
solar panels they purchased. Currently, the product supports charging with 1, 2, 3, 4, 5, 6, 8, and 12
80W solar panels in combination.
Parallel Port(DC 8020 Female)
The solar panel charging
output port (DC8020
male, with DC8020 to
DC7909 Adaptor)
DC7909 to
DC8020 Adaptor

09
CHARGING IN THE CAR
This product can be charged with a 12 V car
charger. Please start the vehicle before charging
to prevent draining the car battery and prevent
your vehicle from being unable to start.
Please also ensure that the car charger and the
car cigarette lighter provide a good connection,
and ensure that the car charger is fully inserted.
In addition, if the vehicle is running on bumpy
roads, it is forbidden to use the car charger in
case it burns due to a poor connection. The
Company will not be responsible for any loss
caused by non-standard operation.
WARNING–When using this product, basic precautions should always be followed, including the
following:
a) Read all the instructions before using the product.
b) To reduce the risk of injury, close supervision is necessary when the product is used near
children.
c) Do not put fingers or hands into the product.
d) Use of an attachment not recommended or sold by power pack manufacturer may result in a
risk of fire, electric shock, or injury to persons.
e) To reduce risk of damage to the electric plug and cord, pull the plug rather than the cord when
disconnecting the power pack.
Vehicle
Explorer 2000 Plus
1 3 5
24 6
R
A/C
AUTO
INSTRUCTIONS PERTAINING TO RISK OF FIRE, ELECTRIC
SHOCK, OR INJURY TO PERSONS
IMPORTANT SAFETY INSTRUCTIONS
❶When the two DC inputs of this product are used at the same time, please ensure that the
number of solar panels connected in series is the same, and try to use the same type of
solar panel.
❷Do not charge from car charger and solar panel at the same time, otherwise, it will
damage the car fuse.
❸Vehicle charging is only applicable in 12V vehicles, not in 24V ones. Please do not charge
this product in 24V vehicle to avoid personal injury and property loss.
❹It is recommended to use Jackery accessories - solar panels for solar charging. We will not
be responsible for the losses caused by using other brands’ solar panels.
SAFETY PRECAUTIONS WHEN CHARGING
SolarSaga Vehicle
Explorer 2000 Plus
1 3 5
246
R
A/C
AUTO

10
f) Do not use a battery pack or appliance that is damaged or modified. Damaged or modified
batteries may exhibit unpredictable behavior resulting in fire, explosion or risk of injury.
g) Do not operate the power pack with a damaged cord or plug, or a damaged output cable.
h) Do not disassemble the power pack, take it to a qualified service person when service or repair is
required. Incorrect reassembly may result in a risk of fire or electric shock.
i) To reduce the risk of electric shock, unplug the power pack form the outlet before attempting any
instructed servicing.
j) PERSONAL PRECAUTIONS
1)Have plenty of fresh water and soap nearby in case battery acid contacts skin,clothing, or eyes.
2)Wear complete eye protection and clothing protection. Avoid touching eyes while working near
battery.
3)If battery acid contacts skin or clothing, wash immediately with soap and water. If acid enters
eye, immediately flood eye with running cold water for at least 10 minutes and get medical attention
immediately.
4)NEVER smoke or allow a spark or flame in vicinity of battery or engine.
5)Be extra cautious to reduce risk of dropping a metal tool onto battery. It might spark or
short-circuit battery or other electrical part that may cause explosion.
k) When charging the internal battery, work in a well ventilated area and do not restrict ventilation in
any way.
l) Under abusive conditions, liquid may be ejected from the battery; avoid contact. If contact
accidentally occurs, flush with water. If liquid contacts eyes, additionally seek medical help. Liquid
ejected from the battery may cause irritation or burns.
m) Do not expose a power pack to fire or excessive temperature. Exposure to fire or temperature
above 130°C may cause explosion. The temperature of 130°C can be replaced by the temperature of
265°F.
n) Have servicing performed by a qualified repair person using only identical replacement parts. This
will ensure that the safety of the product is maintained.
• Use and store the unit only in a clean and dry environment. DO NOT use and store in dusty and wet
environment.
• Check the unit prior to every use. DO NOT use the unit if it is damaged, broken.
• If rust, peculiar odors, overheating or other abnormal circumstances are observed, stop using the
unit immediately and contact the dealer or our customer service center.
• Make sure that the unit is properly secured when transporting it in a motor vehicle.
• Only charge the Explorer 2000 Plus within a ambient temperature 0-45°C (32-113°F),discharge
temperature is -10-45°C (14~113°F) and Storage temperature is 1 year: 0~40°C (32~104°F).
• Switch the unit o immediately if it has accidentally fallen, was dropped or was exposed to
vibrations.
• DO NOT use the unit if the power cord is damaged or broken.
• Keep the unit away from children. DO NOT let children use the power supply unit. Keep this product
away from pets.
• DO NOT use the unit in an area or environment with high temperature.
• Should fluid from inside of the unit come in contact with your skin or clothing, wash the aected
areas with tap water.
• In a storm, unplug the power cord from the socket.
• DO NOT place the unit on its side or upside down while in use or storage.
• DO NOT use accessories for other usage.
SAVE THESE INSTRUCTIONS OPERATING INSTRUCTIONS

11
Warning:Do not remove the battery pack without permission,If you need to repair the battery pack,
contact your local manufacturer as soon as possible
DANGER: This device is for indoor use only (e.g. RV/tent/o-grid cabin, etc.). Do not use outdoors
under any circumstances (e.g. where exposed to rain or snow or use it in wet environments by the sea
or waterways).
• Make sure that the device you are connecting is switched o before you connect it.
• DO NOT expose a power pack to fire or excessive temperature. Exposure to fire or temperature
above 130°C may cause explosion.
• Solar charge times depend on weather conditions, place your solar panel where it will get as much
direct sunlight as possible.
• DO NOT place the power pack on the floor, or at a height less than 457 mm (18 inches) above the
floor, during use in a repair facility.
NOTE: This equipment has been tested and found to comply with the limits for a Class B digital
device, pursuant to part 15 of the FCC Rules. These limits are designed to provide reasonable
protection against harmful interference in a residential installation. This equipment generates, uses
and can radiate radio frequency energy and, if not installed and used in accordance with the
instructions, may cause harmful interference to radio communications. However, there is no
guarantee that interference will not occur in a particular installation. If this equipment does cause
harmful interference to radio or television reception, which can be determined by turning the
equipment o and on, the user is encouraged to try to correct the interference by one or more of the
following measures:
--Reorient or relocate the receiving antenna.
--Increase the separation between the equipment and receiver.
--Connect the equipment into an outlet on a circuit dierent from that to which the receiver is
connected.
--Consult the dealer or an experienced radio/TV technician for help.
• DO NOT move the unit if it is recharging or in use.
• DO NOT dispose the unit together with household waste.
• DO NOT place the unit close to or in a fire or expose it to heat. Keep out of direct sunlight.
• DO NOT store the unit in a bathroom or in an area exposed to rain or moisture.
• DO NOT disassemble the power pack, take it to a qualified service person when service or repair is
required. Incorrect reassembly may result in a risk of fire or electric shock.
• DO NOT store the unit in an area or environment with high temperature.
MOVING AND STORAGE INSTRUCTIONS
When using it for the first time, please fully charge the device before use. If this product is stored for a
long period of time (3 months - 6 months) with the power depleted, its performance will deteriorate
and may even become unchargeable. If this device is stored for a long time, please check the power
regularly and charge it to about 60% to 80%.
USER MAINTENANCE INSTRUCTIONS

12
Warranty Period
Exchange
Exclusions
WARRANTY
Note: We only provide our warranty for the buyer who purchased on Amazon (Jackery
Inc), Jackery website or local authorized dealers.
Jackery Inc. warrants to the original consumer purchaser that the Jackery product will be free from
defects in workmanship and material under normal consumer use during the applicable warranty
period identified in the 'Warranty Period' section below, subject to the exclusions set forth below.
This warranty statement sets forth Jackery's total and exclusive warranty obligation. We will not
assume, nor authorize any person to assume for us, any other liability in connection with the sale of
our products.
3 Years Standard Warranty: The standard warranty period for Jackery Explorer 2000 Plus is 36
months. In each case, the warranty period is measured starting on the date of purchase by the
original consumer purchaser. The sales receipt from the first consumer purchase, or other reasonable
documentary proof, is required in order to establish the start date of the warranty period.
2 Years Extended Warranty: To activate the Warranty Extension, you must register your product
online or contact our customer service team at hello@jackery.com to extend the standard warranty
runtime.
Jackery will replace (at Jackery's expense) any Jackery product that fails to operate during the
applicable warranty period due to defect in workmanship or material. A replacement product
assumes the remaining warranty of the original product.
Jackery's warranty does not apply to:
Misused, abused, modified, damaged by accident, or used for anything other than normal consumer
use as authorized in Jackery's current product literature.
Attempted repair by anyone other than an authorized facility.
Any product purchased through an online auction house.
Jackery's warranty does not apply to the battery cell unless the battery cell is fully charged by you
within seven days after you purchase the product and at least once every 6 months thereafter.
Limited Warranty
The warranty on Jackery's product is limited to the original consumer purchaser and is not transfer-
able to any subsequent owner.
Limited to Original Consumer Buyer
Download the Jackery Mobile App

Versión: JAK-UM-V1.0
Modelo: JE-2000C
Póngase en contacto con nosotros:
1-888-502-2236(US)
Jackery Explorer 2000 Plus
Manual de Usuario

Enhorabuena por su nuevo Jackery Explorer 2000 Plus. Lea atentamente este manual antes de
utilizar el producto, especialmente las precauciones pertinentes para garantizar su uso adecuado.
Guarde este manual en un lugar accesible para consultarlo con frecuencia.
De conformidad con las leyes y reglamentos, la compañía se reserva el derecho a dar una
interpretación final de este y todos los documentos relacionados con este producto.
Por favor, tenga en cuenta que no se darán más notificaciones en caso de cualquier actualización,
revisión o terminación.
ESPECIFICACIONES TÉCNICAS
14
※USB Type-C y USB-C son marcas registradas de USB Implementers Forum.
※Qualcomm Quick Charge es un producto de Qualcomm Technologies, Inc. y/o sus filiales.
Qualcomm y Quick Charge son marcas comerciales o registradas de Qualcomm Incorporated.
® ®
CERTIFICACIONES
4 Salidas de CA
1 Salida de CA
Salida total de CA
1 Puerto de expansión de CA
1 Puerto de expansión de CC
2 Salidas USB-C
2 Salidas USB-A
1 Puerto para el coche
120V~ 60Hz, 20A máx.
120V~ 60Hz, 25A máx.
3000W máx., pico de sobretensión de 6000W
120V~60Hz, 25A máx.
32.2V-50.4V⎓97A máx.
100W máx., 5V⎓3A, 9V⎓3A, 12V⎓3A, 15V⎓3A, 20V⎓5A
Quick Charge 3.0, 18W máx., 5-6V⎓3A, 6-9V⎓2A, 9-12V⎓1.5A
12V⎓10A máx.
INFORMACIÓN GENERAL
Nombre del producto
Nºde modelo
Capacidad
Peso
Dimensiones
Ciclo de vida
Jackery Explorer 2000 Plus
JE-2000C
Ión-litio 45,6 Ah/ 44,8 V CC (2042,8 Wh)
Unos 61,5 libras/ 27,9 kg
18,6 x 14,1 x 14,7 in/ 47,3 x 35,94 x 37,36 cm
4000 ciclos de carga hasta 70% + de capacidad
PUERTOS DE SALIDA
PUERTOS DE ENTRADA
Modo de Carga Entrada CA
Modo Bypass Entrada/salida CA
Entrada de CC
120V~ 60Hz, 15A máx.
120V~ 60Hz, 12A máx.
2x DC 8mm Puertos: 11-17,5V (tensión de trabajo)⎓8A máx.,
doble a 8A máx.; 17,5-60V (tensión de trabajo)⎓12A máx.,
doble a 24A/1400W máx.
0~45°C (32~113 °F)
-10~45°C (14~113°F)
TEMPERATURA DE FUNCIONAMIENTO
Temperatura de carga
Temperatura de descarga

Puerto de expansión CA
(conectar a otro
Explorer 2000 Plus)
MODIFICACIÓN: Cualquier cambio o modificación no aprobado expresamente por el cesionario de
este dispositivo podría anular la autoridad del usuario para utilizar el dispositivo.
LISTA DE PAQUETE
15
CONOZCA SU EQUIPO
Aspecto del producto
Salida de CA
Salida de CA
Botón de CA
Botón de CC
Botón principal
de encendido
Salida USB-C
Salida USB-A
Entrada de CC
Entrada CA
Botón de reinicio de la
entrada de CA
Puerto para el coche
Puerto de expansión
de CC (para conectar
a la batería)
(pulse el botón del asa retráctil y
tire de ella para extenderla)
Asa retráctil
Version:JAK-UM-V1.0
Model:JE-2000C
Contactus:
1-888-502-2236(US)
USER MANUAL
Jackery Explorer 2000 Plus
Jackery Explorer
2000 Plus
1
Manual de
Usuario
5
Cable de carga
de CA
32
Cable de carga
para coche
Adaptador de
DC7909 a
DC8020 x 2
4
Bolsa de
accesorios
6

Modo de ahorro de batería: Cuando esta función está activada, limita la capacidad de carga de la
batería al 85% y la capacidad de descarga al 15%, y la batería solo se cargará cuando la capaci-
dad esté por debajo del 80% para prolongar la vida útil de la batería. Utiliza la aplicación de
Jackery para configurar esta función.
Modo de carga silenciosa: ruido ≤ 30dB en este modo de carga. Puedes configurar esta función en
la aplicación de Jackery.
16
Indicador de carga de la batería
Cuando el producto se está cargando, el círculo naranja alrededor del porcentaje de
batería se iluminará en secuencia. Al cargar otros dispositivos, el indicador mostrará el
nivel de batería.
Indicador de batería baja
Cuando la batería es inferior al 20 %, el Indicador de batería baja permanecerá encendi-
do. Cuando sea inferior al 5 %, el Indicador de batería baja parpadeará. Cuando se está
cargando, el Indicador estará apagado.
Modo de ahorro de energía
Para evitar que se olvide de apagarlo, con el consiguiente consumo de batería, el
producto activa por defecto el modo de ahorro de energía. Esto ocurre cuando no hay
ningún dispositivo conectado o el dispositivo conectado es inferior o igual a un determi-
nado valor. (Consulte la tabla siguiente para obtener más detalles). El dispositivo apagará
automáticamente todas las salidas después de 12 horas.
PANTALLA LCD
13
6
8
14 17
18
19
7
11
1 2
20
12
5
10 21 15 169
3 4
7
1
4
WiFi
Indicador de carga solar
Tiempo de carga restante
Modo de ahorro de batería
10
13 Porcentaje restante de batería
2
5
8
11
14
16 Aviso de baja temperatura 17
19 Potencia de salida 20 21
18
3
6
9
12
15
Indicador de carga de
pared de CA
Bluetooth
Indicador de alimentación
de la batería
Código de Error
Modo de ahorro de batería
Tiempo de descarga
restante Indicador de batería y
cantidad conectada
Indicador de alimentación
de CA
Modo de carga silencioso
Potencia de entrada
Indicador de carga del
coche
Indicador de batería baja
Aviso de alta temperatura
Indicador de
expansión de CA

OPERACIONES BÁSICAS
Salida activada/desactivada
Encendido/apagado de la alimentación principal: Pulse el "Botón de encendido principal" y se
encenderá el indicador de funcionamiento y se iluminará la pantalla LCD. Si el producto no se utiliza
en un periodo de 2 minutos, entrará en estado de hibernación y la pantalla se apagará automática-
mente. Si necesita apagar la alimentación principal, mantenga pulsado el "Botón de alimentación
principal" hasta que se apague elndicador de funcionamiento. El tiempo de espera predeterminado
de este producto es de 2 horas. Si el otro interruptor de salida de alimentación no está encendido, y el
producto no tiene ninguna entrada de carga, el producto se apagará automáticamente después de
2 horas. El tiempo de apagado automático se puede configurar en la aplicación de Jackery.
Encendido/Apagado de la salida de CA: Asegúrese de que la fuente de alimentación principal está
encendida. Pulse el botón CA y se encenderá el indicador de funcionamiento de la salida CA. A
continuación, puede conectar el equipo que necesite carga de CA. Pulse de nuevo el botón CA para
apagar la salida CA.
17
Para desactivar el modo de ahorro de energía
Mantenga pulsado el botón CA y el botón de encendido principal hasta que desaparezca
el icono del modo de ahorro de energía. En el modo nomral (sin ahorro de energía),
recuerde apagar los productos para evitar el consumo de la batería.
Para activar el modo de ahorro de energía
Mantenga pulsado el botón CA y el botón de encendido principal hasta que el icono del
modo de bajo consumo se ilumine en la pantalla.
Salida Potencia de
salida Valores por defecto
Salida de CA
Todas las salidas se apagan automáticamente después de 12 horas
≤25W
≤2W
≤2W
Salida USB
Salida del coche
Advertencia de alta temperatura
Si aparece en la pantalla, no se preocupe, la batería se restablecerá automáticamente
después de enfriarse.
Aviso de baja temperatura
Si aparece en la pantalla, no se preocupe. Se restablecerá automáticamente una vez
restablecida la temperatura ambiente.
Código de error
Con el fin de responder rápidamente a los comentarios, hemos establecido códigos de
avería comunes F0-FE en el sistema: Si aparece el código F8, retire la carga o desconecte
el enchufe de carga, el producto podrá restablecerse por sí mismo. De los contrario,
póngase en contacto con el servicio post-venta. Si aparece el código F9, retire la carga y
el producto podrá recuperarse por sí mismo. De lo contrario, póngase en contacto con el
servicio post-venta. Si aparece cualquier otro código, póngase en contacto con nuestro
servicio postventa.
Indicador de expansión de CA
duplique la potencia conectando otro Jackery Explorer 2000 Plus a través del Jackery
Connector (se vende por separado). Consulte el manual del Jackery Connector para más
detalles.

Para encenderlo, pulse el botón de encendido principal. La pantalla se encenderá automáticamente.
También se encenderá cuando haya una entrada de carga. Para apagarlo, pulse de nuevo el botón
de encendido principal y la pantalla se apagará. Si no se realiza ninguna operación en 2 minutos, el
producto entrará en estado de reposo y la pantalla se apagará automáticamente. Tras encender la
pantalla, haga doble clic en el botón de encendido principal y activará el modo de pantalla siempre
encendida (tanto en estado de carga o como descarga). Pulse el botón de encendido principal para
apagar el modo de pantalla siempre encendida. La pantalla se apagará en 2 minutos.
Consejo: Durante el modo Always-On, la pantalla se apaga automáticamente después de 2 horas sin
cargarse ni descargarse.
Salida USB/puerto de coche encendido/apagado: Asegúrese de que la fuente de alimentación
principal está encendida. Pulse el botón CC para encender el indicador de funcionamiento de la
salida CC. A continuación, los puertos de salida USB/puerto de coche pueden conectarse a
dispositivos de carga externos. Vuelva a pulsar el botón CC para apagar la salida USB/puerto de
coche.
Botón de reinicio por sobreintensidad de la salida de CA:Cuando están protegidos contra la
sobrecorriente, aparece el botón de reinicio. En ese caso, es necesario quitar la carga y pulsar el
botón de reinicio por sobrecorriente para restablecer.
Botón de reinicio de la entrada de CA: Cuando están protegidos contra la sobrecorriente, aparece
el botón de reinicio. En ese caso, es necesario quitar Cable de carga de CA y pulsar el botón de
reinicio por sobrecorriente para restablecer.
SAE: Sistema de alimentación de emergencia.
Una vez que haya conectado la red eléctrica y el puerto de entrada de CA de la SAE mediante el
cable cargador de CA, podrá utilizar el puerto de salida de CA de la SAE para alimentar la unidad (en
este punto, la alimentación de CA procede de la red eléctrica, no de la batería de la SAE). En caso de
pérdida repentina de la alimentación de red, el SAE puede pasar automáticamente al modo batería
en 20 ms. Dado que se trata de una función no profesional del SAI, no admite la conmutación de 0
ms. No lo conecte a equipos con elevados requisitos de alimentación ininterrumpida, como servidores
de datos y estaciones de trabajo. Por favor, pruebe varias veces para confirmar la compatibilidad
antes de usar. Además, se recomienda conectar a un solo dispositivo. No utilice más de una unidad a
la vez para evitar que se active la protección contra sobrecargas. El incumplimiento de estas
instrucciones puede provocar fallos en el equipo o pérdidas de datos de las que no nos hacemos
responsables.
Este producto puede soportar hasta 5 paquetes de baterías para satisfacer la necesidad de una gran
capacidad de energía. Para obtener más información sobre su uso, consulte el manual del usuario de
Jackery Battery Pack 2000 Plus.
Este producto admite la conexión con la aplicación de Jackery para un control y funcionamiento
inteligentes. Los usuarios pueden descargar la aplicación de Jackery a través de App Store o de las
tiendas de aplicaciones Android. Consulte el manual de usuario de la aplicación de Jackery para
obtener instrucciones detalladas sobre la conexión.
Encendido/Apagado de la pantalla LCD
18
SE UTILIZA CON UN PACK DE PILAS
(SE VENDE POR SEPARADO)
Cuando utilice el asa retráctil para mover el Jackery Explorer 2000 plus, no apile fuerza ni coloque
otros objetos por encima encima para evitar que se caiga y pueda causar lesiones.
Cuando utilice el paquete de baterías, no apile más de dos paquetes de baterías encima del Jackery
Explorer 2000 plus para evitar que se caiga y pueda causar lesiones.
PRECAUCIONES DE SEGURIDAD PARA EL USO
CONEXIÓN CON LA APLICACIÓN
Other manuals for Explorer 2000 Plus
1
This manual suits for next models
1
Table of contents
Languages:
Other Jackery Power Supply manuals

Jackery
Jackery Explorer 700 Plus User manual

Jackery
Jackery Explorer 290 User manual

Jackery
Jackery Explorer 100 Plus; JE-100A User manual

Jackery
Jackery Explorer 100 Plus User manual

Jackery
Jackery JE-300B User manual

Jackery
Jackery Explorer 240 User manual

Jackery
Jackery Explorer 3000 Pro User manual

Jackery
Jackery JE-1500B User manual

Jackery
Jackery JE-3000A User manual

Jackery
Jackery Explorer 300 Plus User manual