Jackson Racing 999-200 User manual

READ THESE INSTRUCTIONS THOROUGHLY!
Follow the instructions STEP-BY-STEP, and your
installation will be trouble free. If in doubt, CALL 1-
888-888-4079. We suggest that as you proceed
through the installation, you should read a few steps
ahead in the instructions so you are certain to catch
all notes and warnings.
ATTENTION SUPERCHARGER INSTALLER! Before
proceeding with the installation, it is important to
know that to validate the 2 year, 100K warranty on
your new J/R supercharger, you must completely fill
out the Moss Motors / Jackson Racing warranty card
that comes in every kit, including serial number which
is on a small white ‘bar code’ label on the body of the
supercharger. Write down all of the numbers which
appear on that label in the appropriate space on the
warranty card. Be certain to do this now because
once your supercharger is installed, it may be almost
impossible to retrieve that serial number.
SPECIAL NOTE: Jackson Racing Supercharger
Systems are designed to be installed by individuals
with good mechanical sense and with the proper
tools. Use your discretion--if you are not a competent
mechanic, do not attempt this installation.
TOOLS REQUIRED:
17mm, 14mm, 13mm, 12mm, 10mm, & 8mm sockets
10mm, 12mm, and 17mm open end wrenches
Deep sockets (14mm or 9/16”, 10mm)
Phillips and Standard screwdriver
5mm Allen wrench
Paper clip
Timing light
WARNING: Once the installation is complete,
CHECK AND RECHECK ALL fuel system connec-
tions for possible leaks before operating the vehicle.
91-octane gasoline (or higher) is required when run-
ning a supercharger.
During this installation process, you will reuse some
parts or hardware and not reinstall others. It is rec-
ommended that you make space for those that you
will reuse, and a separate space for those that you
will not reinstall. In addition, you should save the
parts that will not get reused in case you ever have
reason to convert the engine back to stock.
Enclosed is a set of labels that we suggest you use
to label the electrical connectors that you will be
unplugging.
NOTE: Will not work with factory strut tower
braces.
1Revised 1/07999-200
Installation Instructions
SUPERCHARGER
‘99-’00 Mazda Miata 1.8L
999-200 w/ power steering, w/ AC
999-205 w/ power steering, w/ out AC
999-210 w/ out power steering, w/ out AC
999-215 w/ out power steering, w/ AC
440 Rutherford St. P.O. Box 847 Goleta, CA 93117
1-888-888-4079 • FAX 805-692-2525 • www.supercharger.com

1.0 DISASSEMEMBLY
1.1 Disconnect your Miata’s battery.
1.2 Release the air flow meter harness 5-pin con-
nector by pressing the locking tab on its clip.
Remove the stock air flow meter from the air box by
removing the two 10mm headed retaining bolts and
then remove the Air Temperature sensor with its rub-
ber mounting grommet from the Air filter box. And
finally remove the air filter assembly complete with
intake snorkel, these parts will not be reused. Move
the air flow meter to a safe place on a worktable.
1.3 Remove the molded rubber elbow and hard
plastic tube that lead from the throttle body to the
airflow meter.
1.4 Remove the crankcase vent hose that is
attached to the front of the cam cover. (Figure
1.4). This will not be reused. Also, find the small
restrictor inside the rubber hose that ran from the
cam cover to the Mazda plastic crossover/intake
tube. It can be felt as a lump in the straight sec-
tion of the hose near the end. Persuade it out by
gently clamping the hose with a pair of pliers just
behind the lump. If your hose does not have this
restrictor there is one provided in the hose bag of
the supercharger kit. Save this restrictor for step
#7.8.
1.5 You can do this entire procedure without los-
ing too much coolant, there is no need to drain
your cooling system. In the upcoming step you
will be removing the throttle body and Idle
Control Solenoid (ICS) valve. If you remove the
small coolant hoses that run to the ICS valve
(which is mounted under your throttle), you can
drain the excess coolant into a coffee can or
such. Rest the can on the steering rack down in
front of the engine and aim the hoses into the
can as they drain. Once the flow stops, you can
remove the throttle body without making a mess.
2.0 THROTTLE BODY
2.1 Remove the throttle body (FIGURE 1.4) by
releasing the two electrical connectors (one has
a spring wire, one has a plastic lever clip), the
two small coolant hoses on either side of the
lower Idle Control System (ICS) valve, and the
three nuts and one bolt. TIP: THE SPRING
21/07999-200
Figure 1.4

HOSE CLAMPS FROM MAZDA ARE BEST
REMOVED BY APPROACHING FROM THE
SIDE WITH NEEDLE NOSE PLIERS. GRASP
ALL THREE TANGS AT ONCE AND COMPRESS
THEM TOGETHER. THIS IS EASIER TO DO
WITH THE THROTTLE BODY ALREADY LOOSE
FROM THE INTAKE MANIFOLD. Plug the
coolant hoses with a screwdriver, golf tee, or pen-
cil to prevent the leakage of coolant (OR - keep
the hose ends above the radiator cap level to pre-
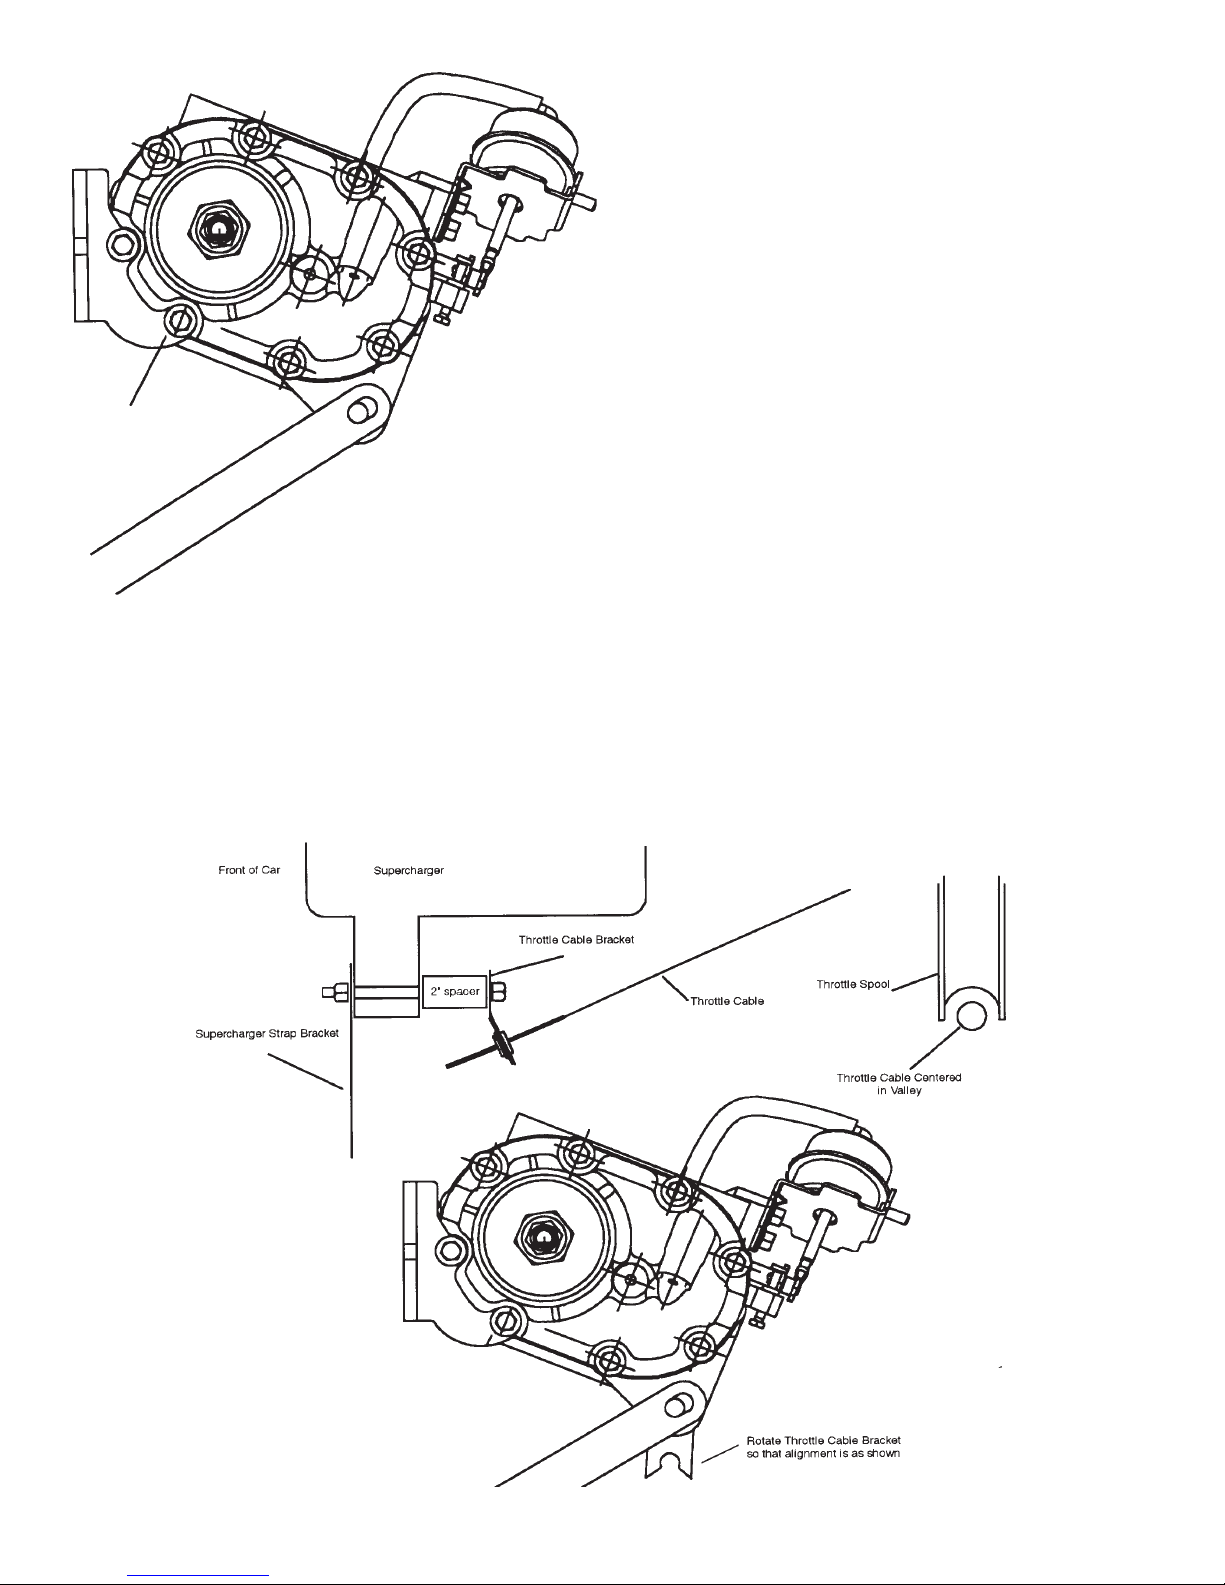
vent leakage). Release the throttle cable from the
throttle shaft spool. Release the Throttle Position
Switch harness by lifting the small wire clip that
runs around the rectangular base of the connec-
tor. If the throttle body gasket tears as you
remove it (even though it is made of metal, it can
tear), you will need to clean off the old gasket
from both surfaces, the throttle body and the
intake manifold. Carefully use a knife or the back-
side of a hacksaw blade to scrape the mounting
surfaces clean. DO NOT SCRATCH OR MAR
THE MOUNTING SURFACES IN ANY WAY.
Immediately below and behind the throttle body
on the intake manifold is a steel support brace in
the shape of an inverted “L” attached by four
12mm headed dolts. Remove the brace and re-
secure the wiring harness ground wire attached
at that point with one of the 12mm headed bolts.
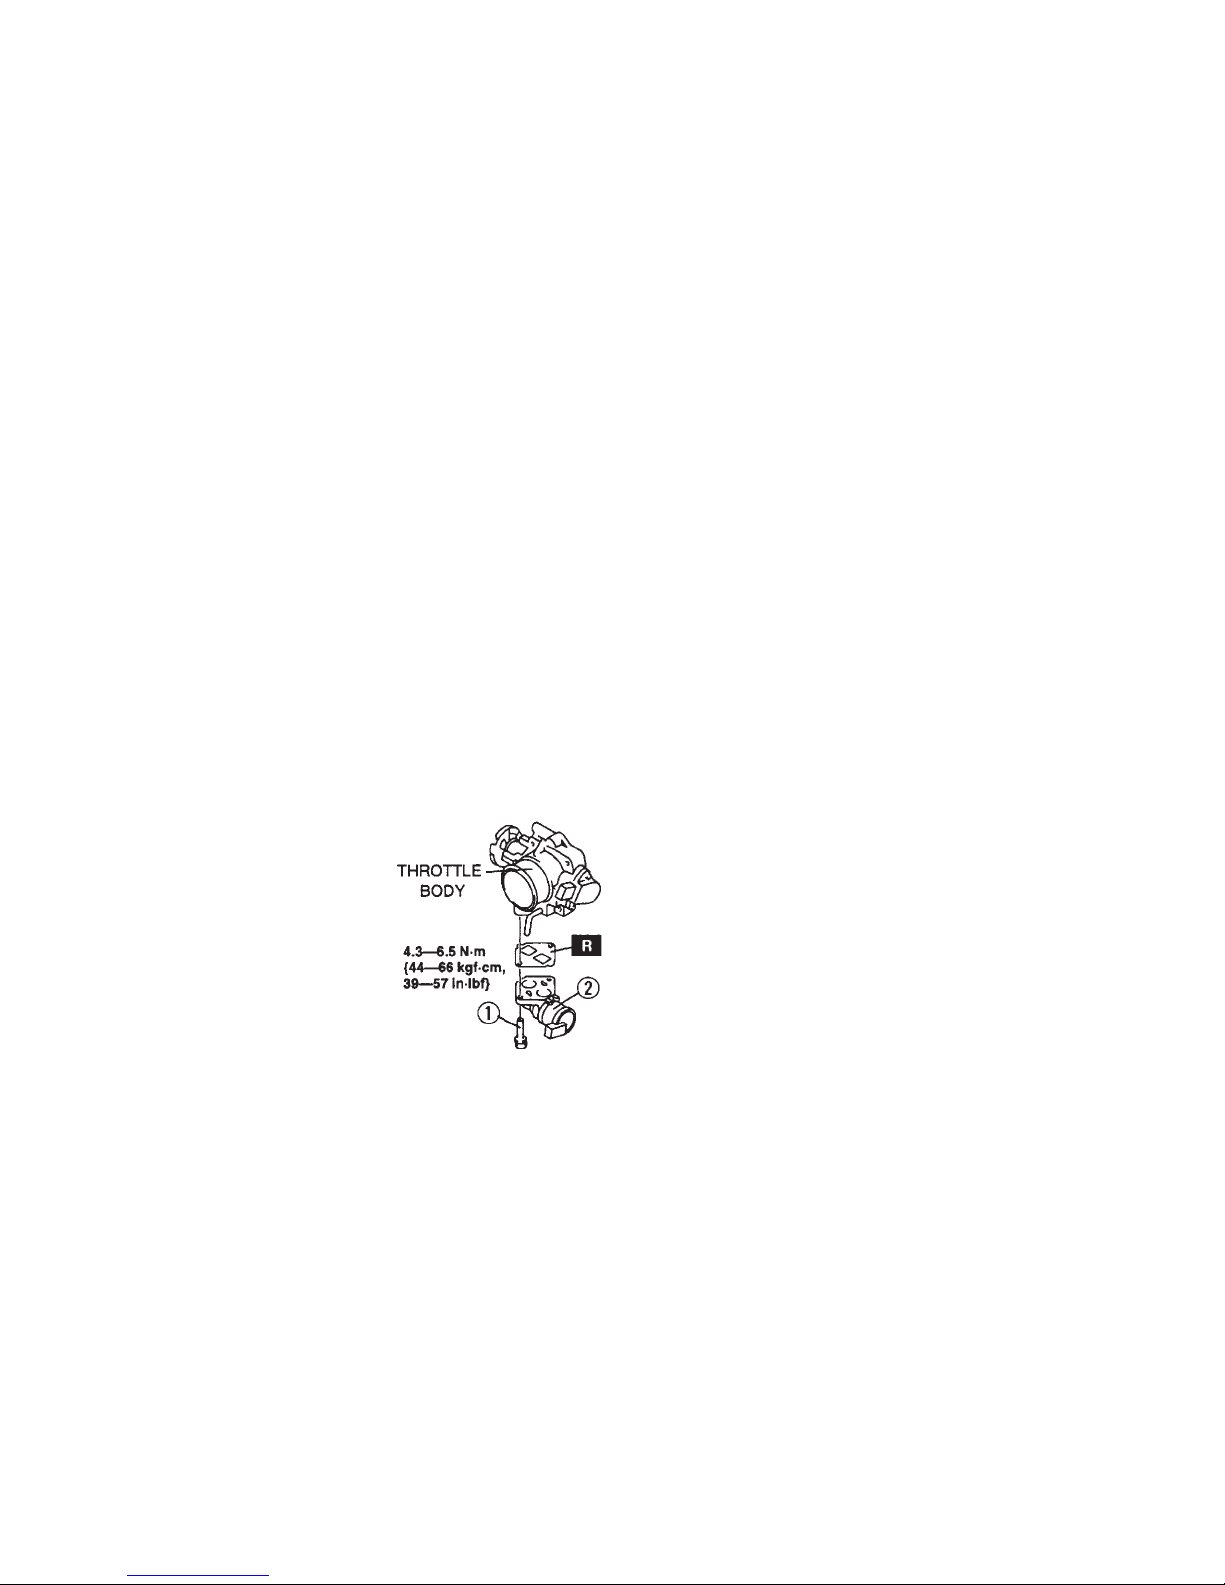
2.2 Moving to a worktable, remove the idle air
control (ICS) valve from the bottom of the throttle
body by removing the two
Phillips head screws. Use a
good quality screwdriver and
be careful not to strip the
Phillips head screw. If you
cannot loosen a screw with
the screwdriver, use a small
set of pliers from the side.
Carefully separate the two
units making sure not to tear
the gasket. The gasket will want to stay with the
Mazda ICS valve.
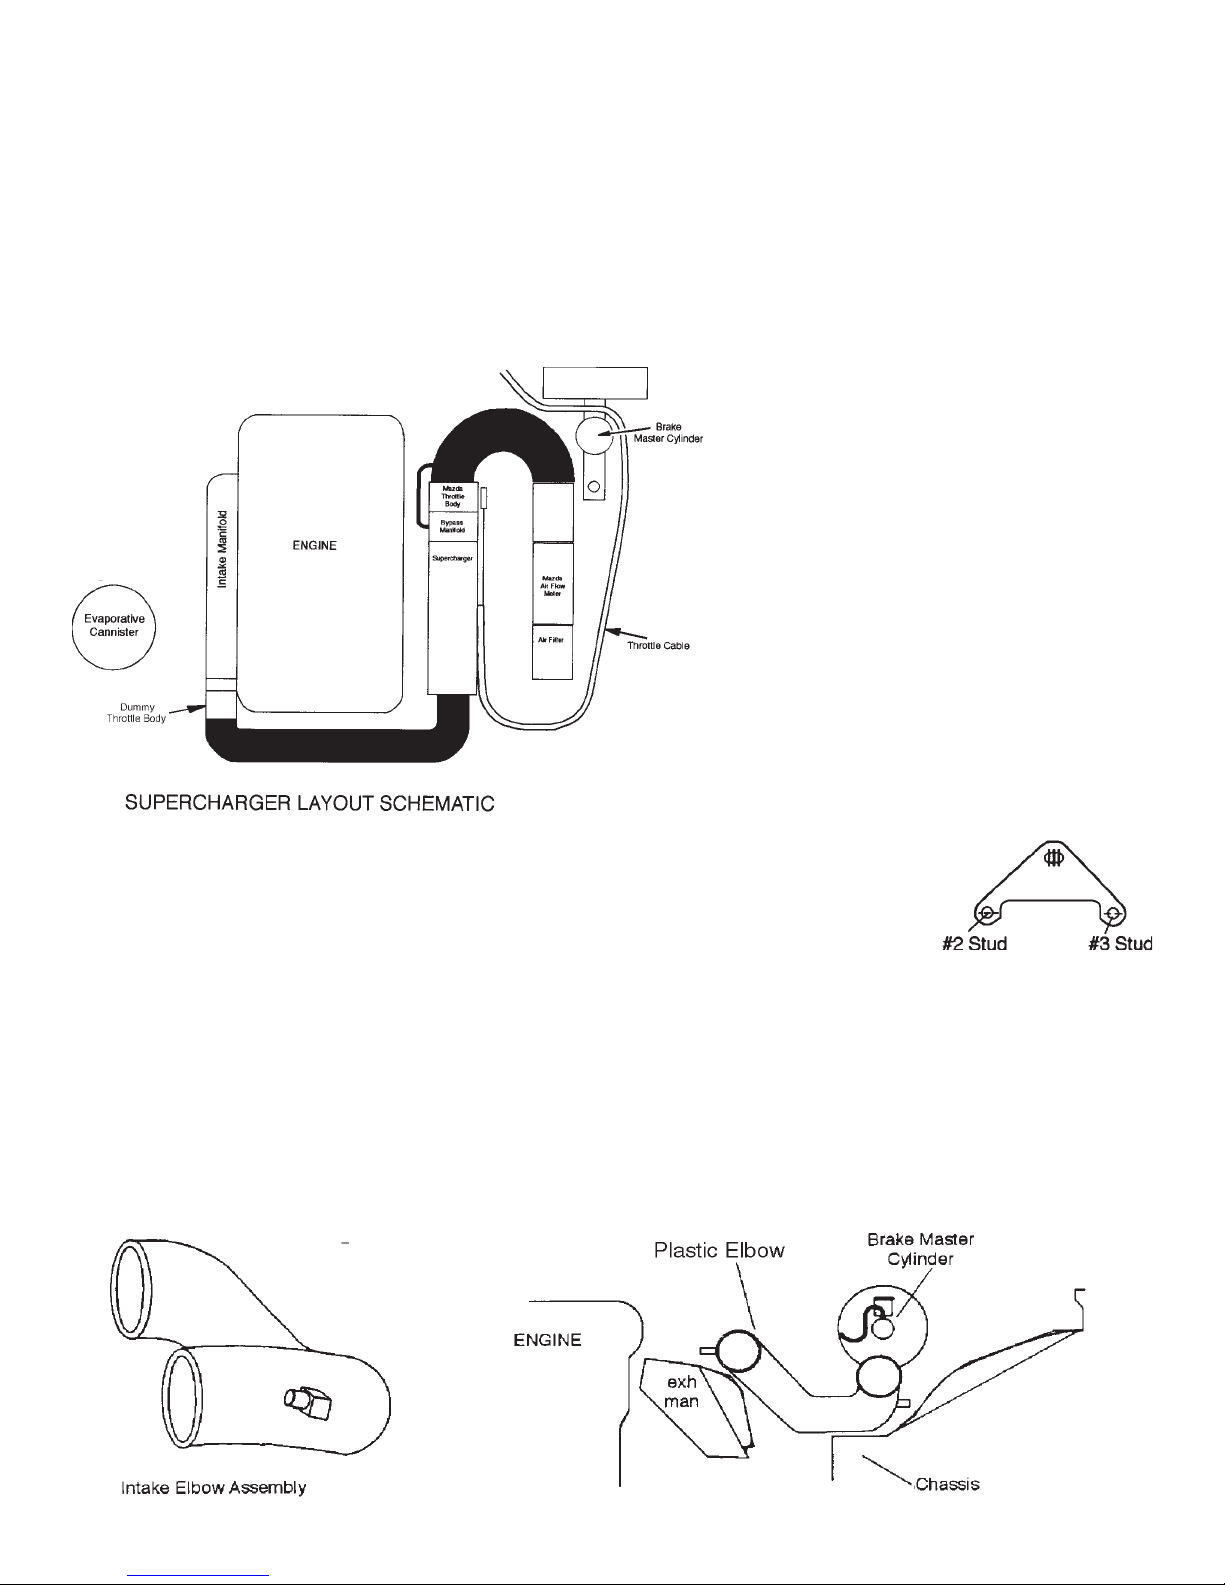
2.3 Take the Dummy Throttle body from your
supercharger kit and install the Mazda Idle Air
Control Valve (ICS) from step 2.2 on the bottom,
rotating the ICS valve 180 degrees so that the
electrical connector now points to the rear of the
engine. Use the Mazda original ICS to Throttle
body gasket.
2.4 Install the Dummy Throttle Body and ICS
valve assembly back onto the intake manifold in
the same position as the standard Mazda throttle
body. Use the original gasket or the1104 adhesive
on the mating surfaces and the two new 8mm x
40mm long bolts provided in the lower two holes
on the dummy throttle body. Reconnect the
coolant hoses to the brass coolant barbs on the
front and side of the dummy throttle body.
2.5 Do not connect the ICS electrical connection
until after the next step.
2.6 Wiring Harness Modifications:
Locate the main engine wiring harness on the left
side of the engine (as viewed from the front of the
engine) where it runs between the intake manifold
and cam cover. Cut the strap of the white plastic
harness anchor at the front and release the fire-
wall end of the harness by gently prying the
release tab on the securing clamp located near
the rear engine lifting eye. Starting at the forward
point where the four black/yellow wires come out
of the harness, cut the black tape binding the
plastic corrugated tubing so that you can access
the wires within. Locate the wiring branch of the
ICS valve connector and follow the wires to the
main harness. Pull these two wires (purple and
orange) back free from the main harness about 4-
5 inches so that you have enough slack to plug
the connector in the repositioned ICS valve. Cut a
length of the small diameter corrugated tubing
supplied in the kit to cover the wires on the ICS
branch from the plug to the main harness with an
additional inch of tubing to protrude into the main
harness tubing. Locate the wiring harness branch
for the Throttle Position Switch (TPS) that origi-
nally connected at the throttle body connector.
Pull these wires back to about 4 inches from the
firewall. If the construction of your particular har-
ness is such that you cannot free all three wires
(light green/red, green/black and black/pink) all
the way back, cut the offending wire (usually light
green/red) and pull the wires with the connector
back free. Then strip about 1/4 inch of insulation
of each end of the cut wire and using the Crimp
connector supplied; insert a stripped end into
each end of the connector. Crimp (collapse) each
end of the connector onto stripped ends, making
sure that the connection is secure. With the crimp
connector installed on the wire, shrink seal the
ends of the Crimp connector by heating it with a
heat gun or a hair blow dryer. Using some of the
small diameter corrugated tubing provided, cover
the TPS harness branch. Wrap the main harness
and branches with the roll of tape supplied in the
kit, in the same manner as the factory had.
Reattach the harness at the rear harness clamp
by snapping it back in place and at the front by
using a new Ty-Wrap strap through the base of
the white plastic anchor. You can now plug in the
ICS valve connector by routing the harness
branch under and around the intake manifold to
the ICS valve. The TPS connector will be plugged
in after installation of the supercharger and throt-
tle body assembly.
31/07999-200

2.7 Locate the ICS blanking plate and take it over
to your Mazda throttle body. Use the 1104 sealant
between the blanking plate and the Mazda throttle
body. Install the blanking plate onto your Mazda
throttle body using the two new Phillips head
screws supplied in the kit. Insert the shaft of a
Phillips or cross head screwdriver into the ends of
the coolant connections. Gently twist the connec-
tions 90 degrees counter clockwise to their stan-
dard position so that they point in the same direc-
tion as the throttle body inlet. Do not worry if you
kink the coolant connections, you are only moving
them out of the way and they will not be reused.
3.0 BELT DRIVES
3.1 NOTE: CARS WITH POWER STEERING: You
will be re-arranging your power steering bracket
components per figure 3.2. Located above the
power steering pump on the black plastic timing
cover, remove the 10mm headed bolt that secures
the small bracket for the Crank Angle Sensor cable.
Remove the bracket and reinstall the 10mm-head-
ed bolt. Referring to figure 3.1, remove the slot
bracket and pillow block by removing bolts “A”, “C”,
and “D”. Take the flat idler pulley bracket from your
kit and trial fit it to the assembly per figure 3.2. You
will be moving the pillow block and bolt “D” to
behind the power steering stamped steel bracket
(pillow block’s dome facing upward). This makes
4
room for the flat idler pulley bracket. The upper
support for the repositioned long bolt “D” comes
from a new adjustment bracket included in the kit.
The new adjustment bracket is attached to the
stamped steel power steering bracket using a new
bolt/washer/nut assembly supplied in your kit. Make
sure to point this bolt with its head nearest the alu-
minum idler pulley and that this bolt goes through
the hole. The rearward hole is now used for the
relocated “D” bolt, which will be used to tighten your
drive belt. Note: The power steering pump must
be in its lowest position for this procedure.
Figure 3.1
1/07999-200

3.2 When you are done with your trial fit-
ting of the flat idler pulley bracket, take
this flat bracket to a workbench and
install the two nylon idler pulleys using
the bolts and Nylock nuts provided. Make
sure that the bolt heads point towards the
rear of the car.
3.3 Secure the idler pulleys firmly to the
flat bracket. Proceed to install the idler
pulley assembly onto the car per the pro-
cedure practiced during the trial fitting.
The final assembly (minus the pulleys)
should look like figure 3.3.
VERY IMPORTANT:
Check the clearance between the small
coolant hose that runs from the base of
the thermostat housing and the passen-
ger side idler pulley. If the clearance is
less than ? inch between the hose and the pulley,
trim three quarters of an inch of length off of the
thermostat end of the small hose. Reinstall the
hose, reusing the spring clamp. By removing a
small piece of the hose end, the hose will be
pulled away from the idler pulley, avoiding any
damage during operation. This is a critical area
for attention since a hose failure could cause
severe engine damage. Not all cars need this
modification.
3.4 POWER STEERING CARS: Spin the power
steering pump pulley until the nut on the main
pump mounting bolt is visible. Insert a socket
wrench (deep 14mm) here and hold the rear hex
head with a 14mm box wrench. Remove the nut.
(item “B” in figure 3.1). VERY IMPORTANT:
MAKE SURE THAT THE DRIVER’S SIDE IDLER
PULLEY IS FREE TO SPIN. THE PINCH BOLT
THAT YOU INSTALL THROUGH THE PILLOW
BLOCK FROM THE REAR CAN INTERFERE
WITH THE BACKSIDE OF THE IDLER IF
INSTALLED INCORRECTLY (i.e. leaving out
the thick washer under the bolt’s head). TEST
THE ASSEMBLY BY TIGHTENING THE PINCH
BOLT FULLY AND SPINNING THE IDLER PUL-
LEY. USE ADDITIONAL WASHERS UNDER
THE PINCH BOLT’S HEAD IF NECESSARY.
3.5 Pick the flat steel supercharger bracket from
the kit and slip the non-slotted end over the
power steering bolt. Reinstall the power steering
pump nut with the flat bracket pinched between
the nut and the cast power steering pump bracket
that is on the engine. When finished, rotate the
power steering pump as far down as possible
(the pulley will touch the AC compressor pulley if
so equipped). This will allow room for the super-
charger to be installed and for the
belt to slip over the pulleys.
3.6 NON POWER STEERING
CARS: Locate your lower bracket
assembly from the kit. The end
with the small 90 degree bracket
mounts to the idler bracket (stan-
dard on AC equipped cars) or to
new idler bracket (supplied with kit
for non-AC, non-PS cars). Use the
new, longer 10mm bolt provided to
attach this bracket to the engine
(Review figure 3.4 for bolt loca-
tion).
51/07999-200
Figure 3.3
Figure 3.4
Figure 3.5
This manual suits for next models
3
Table of contents