manuals.online logo
Brands
  1. Home
  2. •
  3. Brands
  4. •
  5. JADO
  6. •
  7. Plumbing Product
  8. •
  9. JADO Savina 845/485 Series User manual

JADO Savina 845/485 Series User manual

Installation Instructions
To ensure that your installation proceeds smoothly--please
read these instructions carefully before you begin.
©JADO USA 2010
Products Luxury Faucets and Accessories
Pressure Balanced Shower and Valve Set
JADO USA
6615 West Boston
Chandler, AZ 85226
Phone: (8OO) 227-2734
Fax: (8OO) 552-JADO (5236)
www.jadousa.com
Product Numbers
845/485/...
845/486/...
H965860
Savina
H965860
RECOMMENDED TOOLS
Teflon Tape
Phillips Screwdriver
Regular Screwdriver
1ROUGHING-IN Turn off water at main supply.
CAUTION
When soldering, remove PLASTER GUARD, CARTRIDGES and CHECK
STOPS (IF PRESENT). When finished soldering, flush valve body, replace
cartridges, check stops (if present) and plaster guard to continue installation.
Use thread sealant or Teflon tape on threaded connections.
NOTE
If the valve is installed on a fiberglass or
other thin wall application, the PLASTER
GUARD (3) can be used as a support.
Connect hot and cold water supplies.
Cap off shower pipe (5).
For support, use pipe BRACES (6) secured to wooden braces.
With valve turned off, turn on water supplies. Check for leaks.
COLD
HOT
Cut a 4" dia. hole in the shower stall.
Drill two additional 1" holes to allow
access to the stops.
Remove PLASTER GUARD (3), rotate
180˚ so that indicated screw holes fit
MANIFOLD (2). Push CAP (4) on valve, place
ESCUTCHEON on and attach with screws.
1
6
5
3
4
2
See Roughing-in diagram before starting.
Connections are:
1/2" female NPT for threaded inlets
Connect RISER PIPE (1) to MANIFOLD (2)
top outlet marked "SHR".
For proper positioning the finished wall
must be within side wall of PLASTER
GUARD (3). Secure valve body to wall
support.
2
2 1/8" D.
(54mm)
1/2" NPT
(13mm)
FINISHED WALL
OPTIONAL TO
FINISHED
FLOOR
USUALLY
BETWEEN
72'' AND 84"
(1829mm TO
2134mm)
1-5/8" TO 3-1/4"
(41mm TO 83mm)
74" FOR HEAD
CLEARANCE
(OPTIONAL)
(1880mm)
16 5/8"
(422mm)
9 5/8"
(244mm)
3/8"
(10mm)
8" D.
(203mm)
8" D.
(203mm)
TUB "SEE
ILLUSTRATION"
BELOW
ROUGHING-IN DIMENSIONS
5-1/2"
(140 mm)
THREADED INLETS (STOPS)
OUTLETS 1/2" NPT
INLETS 1/2" NPT
3-3/8"
(86mm)
SHW
BOTTOM OF
TUB
OR SHOWER
STALL
(48" TO 54"
OPTIONAL)
1219mm to
1372mm
INSTALL VALVE COVER
When finished tiling the wall, remove
PLASTER GUARD (1).
Push CAP (2) over VALVE CARTRIDGE (3)
until seated against stop.
(Spline in CAP (2) must fully
engage spline on cartridge stem).
1
2
3INSTALL TRIM
1
2
3
4
OFF
HOT
COLD
“OFF” AT BOTTOM
Install ESCUTCHEON (1) onto CAP (2)
and push flush against finished wall.
Align mounting holes in ESCUTCHEON (1) with
with threaded mounting holes in valve body.
Secure ESCUTCHEON (1) with SCREWS (3).
Push DIAL PLATE (4) onto CAP (2).
Adjustable Wrench Pipe Wrench
Hammer
THREADED
MOUNTING
HOLES
H965860
By restricting HANDLE rotation and limiting the amount of hot water allowed to mix with the cold, the
HOT LIMIT SAFETY STOP (1) reduces risk of accidental scalding. To set the maximum hot water
temperature of your faucet, all you need to do is adjust the setting on the HOT LIMIT SAFETY STOP (1).
1
5
1
3
1
1
9
7
5
3
1
0
1
5
1
3
1
1
9
7
5
3
1
1
5
1
3
1
1
9
7
5
3
1
5
COLDER
(Larger Numbers)
0 1 3 5 7 9 11 13 15
HOTTER
(Smaller Numbers)
0 1 3 5 7 9 11 13 15
Turn CARTRIDGE STEM (2) to the OFF position (coldest setting) before making adjustment to HOT
LIMIT STOP (1). Use a flat blade screwdriver to pry free the HOT LIMIT SAFETY STOP (1). Pull
forward and rotate counterclockwise one number to limit hot water temperature.
Use ARROW (3) on CARTRIDGE (4) and NUMBERS (5) on HOT LIMIT STOP (1)
for indication.
1
5
7
6
1
5
4
5
4
3
4
3
22
ADJUST HOT LIMIT STOP (MUST BE DONE WITH TRIM REMOVED)
5BACK TO BACK INSTALLATION
(SEE ILLUSTRATION STEP 8 FOR REFERENCE) 6TEST INSTALLED FAUCET
Remove Handle and Trim from Valve. See
step 4a for reference.
Remove PRESSURE BALANCE UNIT (5). Rotate
PRESSURE BALANCE UNIT (5) 180˚ so that the inlets
face up and the large outlet port faces down.
Push PRESSURE BALANCE UNIT (5) in casting make
sure inlets line up with holes in bottom of casting. Top
flange should butt up against top of casting.
Reassemble FIXATION RING (4) and CARTRIDGE (1).
Turn VALVE "off".
With HANDLE in "off" position, turn on water supplies
and check all connections for leaks.
Operate HANDLE and flush water lines thoroughly. Pull
DIVERTER and check SHOWER for proper operation.
Check SPOUT and SHOWER connections for leaks.
6 7
8
OFF
HOT
4
4a
INSTALL TRIM
INSTALL HANDLE (ADJUST HOT LIMIT STOP PRIOR
TO HANDLE INSTALLATION, SEE STEP 5.)
Remove PIPE PLUG (1) from shower pipe.
Apply sealing tape to both ends of SHOWER ARM (2). Install
SHOWER ARM (2) and RAIN SHOWER HEAD (3).
CAUTION: Protect finish on SHOWER ARM,
SHOWER HEAD when installing.
2
31
For Cross and Lever Handles:
Align and install LEVER HANDLE (4) or CROSS HANDLE (5) into
VALVE STEM (6) and secure with SCREW (7).
Push INDEX BUTTON (8) into HANDLE (4) or (5).
APPLY
SEALING
TAPE
APPLY
SEALING
TAPE
H965860
8HELPFUL HINTS FOR CLEANING AND MAINTENANCE
The solid brass product you have just purchased has been designed to give you years of beauty and service. It is
important to bring to your attention proper care and maintenance procedures, which will ensure its lasting beauty.
First and foremost, it is important (as it is with any fine piece of jewelry or furniture) that the product be wiped clean and
dry with a soft damp cloth after every use.
Second, under no circumstances should an abrasive cleaner or combination cleaner/polish be used on JADO products.
The abrasive nature of such products will eventually destroy the finish and void the warranty.
In the event of stubborn blemishes shown on the finish, we recommend use of Windex window cleaner with a soft cloth,
but we do not recommend it be used on an everyday basis.
It is important to note that it is normal to expect signs of usage over time.
Thank you for selecting JADO for your home.
TO THE PURCHASER OF JADO BRASS PRODUCTS
Attention installer:
Please leave This Pamphlet for The Owner
POLISHED BRASS AND CUSTOM FINISH WARRANTY: A 1 YEAR LIMITED FINISH WARRANTY from date of purchase is provided to the
first residential owner against defects in materials and workmanship. Due to the ever-changing finish of Patina products, the finish warranty
is excluded. Warranty shall not include problems related to the installation of the product.
MECHANICS
MECHANICAL WARRANTY: A LIFETIME LIMITED WARRANTY is provided to the first residential owner on parts to be free from failure
related to defects in materials and workmanship but not installation.
CONDITIONS TO WARRANTIES
JADO Bathroom & Hardware Manufacturing Corp. places the following conditions on its finish and mechanical warranties to the first residential owner only.
JADO finish and mechanical warranties are limited to products correctly installed and used in a residential environment.
JADO warranties will not assume liability for damage due to abuse, mishandling, incorrect installation, improper maintenance, or deterioration
due to normal use.
JADO will not be liable for labor or other costs relating to the sale, installation, or replacement of their products.
In the event of a defect in any JADO product covered by this warranty, the product must be returned to the dealer where originally purchased
along with proof of purchase.
JADO's obligation under the warranty shall be limited to the repair or exchange of any product which has been determined by JADO to be
defective after appropriate examination.
The state of California has mandated under Proposition #65 that
manufactures of products, including faucets which come into
contact with potable water, must warn the consumer if the product
contains materials listed by the state as a carcinogen or
reproductive toxin. Lead, which is contained in all brass faucets in
limited amounts appears on the State's list.
Preliminary industry tests have indicated that users of faucets
made from brass face no significant danger, however,
California Proposition #65 requires that we provide you with the
following notice:
NOTICE: JADO products conform to industry
requirements of water conservation under the
ASTM / ANSI A112.18.1-2005 plumbing code.
Lavatory, bidet, wet bar and kitchen faucet sets
have a maximum flow rate of 2.2GPM. Shower
heads, hand showers and body sprays have a
maximum flow rate of 2.5GPM.
Warning: This product contains an element
known to the State of California to cause cancer
of reproductive harm.
JADO BATHROOM AND HARDWARE MFG. CORP.
6615 West Boston
Chandler, AZ 85226
JADO warrants this product to be free from defects in materials or workmanship for as long as the original consumer purchaser
owns their home.
JADO will provide, free of charge, at it’s sole option, replacement part(s) or product (or if no longer available, a comparable
product) to replace those which have proven defective in materials or workmanship.
Proof of purchase (original sales receipt) from the original consumer purchaser must be made available to JADO for all limited
warranty claims. This limited warranty is non transferable. It does not apply in the event of product damage due to the use of other than
genuine JADO replacement parts, installation error, abuse, misuse, or improper care and maintenance (whether performed by
a plumber, contractor, service provider or member of the purchaser’s household). The limited warranty excludes damage due to aggressive
air or water conditions, or harsh or abrasive cleaners and/or materials. This limited warranty excludes all industrial, commercial and business
usage, whose purchasers are hereby extended a two year limited warranty (with the exception of solenoid valves and other electronic
components which carry a one year limited warranty) applying to all other terms of this limited warranty except duration. This limited warranty
does not cover labor charges incurred and/or damages sustained in installation, repair or replacement, nor incidental or consequential
damages, all of which are expressly disclaimed. This limited warranty is applicable only to JADO faucets manufactured after June 1, 1996
and installed in the United States and/or Canada.
This limited warranty gives the original consumer purchaser of an JADO faucet specific legal rights which may vary from state to
state or from province to province. This limited warranty does not cover any liability for consequential or incidental damages, all of which
are hereby expressly disclaimed, or the extension beyond the duration of this limited warranty of any implied limited warranties, including
those of merchantability or fitness for an intended purpose. In some states or provinces the exclusion or limitation of incidental or consequential
damages is not allowed, so those exclusions may not apply to you.
JADO Bathroom & Hardware Manufacturing Corp. provides the following warranties only to the first residential owner of our products.
FINISHES
JADO FAUCET LIFETIME FUNCTION AND FINISH LIMITED WARRANTY
8
Remove Handle and Trim from Valve. See step 3 for reference.
Shut off water supply by either closing off main water supply, or closing off the hot and cold CHECK STOPS on valve, if present.
TO GAIN ACCESS TO VALVE FOR SERVICING
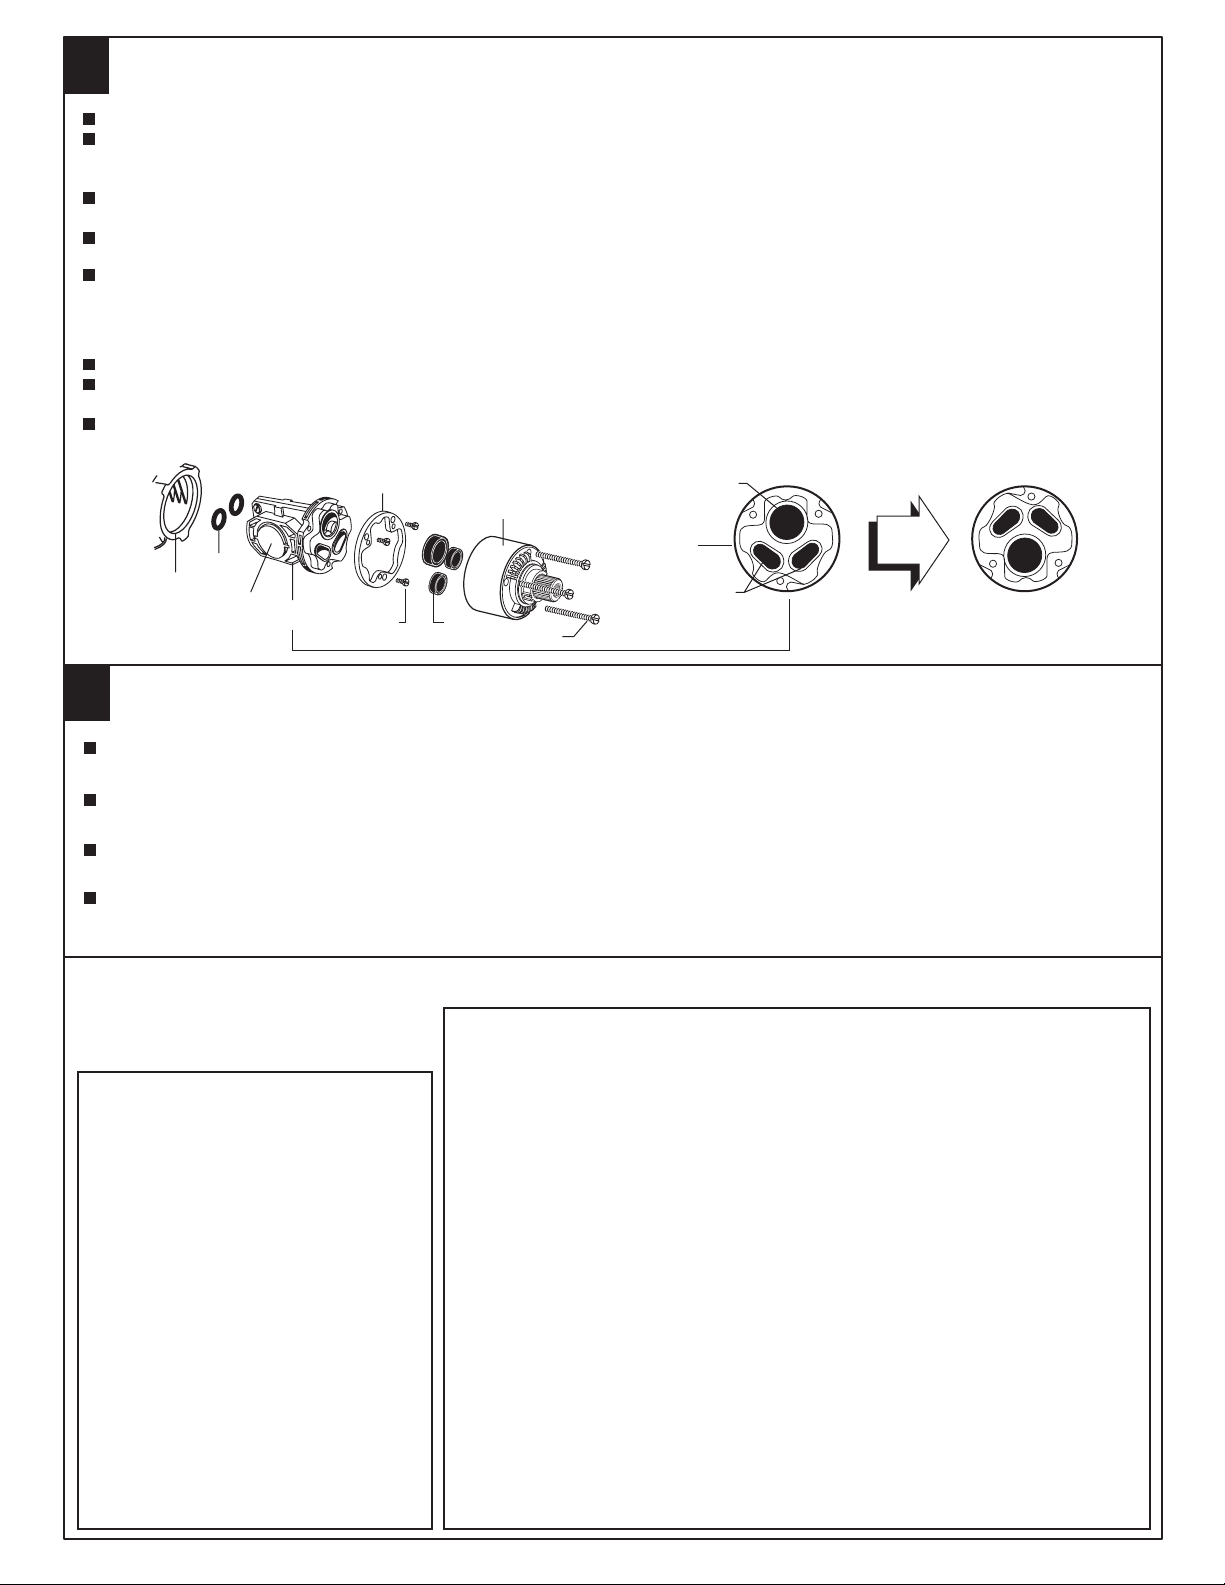
Remove CARTRIDGE (1) by removing CARTRIDGE SCREWS (2). Remove three SCREWS (3) from FIXATION RING (4) and
pull out PRESSURE BALANCING (5) unit.
Clean SEALS (9) on base of CARTRIDGE (1). Check base of PRESSURE BALANCING UNIT (5) and clean O-RINGS (6).
Remove CAPS (7) and check O-RINGS on inside of CAPS (7). Clean inside sealing surfaces of VALVE BODY (8).
Re-assemble PRESSURE BALANCING UNIT (5) and CARTRIDGE (1). Tighten all screws. Turn on water supply and see
above for installing TRIM and HANDLE.
VALVE LEAKS WHEN SHUT OFF
BACK TO BACK INSTALLATION
ROTATE 180˚
Remove PRESSURE BALANCE UNIT (5). Remove CAPS (7) and clean valve thoroughly.
Examine balancing unit and check condition of O-ring on end of piston. Piston should move back and forth. Order Repair
Part M952100-0070 if balancing unit is defective.
Replace CAPS (7) and install PRESSURE BALANCE UNIT (5). Make sure inlets line up with two holes in bottom of casting.
Top flange should butt-up against top of casting.
UNABLE TO MAINTAIN CONSTANT TEMPERATURE
1
2
9
5
5
7
86
4
3
INLETS
LARGE OUTLET

This manual suits for next models

1

Other JADO Plumbing Product manuals

JADO Borma 814 546 Series User manual

JADO

JADO Borma 814 546 Series User manual

JADO IQ 832 001 Series User manual

JADO

JADO IQ 832 001 Series User manual

JADO Hatteras 842/003 Series User manual

JADO

JADO Hatteras 842/003 Series User manual

JADO IQ 832 900 Series User manual

JADO

JADO IQ 832 900 Series User manual

JADO Borma 814 098 Series User manual

JADO

JADO Borma 814 098 Series User manual

JADO Borma 814 802 Series User manual

JADO

JADO Borma 814 802 Series User manual

JADO IQ 832 800 Series User manual

JADO

JADO IQ 832 800 Series User manual

JADO Perlrand 892/312 Series User manual

JADO

JADO Perlrand 892/312 Series User manual

JADO Borma 814 707 Series User manual

JADO

JADO Borma 814 707 Series User manual

JADO Wynd 816 User manual

JADO

JADO Wynd 816 User manual

JADO New Haven 826/003/ Series User manual

JADO

JADO New Haven 826/003/ Series User manual

JADO GLANCE 831/075/000/000 User manual

JADO

JADO GLANCE 831/075/000/000 User manual

JADO Glance 831/178 Series User manual

JADO

JADO Glance 831/178 Series User manual

JADO Glance 831/800 Series User manual

JADO

JADO Glance 831/800 Series User manual

JADO Victorian 85O User manual

JADO

JADO Victorian 85O User manual

JADO New Haven 825 800 User manual

JADO

JADO New Haven 825 800 User manual

JADO Swan User manual

JADO

JADO Swan User manual

JADO Classic 892/398 Series User manual

JADO

JADO Classic 892/398 Series User manual

JADO Borma 814 201 Series User manual

JADO

JADO Borma 814 201 Series User manual

JADO IQ 032 010 Series User manual

JADO

JADO IQ 032 010 Series User manual

JADO Glance 831/O84 Series User manual

JADO

JADO Glance 831/O84 Series User manual

JADO Borma 814 003 Series User manual

JADO

JADO Borma 814 003 Series User manual

JADO New Haven 826/083 Series User manual

JADO

JADO New Haven 826/083 Series User manual

JADO Classic Victorian 850.003 Series User manual

JADO

JADO Classic Victorian 850.003 Series User manual

Popular Plumbing Product manuals by other brands

Moen SHOW HOUSE S658 Series manual

Moen

Moen SHOW HOUSE S658 Series manual

American Standard 8344.112 parts list

American Standard

American Standard 8344.112 parts list

Pfister Skye F-049-SY Quick installation guide

Pfister

Pfister Skye F-049-SY Quick installation guide

American Standard Two and Three Handle Bath/Shower 7220.700... parts list

American Standard

American Standard Two and Three Handle Bath/Shower 7220.700... parts list

Bristan VAL2 BAS C CD (D2) Installation instructions & user guide

Bristan

Bristan VAL2 BAS C CD (D2) Installation instructions & user guide

newform PARK Limited Edition 67570E instructions

newform

newform PARK Limited Edition 67570E instructions

Kohler K-5331T-S-0 Installation and care guide

Kohler

Kohler K-5331T-S-0 Installation and care guide

Hansa PUBLIC E Mounting and operating instructions

Hansa

Hansa PUBLIC E Mounting and operating instructions

Abode Storm Slimline AB2427 manual

Abode

Abode Storm Slimline AB2427 manual

Symmons Dia SLS-3522-1.5 Installation Brief

Symmons

Symmons Dia SLS-3522-1.5 Installation Brief

Sentiotec Onni Small user manual

Sentiotec

Sentiotec Onni Small user manual

Rubi VERTIGO RVT22D Installation

Rubi

Rubi VERTIGO RVT22D Installation

Brizo Baliza 65005LF quick start guide

Brizo

Brizo Baliza 65005LF quick start guide

KADANT ELSJ Repair instructions

KADANT

KADANT ELSJ Repair instructions

Kohler 84625 Service Kit Instructions

Kohler

Kohler 84625 Service Kit Instructions

Toto WASHLET A100 installation guide

Toto

Toto WASHLET A100 installation guide

Hans Grohe Status M Instructions for use/assembly instructions

Hans Grohe

Hans Grohe Status M Instructions for use/assembly instructions

Glacier bay F51A1071CP Use and care guide

Glacier bay

Glacier bay F51A1071CP Use and care guide

manuals.online logo
manuals.online logoBrands
  • About & Mission
  • Contact us
  • Privacy Policy
  • Terms and Conditions

Copyright 2025 Manuals.Online. All Rights Reserved.