JAXJOX DumbellConnect JJ15001 User manual

USER MANUAL
JJ15001


LANGUAGES
English ................................................................................................................. 4
Français .............................................................................................................. XX
Italiano ............................................................................................................... XX
Pусскии ............................................................................................................. XX
Deutsche ........................................................................................................... XX
Português .......................................................................................................... XX
Turk ................................................................................................................... XX
Español ............................................................................................................. XX
한한한 ................................................................................................................. XX
한한한한 ............................................................................................................... XX
........................................................................................................................... XX
3

TABLE OF CONTENTS
Congratulations ................................................................................................... 5
What’s In The Box ................................................................................................. 5
Assembly.............................................................................................................. 6
Using Your DumbbellConnect™ ........................................................................... 8
Troubleshooting.................................................................................................. 12
Safety Warnings................................................................................................... 14
Satisfaction Guarantee........................................................................................ 15
Limited Warranty................................................................................................. 15
How To Obtain Warranty Service......................................................................... 15
Questions Or Concerns ...................................................................................... 16
Notices ............................................................................................................... 16
Disclaimer........................................................................................................... 17
4

Congratulations
What’s In the Box
Thank you for choosing the DumbbellConnect™, the rst-ever connected
dumbbell. This innovative training tool is designed to help you achieve your
tness goals. With exquisite design and advanced technology, the weight of
the dumbbells can be adjusted from 8 pounds (3.6 kg) to 50 pounds (22.7 kg)
in seconds. By connecting the dumbbells to the JAXJOX App, you can set your
goals, track your workouts, and see your tness progress with JAXJOX®Fitness
IQ™.
This product manual will help you better understand the equipment. Read
and understand the contents of this manual before attempting to use the
DumbbellConnect™. Please keep this manual for future reference.
Carefully remove all items from the box, and place them on the oor before
assembly. Verify that all of the components have been included.
Should you nd any parts missing, return the product to your point of purchase or contact
JAXJOX®via email at [email protected]
Base (x2)
Weights (x28)
Charging Cable (x2)
5
Handle (x2)

Assembly
Place each base on a solid, level oor.
This product needs to be charged, with the handles seated on the base, to
be activated before rst use. Failure to do so will result in the product not
functioning.
We recommend using and storing your dumbbells on the oor to minimize the
risk of injury.
Charge the DumbbellConnect™
• Plug the USB cable into a USB Power Adapter.
• Plug the USB-C end of the charge cable into the base of the
DumbbellConnect™.
• Plug the adapter into a functioning power outlet.
6

Stack the weights one at a time.
• Facing the base’s screen, stack the weights on the base one by one. Make
sure that there are 7 weights on each side.
• Ensure that the at side of the weight faces out from the handle, and the
raised edge faces in toward the handle.
• Place weights on the base, making sure there are no spaces between
weights
Place each dumbbell handle onto its base.
• Place each handle on the base, making sure the handle is aligned with the
sensors.
• When placing the handle on the base, you should not need any additional
force to seat the handle, if all components are properly aligned.
• When properly seated and ready for use, the unit will beep once.
Note: Weights must be stacked equally
on both sides, so the handles can connect
and perform properly. Improper assembly
of weights and handles can damage the
unit or cause serious injury.
7

Download the app.
• The JAXJOX®DumbbellConnect™ is compatible with mobile devices that
support iOS and Android. To get the most from your DumbbellConnect™,
install the JAXJOX®App. Visit jaxjox.com/support for more information and
instructions on how to use the app.
Connect to Bluetooth.
• Turn Bluetooth on in your phone’s settings.
• Open the JAXJOX App to connect via Bluetooth.
Using Your DumbbellConnect™
Navigating the LCD Display.
1. Base battery icon. The icon will be animated when charging, and will be solid
when the battery is fully charged.
2. Handle battery icon. The icon will be animated when charging, and will be
solid when the battery is fully charged.
3. Weight setting. Number displayed is the amount of weight loaded onto the
handle.
4. Weight unit icon. Will display LB or KG, dependent on which unit of weight is
being used.
8
4321

Turn on the DumbbellConnect™.
• Press the [-] or [+] button on the base to turn the unit on.
• The screen will display the Bluetooth icon to remind you to connect to the
JAXJOX®app.
Change the unit of weight.
• The current unit of weight is displayed in the upper right corner of the screen.
• If you need to change the unit of measurement between LB and KG, press
the [+] button for 3 seconds. The weight icon will ash. Press the [+] to
change the weight unit of measure.
Change the weight of the handle.
• With the unit turned on, and the current weight shown on the LCD screen,
press the [+] or [-] button, to change the weight as desired.
• The DumbbellConnect™ can be adjusted from 8 lbs (3.6 kg) to 50 lbs (22.7
kg) in increments of 6 lbs (2.7 kg).
• The DumbbellConnect™ takes approximately 3 to 5 seconds to change to
your selected weight. The weight loading animation plays while the weight is
adjusting. Do not move the handle while it is adjusting.
• The DumbbellConnect™ will beep once when it is ready for use.
9

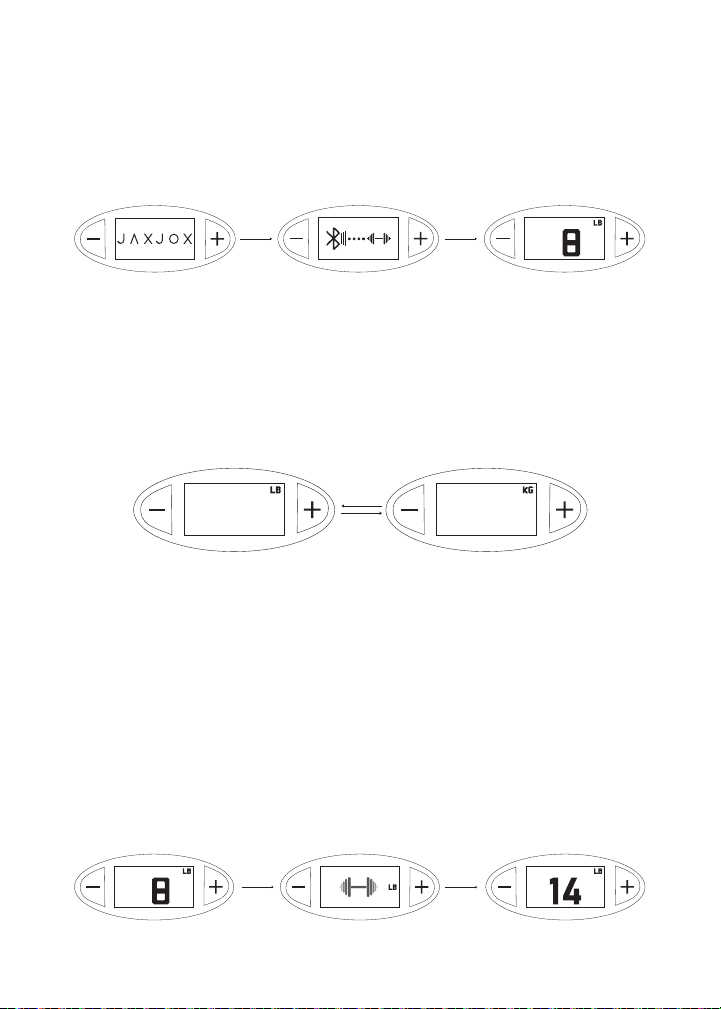
Making sure your dumbbell handle is connected.
If your handle is properly seated on the base, the battery icon will be displayed
on the LCD screen. If the handle is removed from the base, improperly seated, or
does not have a charge, the battery icon will not be displayed.
Working out with the DumbbellConnect™.
Before starting your workout, ensure your environment is free of anything that
may interfere with your movements.
Do not drop the dumbbells or use excessive force when moving or working out
with the dumbbells.
IMPORTANT: Do not attempt to adjust any structure of the dumbbell handles or manually
adjust the weight of the dumbbell handles. This can cause serious injury or product failure.
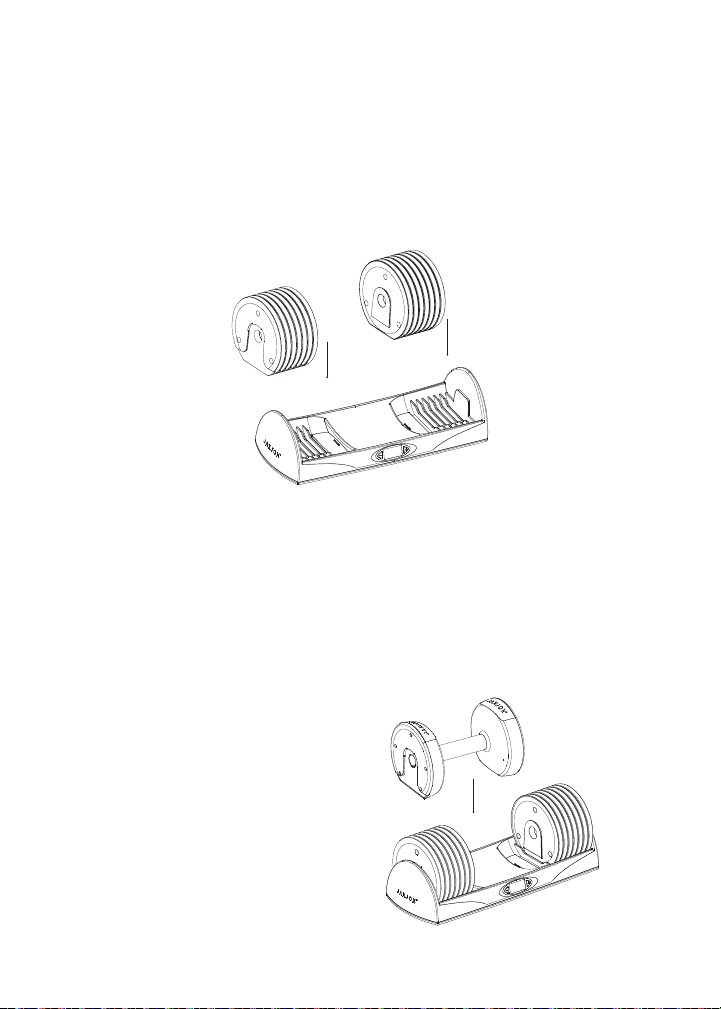
Lifting the handles from the base.
After changing the weight, wait for a beep
sound before lifting the dumbbell handles.
IMPORTANT: Lift the dumbbell handles
vertically and remove the handles from each
base before use. Not doing so may result in
serious injury.
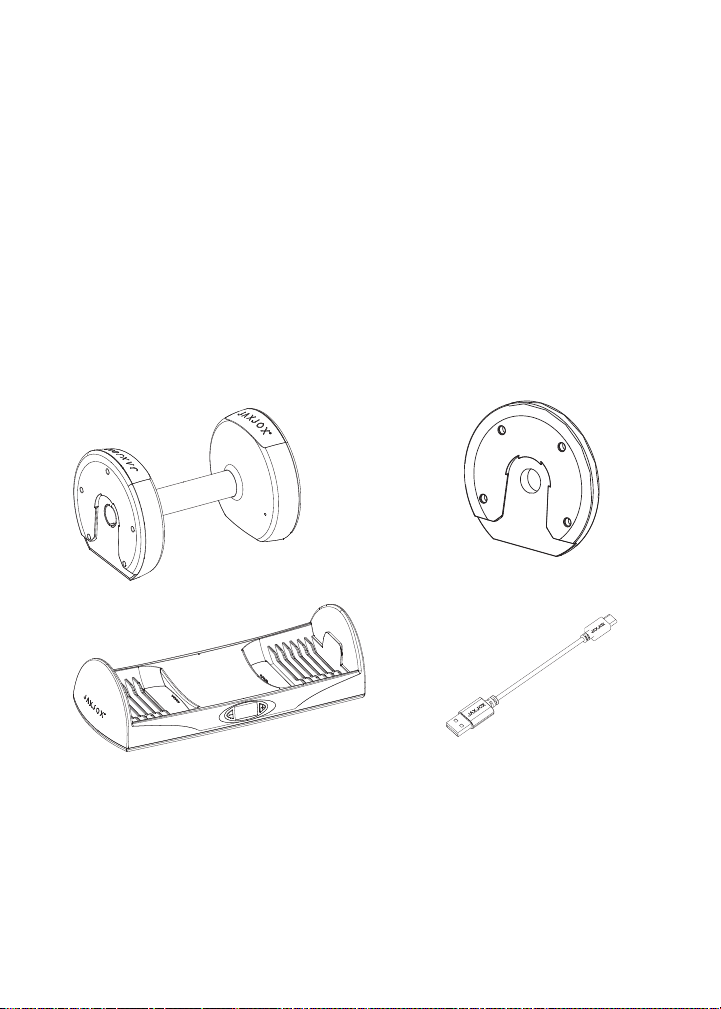
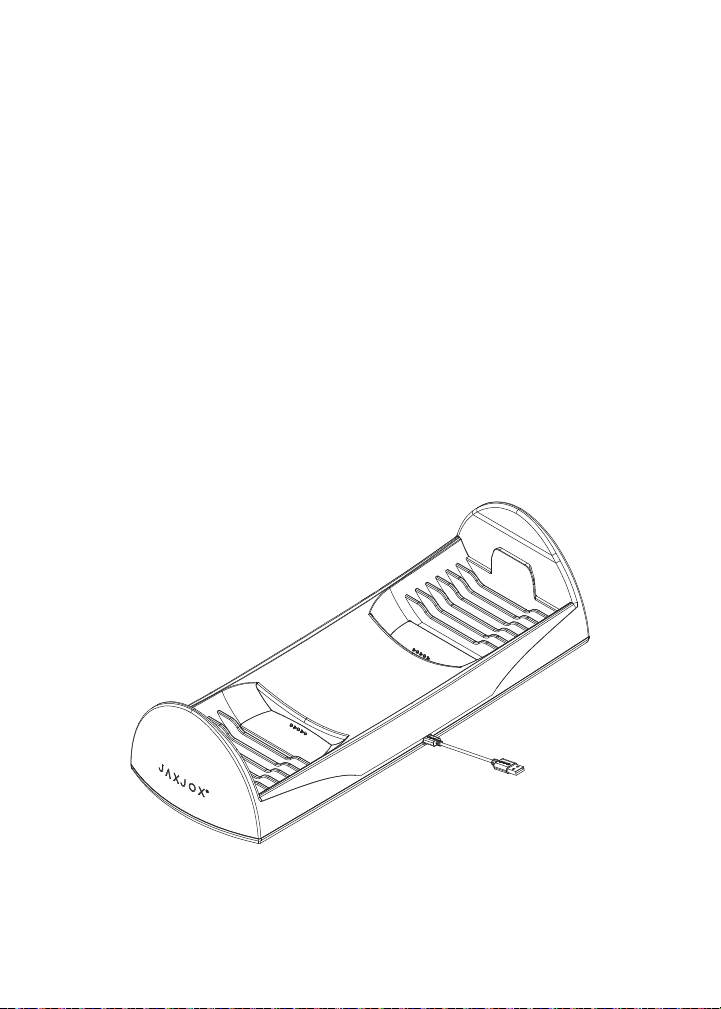
Reminder: The DumbbellConnect™ handles only charge when they are properly seated on
the base, and the base is plugged into a working power source.
10

Return the handle to the base.
• Avoid excessive force when returning a dumbbell to the base.
• Ensure that weights are properly aligned with the base. When all components
are aligned correctly, no additional force is required to seat the dumbbell
handles.
• When you seat the dumbbell handle on the base, and it is properly seated,
the unit will beep once.
Reset the DumbbellConnect™.
• If you are experiencing issues with your DumbbellConnect™, resetting the
device may correct them.
• To reset the unit, press the reset button on the underside of the base, which
is highlighted in the gure below.
11

Sleep Mode.
When not in use, the DumbbellConnect™ enters into sleep mode after 20
seconds, and the backlight turns off.
Troubleshooting
Low battery.
• Make sure the DumbbellConnect has been charged.
• Verify that the charging cable is fully inserted into the base and the power
adapter. Ensure that the cable is functioning properly, switching cables if
unsure.
• Verify that the power adapter is plugged into a functioning power outlet. Ensure
that the power adapter is functioning properly, switching adapters if unsure.
• Make sure the handles are properly seated on the bases.
Bluetooth not connecting.
• Make sure that the unit has been connected to the JAXJOX®App.
• Verify that Bluetooth is enabled on your device.
• For further troubleshooting, please visit jaxjox.com/support.
DumbbellConnect™ is not adjusting the weight.
• Make sure the dumbbell handle is properly
seated on the base before adjusting the weight.
• The unit will beep once when the handle
is properly seated.
• Ensure that there are no gaps between
weights, and that all weights are sitting
properly on the base before use.
12

DumbbellConnect™ does not beep.
• Make sure the handle is properly seated on the base.
• Verify that there are no spaces between weights, and that the weights are
sitting properly on the base.
• The weight loaded on the handle does not match the weight displayed on the
base.
Handle weight does not match displayed weight.
• Remove all unattached weight plates from the base.
• Make sure the handle is charged.
• Place the handle alone on the base.
• Decrease the displayed weight to 8lbs.
• Wait for unit to beep. Weight plates should now be released from handle.
• After successful release, stack the weights back on the base, reseat the
handle, and continue your workout.
WARNING: Manually adjusting the weight of dumbbell handles can cause serious injury
or equipment damage. It can also cause a weight mismatch between the dumbbell handle
and the base, causing the device to become inoperable. In this event, follow all safety
precautions noted before attempting to x the issue.
IMPORTANT: Perform all troubleshooting steps low to the ground and keep all body parts
out of the direct path of the weights.
13

Product Parameters
Product model: JJ15001
Handle size: LWH: 19.5 x 7.5 x 7 IN / 49.5 x 19 x 17.5 CM
Base size: LWH: 19.5 x 7.5 x 5 IN / 49.5 x 19 x 12 CM
Product Net Weight: 104.5 Lbs / 47.5 Kg
Wireless connection: Bluetooth
APP: iOS 13.0+; Android 5+
Always store your product on the ground, in a at place, to ensure that is not a
falling or tripping hazard. Before you work out, ensure your environment is free of
anything that may interfere with your movements.
When moving the DumbbellConnect™, disassemble all of the parts and
reassemble them in the new location. Do not attempt to move the entire unit at
one time.
Consult your physician before starting a workout plan. If you experience
faintness, pain, or shortness of breath, stop exercising immediately, and consult
a physician.
Select an intensity level that is appropriate for your tness level and warm up
before each workout.
The DumbbellConnect™ is not a toy. Do not allow children or pets to play with or
around the device. Supervise and provide instruction to anyone under the age of
18 using the product. DO NOT drop or use excessive force, at any time, with the
DumbbellConnect™.
The DumbbellConnect™ can be used both indoors and outdoors, under the
proper conditions. Do not use this product outside in temperatures that are hot
or cold enough to damage the electronics. This product is not waterproof. Avoid
using it near water, or in high humidity areas such as a sauna or steam room. Do
not store our products outside.
Prior to cleaning, unplug the DumbbellConnect™. To clean the
DumbbellConnect™, use a dry or slightly damp cloth. Avoid using detergents.
Avoid water coming in contact with the base, as it contains sensitive electronics.
Wipe handles with a dry cloth.
Safety Warnings
14

If you are not satised with your JAXJOX®DumbbellConnect™(hereafter
referred to as the “Product”) for any reason, you must contact JAXJOX by email
at [email protected], within 30 days of delivery. Returned Product(s) must
be in good physical condition (not broken or damaged). All product components
originally included with your purchase must be included with your return. Returns
found to be broken, damaged, or missing any part(s) may be subjected to
additional fees. Shipping and handling charges, gift wrap fees, and taxes paid
(such as state, customs, or VAT) are not refundable. You are responsible for all
shipping charges and you assume the risk of loss or damage to the returned
Product(s) while in transit back to JAXJOX®.
JAXJOX®warrants to the original purchaser that your DumbbellConnect™
(hereafter referred to as the “Product”) shall be free from defects in materials
and workmanship under normal use for a period of one (1) year from the date of
delivery.
If such a defect arises and a request is received by JAXJOX®within the
applicable Warranty Period, JAXJOX®will, at its option and to the extent
permitted by law, either (1) repair the Product at no charge, using new or
refurbished replacement parts or (2) replace the Product with a new or
refurbished Product. In the event of such a defect, to the extent permitted by law,
these are your sole and exclusive remedies. Shipping and handling charges may
apply except where prohibited by applicable law. This Limited Product Warranty
is valid only in the jurisdictions where the Products are sold by JAXJOX®itself or
through its authorized reseller or agent and is valid to the extent permitted by the
applicable laws of such jurisdictions. Any replacement Product will be warranted
for the remainder of the original warranty period or thirty days, whichever is
longer, or for any additional period of time that may be required by applicable law.
30-Day Returns Policy
Limited warranty
15

JAXJOX® stands behind the quality of our product. We hope that our beautifully
designed, interconnected tness products and accessories meet your needs
and get you where you want to be. If you need assistance or are experiencing
answers.
User Manual Published 2021 - The content of this manual is subject to change
due to the manufacturer’s ongoing research and development plans, without
prior notice. For the most updated version, please visit our Support Page at
www.jaxjox.com.
Questions or Concerns
16
To be eligible for service under this Limited Warranty you must contact JAXJOX®
details and/or comply with other requirements before receiving warranty service.
Claims must be made within the specied warranty period.
The products are subject to change due to the manufacturer’s ongoing research
and development plans without prior notice.
Our Company makes no representations or warranties as to this user manual or
the product we described.
Our Company shall not be liable for any direct or indirect, accidental or special
damages, losses or expenses arising out of or in connection with this user
manual or the product we described.
How to Obtain Warranty Service
Liability Statement

This device complies with Part 15 of the FCC Rules. Operation is subject to the
following two conditions: (1) This device may not cause harmful interference, and
(2) This device must accept any interference received, including interference that
may cause undesired operation.
WARNING: Changes or modications not expressly approved by the party
responsible for compliance could void the user’s authority to operate the
equipment.
NOTE: This equipment has been tested and found to comply with the limits for
a Class B digital device, pursuant to Part 15 of the FCC Rules. These limits
are designed to provide reasonable protection against harmful interference in a
residential installation.
This equipment generates, uses and can radiate radio frequency energy and, if
not installed and used in accordance with the instructions, may cause harmful
interference to radio communications. However, there is no guarantee that
interference will not occur in a particular installation. If this equipment does cause
harmful interference to radio or television reception, which can be determined
by turning the equipment off and on, the user is encouraged to try to correct the
interference by one or more of the following measures:
• Reorient or relocate the receiving antenna.
• Increase the separation between the equipment and receiver.
• Connect the equipment into an outlet on a circuit different from that to which
the receiver is connected.
• Consult the dealer or an experienced radio/TV technician for help. This
device meets the FCC requirements for RF exposure in public or uncontrolled
environments.
Notices
17
Table of contents
Other JAXJOX Fitness Equipment manuals
Popular Fitness Equipment manuals by other brands

Force USA
Force USA F-CLP owner's manual

York Fitness
York Fitness anniversary g201 owner's manual

York Fitness
York Fitness 234 Bench Plus Butterfly Assembly instructions

Auvon
Auvon TU2224-A user manual

Rifton
Rifton E-Pacer K660 product manual

BH FITNESS
BH FITNESS Nevada plus G119X Instructions for assembly and use