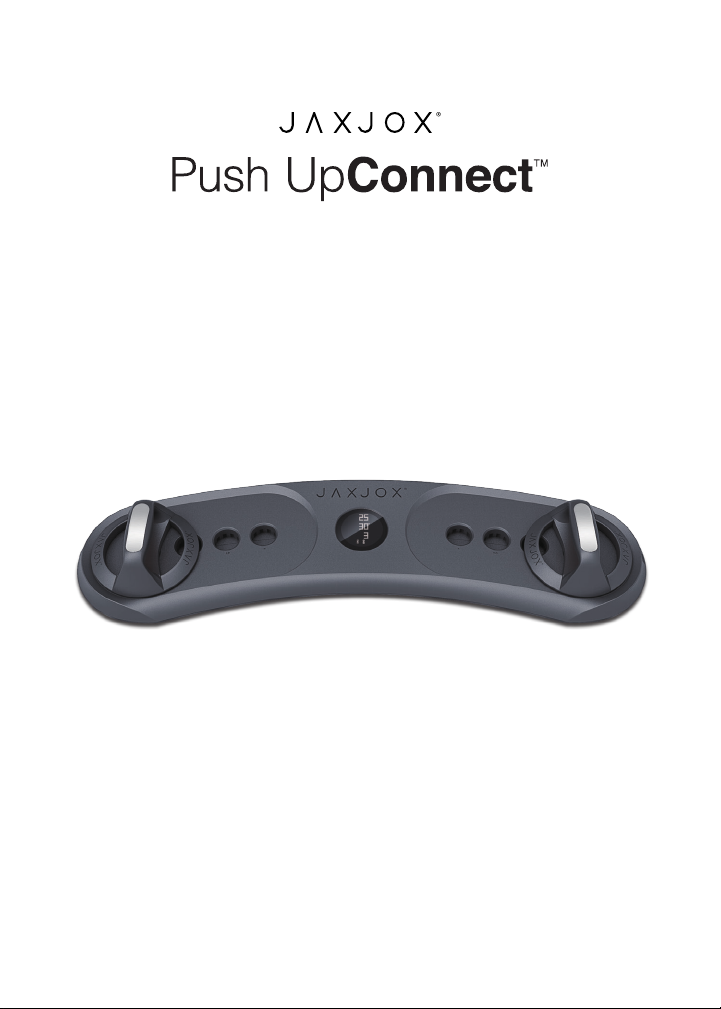
JAXJOX Push Up Connect User manual

USER MANUAL
JJ15002


LANGUAGES
English ................................................................................................................. 4
Français .............................................................................................................. XX
Italiano ............................................................................................................... XX
Pусскии ............................................................................................................. XX
Deutsche ........................................................................................................... XX
Português .......................................................................................................... XX
Turk ................................................................................................................... XX
Español ............................................................................................................. XX
한한한 ................................................................................................................. XX
한한한한 ............................................................................................................... XX
........................................................................................................................... XX
3

TABLE OF CONTENTS
Congratulations ................................................................................................... 5
What’s In The Box ................................................................................................. 5
Assembly.............................................................................................................. 6
Reading Data On the LCD Display ....................................................................... 8
Charging Your Push UpConnect™ ...................................................................... 8
Connecting Your Push UpConnect™ ................................................................... 9
Using Your Push UpConnect™ .............................................................................. 9
Safety Warnings................................................................................................... 11
Satisfaction Guarantee........................................................................................ 12
Limited Warranty................................................................................................. 12
Liability Statement ............................................................................................. 13
How To Obtain Warranty Service......................................................................... 13
Questions Or Concerns ...................................................................................... 13
Notices ............................................................................................................... 14
Disclaimer........................................................................................................... 14
4

Congratulations
What’s In the Box
Congratulations on your purchase of the JAXJOX®Push UpConnect™, an
innovative training tool designed to help you achieve your tness goals. Equipped
with pressure sensors, the Push UpConnect™ records every rep and set.
The real-time data can be displayed on the LCD digital display. By connecting
the Push UpConnect to the JAXJOX App, you can set your goals, track your
workouts, and see your tness progress with JAXJOX®Fitness IQ™.
This product manual will help you better understand the equipment. Read and understand
the contents of this manual before attempting to use the Push UpConnect™. Please keep
this manual for future reference.
Carefully remove all items from the box and place them on a solid, level surface.
Verify that all of the components have been included.
Should you nd any parts missing, return the product to your point of purchase or contact
JAXJOX®via email at [email protected]
Base (x1)
Handles (x2) Charging Cable (x1)
5

Assembly
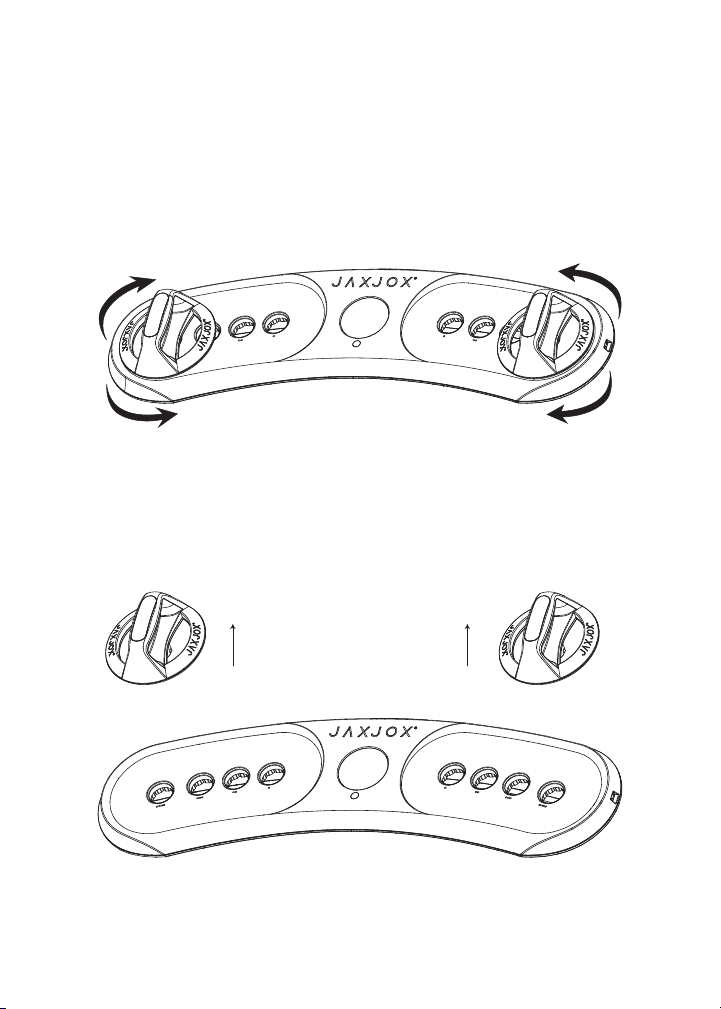
Install the handles on the base.
Place the Push UpConnect™ on a solid, at surface.
1. The Push UpConnect™ has four holes on the left and right sides of the
base. With a handle in each hand, rmly push the handles down into holes
on the base, one on each side of the LCD screen. Be sure to install them
symmetrically to ensure even weight distribution and proper form.
2. For a closer grip, install the handle using the innermost hole on each side.
For a wider grip, use the outermost holes. And for standard width, use
one of the middle two holes. To determine the best width, perform practice
repetitions from your selected position, and adjust accordingly.
3. After you push the handle down into the holes on the base, you should hear a
click. This indicates that the handle is locked. If you hear no click sound, turn
the handles left and right until you hear it lock. Pull upward on each handle to
ensure each one is securely attached.
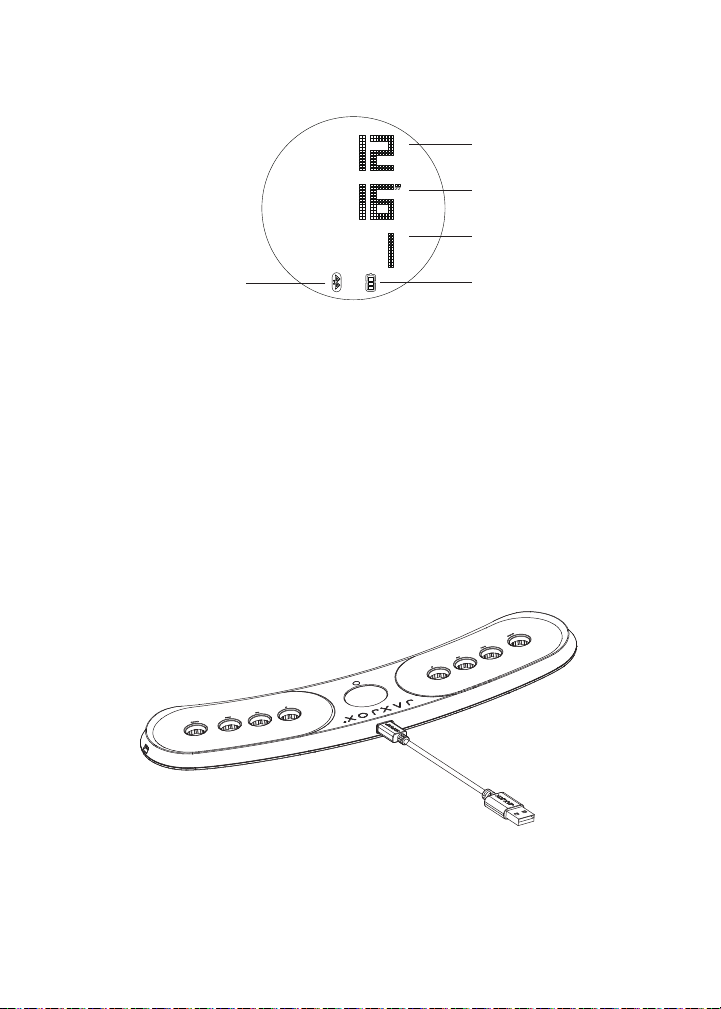
4. The Push UpConnect will automatically reset after 5 seconds of inactivity, and
will automatically power off after 20 seconds.
Push UpConnect™ has four
holes on the left and right sides.
Make sure there is a handle on
the left and right sides.
6

Adjust the angle of the handle.
• To adjust the angle of the handle, lift handle out from the base and adjust to
the angle of your choice, then install it down into one of the holes. If there is
a click sound when pressing down the handle at your preferred angle, the
handle has been inserted properly. If there is no click sound, turn the handle
slightly to the left and right until it clicks at your selected angle. Be sure that
the two handles are inserted symmetrically.
Remove the handle.
• To remove the handles, push down on the base and gently pull each handle
up out of the hole.
7

1. Reps
2. Time
3. Set
4. Battery
5. Bluetooth
Important: You must charge the Push UpConnect™ for at least three (3) hours prior to the
rst use. Both handles must be rmly installed so that the Push UpConnect™ can connect
and work properly.
Reading Data On the LCD Display
Charging your Push UpConnect™
How to charge the Push UpConnect™
1. To charge, plug the USB end of the cable into a USB Power Adapter.
2. Insert the USB-C end of the cable into the base of the Push UpConnect™.
3. Plug the Power Adapter in a functioning power outlet.
8
1
2
3
45

Download the app.
The JAXJOX®App is compatible with mobile devices that support iOS and
Android. To get the most from your Push UpConnect™, install the JAXJOX®App,
and connect it with your device. Visit jaxjox.com/support for more information
and instructions on how to use the App.
Bluetooth Connection
• Make sure that Bluetooth is enabled on your phone.
• Open the JAXJOX App to connect via Bluetooth.
Using Your Push UpConnect™
Connecting Your Push UpConnect™
1. Wake up the Push UpConnect™ by touching the handle. The LCD will enter
the main interface display after showing the word “JAXJOX®” for 2 seconds.
2. Place the Push UpConnect™ on a at, level surface to ensure proper
technique and accurate data recording.
When the Push UpConnect™ is charging, the battery symbol will be animated.
Once charged, the battery symbol will be fully displayed. After touching, the
Push UpConnent™ will wake up and the backlight will turn on.
9
Over 75% Over 50% Over 25% Below 25%

3. Real-time data reading: Grab both handles rmly. Assume a standard push-
up position. Once you perform more than two push-ups, reps and times will
be shown on the LCD. If you perform less than two push-ups, the screen will
not display data. If you haven’t performed the exercise for over six seconds,
the current set will be nished and the data will be deleted after two minutes.
4. Once your workout is complete, the LCD will display the number of push-ups
and total exercise time.
5. Sleep Mode: After twenty seconds of inactivity, the Push UpConnect™ will
enter sleep mode. Touch a handle or move the device to power it back on.
Please Note: Before doing exercise, the following condition may affect the counts:
Please gently peel off the screen protector so that the device can count more accurately.
Do not block the screen with foreign objects, such as a cellphone.
10
Reset the Push UpConnect™.
After 2 minutes without any operation, the device will automatically reset.
Product Parameters
Product model: JJ15002
Handle size: LWH - 6.42 x 6.42 x 3.56 IN / 16.32 x 16.32 x 9.05 CM
Base size: LWH - 8.68 x 34.5 x 1.24 IN / 22.06 x 87.63 x 3.14 CM
Product Weight: 4.4 Lb / 2 Kg
Wireless connection: Bluetooth
APP: iOS 13.0+; Android 5+

11
Care should be taken when storing the tness equipment away from areas where
it could become a trip or falling object hazard. Before you exercise, ensure your
environment is free of anything that may interfere with your movements. Consult
your physician before starting a workout plan. If you experience faintness, pain,
or shortness of breath, stop exercising immediately, and consult a physician.
Select an intensity level that is appropriate for your tness level and warm up
before each workout.
The Push UpConnect™ is not a toy. Do not allow children or pets to play with or
around the device. Supervise and provide instruction to anyone under the age of
18 using the device. Do not drop the Push UpConnect™ or use excessive force
when using it.
The Push UpConnect™ can be used both indoors and outdoors, under the
proper conditions. Do not use this product outside in temperatures that are hot
or cold enough to damage the electronics. This product is not waterproof. Avoid
using it near water, or in high humidity areas such as a sauna or steam room. Do
not store our products outside.
Prior to cleaning, unplug the Push UpConnect™. To clean the Push
UpConnect™, use a dry or slightly damp cloth. Avoid using detergents. Avoid
water coming in contact with the base, as it contains sensitive electronics. Wipe
handles with a dry cloth.
Safety Warnings
If you are not satised with your JAXJOX®Push UpConnect™ (hereafter referred
to as the “Product”) for any reason, you must contact JAXJOX by email at
[email protected], within 30 days of delivery. Returned Product(s) must be
in good physical condition (not broken or damaged). All product components
originally included with your purchase must be included with your return. Returns
found to be broken, damaged, or missing any part(s) may be subjected to
additional fees. Shipping and handling charges, gift wrap fees, and taxes paid
(such as state, customs, or VAT) are not refundable. You are responsible for all
shipping charges and you assume the risk of loss or damage to the returned
Product(s) while in transit back to JAXJOX®.
30-Day Returns Policy

JAXJOX®warrants to the original purchaser that your Push UpConnect™
(hereafter referred to as the “Product”) shall be free from defects in materials
and workmanship under normal use for a period of one (1) year from the date of
delivery.
If such a defect arises and a request is received by JAXJOX®within the
applicable Warranty Period, JAXJOX®will, at its option and to the extent
permitted by law, either (1) repair the Product at no charge, using new or
refurbished replacement parts or (2) replace the Product with a new or
refurbished Product. In the event of such a defect, to the extent permitted by law,
these are your sole and exclusive remedies. Shipping and handling charges may
apply except where prohibited by applicable law. This Limited Product Warranty
is valid only in the jurisdictions where the Products are sold by JAXJOX®itself or
through its authorized reseller or agent and is valid to the extent permitted by the
applicable laws of such jurisdictions. Any replacement Product will be warranted
for the remainder of the original warranty period or thirty days, whichever is
longer, or for any additional period of time that may be required by applicable law.
Limited Warranty
12
To be eligible for service under this Limited Warranty you must contact JAXJOX®
details and/or comply with other requirements before receiving warranty service.
Claims must be made within the specied warranty period.
The products are subject to change due to the manufacturer’s ongoing research
and development plans without prior notice.
Our Company makes no representations or warranties as to this user manual or
the product we described.
Our Company shall not be liable for any direct or indirect, accidental or special
damages, losses or expenses arising out of or in connection with this user
manual or the product we described.
How to Obtain Warranty Service
Liability Statement

JAXJOX® stands behind the quality of our product. We hope that our beautifully
designed, interconnected tness products and accessories meet your needs
and get you where you want to be. If you need assistance or are experiencing
answers.
User Manual Published 2021 - The content of this manual is subject to change
due to the manufacturer’s ongoing research and development plans, without
prior notice. For the most updated version, please visit our Support Page at
www.jaxjox.com.
Questions or Concerns
13
This device complies with Part 15 of the FCC Rules. Operation is subject to the
following two conditions: (1) This device may not cause harmful interference, and
(2) This device must accept any interference received, including interference that
may cause undesired operation.
WARNING: Changes or modications not expressly approved by the party responsible for
compliance could void the user’s authority to operate the equipment.
NOTE: This equipment has been tested and found to comply with the limits for a Class B
digital device, pursuant to Part 15 of the FCC Rules. These limits are designed to provide
reasonable protection against harmful interference in a residential installation.
This equipment generates, uses and can radiate radio frequency energy and, if not
installed and used in accordance with the instructions, may cause harmful interference to
radio communications. However, there is no guarantee that interference will not occur in a
particular installation. If this equipment does cause harmful interference to radio or television
reception, which can be determined by turning the equipment off and on, the user is
encouraged to try to correct the interference by one or more of the following measures:
• Reorient or relocate the receiving antenna.
• Increase the separation between the equipment and receiver.
• Connect the equipment into an outlet on a circuit different from that to which the receiver
is connected.
• Consult the dealer or an experienced radio/TV technician for help. This device meets the
FCC requirements for RF exposure in public or uncontrolled environments.
Notices
Table of contents
Other JAXJOX Fitness Equipment manuals
Popular Fitness Equipment manuals by other brands

KingsBox
KingsBox Power Platform quick start guide

MAXXMEE
MAXXMEE 09529 manual

Sunny Health & Fitness
Sunny Health & Fitness SF-RW5624 user manual

IRONEDGE
IRONEDGE Bench Pull Assembly instructions

Insportline
Insportline 3908 user manual

Ring Mekanikk
Ring Mekanikk Steens Physical User manual and technical specifications