Jazz DV152 User manual

0
J
Ja
az
zz
z
D
DV
V1
15
52
2
I
In
ns
st
tr
ru
uc
ct
ti
io
on
n
M
Ma
an
nu
ua
al
l

1
FCC Statement.
FCC part15.21
Warning:Changesormodificationstothis unitnotexpresslyapproved bythepartyresponsibleforcompliancecould
voidthe user sauthoritytooperatetheequipment.
FCC part15.105
Note:This equipment hasbeen tested and found tocomplywiththe limitsforaClass Bdigitaldevice, pursuant toPart
15 of the FCCRules.Theselimitsaredesigned toprovide reasonableprotectionagainstharmfulinterferencein
aresidentialinstallation.Thisequipmentgenerates,uses,andcan radiateradiofrequencyenergyand,ifnot
installed and used inaccordancewiththe instructions,maycauseharmfulinterferencetoradio
communications.However,thereis no guaranteethatinterferencewill notoccurinaparticularinstallation.If
this equipmentdoescauseharmfulinterferencetoradioortelevision reception,whichcan bedetermined by
turning the equipment off and on, theuseris encouraged totrytocorrect the interferencebyone ormoreof the
following measures:
- Reorient orrelocatethe receiving antenna.
- Increasetheseparation between the equipment andreceiver.
- Connect the equipment intoan outlet on acircuit different fromthat towhichthe receiveris connected.

2
Using YourCamcorder
TurnOn/Off
1.Press &holddown" "toturn
camcorderon.
2.
Press "
"toturncamcorderoff.
Note:
Camcorderwill poweroff after1minute
if not inused.
ChangeMode
Press " "tochangemode between
videorecord,stillphotocaptureand
playback.
Record/Capture
1.Press " "tobeginvideorecording
ortakeaphoto.
2.Press " "againtostopvideo
recording.
Note:
Insert2fresh
AAbatteries
and
S
D
(
orMMC
)
cardtooperatethe
cam
era
.
ChangeResolution
Press " "tochangeresolution.
Zoom
1. Press " "tozoomin.
2. Press " "tozoomout.
Playback
1. Press " "toenterplaybackmode.
2. Inplaybackmode, press " "or" "to
select anotherfile.
3. Press " "tobeginortostop playing
video,and press " "or" "to
zoomin/out photo.
4. When zoomed inpress " "or" "to
enterPANModetoview image
Delete
1. Inplayback mode,press " "and
“DeleteCurrent?”will appearon
displayscreen.
2. Press " "againand “DeleteAll?”will
appearon displayscreen.
3. Press " "toconfirm.Pressany
other
buttontocancel.
ChangeBatteries
1.Press “ ” switchtoreleasethe
batterycover, slide downthe battery
covertoremoveit.
2.Removeused batteries.
3.ReinstalltwofreshAAbatteries,
align “+”, “-”terminals asindicated.
4.Closethe batterycover.

3
Tripod nut
SD/MMC
CardSlot
LCD Screen
Lens
Microphone
LED Light
Speaker
Appearance
USB Connector
TVOut Port
USB
ejector
Strap Holder
BatteryCover

4
Note:Pleaseinserttwofresh AA batteriesandSDcardtooperatethecamera
a)Installing Batteries and Powering ON
Press “ ” switchtoreleasethe batterycover.Slide downandremovethebatterycover.InserttwonewAA
alkalinebatteries.Notepolarityon batteryterminals.Slideand closethebatterycover.Press andholddown
thepowerswitchuntil LCD panelshowsthat cameraisturned ON
b)Installing SD/MMCCard
TurnyourcamcorderOFF beforeinserting / removingtheSD/MMCCard(maximum2GB)
InserttheSDMemorycardintotheSD/MMCCardSlot. Checkcardsalignmentaccording to
position diagramonthecamerabeforeinserting.Pushitdownuntil thecardstays latched.Donot
forcecardduring insertion –forcing maydamageSDcardandcameraaswell.
Pushand releaseinsertedcardwhen you wishtoremoveorreplacethecard.
NotethattheSDCardhasatinyLOCKswitchontheside.Settheswitchonthecardtoun-LOCK;
onlythis unlockedposition will allowyou tostorerecorded videosand still pictureson theSDMemory
Card.
c)Selecting Video/ Still Pictures Resolution
You can select High orLowresolution forrecordingvideosortakingstill pictures.
Press " " resolutionswitch selecting desired resolution.
LCDscreen will display “Hi”or “Lo”indicating HIGHorLOWresolution selected.

5
d)Videoand picturetaking
TheSDcardmust beinstalled ifyouwishtorecordvideo ortakestill pictures.
Press" "toscroll andselectVideoRecordingorStill photocapturemode. Noterelatediconsvisibleinleft
uppercornerontoLCDscreen.
Press" "tobeginVideoRecordingortakeaStill Picture.
Press" "againtostopVideoRecording.
e) Playback
Press" "toscroll andenterthePlaybackmode.
Press" "or" "(left orright)buttonstoselect desired Video orStill Picturefile.
Press " "(downbutton)toenter “THUMBNAILMODE”toviewmultiplefiles.Then scrolltodesired fileand press
""toselect
Press" "tostart playing video, press this button againtostop.
Press " "or" "tozoomin/out ofaStill Picture
When youhavezoomedin, press" "or" "(left orrightbutton) toenter “PAN MODE”.Then pressing anydirection
keyswill movetheenlarged image inanydirection soyou mayview selected picturesegment.
Toexit from “PANMODE”, press " "button.

6
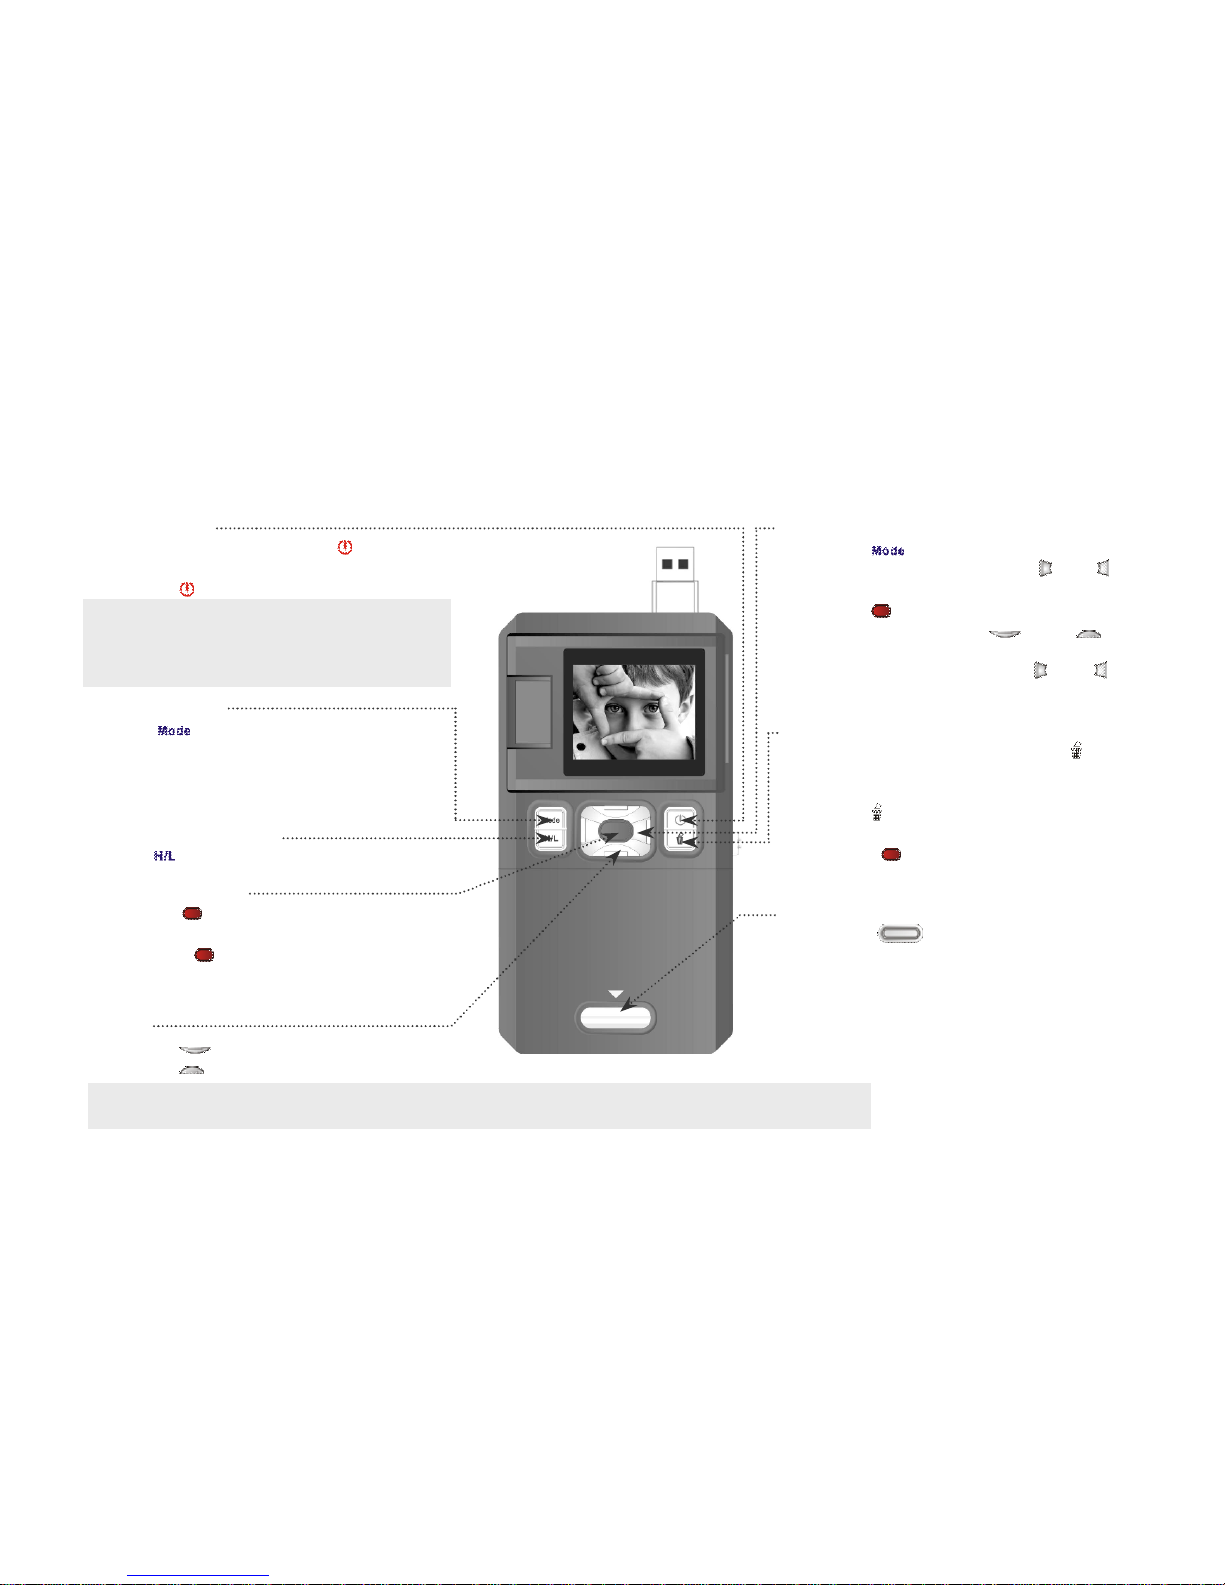
f) Deleting VideoorStill Picture
Select thePlaybackmode, press" "and “DeleteCurrent?”will appearon LCD screen.
Press" "toconfirmdeletingcurrent VideoorStill picture. Press anyotherbutton tocancel “delete”function.
Press" "twiceand “DeleteAll?”will appearon displayscreen.
Press " "toconfirmdeleting all Video orStill Pictures. Pressanyotherbutton to cancel “delete”function.
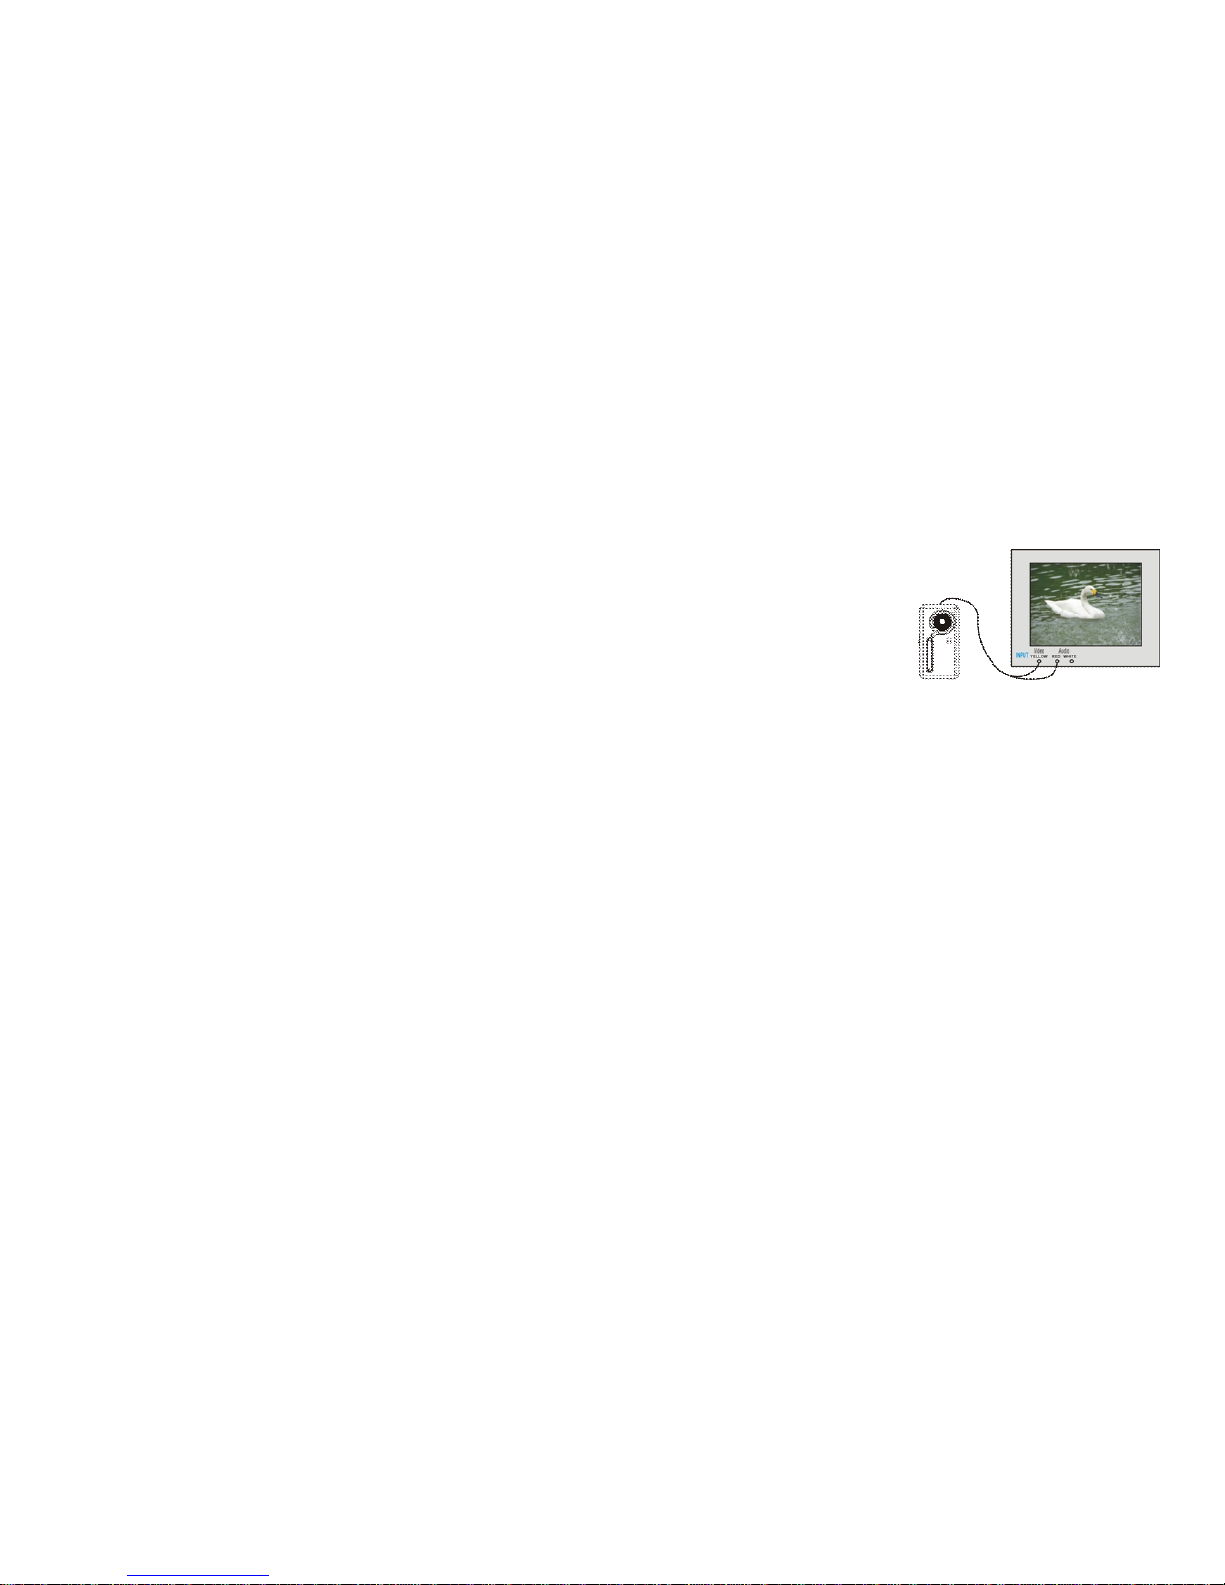
ConnectToPC, DownloadVideo/ PhotosandTVOutput
Pleaseinstall bundledprogramsfromsupplied installation CD before connecting camcorderwithPCforthefirst
time
1. Insert supplied CDintocomputer'sCD ROM
2. Followinstructionand install programs; see moreinformationinside"Howtoupload yourvideo clipsto
YouTube"
Connectto PC
1. Pressandthenslideupthe switchtoextendUSBconnector.Turnthe camcorderON.
2.InsertcamcorderUSB connectorintoUSB porton computer,orusesupplied USB extension cabletomake
connection.
DownloadVideo/PhotosFrom CamcorderToPC
1.Afterconnecting tocomputer,goto"MyComputer”and open the
"RemovableDisc."The photosorvideoswill be savedinthe \DCIM\ 100MEDIA
folderinthe removabledisc.Choosethe desired photo/video inthe 100MEDIA
folderand copy(drag withmouse)it intothe target folderinyourcomputer.

7
2. Install ArcSoft MediaImpression, PhotoImpression and VideoImpression fromCD supplied.
3. UseArcSoft PhotoImpression and VideoImpression toeditvideosandphotos.
4. UseArcSoft MediaImpression toupload yourvideostoYOUTUBE site.
TVOutput
1.Plug inTVcable:Insertsingle-connectorend tocamcorder.Connectthe end with
double-connectorstovideo (yellow)and toaudio(red orwhite)input jackonTV.
2.Turnon TVand camcorder.
3.Switchmode on TV toselectvideo input (see yourTVmanual forinstructions).
HowtouploadyourvideoclipstoYouTube
1. Install theArcSoftMediaImpression program
Insertthe CD-ROMintothecomputer sCD-ROMdrive.The auto-runscreen will appear.Click Install
MediaImpression”

8
(Ifauto-run screen doesnotappear,pleaseclickon SoftwareInstaller.exe undertheCD-ROMdriveicon on the
computer.)
Follow on-screen instructionsand completeinstallation

9

10

11
ArcSoft MediaImpression icon will appearon computersdesktop wheninstallation is complete.
2. Using ArcSoftMediaImpression
Connectyourcamcordertothe computer.DoubleclickMediaImpression icon on the Desktop.The
MediaImpression softwaremainscreen willopen on thecomputersdesktop:
Click Import Option on the mainscreen and enterinto Import”screen.Then select the filesinthe camcorder

12
thatyou wanttouploadtothecomputerand click Option.
Afterimporting the filehasbeen completed,click on the Importing…”windowand enterinto
MediaBrowser”window.
Note: Onthe mainscreen,youcan alsoclickotheroptionssuchas toenterinto

13
MediaBrowser”window.Then select the filesinthe computerforuploading.
Selectthe video you wishupload toYou Tube on MediaBrowser”screen andthen clickoption toaccess
yourYouTube log-inscreen.

14
On Login”screen,pleaseenteryourYouTube Usernameand Password(youcan selectthe corresponding option
underneathtosavethe Usernameand Passwordsothatyou do notneed toinputthesedatanexttime).Then click
option.
When Upload toYouTube”screen appears,fill inTitle,Description,etc.Then click option and start
uploading selected video.
Click “Cancel”if you wishtostop upload, otherwisecontinue forsuccessfuluploading.

15
SpecificationsAndSystemRequirements
Productspecifications:
Image sensor:300,000pixels
Function mode:Recording Video,CaptureStill Images, Playback,Mass storage device
Resolution:Video: 640×480 (30fps); 320×240 (30fps)
Photo: 640×480,320×240
Lens:F2.8 f=3.0mm
Focusrange:1.2m(4feet)toinfinity
DigitalZoom:4×
LCD display:1.5inch(480x240)TFT LCD
Whitebalance:Auto
Exposure:Auto
Fileformat: AVI/JPEG
Video out: PAL
Storage media:UsesSD/MMC card(max. 2GB) –notsupplied
USB port: USB2.0port
Powersupply:UsestwoAAAlkaline batteries –not supplied
SystemRequirements:
Operation System Microsoft Windows2000,XP,Vista
CPU AboveIntelPIII800orCPU of equalperformance
Memory Above256 MB
Soundcardand displaycard
Support DirectX8orabove
CD-ROM 4Xspeed orabove
HardDisk 1GBspaceaboveuseable
Other One standardUSB 1.1orUSB 2.0port
Table of contents
Other Jazz Camcorder manuals