Jazz DV153 User manual

J
Ja
az
zz
z
D
DV
V1
15
53
3
A
AV
VI
I/
/J
JP
PE
EG
G
I
In
ns
st
tr
ru
uc
ct
ti
io
on
n
M
Ma
an
nu
ua
al
l

2
G
Ge
en
ne
er
ra
al
l
N
No
ot
te
es
s/
/
P
Pr
re
ec
ca
au
ut
ti
io
on
ns
s:
:
Pleaseread this Instruction Manualfullyinordertobecomefamiliarwithyourcamera;enjoymaximum
performanceand preserveitsservicelife.
uSD cardsmust NOTbe exposed toheat, moistureorstrong magneticfieldasthememorycouldbe lost or
damaged.DonotbendorforceSDcardwheninserting intothe cameraslotascardis adelicate
electronic devicethat needscarefulhandling
uRemovebatteriesif you do not plan tousecameraforafew weeks
uAvoidexposing cameratodirect sunshine orexcessivelyhigh temperatures(suchasinside parked car).
uAvoidexposing cameratodirty, sandyorwet environmentsorharmfulchemicals.
uCarefullyclean sand ordustfromthe surfaceofthe cameraifcontaminated,Usesoft rag ortissue for
cleaning lensif required.Avoiduseof anysolvent toclean cameraand lens.
uTVprograms,movies, music, picturesand otherrecordsmaybe subject tocopyrightprotection.
uIt is yourresponsibilitytocomplywithcopyright regulations.

3
FCC Statement.
FCC part15.21
Warning:Changesormodificationstothis unitnotexpresslyapproved bythepartyresponsibleforcompliance
couldvoidthe user sauthoritytooperatetheequipment.
FCC part15.105
Note: This equipment hasbeentestedandfound tocomplywiththelimitsforaClass Bdigitaldevice, pursuantto
Part15 oftheFCC Rules.Theselimitsaredesigned toprovide reasonableprotection againstharmful
interferenceinaresidentialinstallation.This equipmentgenerates,uses,and can radiateradiofrequency
energyand, if not installed and used inaccordancewiththe instructions, maycauseharmfulinterferenceto
radiocommunications.However,thereis no guarantee thatinterferencewill notoccurinaparticular
installation. If this equipment doescauseharmfulinterferencetoradioortelevision reception, whichcan be
determined byturning the equipment offand on, theuseris encouraged totrytocorrect the interferenceby
one ormoreof the following measures:
- Reorient orrelocatethe receiving antenna.
- Increasetheseparation between the equipment andreceiver.
- Connect the equipment intoan outlet on acircuit different fromthat towhichthe receiveris connected.

4
AppearanceAnd Buttons
USB Connector
PowerKey
TVOut Port
Resolution
Switch
SD/MMC
CardSlot
Speaker
Strap Holder
Microphone
LED Light
Lens
BatteryCover
Tripod
BatteryLidSwitch
USB Switch

5
Using Your Camcorder
LCD
ModeButton
Press this button toselect desired mode:
lVideorecording mode
lStillpicturemode
lPlaybackmode
UpButton
lPress tozoomIN.
lInPan mode,pressthis
button toshift zoomed
image upwards.
Right Button
Press this Button toselect next
video orpicture.
Inplayback mode,afterzooming
inthe image,pressthisbuttonto
enterpan mode.
InPan mode,pressthisbutton to
shift zoomed image tothe right.
Shutter/ OK Button
1.Press thisbutton tostartVideo
recording ortakeaStillpicture.
2.Pressthisbutton againtostopVideo
recording.
3.Pressthisbutton tostartorstop
playing Video inVideo playback
mode.
4.Inplayback mode,afterzoomingthe
image todesired size,press this
button toenterpanmode.Pressthis
button againtoexit pan mode.
1.
LeftButton
Press this button toselectpreviousvideo
orpicture.
Inplayback mode,afterzooming inthe
image,pressthisbutton toenterpan
mode.
InPan mode,press thisbuttontoshift
zoomed image totheleft. DownButton
lPress tozoomOUT.
l
InPan mode, press this button toshift zoomed image downwards
.

6
Note:Pleaseinserttwofresh AA batteriesandSDcardtooperatethecamera
•Installing Batteries
SlidetheBatteryLidSwitchto “unlock”position.
Press/ slidedowntheBatteryCoverand insert twonewAAalkalinebatteries. Align withcorrect polarityof
batteryterminals. ClosetheBatteryCoverandlocktheBatteryLidSwitch.
•Installing SDCard
Insert theSDMemorycardintotheSD/MMCCardSlot. Pushit downuntil thecardstayslatched.
Donot force –checkcard spositionaccordingtotheposition markonthecamera.
Pushand releaseinsertedcardifyou wishtoremoveorreplacethecard.
TurnyourcamcorderOFF beforeinserting / removingtheSDCard.
-NotethattheSDCardhasatinyLOCKswitchontheside.Settheswitchtoun-LOCK
position tobeabletostorerecorded videos, still pictureson insertedSDMemoryCard.
•Selecting Video/ StillPicturesResolution
You can select High orLowresolution forrecordingvideosortakingstill pictures.
SlidetheResolutionSwitchlocatedoncamcorder ssideandselect desiredposition.
LCDscreen will display “Hi”or “Lo”indicating selectedresolution.
- Notethathigherresolutionwillproduce betterqualityrecordedvideosorstillpictures,butit
will occupymorememoryspace.

7
Recording/ taking pictures
- PresstheShutterButtontoStart / Stoprecordingin Videorecordingmode
- PresstheShutterButtontotakeapictureinStill picturemode
Playback
- Whenyou selectthePlaybackmode,you will see thelastrecord:video orapicture.PressLEFT/
RIGHTbuttontoreviewtaken pictures(see JPEGiconon theleftdowncorner)orrecorded video
(seethevideoicon).
Alsoyou maypressDOWNbuttontoseeVideoandStill picturesdisplayed as “thumbsize”frames.
UseUP/ DOWN/LEFT/ RIGHTbuttontoselect desiredfile, thenpressShutter/ OK toenlarge
pictureorplaybacktheVideo.
Deletefunction
- InthePlaybackmodepress Deletebuttontoenter “DeleteCurrent?”option,orpress twicetoenter
“DeleteAll?”option.
- PressShutter/OKbuttontoconfirmyourselection andexecutedeleting,press any other button to
abort deleting and exit Deletemode.
Note: “DeleteAll”option will lead todeleting all storedVideoand Still pictures;remembersaveandstore
yourvaluableimagesand video before executing deleting.

8
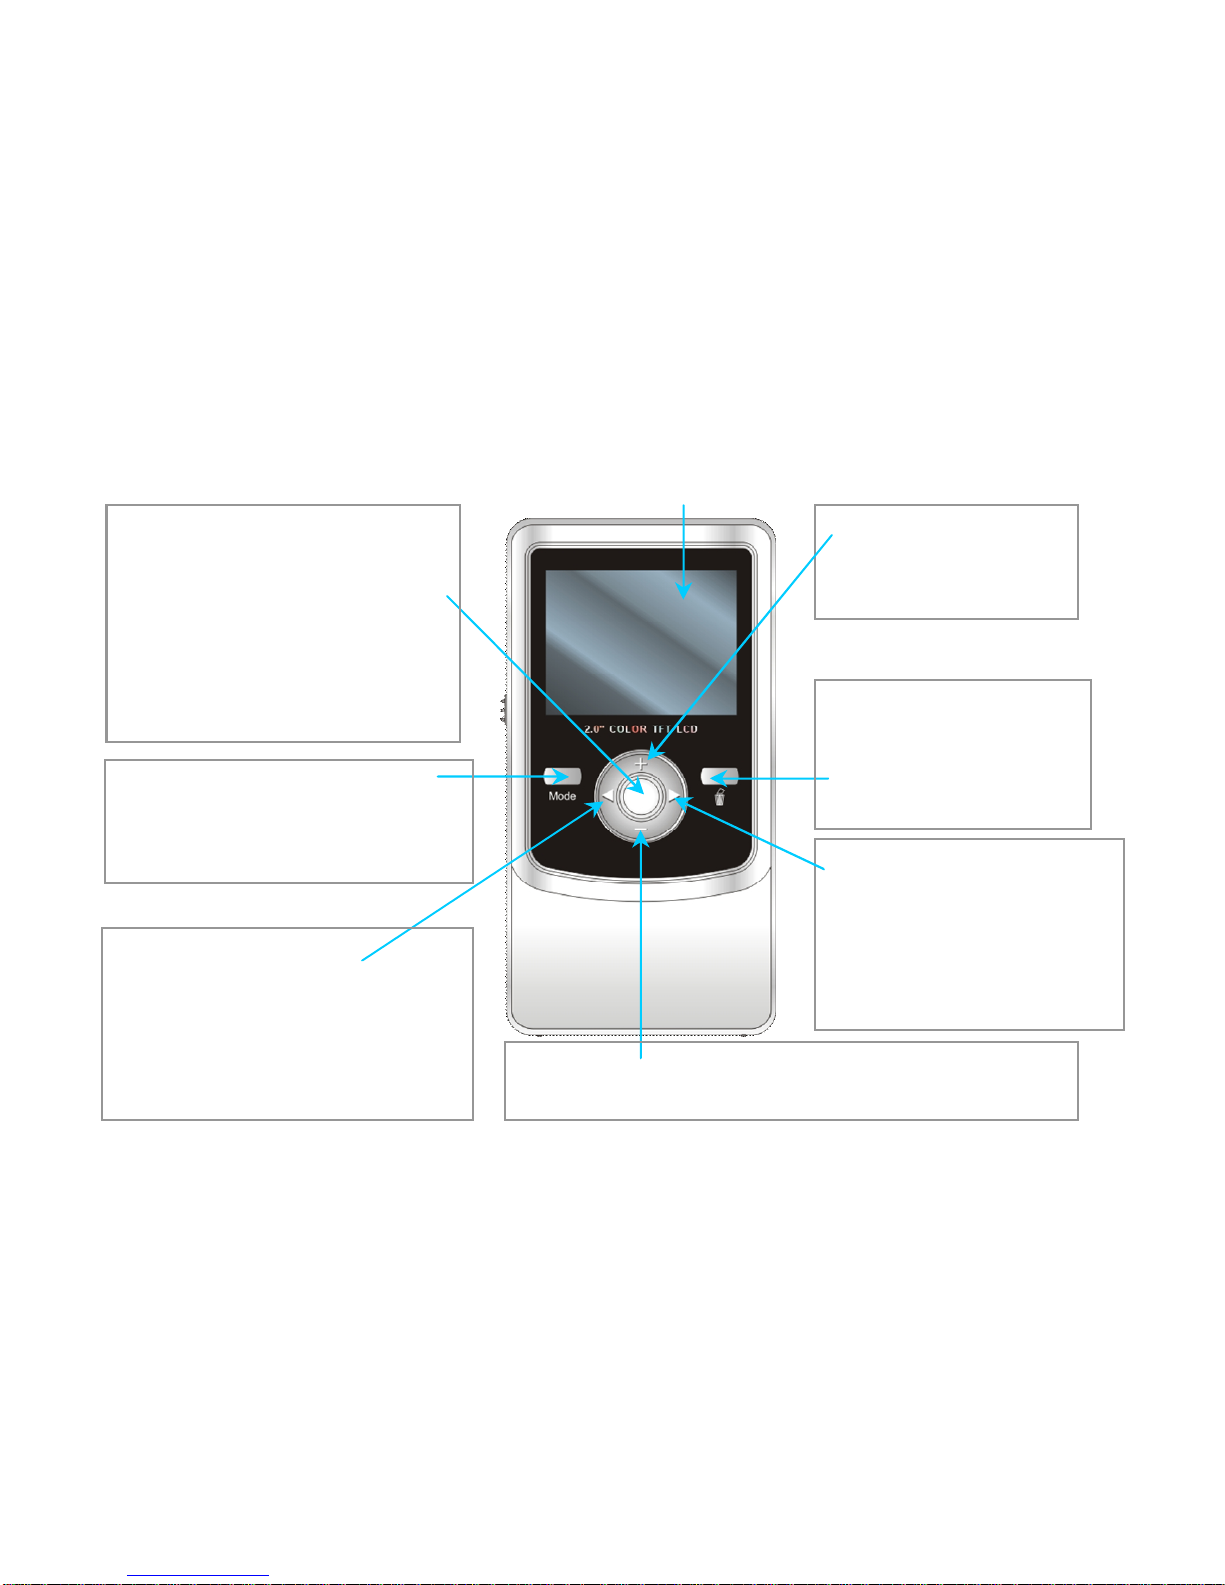
ConnectToPC, DownloadVideo/ PhotosandTVOutput
Pleaseinstall bundled programsfromsupplied installation CDbefore connecting camcorderwithPCforthe
first time
1. Insert supplied CDintocomputerCDROM
2.Followinstructionandinstall programs;seemoreinformation inside “Howtoupload yourvideoclipsto
YouTube”.
•Connecting ToPC
1. Slide the USBSwitchUPtoextendthe USBconnector.
2.Turnthe camcorderON.
3.InsertcamcorderUSB connectorinto computer USB port, orusesuppliedUSB extension cabletomake
connection.
•DownloadVideo/PhotosFrom CamcorderToPC
1.When camcorderis ONand connected to PC, go to “Mycomputer”and
select the “RemovableDisc”
2.Open the “RemovableDisc”and \DCIM\100MEDIAfolderwhichstoresall
yourVideosand Still pictures.
3.Selectdesired pictureorvideo from100MEDIAfolderand copyordrag file
intothe selected location inyourcomputer(MyDocuments, Desktop,etc).
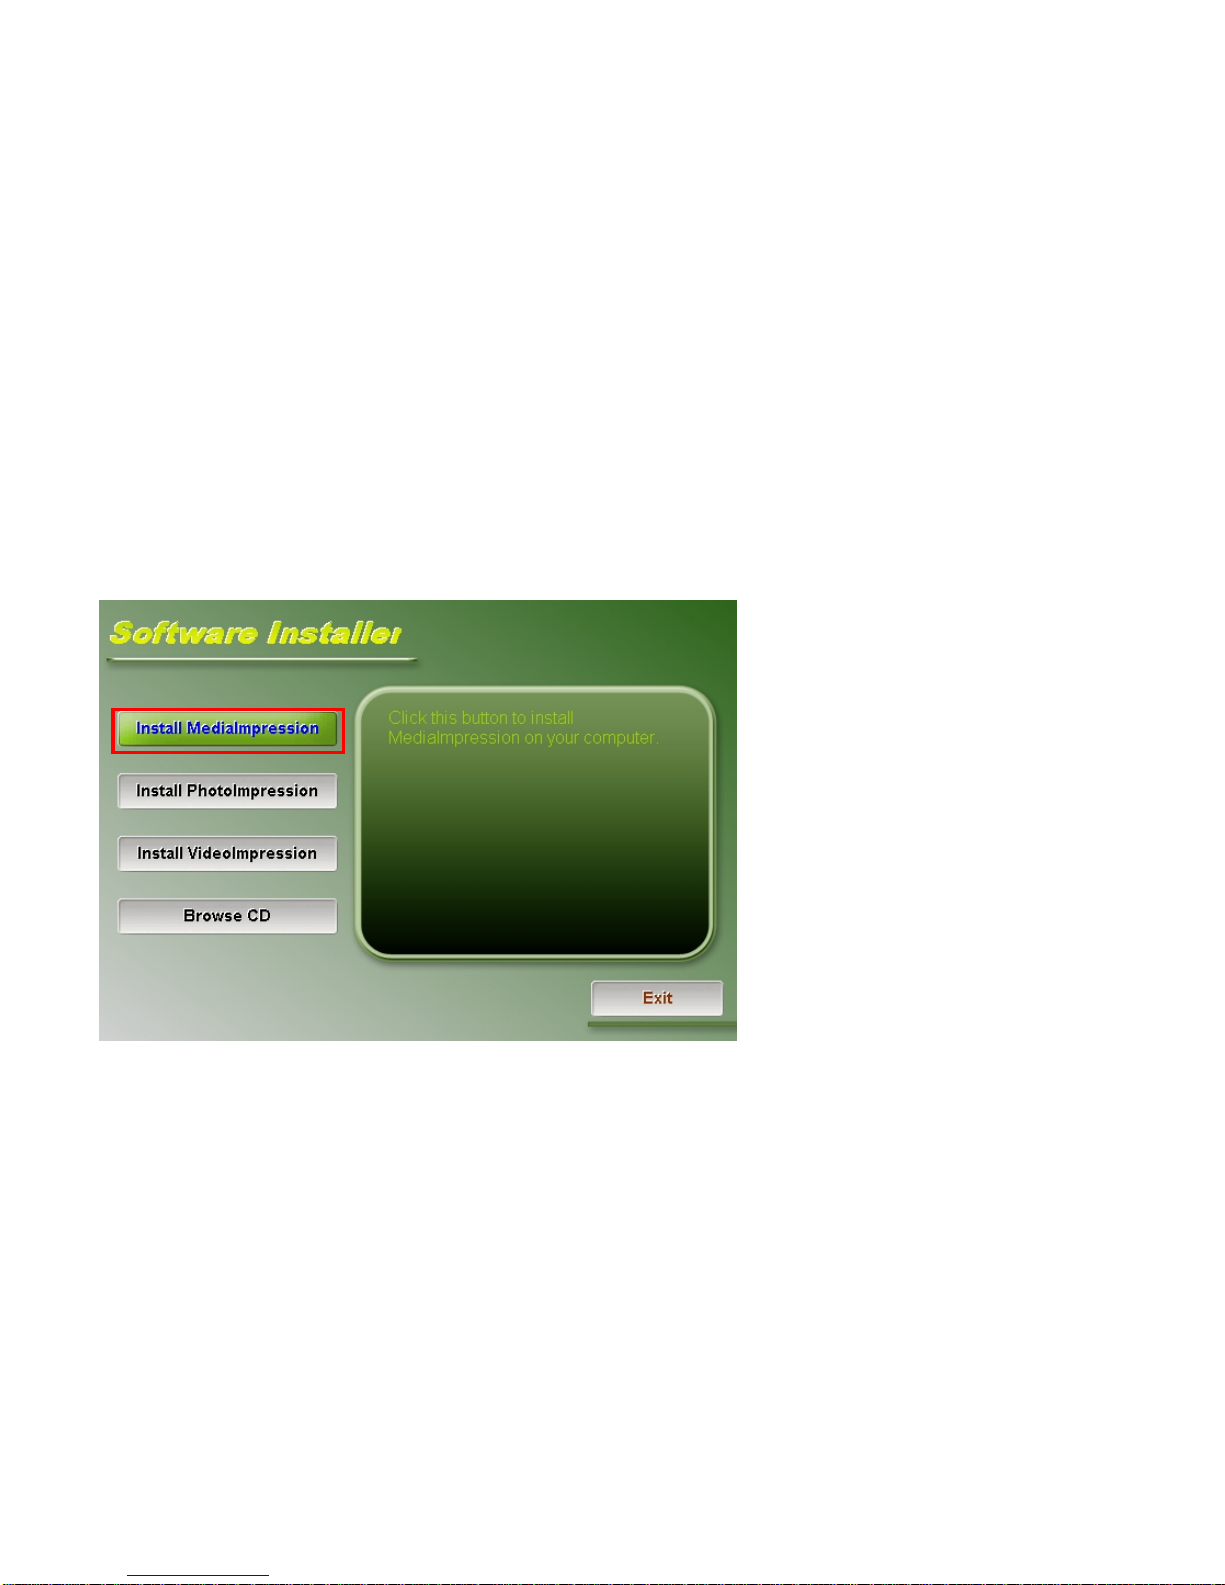
4.You mayuseArcSoft MediaImpression toupload yourvideostoYOUTUBE site.
5.You mayuseArcSoft VideoImpression and PhotoImpression toedit Videoand pictures.
All aboveprogramscan be installed fromsupplied CD.
•TVOutput
You canviewyourrecordedVideoorStill pictureson TVscreen
1.Plug insupplied TVcableintocamcordersTVOUTPORT.
2.Connectanotherend of TVcable-video (yellow)and audio(red orwhite) –intoAV
port ofyourTV.
3.Turnon TVand camcorder.

9
4.SetTVtoVideo Input (see yourTVManualforinstructions)and watchVideo orstillpictureson TVscreen.
HowtouploadyourvideoclipstoYouTube
1. Install theArcSoftMediaImpression program
Insert theCD-ROMintothe computer CD-ROMdrive.The auto-run screen willappear.
Ifauto-run screen doesnotappear, pleaseclickon SoftwareInstaller.exe undertheCD-ROMdriveicon on the
computer.)
Click “Install MediaImpression”, Follow on-screen instructionsand completeinstallation

10

11
ArcSoft MediaImpression icon will appearon computersdesktop wheninstallation is complete.

12
2. Using ArcSoftMediaImpression
Connectyourcamcordertothe computer.DoubleclickMediaImpression icon onthe Desktop.The
MediaImpression softwaremainscreen willopen on thecomputersdesktop:
Click Import Option on themainscreen and enterinto “Import”screen. Then select the filesinthe camcorder
thatyou wanttouploadtothecomputerand click Option.

13
Afterimporting the filehasbeen completed,click on the “Importing…”windowand enterinto
“MediaBrowser”window.
Note: Onthemainscreen,youcan alsoclickotheroptionssuchas toenter

14
into”MediaBrowser”window.Then select the filesinthe computerforuploading.
Selectthe video you wishupload toYou Tube on”MediaBrowser”screen and then clickoption to
access yourYouTube log-inscreen.

15
On”Login”screen,pleaseenteryourYouTube Usernameand Password(you can selectthe corresponding option
underneathtosavethe UsernameandPasswordsothatyoudo notneed toinputthesedatanexttime).Then
click option.
When”Upload toYouTube”screen appears,fill inTitle,Description,etc.Then click option and start
uploading selected video.
Click “Cancel”if you wishtostop upload, otherwisecontinue forsuccessfuluploading.

16
Specifications/ SystemRequirement
Specifications:
Image sensor:300,000pixels
Function mode:Recording Video,CaptureStill pictures, Playback.
Lens:F2.4 f=3.6mm
Focusrange:1.2m(4feet)~infinity
DigitalZoom:4×
Shutter:Electronic
LCD display:2.0inchTFT LCD
Resolution:Video: Hi640×480, Lo320×240, 30fps
Photo: Hi640×480, Lo320×240
Whitebalance:Automatic
Exposure:Automatic
Fileformat: AVI/JPEG
Video out: NTSC
Storage media:SD/MMC card(max. 4GB)
USB port: USB2.0port
Powersupply:TwoAAAlkaline batteries(not supplied)
SystemRequirements:
Operation System Microsoft Windows2000,XP,Vista
CPU IntelPIII800 MHzorCPUof equalperformanceorhigher
Memory Above256 MB
Sound cardand displaycard
Support DirectX8orabove
CD-ROM 4Xspeed orabove
HardDisk 1GBspaceaboveuseable
Other One standardUSB 1.1orUSB 2.0port
Table of contents
Other Jazz Camcorder manuals