Jazz jdc77 HDV141 User manual

0

1
TableofContents:
F
FC
CC
C
P
Pa
ar
rt
t
.
.
.
.2
2
K
Kn
no
ow
w
y
yo
ou
ur
r
c
ca
am
me
er
ra
a
3
3
S
St
ta
ar
rt
t
t
to
o
u
us
se
e
.
..
..
.5
5
I
In
ns
st
ta
al
ll
l
B
Ba
at
tt
te
er
ry
y
.
..
.
.
.
.
.5
5
U
Us
se
e
S
SD
D
C
Ca
ar
rd
d
.
.
.
..
.
.
..
.5
5
SelectingLensMode
.
..
.
.
..
.6
6
Turning thecameraONand OFF
.
.7
7
SelectingtheMODEofthecamera
7
7
SettingDateandTime
.
..
..
..
.7
7
Indicators/LEDlights
.
..
..
..
..
.8
8
VideoRecordingmode
9
9
Cameramode
.
..
.
.
..
.1
11
1
Playbackmode
.
..
.1
13
3
InternalSetting ofthecamera
1
17
7
Setting theStart-up Image
.
.
1
18
8
ChangingtheStart-upImage ..18
C
Co
on
nn
ne
ec
ct
ti
in
ng
g
c
ca
am
me
er
ra
a
t
to
o
t
th
he
e
c
co
om
mp
pu
ut
te
er
r
.
..
.
1
19
9
InstallingtheArcSoftMediaImpression program
.
.
1
19
9
Using camerawiththecomputer
.
.
.
.2
21
1
Uploading yourvideo clipstoYouTube
.
..
.2
21
1
Connecting cameratoTV
.
.
.
..
.
2
25
5
T
Te
ec
ch
hn
ni
ic
ca
al
l
S
Sp
pe
ec
ci
if
fi
ic
ca
at
ti
io
on
ns
s
.
.
2
26
6
S
Sy
ys
st
te
em
m
r
re
eq
qu
ui
ir
re
em
me
en
nt
ts
s
.
.
.
..
.
2
27
7

2
HDV141
FCC part15.21
Warning:Changesormodificationstothisunitnotexpresslyapprovedbythe partyresponsible
forcompliancecouldvoidtheuser’sauthoritytooperatethe equipment.
FCC part15.105
Note:This equipmenthasbeentestedandfound tocomplywiththe limitsforaClass Bdigital
device,pursuanttoPart15oftheFCC Rules.Theselimitsaredesigned toprovide
reasonableprotection againstharmfulinterferenceinaresidentialinstallation.This
equipmentgenerates,uses,and can radiateradiofrequencyenergyand,ifnotinstalled
and used inaccordancewiththeinstructions,maycauseharmfulinterferencetoradio
communications.However,thereis no guarantee thatinterferencewill notoccurina
particularinstallation.Ifthis equipmentdoescauseharmfulinterferencetoradioor
television reception,whichcan be determined byturning the equipmentoffandon,the
useris encouraged totrytocorrectthe interferencebyone ormoreofthefollowing
measures:
- Reorient orrelocatethe receiving antenna.
- Increasetheseparation between the equipment andreceiver.

3
- Connect the equipment intoan outlet on acircuit different fromthat towhichthe receiver
is connected
- Consult the dealeroran experienced radioTVtechnician forhelp.
Pertinent testing documentation is availableforverification.
K
Kn
no
ow
w
y
yo
ou
ur
r
c
ca
am
me
er
ra
a
1
L
en
s
2
Lensselector
3
Shutterkey
4
Busylight
5
Powerkey
6
OK
button
D
irection
key
s
:
Up
Down
Righ
t/
LED s
witch
7
Le
ft/
Selft
imer
8
Modekey
9
Batte
ry
cover
20

4
10
Speaker
11
Wriststraploop
12
Wriststraphole
13
Zoominkey
14
Zoomout key
15
USB/TVout port
16
LED light
17
Self
time
r
indicator
18
Tripod
socket
19
SD cardslot
20
LCD Screen

5
S
St
ta
ar
rt
t
t
to
o
u
us
se
e
NOTE: Please insertthree fresh AAAbatteries and SD/SDHCmemorycard to
operatethecamera
1. Installing Batteries
1. Pressthetop andslidedowntheBatteryCover.
2. Insert threefreshAAAalkaline batteries;align polarityofterminalscorrectly.
Keep theblackribbon placedunderinstalled batteries;pulling thatribbonlaterwill
helpremoveexhausted batteries.
3. SlideuptheBatteryCovertoclosethebatterycompartment.
2. UsingSDCard
Youmustinsertand use SDmemorycard;camerawill storeall recordedimages
and videoonthecard. CameraacceptsSDcard withup to8GBcapacity.
Notethat thecardhasatiny “LOCK”sliderlocatedon theside.
Set thissliderto “non-LOCK”position beforeinsertingandtaking videoorstill images.
1. PushtheSDcardcarefullyintotheslot until thecardiscompletelyinserted.
2.Toremove/ replacethecard, lightlypress/ releaseinsertedcardtoeject thecard.
3.TheSDcardhastobeformatted first: Press OKbutton andthen pressRight
DirectionkeytoenterSetup Menu.PressUpandDownDirectionkeytoselect ‘Format’
option. Press Right Direction keyandthenpress UporDownDirection keytoselect ‘Yes’

6
option.Thememorycardwill beformattedautomatically.
Pleasenotethatall DATAstored onSDcardwill bedeleted during formatting.
3. Selecting LensMode
SlidetheLensSelectorto Normal orMacro position depending on the
distancebetween themainsubjectandthecamera.
1.UseNormalsetting forshootingsubjectslocated5feetormoreawayfromthe
camera
2.UseMacrosetting forshooting close-up subjectsthatarejust6”–10”from
camera

7
4. Turning thecameraONand OFF
1. PowerON: pressthePowerkeyforasecond ortwototurnthecameraON.
2. PowerOFF: when thecameraisactivepress thePowerkeytoturnthepowerOFF.
AutoPowerOFF: thecamerawill turnOFFautomaticallywhen hasbeen unused for
1minute.TheAutoPowerOFF delaytimemaybesetat 1, 3or5minutes.
GotoSetup Mode/PowerSaveand makeadjustmentifnecessary(seealso
Section11Setupthecamera).
3. LowPowerIndicator:Whenthebatteriesbecomeexhausted, theLCDdisplaywill
displaylowbatteryiconand thecamerawill beautomaticallyturnedOFF.
Replaceexhaustedbatteries.
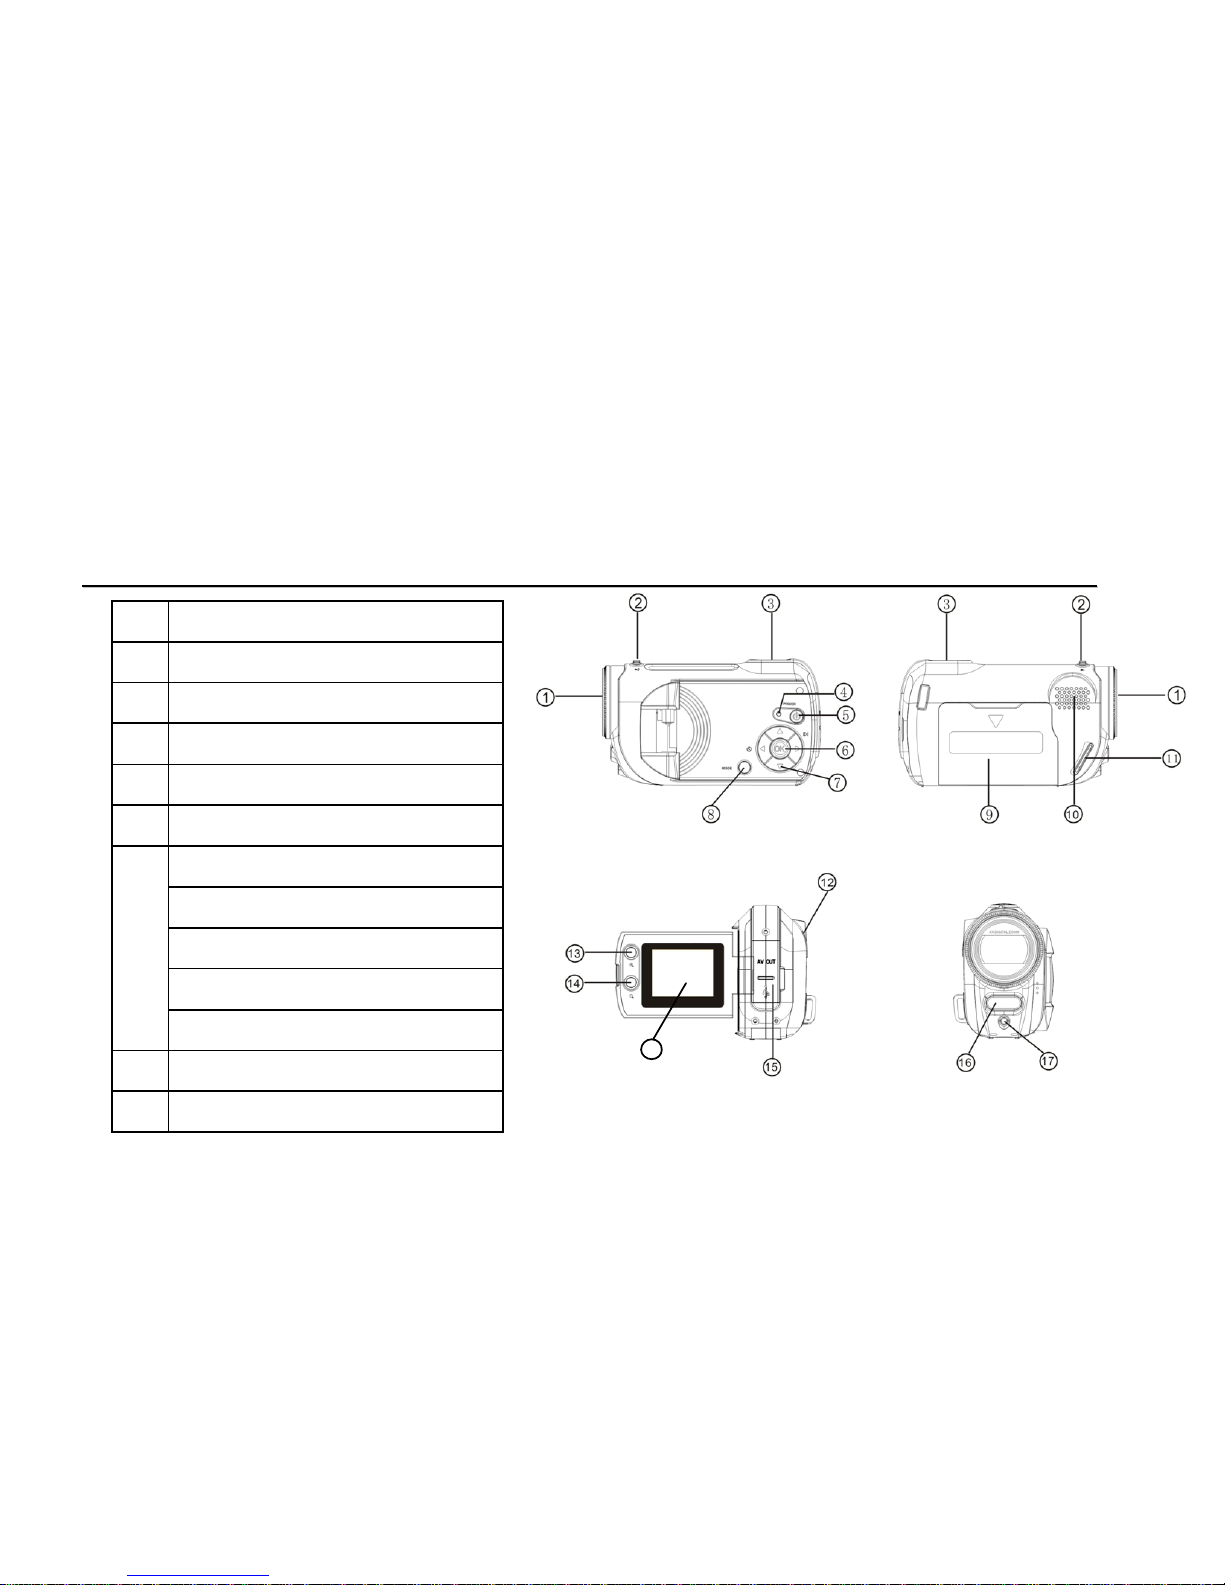
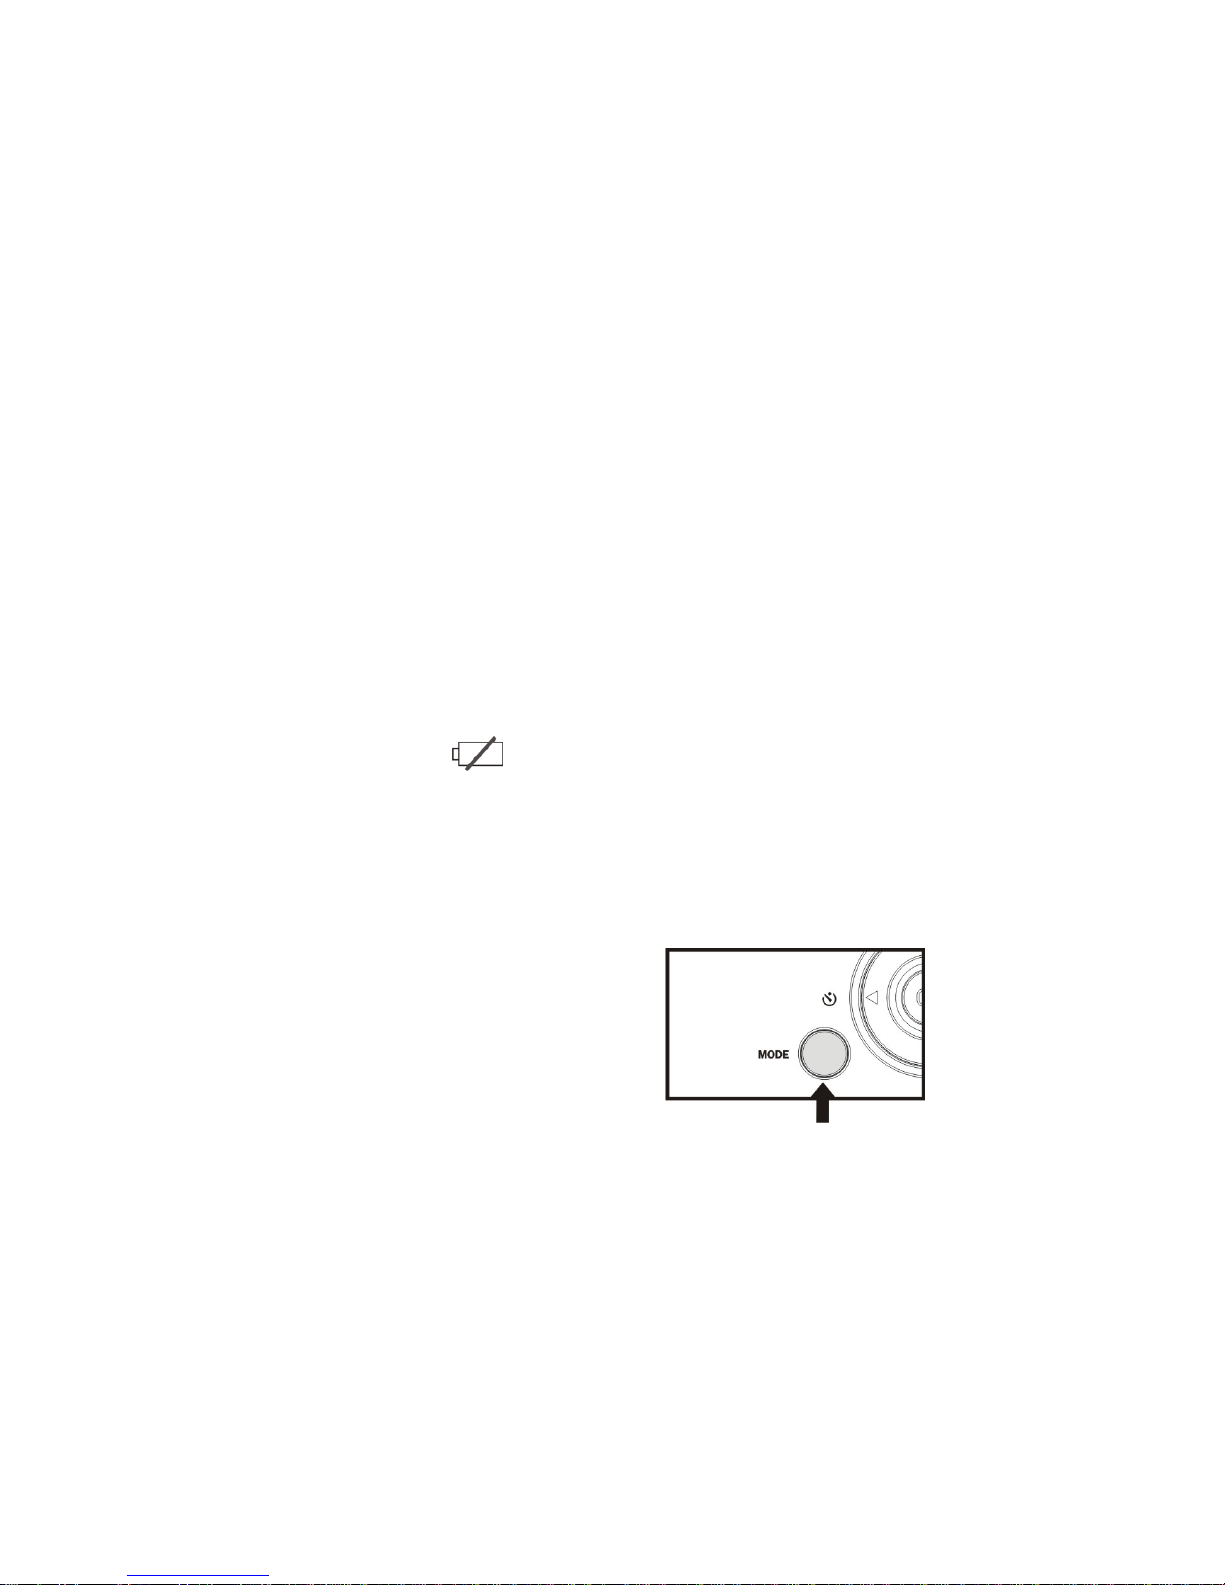
5. Selecting theMODE ofthecamera
WhenpoweredON, thecameraisset inVideo recording mode.
PresstheMODE keytochangeorselect desired modeasfollows:
Video (default mode) –recordingvideo clips
Camera mode –taking still photos, images
Playback mode –playing backrecorded video
ordisplaying still photos
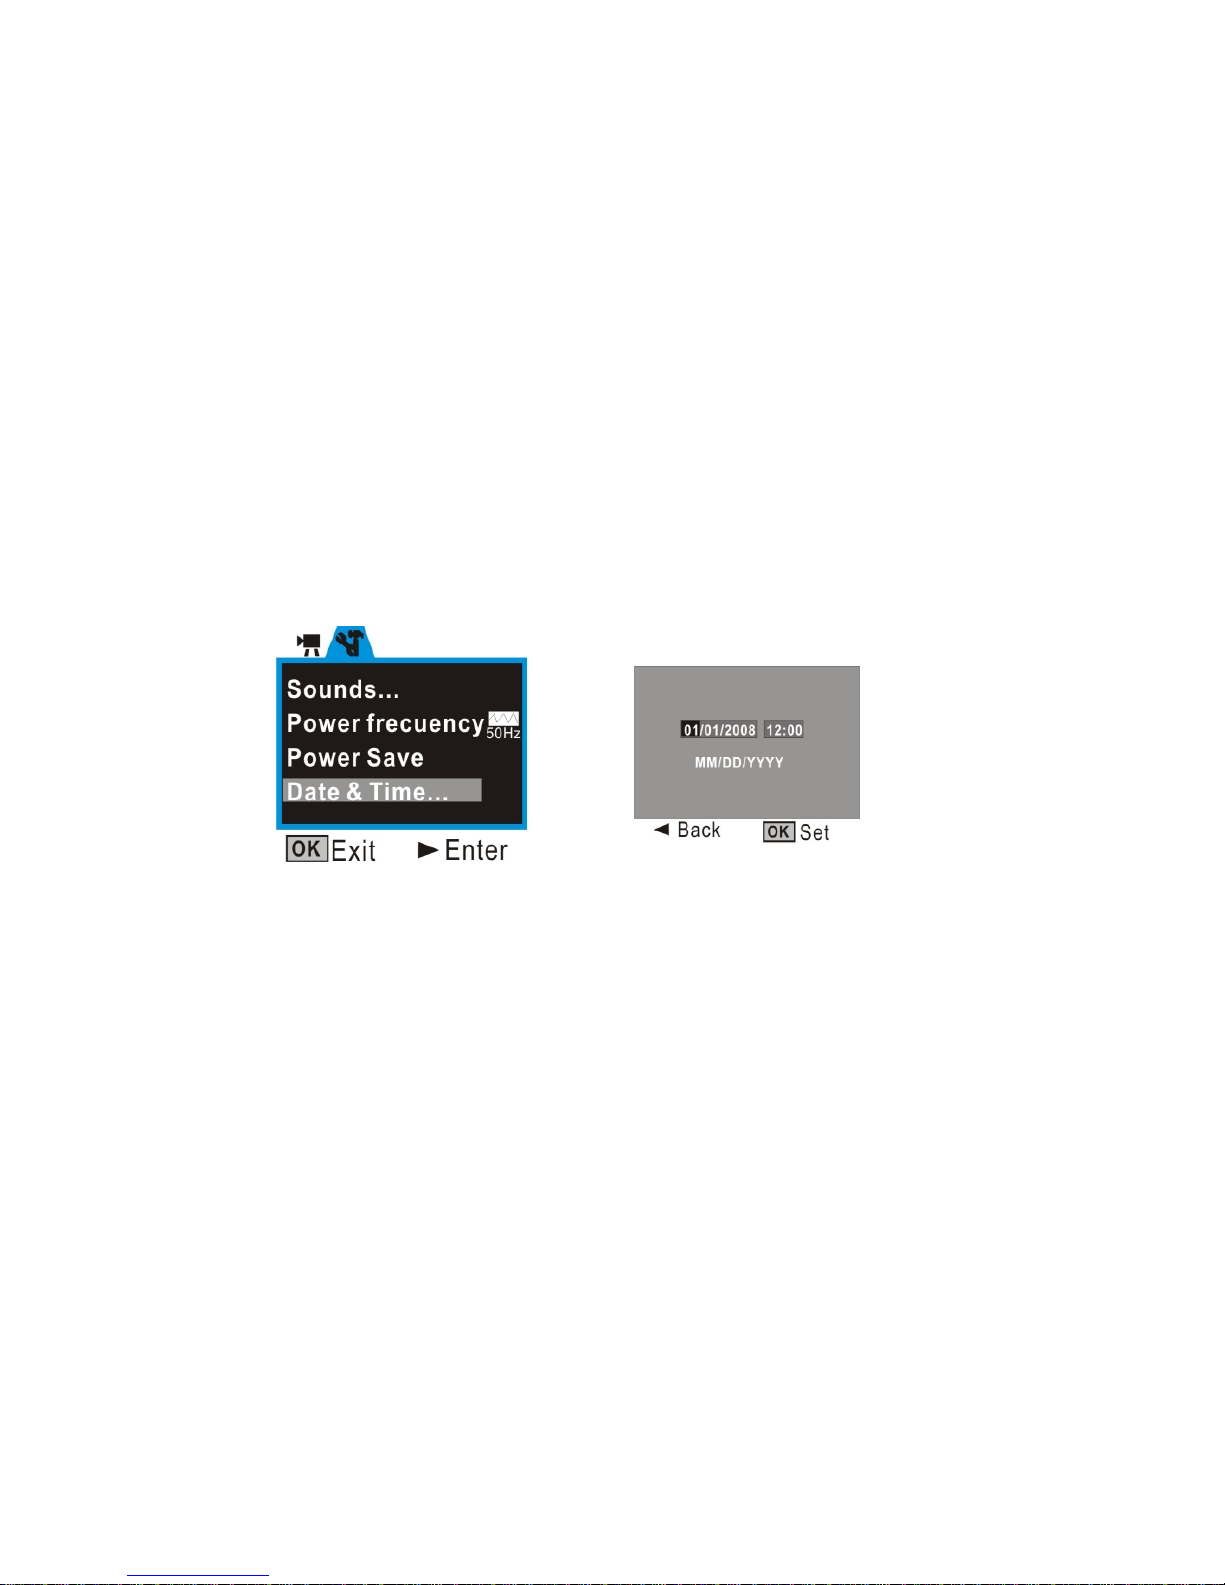
6. Setting Dateand Time:
Thisoptionwill helpyou identify “when”yourimageshavebeen taken.Thisinformation

8
will beadded to “Properties”ofeachimageand youcanretrieveitusing computerwhen
cameraisconnected,orafterimagesaredownloaded intocomputer.
Setting:
Press theOK buttonthen pressRightDirectionkeytoenterSetup Menu. PressUpand
DownDirectionkeytoselect ‘Date& Time’optionthenpressRightDirection keyand the
DateandTimewill bedisplayedon theLCD screen,seebelow:
Toset theDateandTime, usetheDirection key: UporDowntoadjust,Right keytomove
thecursor. Press OK button toconfirmsetting and press itagaintoExit setup mode.
ToleavetheDateand Timeunaltered, pressLeft thenOK keytoExit theSetupmode.
Notethatremovingorreplacing batteriesmayresetData/Timesetting;repeatsetting if
required.
7. Indicators/ LEDlights:
Busylight- thelight will turnon when thecamerais “busy”recording video, capturing

9
photo, processingdata, orbeing connected tocomputer.
LEDlight thissupporting lightmaybeused when recording video/picturesindark
environment. Please note that thislampiseffectiveforshort distancesonly.
SelfTimerlight indicatesthat thecameraSelf Timerhasbeen activated.
8. VideoRecording mode:
Previewmode
RecordingtheVideoclip
1.OpentheLCD screen.
2.Press / holdthePowerkeyand turnthecameraON
Video Recording Icon
SDcard
icon;cardinserted
Video resolution; set at640x480pixels
Theremaining timeforrecorded
Video; ex1minute8secondsleft
Batteryicon TheLEDLampisturnedON
Zoomratiorange

10
3.Press theShutterkeytostart recording video
4.Tostoprecording, presstheShutterkeyagain.
Notethat camerawill auto-stoprecording when theSDmemorycardisfull.
5.YoumaypressZoomIN/ OUTbuttonsduring recording toselect desired
zoomrange.
•The LCD screen actsasaviewfindertohelpyoumoreaccuratelypointatand centerthe
mainsubject orperson whilerecording.
Setting theresolutionforrecordedVideo
1. Press OKbutton toopen the menu.
2. Press UporDownDirection keyand select ‘MovieSize’option.
3. Press Right Direction keyentering setting
4. Press UporDownDirection keytoselectthe required resolution setting:HD:1280 x
720, VGA: 640 x480 orQVGA:320 x240pixels.
5. Press OKbutton toconfirmyourselection then press OKbutton toexit the menu.

11
9. Cameramode:
Previewmode
Shooting Photos
1.Open theLCDscreen and press / holdthePowerkeytoturncameraON
2.Press theModekeyoncetoselect theCameramode
3.Aimand observethesceneontheLCD screen andpresstheShutterkeytotakea
picture.
Imageresolutionmode
Imagecounter
Zoomratiorange
LEDlighticon
Batteryicon
CameraModeicon
Self timermode
icon
SDcardicon;cardinserted 10 Self timercounter; photo
Will betakenafter10 sec
ExposureValue

12
Setting theresolutionfortakenphoto
1. Press OKbutton toopen the menu.
2. Press UporDownDirection keytoselect ‘Resolution’option.
3. Press Right Direction key.
4. Press UporDownDirection keytoselect the required resolution fromavailableoptions
shown: 5Megapixel, 3Megapixelor1.3 Megapixel.
5. Press OKbutton toconfirmthe selection and press OKbuttontoexitmenu.
SelfTimer
Press the Left direction keyand a ’10secdelayself timer’icon will appearon LCD screen.
PresstheShutterkey;camerawill beepfor10secondsand SelfTimerwill thentake
onephotoautomatically.
PresstheLeft directionkeytoexit Selftimermodesetting.
Taking three continuousphotos:
PressOK buttontoopen themenu then scroll downand select ‘DriverMode.
PresstheRight keytoentersub-selectionand scroll downtoselect ‘Burst’option.
PressOKbuttontoexitthemenu.ABurstmodeiconwill appearonLCD screen.
PresstheShutterkeyandcamerawill auto-takethree photosconsecutively.
PresstheLeft Directionkeytoexit Burst modesetting.

13
Taking photowithspecialeffect
1. Press OKbutton toopen the menu.
2. Press UporDownDirection keytoselect ‘Effect’option.
3. Press Right Direction key.
4. Press UporDownDirection keytoselect therequiredeffect: Normal; B&W(Blackand
White); Sepia, Negative,Red, Green,Blue.
5. Press OKbutton toconfirmthe selection and press OKbuttontoexitthe menu.
10.Playback mode:
1. Press/ holdthePowerkeytoturnthecameraON
2. PresstheModekeytwicetoselect thePlaybackmode; LCD screen will display
last phototaken,orrecordedvideo.
Corresponding iconswill identifyrecordsasshownbelow:
You canselectphotosorvideo bypressing Left/Rightdirection key;presstheShutter
keyforplaying / stoppingrecorded video.
Playback
Video Photo

14
You can alsoZoomIn/ Out displayed photobypressing theZoomkeys.
AfterZooming Inyoumaypress LeftorRightdirectionkeytoenterintothe “Pan”mode
and viewselectedareaoftheimage. Press theOK buttontoresumenormalpreview.
AdditionalPlayback options
SelectthePlaybackmodeand pressOKbutton toentermenuand you maychoose
amongseveralavailableoptions:
Forphotoandvideo records:
Lock:You canLock/ Unlockthephoto/ video currentlydisplayed file
Delete:YoucanDeleteOneorAll filesrecorded stored ontheSDcard
Forphotorecordsonly:
SlideShow:Youcansetupand activatetheSlideShow
Effect: YoucancreateSpecialEffect fordisplayedphoto
Rotate:You can rotatethephoto90 degreesclockwise
Resize:You can lowertheresolutionofphoto
VoiceMemo:You canadd/ deletevoicerecordfordisplayed photo
Start-upImage:Youcanselect onestoredphotoand set it astheStart-up Image
on cameraLCDscreen.
Note: Press OKkeytoexecutethe command and exit theAdditionalOption setting.

15
Thumbnailmode
•InPLAYBACKmode, pressZoomOut Keytoselect the “Thumbnail”format.
•PressUP, DOWN, LEFTorRIGHTbuttonstobrowsethrough images, then
press OK (centerbutton)toselect imageforan instant review.
•PressZoomInKeytoenlargeand viewimageinfull resolution.
•PressZoomOut Keytoreturntonormalscreen sizeand presssamekey
againreturning to “Thumbnail”format.
TheThumbnail icons(visibleon theLCD screen)will identifyfilesasfollows:
Iconindicatesrecorded Video(AVI file)
Iconindicatesstill photo(JPGfile)withadded voiceMemo
“Noicon”isdisplayed onstill photos

16
Adding theVoicememoforselectedphoto
1. SwitchthecameratoPlaybackmode.
2. Browsetothephotoyou wishtoaddvoicememo.
3. PressOK buttonand select ‘VoiceMemo’optionbypressing Up or Down
Directionkey
4. PressRight Directionkeyandentersub-menu options
5. Scroll downand select the “Add”option; press OKkeytoconfirm
6. CounterappearsontheLCD screen andcameraisreadyforrecordingvoice
memo.
7. Speakyourmemo/ messageandthecameramicrophonewill recordthe
message.
8. PressOK buttonagaintostop recordingvoicememo.
Notethat themaximumtimeofrecorded “memo”islimitedto30 seconds.
Playing back thePhoto/ Memofile
Selectthephotowithindicated voice Memoicon (Playbackmode),seeother
corresponding icons:

17
1Playbackmodeicon2Imagecounter3VoiceMemoindicator
4PHOTOfileindicator5Playing time6Controlpanelforplaying voicememo
PresstheShutterkeytostartplaying thevoiceMemoofthephoto(withadded
voicememo),orpressOK keytostop playing.
UsetheUPkeytopause/ resumeplayingthevoiceMemoifdesired.
11. InternalSetting ofthecamera
1. PressOK button; thenpress Right Direction keytoentertheInternalSetupMenu
(seethe “tools”icon).
2.Thefollowing Optionsaredisplayed on theSetup Menu.
UsetheUp or DownDirection keytoscroll /selectdesiredoptionand presstheRight
keytoenterfollowinginternalsettings:
Sound:You mayturnsoundOn/ Off.Thisincludessound emittedwhen tripping
Shutter,Start-up,Beep sound (withanybutton ispressed)and self timerBeep sound.
You mayalsochangetheVolumeofaudiosound.
PowerFrequency:You mayalsoaltertheFrequencysetting ofcamerasothat it
adaptstomatchpowersupplyand indoorfluorescent lampat 60Hz.
PowerSave: Select desired autoPowerturnOff at 1, 3or5minutes.
Date&Time: Set up thedateand time(seeSection6: Setting Dateand Time).
Language: Changethemenu setting indifferent languages.
TV Out: ChangetheTV output tosuit yourNTSCtelevision system.
Start-up Image:You canDisable,reset theDefault start-upImageorsetyourown

18
taken image/ photoastheStart-upImage.
Format: Format theSD/MMCcard(seeSection 2: UsingtheSDCard).
Resetall: Resetall theoptionstodefault values(manufacturer’ssetting).
Setting theStart-up Image:
1. Select Playbackmodeand select aphototobesetasthe “Start-upImage”
2. PressOK keyanduseUp/ Downkeys toselect ”Start-upImage”optionand
press OKkey
3. PressRight Directionkeyandasub-menu appearsonLCD screen
4. PressUp/ Downkeys and select “Set”option; press OK button toconfirm.
Thesub-menu disappearsandcameradisplays and “memorizes”thephoto
youhaveselected.
5.PressOK key, then theRight directionkeyentering InternalSetting Menu
6UseUp/ Downkeysandscroll / select the “Start-up Image”option
7PressRight Directionkeytoenterthesub-menu anduseUp or Down
Directionkeytoselect “MyImage.”PressOK keytoexecutesetting.
8.PressOK buttonagaintoexit InternalSet-up.
Afterthat, everytimethepoweristurned ONthecamerascreen will displayyour
selectedphotoastheStart-up Image.
Changing theStart-up Image
You can activatecameraInternalSetting andscroll / select “Start-up Image”mode,
then presstheRight directionkeytoenteravailablesettings.
Select your preferences asbelow:

19
Off –Onlythe “blank”screen will bedisplayed during turning cameraON.
System –TheDefault Imagewill bedisplayed astheStart-up Image
MyImage –Camerawill useyourselectedphotoastheStart-upImage.
Notethat ifyou selectandexecutethe “ResetAll”(fromInternalSetting)option, this
will alsoactivatetheDefault Start-up Imageaccording tomanufacturer’ssetting.
C
Co
o
n
n
n
n
e
ec
c
t
ti
i
n
n
g
g
c
c
a
a
m
me
er
r
a
a
t
to
o
t
t
h
he
e
c
co
o
m
mp
p
u
u
t
te
e
r
r
Yourpersonalcomputer(withtypicalprogramsinstalled)shouldbeabletoplayback
photosandrecorded video fromcamera –whenit isconnected.
Howeverwedosuggest you install softwarefromsupplied CDbeforeconnecting camera
tothecomputer; see simpleinstructionstepsbellow.
1. Installing theArcSoftMediaImpression program
Insert supplied CD intocomputerCD-ROMdrive.
The auto-run screen willappear. Click Install MediaImpression”
Table of contents
Other Jazz Camcorder manuals
Popular Camcorder manuals by other brands

Panasonic
Panasonic AGDVC20P - 3 CCD DV CAMCORDER operating instructions

Sony
Sony HANDYCAM HVR-M35U Brochure & specs

JVC
JVC GZ-E300 Basic user's guide

Panasonic
Panasonic MultiCam PV-DV202-K operating instructions

Panasonic
Panasonic AJ-PX270 operating instructions

Panasonic
Panasonic HDC-HS300P Service manual