manuals.online logo
Brands
  1. Home
  2. •
  3. Brands
  4. •
  5. JBL
  6. •
  7. Speakers
  8. •
  9. JBL COL Series User manual

JBL COL Series User manual

This manual suits for next models

2

Other JBL Speakers manuals

JBL MPro 400 User manual

JBL

JBL MPro 400 User manual

JBL SCS10/230 User manual

JBL

JBL SCS10/230 User manual

JBL R123 User manual

JBL

JBL R123 User manual

JBL Harman Clip 2 User manual

JBL

JBL Harman Clip 2 User manual

JBL Spot User manual

JBL

JBL Spot User manual

JBL On Air Control 2.4G User manual

JBL

JBL On Air Control 2.4G User manual

JBL SC305 User manual

JBL

JBL SC305 User manual

JBL DPS-12 Use and care manual

JBL

JBL DPS-12 Use and care manual

JBL L120 User manual

JBL

JBL L120 User manual

JBL Studio 580 User manual

JBL

JBL Studio 580 User manual

JBL EON515XT/230 User manual

JBL

JBL EON515XT/230 User manual

JBL VP7210 User manual

JBL

JBL VP7210 User manual

JBL PRX515 User manual

JBL

JBL PRX515 User manual

JBL 4671 User manual

JBL

JBL 4671 User manual

JBL CONTROL CONTRACTOR 200 Series User manual

JBL

JBL CONTROL CONTRACTOR 200 Series User manual

JBL Charge 4 User manual

JBL

JBL Charge 4 User manual

JBL CHARGE 5 User manual

JBL

JBL CHARGE 5 User manual

JBL Stage Venue Series Operating instructions

JBL

JBL Stage Venue Series Operating instructions

JBL L200B User manual

JBL

JBL L200B User manual

JBL HLS 810 User manual

JBL

JBL HLS 810 User manual

JBL Harman GO3 User manual

JBL

JBL Harman GO3 User manual

JBL PRO SOUND COMES HOME N24 User manual

JBL

JBL PRO SOUND COMES HOME N24 User manual

JBL 4348 User manual

JBL

JBL 4348 User manual

JBL VS3215-9 User manual

JBL

JBL VS3215-9 User manual

Popular Speakers manuals by other brands

Electro-Voice LR4S engineering data

Electro-Voice

Electro-Voice LR4S engineering data

Definitive Technology Sound Cylinder user guide

Definitive Technology

Definitive Technology Sound Cylinder user guide

AudioSource LS545 user manual

AudioSource

AudioSource LS545 user manual

Paso C402-T Instructions for use

Paso

Paso C402-T Instructions for use

Altec Lansing 416-8C LF SPEAKER manual

Altec Lansing

Altec Lansing 416-8C LF SPEAKER manual

Kenwood KFC-1072 Servise manual

Kenwood

Kenwood KFC-1072 Servise manual

Peavey ProSys 112 user guide

Peavey

Peavey ProSys 112 user guide

Aura STORM-8 owner's manual

Aura

Aura STORM-8 owner's manual

Oontz ANGLE 3 PLUS quick start guide

Oontz

Oontz ANGLE 3 PLUS quick start guide

Electro-Voice LR4A engineering data

Electro-Voice

Electro-Voice LR4A engineering data

Rave RK-650-ICA-B owner's manual

Rave

Rave RK-650-ICA-B owner's manual

Flux Reference Series installation manual

Flux

Flux Reference Series installation manual

Lanzar AQAWBS64BK installation manual

Lanzar

Lanzar AQAWBS64BK installation manual

DAPAudio DCS-6230 manual

DAPAudio

DAPAudio DCS-6230 manual

Aluratek ABS03F quick start guide

Aluratek

Aluratek ABS03F quick start guide

Kenwood KES-5A instruction manual

Kenwood

Kenwood KES-5A instruction manual

Sonance ORIGINAL SERIES instruction manual

Sonance

Sonance ORIGINAL SERIES instruction manual

Empire S-5000 user manual

Empire

Empire S-5000 user manual

manuals.online logo
manuals.online logoBrands
  • About & Mission
  • Contact us
  • Privacy Policy
  • Terms and Conditions

Copyright 2025 Manuals.Online. All Rights Reserved.

COL Column Speaker Installation Guide
COL 800
JBL-COL800-BK and
JBL-COL800-WH)
COL 600
JBL-COL600-BK and
JBL-COL600-WH)
Included Hardware
(not to scale)
3 pieces M6 x 12 mm bolts with flat washers & lock washers
3 pieces M6 x 20 mm bolts with flat washers & lock washers
3 pieces M6 x 28 mm bolts with flat washers & lock washers
(Note: Flat washers & lock washers are captive on the bolts.
One additional of each bolt is provided for backup.)
4 mm hex key
2-part Low-Profile Swivel (Pan) / Tilt
WALL BRACKET ASSEMBLY
Consists of:
•SPEAKER-SIDE of Bracket
•WALL-SIDE of Bracket
•Decorative Trim piece for WALL-SIDE BRACKET (not shown)
2 pieces L-BRACKETS
Ver 1.0
TRIM COVER (for WALL BRACKET ASSEMBLY)
2
Important Safety Instructions
1. Please read and keep all safety and user instructions.
2. This product is intended for installation by professional installers only! This document is intended to provide professional
installers with basic installation and safety guidelines for this product in typical fixed-installation systems. Please read
this document and all safety warnings before attempting installation. Do not attempt to service this product yourself.
Refer all servicing to authorized service centers, installers, technicians, dealers or distributors. To contact Harman
Professional or to find a dealer or distributor near you, visit https://www.jblpro.com.
3. The products must be installed in accordance with local, state, federal and industry regulations. It is the installer’s
responsibility to ensure installation of the loudspeakers and mounting system is performed in accordance with all
applicable codes, including local building codes and regulations. Consult the local authority having jurisdiction before
installing this product.
4. Unsafe mounting or overhead suspension of any heavy load can result in serious injury or death, and property damage.
It is the installer’s responsibility to evaluate the reliability of any mounting method used for their application. Only
professional installers with the knowledge of proper hardware and safe mounting techniques should attempt to install
any loudspeaker overhead.
5. Do NOT make unauthorized alterations to this product.
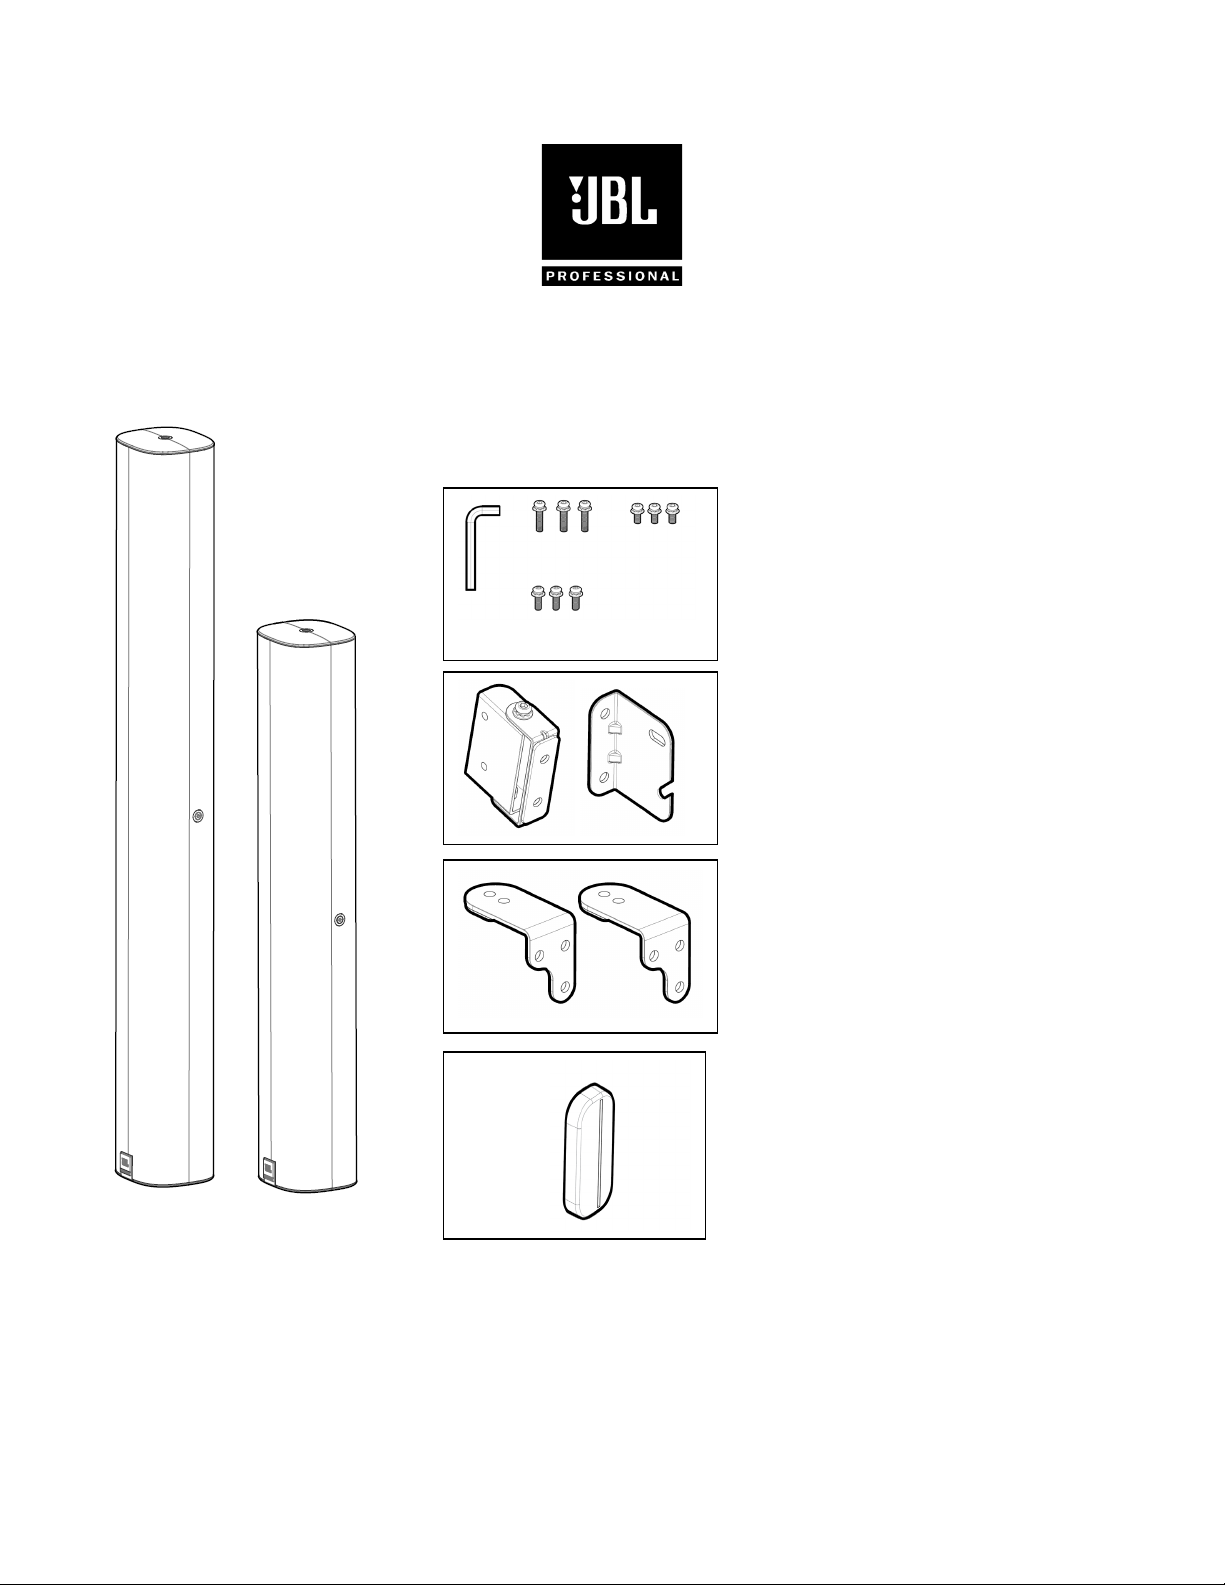
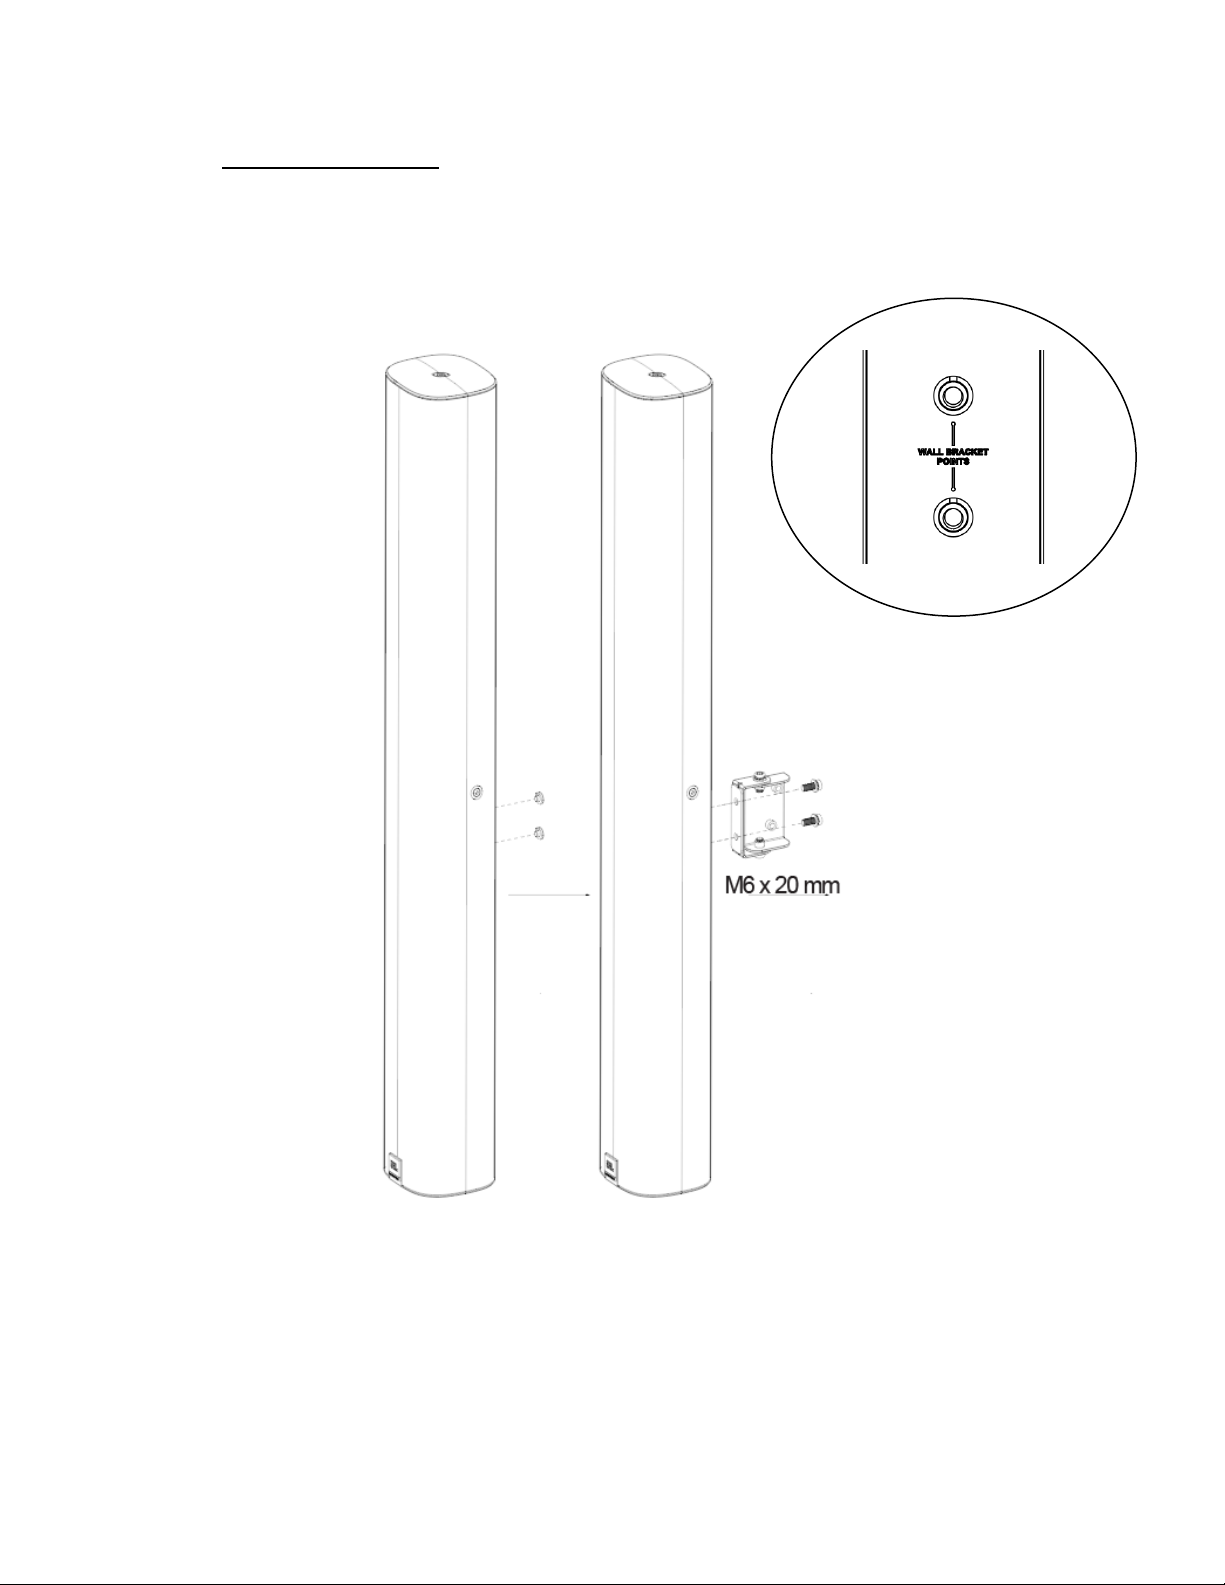
6. Only use the mounting hardware supplied with this product.
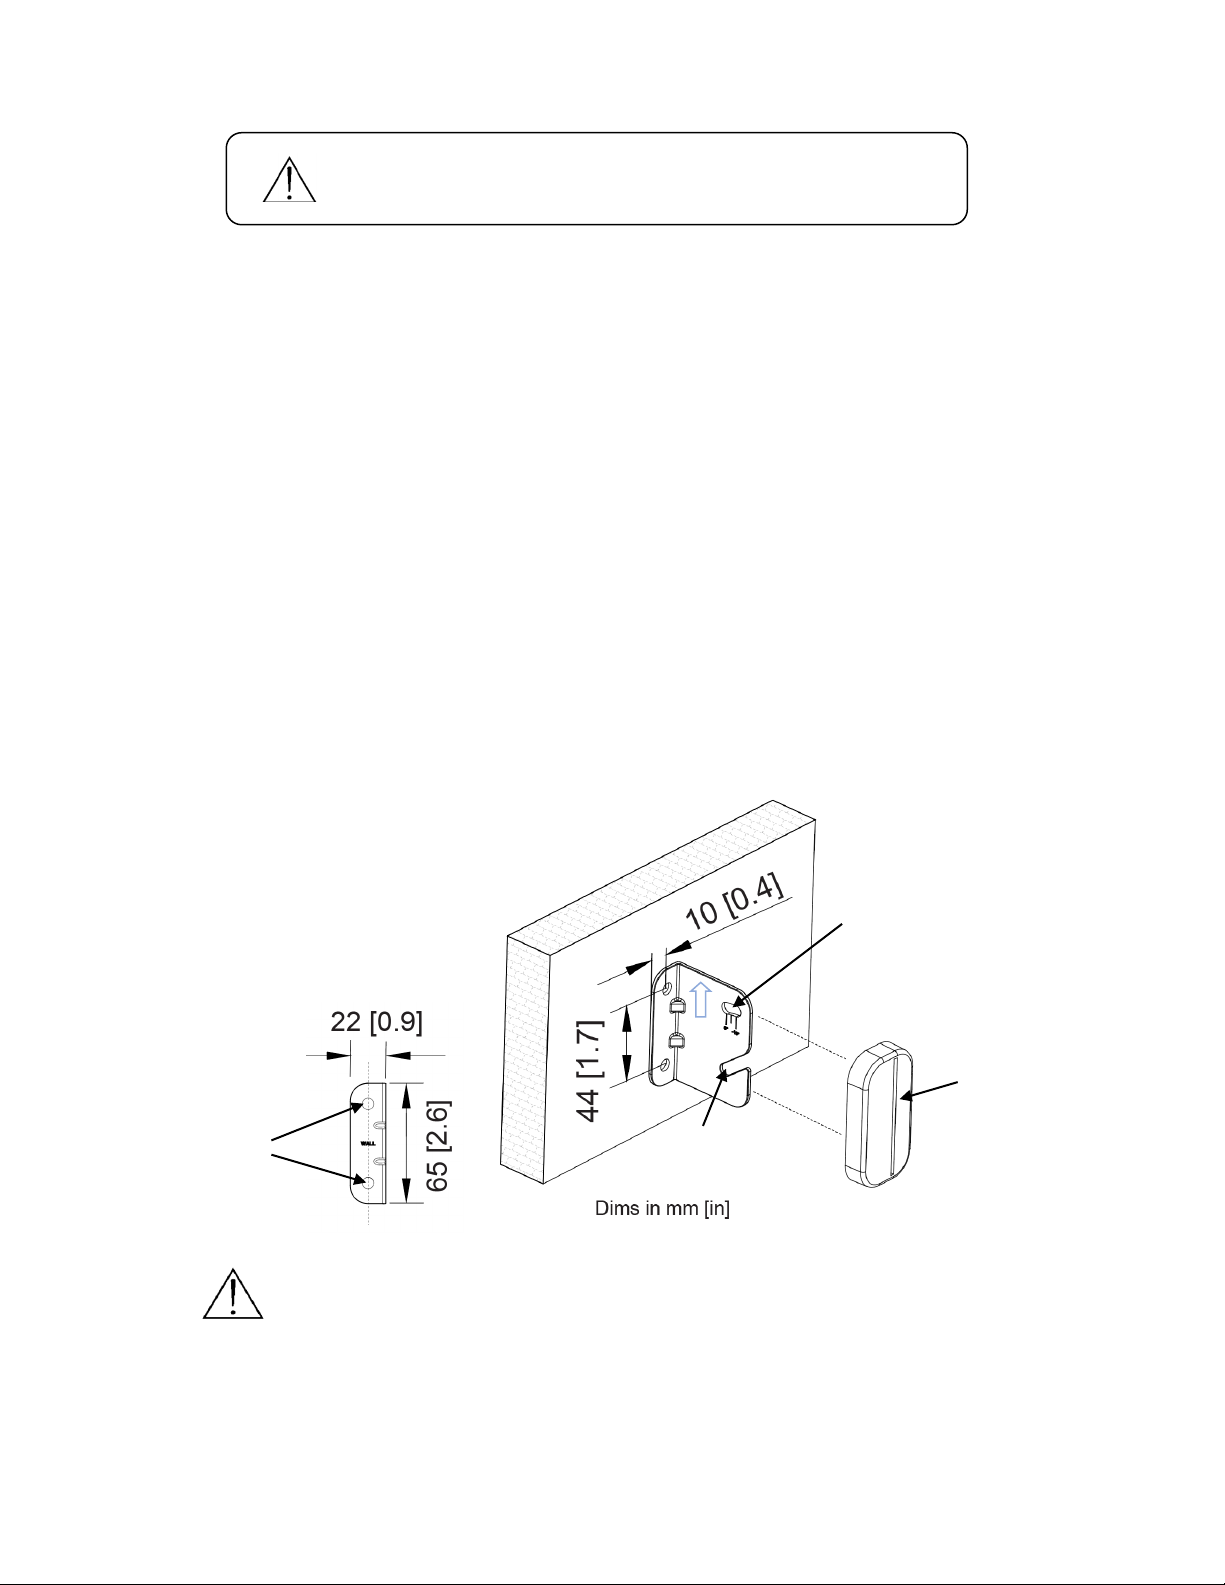
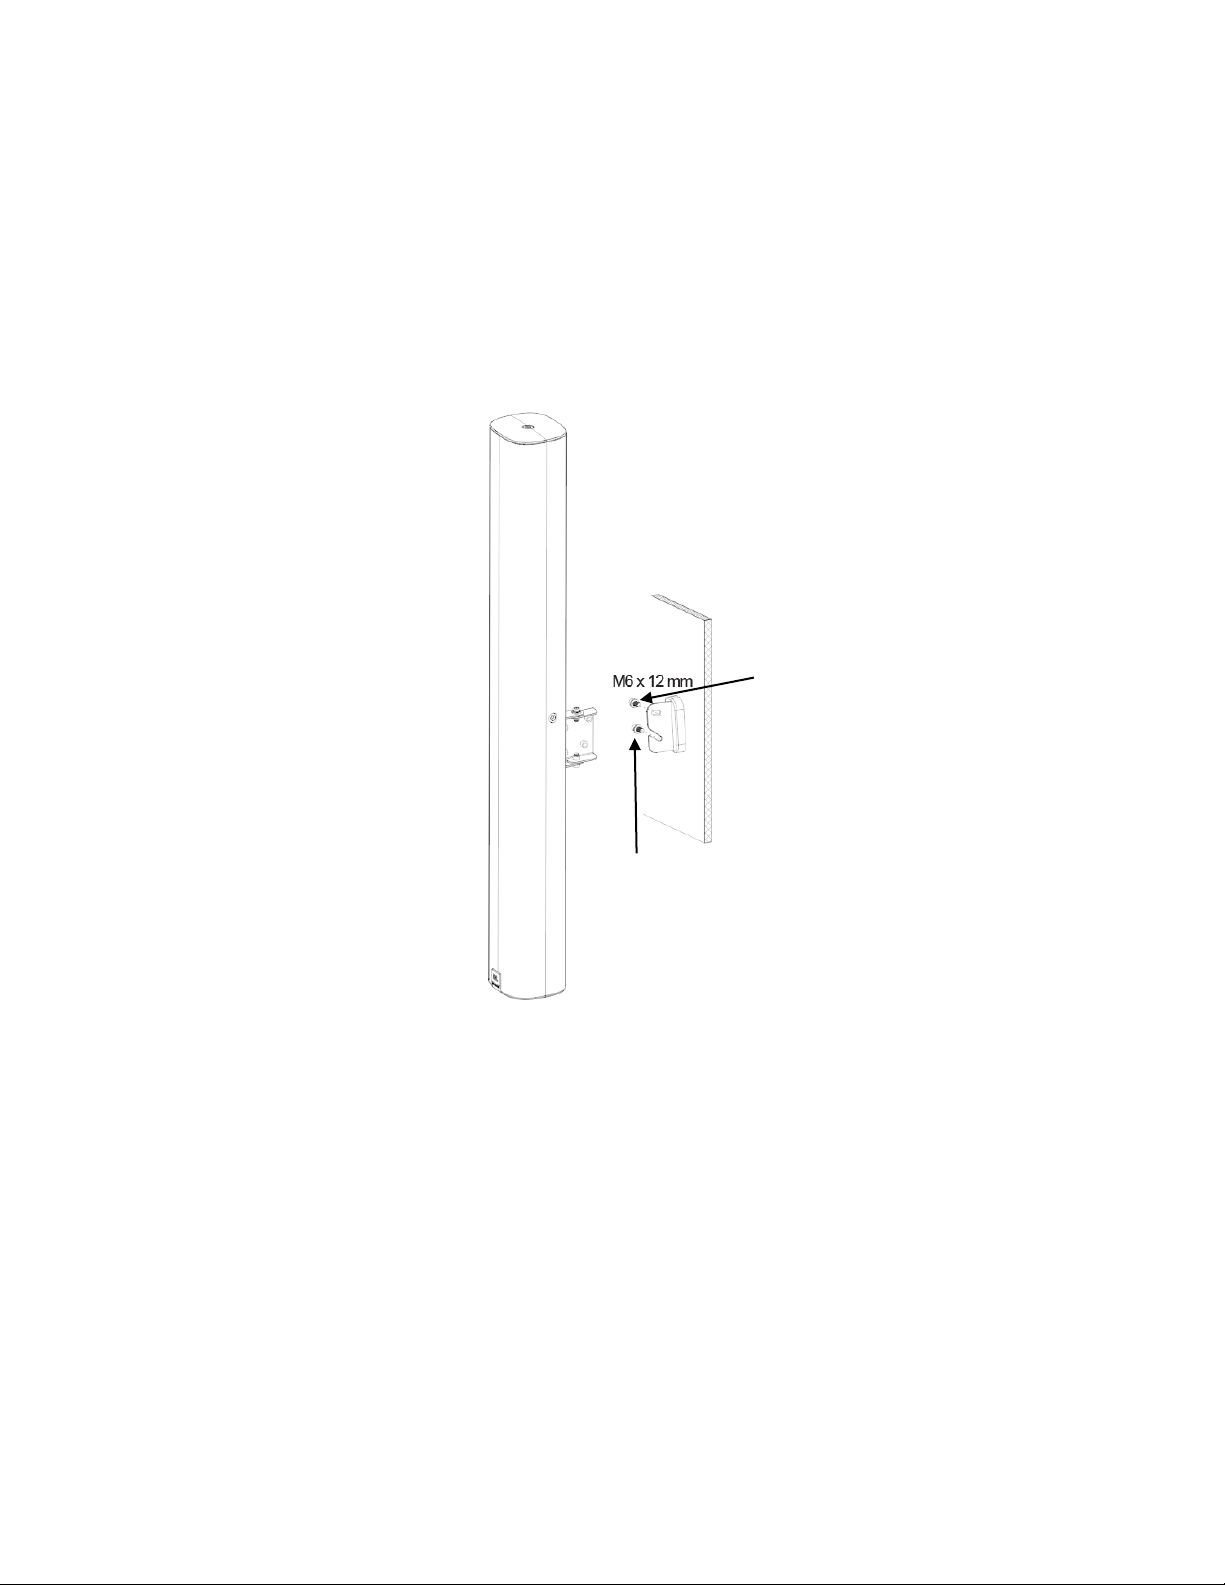
7. Do not mount on surfaces that are not sturdy, or that have hazards concealed behind them, such as electrical wiring or
plumbing. If you are not sure about installing the bracket, contact a qualified professional installer. Ensure the bracket is
installed according to local building codes.
8. Do not use hydrocarbon based solvents, lubricants or cleaning agents of any type on or around this speaker, and
associated mounting hardware, during installation. The use of such hydrocarbon based lubricants, solvents or cleaning
agents on or around the mounting anchors and screws can lead to degradation of the plastic material, possibly resulting
in cracking and premature failure of the product.
9. Keep the product away from fire and heat sources. Do NOT place naked flame sources, such as lighted candles, on or
near the product.
10. The loudspeaker and all mounting components must be inspected annually by a qualified professional who is trained
and certified in suspending loudspeaker systems. All rigging parts and components used in the suspension of the
loudspeaker system should be visually inspected for signs of cracking, bending, water damage, corrosion, de-lamination,
or any other condition that could compromise the system's integrity and create a dangerous falling hazard.
11. Prolonged exposure to excessive SPL can cause hearing damage! The loudspeaker is easily capable of generating sound
pressure levels (SPL) sufficient to cause permanent hearing damage to performers, production crew, and audience
members. Caution should be taken to avoid prolonged exposure to SPL in excess of 90 dB.
3
WATCH FOR THIS SYMBOL:
The exclamation point, within an equilateral triangle, is intended to alert the user to the presence of
important operating and maintenance (servicing) instructions in the literature accompanying the product.
WARNING: No naked flame sources – such as lighted candles – should be placed on the product.
CAUTION: To be installed by instructed, or skilled, persons only.
Regulatory Information
This product conforms to all applicable EU directive requirements. The full text of the EU declaration of
conformity is available at the following internet address: https://www.jblpro.com
This product conforms to all applicable Electromagnetic Compatibility Regulations 2016 and all other applicable
UK regulations. The complete declaration of conformity can be found at: https://www.jblpro.com
This symbol means the product must not be discarded as household waste, and should be delivered to an
appropriate collection facility for recycling. Proper disposal and recycling helps protect natural resources, human health
and the environment. For more information on disposal and recycling of this product, contact your local municipality,
disposal service, or the shop where you bought this product.
ROHS认证和环保使用年限
此标识适用于在中华人民共和国销售的电子信息产品。标识中间的数字为环保使用期限的年数。
部件名称
有毒有害物质或元素
铅
(Pb)
汞
(Hg)
镉
(Cd)
六价格
(Cr+6)
多溴联苯
(PBB)
多溴二苯醚
(PBDE)
电路板
○
○
○
○
○
○
线材
○
○
○
○
○
○
包装材料
○
○
○
○
○
○
金属件
X
○
○
○
○
○
除电路板以外的其他电子件 X ○○○○○
本表格依据SJ/T 11364的规定编制。
○: 表示该有毒有害物质在该部件所有均质材料中的含量均在SJ/T11363-2006标准规定的限量要求以下.
X: 表示该有毒有害物质至少在该部件的某一均质材料中的含量超出SJ/T11363-2006标准规定的限量要求.
4
CAUTION: Installation must be done by skilled
persons using safe installation standards.
The COL speaker can be attached to the wall either using the included SWIVEL/TILT WALL BRACKET or using the two included L-
BRACKETS.
OPTION A: WALL SURFACE MOUNTING VIA
INCLUDED SWIVEL/TILT WALL BRACKET
Note that the BRACKET ASSEMBLY consists of a SPEAKER-SIDE and a WALL-SIDE.
1.0) Mounting WALL-SIDE BRACKET:
1.1) Run the wiring from the power amplifier to the location desired for mounting the JBL COL loudspeaker.
1.2) Secure WALL-SIDE BRACKET to wall using the appropriate installer-selected attachment hardware, and using a level to
ensure that the WALL-SIDE BRACKET is straight. Use both screw holes of WALL-SIDE BRACKET. Be sure that the TILT-SET
SLOT is at the top and HOOK SLOT is at the bottom. After attaching to the wall, slide plastic TRIM COVER over bracket and
snug to wall.
Hardware for attaching WALL SIDE of Bracket to wall is not included. The installer
is responsible for proper selection and use of mounting hardware and for properly
and safely securing the bracket to the wall material.
TILT-SET SLOT
(on the top)
HOOK SLOT
(on the bottom)
TRIM COVER
(slide over WALL-SIDE
BRACKET after bracket gets
secured to wall)
Dia Ø6.5 [0.26]
UP
5
2.0) Mounting SPEAKER-SIDE BRACKET to COL speaker:
2.1) Identify the COL speaker’s two back panel mounting points, labeled on the back panel as “WALL BRACKET POINTS”.
Remove the silicone caps from those points, exposing the threaded inserts.
2.2) Attach the 2-part SPEAKER-SIDE BRACKET to COL speaker using two M6 x 20 mm bolts (with flat washers and lock
washers). Recommended –– 3.5 N•m [+0.5/-0] (2.6 ft-lb [+0.4/-0]).
Remove Silicon Caps
Insert M6 x 20 mm Bolts
with Flat Washers &
Lock Washers
WALL BRACKET POINTS (M6) are
labeled on the back of the speaker
6
3.0) Connecting SPEAKER-SIDE BRACKET to WALL-SIDE BRACKET to form SWIVEL/TILT BRACKET ASSEMBLY:
3.1) After sliding TRIM COVER onto WALL-SIDE BRACKET, loosely thread one of the M6 x 12 mm bolts (with flat washer and
lock washer) into the bottom PIVOT hole of the SPEAKER-SIDE BRACKET. This bolt becomes the PIVOT BOLT.
3.2) Slide COL speaker (with SPEAKER-SIDE BRACKET attached) onto the WALL-SIDE BRACKET, sliding the PIVOT BOLT into the
HOOK SLOT of the WALL-SIDE BRACKET. Make sure the flat washer and lock washer are on the same side of the WALL-SIDE
BRACKET as the bolt’s head (and aren’t caught between the two brackets).
3.3) After the column is being held in place by the PIVOT BOLT, insert the other M6 x 12 mm bolt (with flat washer and lock
washer) through the TILT-SET SLOT and thread it into the press-fit nut that’s part of the SPEAKER-SIDE BRACKET.
3.4) With both bolts now engaged, tighten them. [Recommended torque 3.5 N•m [+0.5/-0] (2.6 ft-lb [+0.4/-0]).
3.5) To set a down-tilt aiming angle, loosen both bolts slightly, adjust the tilt of the speaker, and re-tighten the bolts.
3.6) To set the swivel (pan), loosen the bolts at the top and bottom of the SWIVEL JOINT, set the swivel (pan), and re-tighten
the bolts.
PIVOT BOLT
(with flat washer and lock washer)
TILT ADJUSTMENT BOLT
(with flat washer and lock washer)
7
SWIVEL (PAN) / TILT WALL BRACKET ASSEMBLY Dimensions and Settings
Dims in mm [in]
8
OPTION B: WALL SURFACE MOUNTING VIA
INCLUDED L-BRACKETS
Note that the L-BRACKETS can be attached to either the top and bottom of the speaker (via threaded inserts located on the top
and bottom panels) or to the sides of the speaker (via threaded inserts located in the left and right panels of the speaker). The
following instructions and drawings are for using the side points.
L-BRACKET Dimensions
9
4.0) Install L-BRACKETS to the Wall and Side Insert Points:
4.1) Run the wiring from the power amplifier to the location desired for mounting the JBL COL loudspeaker.
4.2) Secure L-BRACKET to wall using the appropriate installer-selected attachment hardware, and using a level to ensure that
the L-BRACKETS are plumb. Use 3 screws for each L-bracket. For use with side insert points, space brackets so that inner-
most screws holes are 25 mm apart (adjust as needed).
CAUTION: Installation must be done by skilled persons
using safe installation standards.
Hardware for attaching L-BRACKETS to wall is not included. The installer
is responsible for proper selection and use of mounting hardware and for
properly and safely securing the brackets to the wall material.
If precipitation can be present at the installation location, cabinet must not
be installed at any upward aim angle, and slight downward aim angle (5°
or greater) is recommended to keep water out of loudspeaker.
10
4.3) Remove the silicone caps from over the left-side and right-side threaded insert points, exposing the metal threaded
inserts.
Note: There are two holes in the column-end part of each L-BRACKET – one for situating the column closest to the wall and
one for spacing farther out from the wall. Select the hole to meet with desired distance from the wall (for example,
clearance for cables, or keeping entire distance from the wall below 4 inches in order to comply with ADA).
4.4) Use the M6 x 20 mm bolts through the L-BRACKETS and tighten into threaded inserts. Recommended torque 3.5 N•m
[+0.5/-0] (2.6 ft-lb [+0.4/-0]).
Remove Silicone Caps
Insert Bolts with
flat washers & lock washers
2 pcs M6 x 20 mm bolts with
flat washers & lock washers