-10-
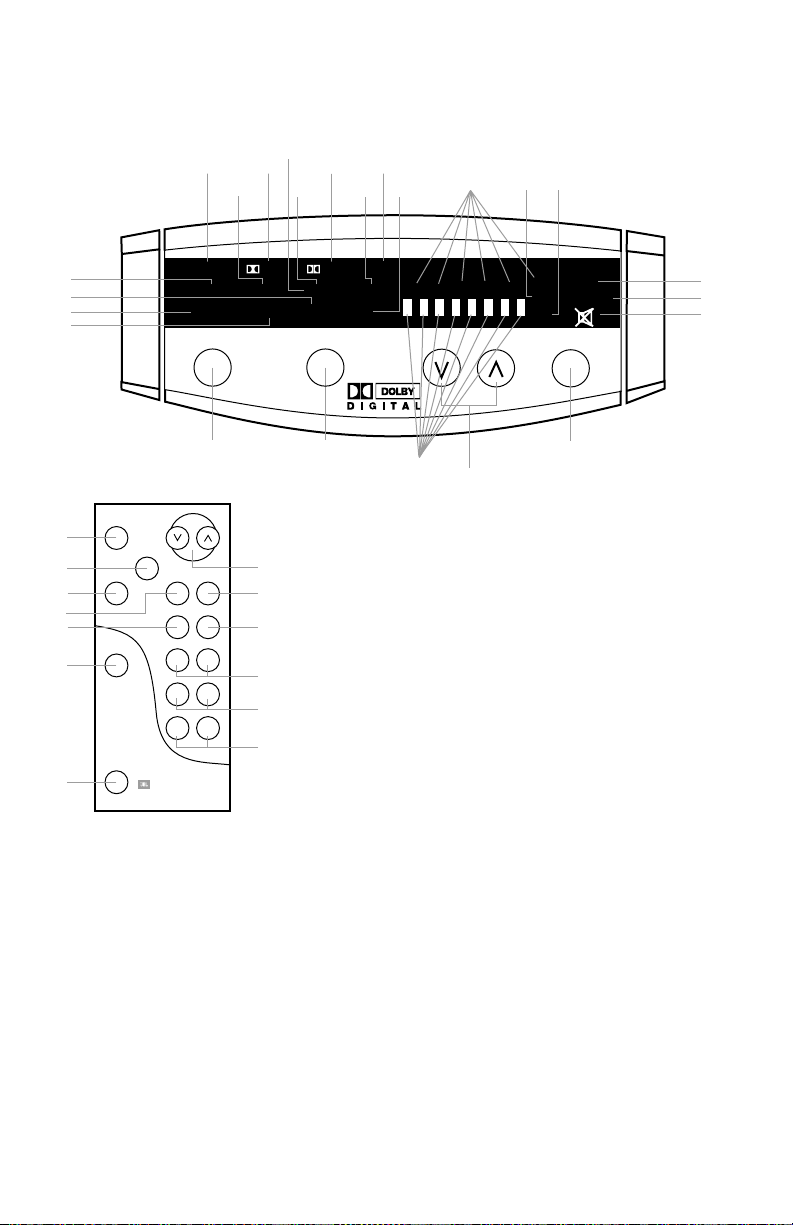
4. Input
This control is available on both
the front panel and the remote
control. It allo s manual selec-
tion hen the user repeatedly
presses and releases the button
for any of the Media 3000’s four
inputs. The Media 3000 features
an Automatic Digital Input
Selection feature that
automatically s itches the
Media 3000 to the source
connected to one of its t o
digital inputs as soon as that
device is po ered on. Please
read the section on page 3 to
thoroughly familiarize yourself
ith the conveniences and
conditions of using the
Automatic Digital Input
Selection feature. The Input
s itch is also used hen the
source connected to the Media
3000’s analog input is not the
analog source that as listened
to the last time the Media 3000
as on (and hence the
Automatic Turn-On feature is
not available). The Input s itch
also turns on the Media 3000
hen pressed (see item 1 earlier
in this section). Whenever a
specific input is selected either
manually or automatically, its
indicator (14, 15, 16 or 17) on
the Media 3000’s front panel
ill be illuminated.
5. Surround Mode
Pressing and releasing this
button allo s the selection of
different listening modes.
Surround (18), Phantom (19)
and 3-Stereo (20) are available
listening options for Dolby
Digital and Dolby Pro Logic.
Stereo (21) bypasses the
surround processing and out-
puts sound through the right-
and left-front speakers only. In
Surround mode, all five
satellites and the sub oofer ill
play. In Phantom mode, all
speakers except the center
channel ill play. In 3-Stereo,
all speakers except for the t o
surround speakers ill be active.
6. Volume
Press (∧) on the remote control
or the front panel to raise the
system’s volume. Press (∨) on
the remote control or the front
panel to lo er the system’s
volume. The volume setting is
indicated on the status-bar
indicator (27).
7. 0 dB
Press this button to reset the
Center, Surround, Balance,
Treble and Bass controls to their
default positions.
8. Test
Press this button to activate the
Test Tone mode (see Test Tone
section).
9. Delay
The relative timing of sounds
coming from the center and/or
surround speakers compared to
the front-left and front-right
speakers can be adjusted. The
first press of this button allo s
adjustment of the center
channel, all the ay from the
default setting of 0 ms (milli-
seconds), hich means no delay
(all status bars off), to a
maximum of 5 ms (5 status bars
on). The indicators C (28) and
DLY (30) ill be on. The second
press of the Delay button allo s
adjustments of the surround
speakers; indicators LS (28) and
RS (28) and DLY (30) ill be on.
The delay can be adjusted from
zero (all status bars off) to
15 ms (all status bars on) in
5.1 Channel Dolby Digital and
from 15 ms (all status bars off)
to 30 ms (all status bars on) in
Dolby Pro Logic (there is an
inherent and fixed 15 ms of
delay added in the “matrixed”
Dolby Pro Logic to re-create the
proper surround effect). The
center and surround delay
adjustments can be done from
either Dolby Digital or Dolby Pro
Logic “matrixed” modes. There
are no separate delay
adjustments for the individual
modes of operation. During
adjustments, the audio mutes
momentarily every time the
Adjustment +/– button (11) is
pressed. Please note that the
status-bar indicator (27) ill not
display unless Adjustment +/–
buttons are pressed. Also, hile
the status-bar indicator (27) is
on, channel indicators (28) and
DLY (30) ill not be displayed.
And, if adjustments are done in
a mode here a certain channel
is not available, the adjustment
step for that channel is skipped.
For example, in Phantom mode,
the center- channel delay
cannot be adjusted since
Phantom does not have a center
channel. In Stereo, neither the
center nor the surround delay
can be adjusted since Stereo
does not feature surround
speakers or a center speaker. A
third press of the Delay button
ill exit the Media 3000 from its
delay-adjustment mode.
10. Level
The relative level of sounds
coming from each of the Media
3000’s speakers can be adjusted
hile listening to program
material on the Media 3000.
Repeated pressing and releasing
of the Level button allo s access
to each channel. The display ill
indicate LVL (29), and the
channel indicators (28) LF (Left
Front), C (Center), RF (Right
Front), LS (Left Surround), RS
(Right Surround) and SUB
(sub oofer) ill illuminate to
indicate the active speaker. The
level for the selected channel
can then be changed using the
Adjustment +/– buttons (11).