manuals.online logo
Brands
  1. Home
  2. •
  3. Brands
  4. •
  5. JCHADWICK
  6. •
  7. Laboratory Equipment
  8. •
  9. JCHADWICK 8400 User manual

JCHADWICK 8400 User manual

User Manual
Includes Accessories:
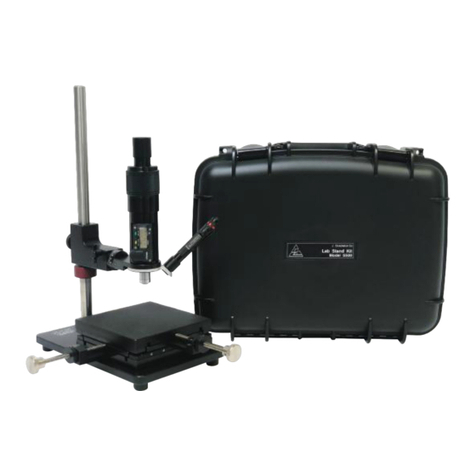
5500 Lab Stand w/ X-Y Stage
4400 Surface Replication Kit
Dino-Eye® Digital Camera
Model 8400
Optical Depth Micrometer
2
Contents
Page 4
Part Number List
Pages 5-11
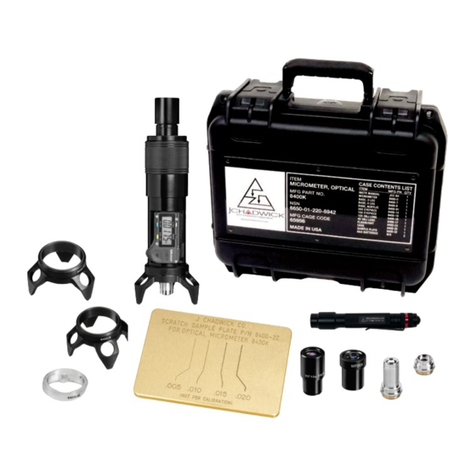
Optical Depth Micrometer
The Optical Depth Micrometer is a visual
inspection microscope designed to make
quick and repeatable measurements of
the depth of small surface features, like
pits, scratches, and engraving.
Pages 12-15
Micrometer Lab Stand
Designed for use when surface geometry
prevents using the handheld Micrometer
on a standard base.
Pages 16-17
Dino-Eye®Digital Camera
The Dino-Eye connects the Micrometer
to a laptop or tablet to create electronic
inspection records with detailed notes
and high-resolution images.
Pages 18-22
Microset®Surface Replication
Microset compounds provide a quick and
easy method of obtaining measurements
of damage in hard-to-reach places.
Lifetime Warranty
Technical Support
All J Chadwick Co (“JCC”) manufactured products
(“Products”) are covered by a limited lifetime warranty.
JCC warrants that the Products will perform substantially
in conformance with the published specications and be
free from defects of material and workmanship when
subject to normal, proper, and intended usage for the
lifetime of the products.
JCC agrees during the warranty period to repair or replace,
at JCC’s option, defective Products so as to cause the same
to operate in substantial conformance with published
specications.
THERE ARE NO REPRESENTATIONS OR WARRANTIES OF
ANY KIND, EXPRESS OR IMPLIED, AS TO MERCHANTABILITY,
FITNESS FOR PARTICULAR PURPOSE, OR ANY OTHER
MATTER WITH RESPECT TO ANY OF THE PRODUCTS.
This warranty does not cover cosmetic damage or damage
due to acts of God, accident, misuse, abuse, negligence or
improper operation or maintenance. Warranty is null and void
if repair or modication is attempted by anyone other than
JCC or its authorized representatives.
Repair or replacement as provided under this warranty is the
exclusive remedy of the consumer.
3
www.jchadwickco.com
suppor[email protected]
(866) 358-9955
4
Part Number List
PART# ITEM
8600C All-In-One Optical Micrometer Kit
8600R All-In-One: Microset Add-On
8600CK All-In-One: 8600C Upgrade
8600-25 Case, 8600C All-In-One Kit
8400K Optical Micrometer Kit
8400-7 Base, 3-Leg
8400-71 Base, 3-Leg Soft Tip
8400-8 Base, 4-Le
8400-12 Base, 3-Leg Offset
8400-14 Eyepiece, 20X
8400-15 Eyepiece, 10X
8400-16 Objective, 10X
8400-17 Objective, 4X
8400-23 Flashlight
8400-25 Case, 8400K Optical Mictometer Kit
8400-27 Tall Tripod Base 4.5”
8400-32 Scratch Sample Plate
8400-35 Base, Corner
8400-91 Base, Acrylic V-Block
5500L Lab Stand Kit, w/ X-Y Stage
5500K Lab Stand Kit, no X-Y Stage
5500-50 X-Y Stage
4400M Surface Replication Kit
4400-1 Dispensing Gun, 50ml
4400-2RTG Microset®, Thixotropic, 50ml, Grey
4400-2RFG Microset®, Fluid, 50ml, Grey
4400-31 Nozzle Pack, 50ml, 50/Pack
4400-4 Microset® Backing Slides,
60mm X 40mm, 50/Pack
4400-5 Microset® Backing Paper,
70mm X 60mm, 100/Pack
4400-6 Case, 4400M Surface Replication Kit
4400-7 Base, Tilting Stage
AM7025X Dino-Eye Eyepiece Camera
Optical Depth Micrometer
ORIGIN
Sets the absolute zero that
the tool will reference from
by default. Origin is preset
so the Micrometer will be
in focus on a at surface at
100X magnication.
in/mm
Toggles between US standard
(in) and metric (mm)
ZERO/ABS
Sets starting position
(temporary zero) for a
depth measurement.
ON/OFF
Turns the display
on or off.
Battery
SR44/LR44
Button Cell Battery
Digital Display Detail
Interchangeable
Objective
Interchangeable
Eyepiece
Focus Ring
Interchangeable
Handheld Base
Flashlight Ring
Digital Display
Optical
Depth
Micrometer
5
6
8400-7
Base, 3-Leg 8400-71
Base, 3-Leg, Delrin Tip
8400-8
Base, 4-Leg
8400-91
Base, Clear, V-Block
8400-12
Base, Offset
8400-35
Base, Corner
8400-27
Base, Large 3-Leg
Tripod bases are
used for most at
and simple curved
surfaces.
Use the 4-leg base
on broad convex and
concave surfaces.
Use the V-block base
for leading edges,
small diameters,
outside angles, and
at surfaces next to
an edge.
Use the offset base
on surfaces adjacent
to an edge or wall.
Use the 2-Leg corner,
or wedge, base on
inside angles.
Use the large tripod base is for
small parts (up to 2”) or with the
tilting stage base for inspection of
Microset® replicas.
4400-7
Tilting Stage Base
Interchangeable Bases
Delrin-tipped feet
protect windshields
and other delicate
nishes.
7
Optics & Other Components
To change the eyepiece, remove
from the Micrometer by pulling
it up and out. There are no
threads on the eyepiece tube.
Promptly replace the eyepiece to
prevent debris from entering the
Micrometer through the exposed
eyepiece tube.
To change the objective lens, rotate
the focus ring counter-clockwise
(focus down) to expose the objective
lens threads. Grip the objective and
turn clockwise to remove. Reverse
to install. Do not over-tighten the
objective lens.
8400-17
Objective, 4X
8400-14
Eyepiece, 20X
8400-16
Objective, 10X
8400-15
Eyepiece, 10X
Use the Scratch Sample Plate to
practice positioning and focusing
the Optical Micrometer.
8400-23
Flashlight
8400-32
Scratch Sample Plate
AAA Battery
Overall magnication is calculated by multiplying the power
of the eyepiece and objective lens; for example, using the 10X
eyepiece and the 10X objective will produce 100X magnication.
Note: The Dino-Eye camera has 20X magnication.
Use 100X and 200X to inspect small features, like corrosion pits.
Use 40X and 80X for wider features or to measure the thickness
of a transparent surface, like a windshield.
Mag Eyepc/Obj Accuracy Max Depth Field of View
40X 10X/4X +/- 0.001” 1.150” 0.18” Dia
80X 20X/4X +/- 0.001” 1.150” 0.10” Dia
100X 10X/10X +/- 0.001” 0.250” 0.07” Dia
200X 20X/10X +/- 0.001” 0.250” 0.04” Dia
Specications
8
Optical Micrometer Setup
Always use one hand
to hold the base steady
and prevent movement,
and the other to focus
the Micrometer.
The view through the
eyepiece is reversed. This
means that that when the
subject is moved left, the
image moves right.
Turn the Focus Ring so that the objective lens is over the
subject by approx. ¼” using the 10X Objective, or 1” with
the 4X (so the surface will be roughly in focus).
Once in position, use one hand to hold the Micrometer
steady, and the other to insert the ashlight into the base.
5
6
1/4”(10X)
Install optics for desired
level of magnication.
Install handheld base or
mount on a Lab Stand.
Position directly over the
damaged area.
Shine the ashlight down
into the eyepiece. A bright
spot will appear directly
below the objective, this
will be the center of the
eld of view. Position the
Micrometer so that the
bright spot is shining on
the edge of the step height
to be measured, like the
edge of a scratch or pit.
1
4
3
2
9
Measuring Depth
1Position the Micrometer so that the subject is in the center of
the eld of view.
2Focus on the top surface directly next to the recessed area (A).
3When the surface area is in sharpest focus, gently press the
ZERO/ABS button on the display to set a starting point for the
measurement.
4Without moving the Micrometer, focus down to the bottom of the
recessed area (B).
To nd the true lowest point, focus down passed what seems
to be the bottom until nothing else appears in focus below,
then come back up to the rst area that comes into sharp focus.
5Record the measurement from the digital display.
6Verify the measurement by refocusing up to the top surface (A).
The display should show “0.0000“ again.
Turn the Focus Ring so that the objective lens is over the
subject by approx. ¼” using the 10X Objective, or 1” with
the 4X (so the surface will be roughly in focus).
Once in position, use one hand to hold the Micrometer
steady, and the other to insert the ashlight into the base.
The Micrometer uses focus to measure the distance
between two points on different surfaces (at different
heights). Features at the same depth will appear in
focus and features above or below appear blurry.
Turn the Focus Ring to move the focus up and down.
The entire measurement cycle should be completed by
the same person. Always reset zero when switching users.
Focus Target
Field of View-
Top Surface
Field of View-
Bottom Surface
0.0045”
10
Transparent Surfaces
The method for measuring depth on a transparency (scribe lines,
for example) is the same as any other surface: focus on the surface
next to the damage, zero the display, and focus down to the bottom.
Measuring overall thickness is the same except that, instead of the
bottom of a pit, the second surface is the far side of the glass.
**VERY IMPORTANT**
When measuring overall thickness (only), the initial result on the
display is not accurate because the refraction index must be taken
into account. To calculate the overall thickness, multiply the result
on the display by the refraction index of the material.
A normal refraction index for transparent materials is approx. 1.5:
PMMA (acrylic, Lucite) 1.49
Plate/Window Glass 1.52
Polycarbonate (Lexan) 1.58
Tables of refraction indexes of other materials are available online.
Surface and embedded damage, like scratches and bubbles,
are air space and not subject to the refraction index.
Transparencies usually
have extremely shallow
surface marks, like
polishing lines and
micro-scratches, which
make it easy to focus on
the surface.
If it is difcult to locate
the surface, use a felt
pen to create a focal tar-
get point on either side
of the transparency.
Nearside
Farside
11
Calibration
The Micrometer can be returned to J Chadwick Co for recertication, or
any ISO/IEC 17025 accredited calibration lab can provide a calibration
certicate using this procedure.
The Micrometer can easily be calibrated in-house. The procedure is a
verication of accuracy against standards (gage blocks); no adjustment
to the tool is required.
Any unit found out of tolerance (not measuring correctly) must be
returned to the manufacturer for repair.
3Focus on the surface of the upper gage block.
Zero “0.0000” display.
4Refocus on the surface of the lower block.
Record displayed result.
If the Micrometer is measuring properly, the display will
show the exact thickness of the upper block.
Repeat steps 1-5, using each of the 2 remaining gage
blocks as the upper block.
Calibration Procedure
Recommended Cycle: 1 Year
Equipment
4x Rectangular Gauge Blocks, Grade 0, ASME B89.1.9, NIST,
ISO/IEC 17025:2005 calibrated. Size range 0.005” - 0.200”.
Instructions
1Wring two gage blocks together by sliding one block
perpendicularly across the top of the other, then rotate
lengthwise and slide to create a step.
2Position the Micrometer
so the step between
the blocks is the
center of the eld of
view.
Micrometer Lab Stand
12
Safety Ring
X-Y Stage
Lead Screw
Upper Pole
Base Plate
w/Lower Pole
Lead Screw
Clamp
Micrometer
Focus Block
6
9
8
10
7
2
3
4
5
Lab Stand Setup
1 Loosen thumb wheel to
remove the Micrometer
Focus Block from the Base
Plate, set aside.
2 Set the Base Plate on a at
surface.
3 Slide red Safety Ring onto
the Lower Pole on the Base
Plate. Do not tighten.
4 Thread the Upper Pole
onto the Lower Pole on the
Base Plate.
5Slide the Focus Block onto
the Upper Pole with the
graduated dial facing up and
the Flashlight Ring pointing
down.
6 Tighten the Safety Ring
directly under the Focus
Block.
7 Use a 7/64 hex wrench to
loosen the set screw on the
Lead Screw Clamps, insert
Lead Screws until the black
collar is ush with the clamp.
Retighten set screws.
8 Turn both Lead Screws
evenly until the X-Y Stage is
centered on the Base Plate.
9 Remove base and thread
Optical Depth onto the
Focus Block.
10 Install Flashlight into the
ring on the Focus Block.
The Flashlight Ring rotates
for optimal lighting angle.
1
13
Lab Stand Disassembly For Storage In Case
1 Remove Micrometer Focus Fixture from Pole, set aside.
2 Remove Safety Ring from pole assembly and return to case.
3 Remove (unthread) the Upper Pole from the Base Plate and
return to case.
4(For stands with X-Y Stages only,) Use 7/64 Hex Wrench to
loosen the set screw on the Lead Screw Clamp. Pull out Lead
Screw and return to case for storage. Re-tighten set screw on
Lead Screw Clamp to prevent loss.
5Invert the Focus Fixture and clamp to the Lower Pole on the
Base Plate (by tightening thumb wheel). Return to case.
Correct Lab Stand setup with
Lead Screws, Micrometer and
Flashlight installed.
14
Invert Focus Block on Base
Plate before returning to Case.
X-Y Stage Installation
1 Invert the X-Y
Stage and place
near the edge
of a at surface
(like the edge of
a table).
2 Position the
Lab Stand Base
Plate over the
X-Y Stage so that
the (4) holes in
the Base Plate
align with the
threaded holes
on the underside
of the X-Y Stage.
The Lead Screw
Clamps must
be oriented as
shown above.
3 Mount the X-Y
Stage on the Lab
Stand with (4)
¼-20 x ½”
Socket Head
Cap Screws on
the underside of
the Base Plate.
Use a 3/16” hex
wrench to tighten
the screws.
X-Y Stage correctly
installed on Base Plate
Table Edge
1
2
3
4
Table Edge
Lead
Screw
Clamps
1
2
3
4
15
Dino-Lite®Eyepiece Camera
J Chadwick Co is an authorized reseller for Dunwell Tech, Inc.
https://www.dinolite.us/en/downloads
www.dinolite.us/products/
eyepiece-cameras/dino-eye-edge/
am7025x/
DinoCaptire Software is required to use
the Dino-Eye eyepiece camera. Scan QR
to download the current version of the
software and user manual:
For product support, visit the
manufacturer’s ofcial website:
16
Using the Eyepiece Camera
1 Position the computer or tablet (with
DinoCapture software installed) near the
subject. Plug Dino-Eye camera into the
USB port and open DinoCapture software.
Check that the camera is live.
2 Position Micrometer over the subject
using the ashlight to pinpoint the ROI
(see page 8 “Setup Instructions”).
3 Use one hand to hold the Micrometer
steady. Use the other hand to remove the
standard eyepiece and replace with the
Dino-Eye camera. Insert the Dino-Eye di-
rectly into the Micrometer eyepiece tube.
4The screen will display the view through
the eyepiece. Take measurements as
usual by manually turning the focus knob
on the Micrometer to bring each surface
into sharp focus (see page 9 “Measuring
Depth”).
Images can be captured, annotated, and
saved (refer to software user manual).
The Dino-Eye Camera’s magnication
power is 20X; overall magnifcation is
200X when combined with the 10X
objective lens, or 80X with the 4X
objective lens.
17
Tablet Not Included.
https://www.microset.co.uk
J Chadwick Co is an authorized US reseller for
Microset Products, LTD, United Kingdom.
For more products, SDS and other technical
information, visit the manufacturer’s website:
MICROSET®101 REPLICATING COMPOUNDS are
very high resolution, two-part silicone polymers specically
designed for surface replication.
The easy cartridge application system allows replicas to
be made of most solid non-porous surfaces, in any shape
or size, Microset replicas are dimensionally stable for
geometric measurement and can be stored indenitely for
future reference.
When viewed through the Micrometer, the replicas have
a bright metallic appearance, allowing very ne details
like microstructure, cracking and pitting to be observed.
Microset is ideal for the assessment of defects on critical
engineering surfaces.
Surface Replication with Microset ®
Microset replicas are high
strength elastomeric materials
that can be removed from holes,
tubes and moderate re-entrant
geometries without altering the
replica. This allows access to,
otherwise inaccessible, internal
surfaces.
Common applications include
surface defect characterization,
surface nish assessment and
metallography.
18
101RT FAST CURING THIXOTROPIC
4400-2RTG 101RT, Thixo, 50ml, Grey
4400-2RTB 101RT, Thixo, 50ml, Black
101RF FAST CURING FLUID
4400-2RFG 101RF, Fluid, 50ml, Grey
4400-2RFB 101RF, Fluid, 50ml, Black
The free-owing nature of uid
compounds minimizes the risk of
air entrapment in the replica and
makes application easy over large
areas. Use for replicating rough
surfaces, cavities, tubes, threaded
holes, etc.
Thixotropic compounds
can be applied to vertical
and overhead surfaces
without the compound
dripping or owing away
from the surface.
Working Life 30 SECONDS
Cure Time 5 MINUTES (25°C)
Resolution 0.1 MICRONS
Shrinkage <0.1%
Temp Range -10°C to 180°C
Color BLACK or GREY
Thixotropic vs. Fluid Compounds
4400-1
Manual Dispensing Gun
4400-3
Mixing Nozzle, 50ml
(50/pack)
4400-4
Backing Slides
60mm X 40mm
(50/Pack)
4400-5
Backing Paper
70mm X 60mm
(100/Pack)
19
Additional compound formulas are
available, call or visit the Microset
website for a complete list.
Making Microset Replicas
Assemble Dispenser
1Lift the cartridge clip.
2Insert slider from
opposite side and push
in until ush with holes in
slot on the dispenser.
Microset replicas are made using a simple application system that is
comprised of a dispensing gun, compound cartridge (contains both
base material and catalyst), mixing nozzles, and backing paper or slides.
Each application delivers fully mixed replicating compound directly to
the area of interest. The static mixing nozzle attaches to the cartridge
to provide air free mixing of the base and catalyst.
Install Compound Cartridge
1Check that slider is
installed and pushed in
completely.
2Slide cartridge into slot
on dispenser.
3Lower cartridge clip to
secure.
Install Mixing Nozzle
1Remove cap from
cartridge.
2Position mixing nozzle
on cartridge and rotate
clockwise to lock.
3 For new cartridges
only, dispense a small
amount of compound on
to waste paper before
applying to subject (to
ensure that the rst
application is fully
mixed).
Raise cartridge
clip.
Insert slider and
push in until ush.
Align nozzle
with holes on
cartridge, turn
clockwise to lock.
Align cartridge
with slots on
dispensing gun.
Lower clip to
secure in place.
Properly assembled
and ready to use.
20

Other JCHADWICK Laboratory Equipment manuals

JCHADWICK 5500L User manual

JCHADWICK

JCHADWICK 5500L User manual

JCHADWICK 8400K User manual

JCHADWICK

JCHADWICK 8400K User manual

JCHADWICK 8400K User manual

JCHADWICK

JCHADWICK 8400K User manual

Popular Laboratory Equipment manuals by other brands

Velp Scientifica JLT Series instruction manual

Velp Scientifica

Velp Scientifica JLT Series instruction manual

Hach Sigma 1600 Instrument manual

Hach

Hach Sigma 1600 Instrument manual

Dürr Technik SICOLAB mini ENDO Installation and operating instructions

Dürr Technik

Dürr Technik SICOLAB mini ENDO Installation and operating instructions

Sutter Instrument XenoWorks BRM Operation manual

Sutter Instrument

Sutter Instrument XenoWorks BRM Operation manual

Bullard NXT user manual

Bullard

Bullard NXT user manual

Lumencor SOLA SM instruction manual

Lumencor

Lumencor SOLA SM instruction manual

Mitutoyo StyliCleaner manual

Mitutoyo

Mitutoyo StyliCleaner manual

illumina MiSeq System System guide

illumina

illumina MiSeq System System guide

Buehler IsoMet 4000 manual

Buehler

Buehler IsoMet 4000 manual

MELAG Vacuklav 41 B Plus Evolution Technical manual

MELAG

MELAG Vacuklav 41 B Plus Evolution Technical manual

Hach BOD Direct plus Basic user manual

Hach

Hach BOD Direct plus Basic user manual

Thermo Scientific TSE Series Operating and maintenance manual

Thermo Scientific

Thermo Scientific TSE Series Operating and maintenance manual

Genrui WP21B manual

Genrui

Genrui WP21B manual

Binder FP 53 operating manual

Binder

Binder FP 53 operating manual

Agilent Technologies 6100 Series Familiarization guide

Agilent Technologies

Agilent Technologies 6100 Series Familiarization guide

Stuart SC6/100V/50 Instructions for use

Stuart

Stuart SC6/100V/50 Instructions for use

Hach ORBISPHERE K1200 Basic user manual

Hach

Hach ORBISPHERE K1200 Basic user manual

Thermo Scientific Sorvall ST 16 instruction manual

Thermo Scientific

Thermo Scientific Sorvall ST 16 instruction manual

manuals.online logo
manuals.online logoBrands
  • About & Mission
  • Contact us
  • Privacy Policy
  • Terms and Conditions

Copyright 2025 Manuals.Online. All Rights Reserved.