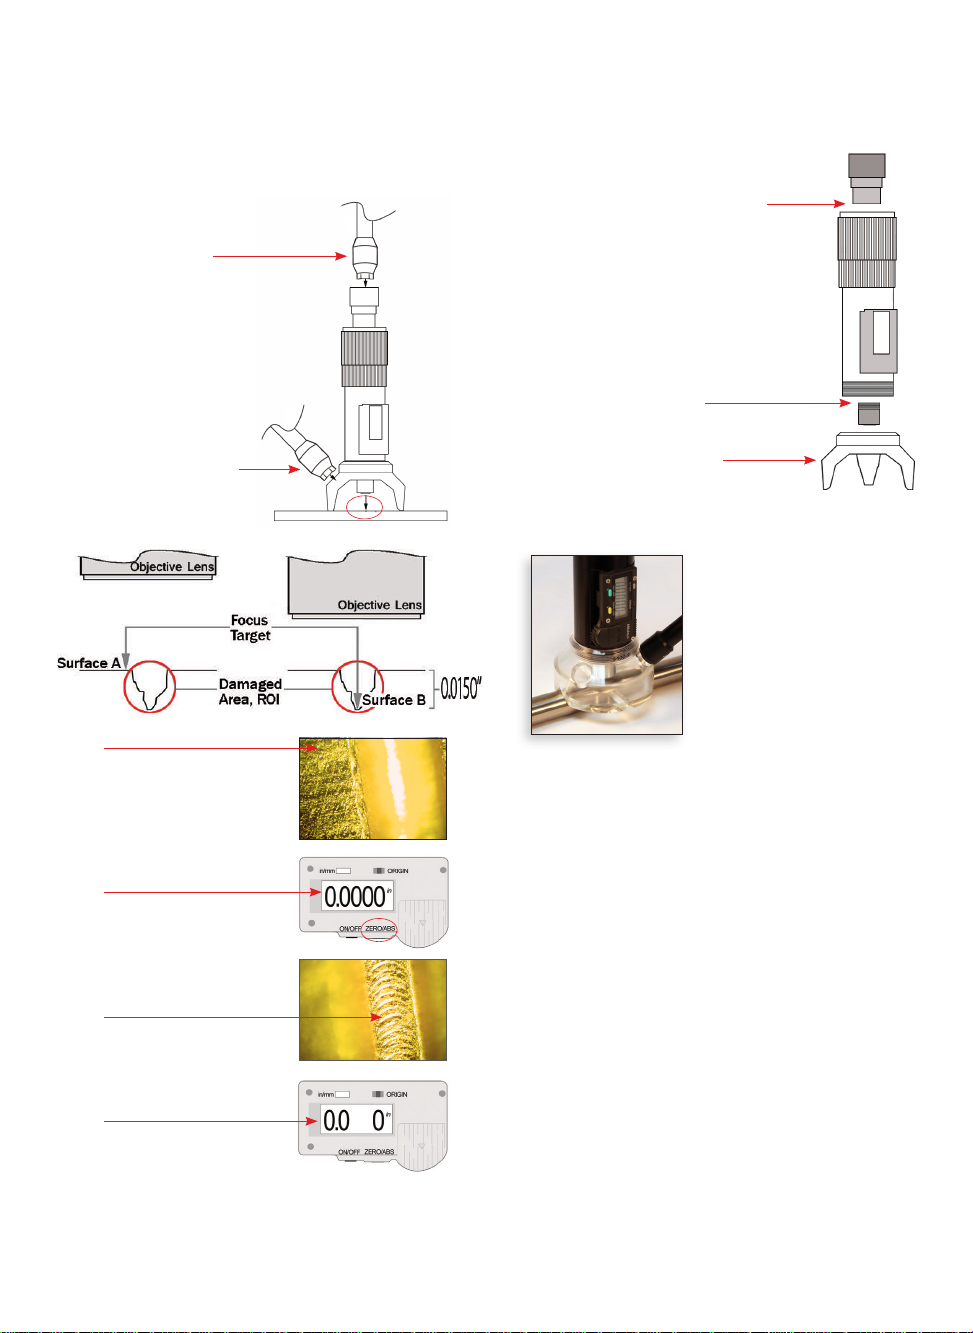
manuals.online logo
Brands
  1. Home
  2. •
  3. Brands
  4. •
  5. JCHADWICK
  6. •
  7. Laboratory Equipment
  8. •
  9. JCHADWICK 8400K User manual

JCHADWICK 8400K User manual

For technical support:
USER MANUAL
8400K
Optical Micrometer Kit
(866) 358-9955
www.jchadwickco.com
Specications
Accuracy +/- 0.001” (+/- 0.02mm)
Resolution 0.0005” (0.01mm)
Vertical Range
10X Objective - Max depth 0.250” (6.4mm)
4X Objective - Max depth 1.250” (32mm)
Temperatures
Operating 0ºC to 40ºC / 32ºF to 140ºF
Storage -10ºC to 60ºC / 14ºF to 140ºF
Calibration
Recommended calibration cycle: 12 months
Link to our website with
training videos and
product registration.
Eyepiece
Focus Adjustment
Base
Flashlight Receptacle
Optical Micrometer
Objective Lens
Digital Display
in/mm
Toggles
between
inches and
millimeters
ORIGIN
Used to set
initial zero
on a at
surface
ON/OFF
Turns
display
on or off
ZERO/ABS
Use during
measurement
to set zero
(start point)
1
P/N Item Description
18400-0 Optical Micrometer
(shown w/ eyepiece, objective and base installed)
28400-7 Base, 3-Leg
38400-8 Base, 4-Leg
48400-91 Base, Clear V-Block
58400-14 Eyepiece, 20X
68400-15 Eyepiece, 10X w/ Reticle
78400-16 Objective Lens, 10X
88400-17 Objective Lens, 4X
98400-23 LED Flashlight
10 8400-25 Carrying Case
11 8400-32 Scratch Sample Plate
1
7
11
4
3
2
5
6
8
9
8400K Kit Contents
10
Doc# B4 Rev Aug-2018
Online Product Registration
www.jchadwickco.com
15
Taking Measurements
The Micrometer uses focus to measure the distance
between two points at different depths. Subjects on
the same focal plane (depth) will appear in very sharp
focus, while anything above or below will be blurry.
Step 2
Look through the eyepiece
and use the focus adjustment
to bring the surface directly
next to the pit (Surface A)
into focus.
Step 3
Press the “ZERO/ABS”
button to set the starting point
for the measurement. The
display will read “0.0000”.
Step 4
Focus down to nd the the
bottom of damaged area
(Surface B).
Step 5
Record the depth shown on
digital display.
Step 6
For verication, refocus on
the top surface; the display
should show “0.0000” again.
Interchangeable Parts
Use the 3-Leg Base on at surfaces.
Use the 4-Leg Base on curved surfaces.
The Eyepiece, Objective Lens and Base can
be swapped out for different applications.
Use the clear V-Block
Base for small diameters,
outside angles and edges
of at surfaces.
Care should be taken to prevent
dirt or moisture from entering the
tube when swapping eyepieces.
To change the Objective Lens,
turn the focus adjustment
clockwise until the threads of the
objective lens are visible at the
base of the Micrometer. Holding
the Micrometer body rmly, turn
objective lens counter-clockwise
until threads disengage.
The three bases accommodate
di󰀨erent types of surfaces:
Useful Tips
The Micrometer does not have prismatic
correction; the view through the eyepiece is
reversed/opposite.
At 100X magnication, the objective lens will be
approx. ¼” above a at surface when in focus.
Lower magnication shows less detail but
provides a wider eld of view. Higher
magnication shows very ne detail but the
eld of view is small.
Use 100X and 200X magnication to inspect
very small features, like scratches, scribe lines,
and corrosion pits.
Use 40X and 80X magnication for wide features
like gouges and bubbles, or to measure overall
thickness of a transparency.
The 10X eyepiece has a reticle for visual width
measurements. Width observations are valid
only at 100X magnication.
Step 1
Shine the ashlight
down through the
eyepiece. A bright spot
will appear below the
objective lens; this is
the center of the eld of
view. Position it directly
over the subject.
Hold the micrometer to
prevent it from moving,
and insert lit ashlight
into base.

Other JCHADWICK Laboratory Equipment manuals

JCHADWICK 8400K User manual

JCHADWICK

JCHADWICK 8400K User manual

JCHADWICK 8400 User manual

JCHADWICK

JCHADWICK 8400 User manual

JCHADWICK 5500L User manual

JCHADWICK

JCHADWICK 5500L User manual

Popular Laboratory Equipment manuals by other brands

National Instruments PXI-1002 Getting started

National Instruments

National Instruments PXI-1002 Getting started

Metrohm 736 GP Titrino Instructions for use

Metrohm

Metrohm 736 GP Titrino Instructions for use

DLC SA-230FA instruction manual

DLC

DLC SA-230FA instruction manual

THORLABS T-Cube LEDD1B Operation manual

THORLABS

THORLABS T-Cube LEDD1B Operation manual

DIATECH PHARMACOGENETICS EasyPGX qPCR instrument 96 user manual

DIATECH PHARMACOGENETICS

DIATECH PHARMACOGENETICS EasyPGX qPCR instrument 96 user manual

ICANCLAVE STE-18-D instruction manual

ICANCLAVE

ICANCLAVE STE-18-D instruction manual

Hanil Cellspin II user manual

Hanil

Hanil Cellspin II user manual

Metrohm 862 manual

Metrohm

Metrohm 862 manual

Sper scientific 800047 instruction manual

Sper scientific

Sper scientific 800047 instruction manual

SKC AirLite Sample Pump operating instructions

SKC

SKC AirLite Sample Pump operating instructions

Drawell TDD4-MC Operation manual

Drawell

Drawell TDD4-MC Operation manual

Showa Denko Shodex IC SI-50 4E Operation manual

Showa Denko

Showa Denko Shodex IC SI-50 4E Operation manual

Thermo Scientific LTQ XL Getting started

Thermo Scientific

Thermo Scientific LTQ XL Getting started

BioLAB BAVT 500 Series Operation manual

BioLAB

BioLAB BAVT 500 Series Operation manual

biosystems X-CLARITY user manual

biosystems

biosystems X-CLARITY user manual

Labnet ENDURO GEL XL E0160 user manual

Labnet

Labnet ENDURO GEL XL E0160 user manual

Sartorius Sartorius SWC Installation and operating instructions

Sartorius

Sartorius Sartorius SWC Installation and operating instructions

Apex Instruments VSC-33 Operator's manual

Apex Instruments

Apex Instruments VSC-33 Operator's manual

manuals.online logo
manuals.online logoBrands
  • About & Mission
  • Contact us
  • Privacy Policy
  • Terms and Conditions

Copyright 2025 Manuals.Online. All Rights Reserved.