manuals.online logo
Brands
  1. Home
  2. •
  3. Brands
  4. •
  5. Harken
  6. •
  7. Marine Equipment
  8. •
  9. Harken 1561 User manual

Harken 1561 User manual

INSTRUCTIONS
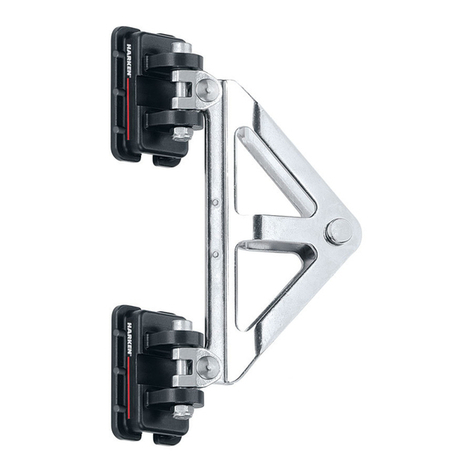
1561/1638 Stand-Up Toggles
Fit Midrange Cars: 1624/1625/1628/1629, T27 Series
Parts List
1/4" (6 mm) Clevis Pin
1. Load plastic bushings from
inside toggle.
Tip: Slip small screwdriver
into hole and use it as a
guide to insert plastic sleeve.
2. Slip 1/4" (6 mm) clevis pin
through toggle and secure
with small cotter pin.
Install Replacement Bushings (MP-1837)
Install Replacement Polyurethane Stand-Up Device (MP-1838)
Use These Mainsheet Blocks with 1561/1638
Fits Blocks
Single
Double
Triple
Fiddle
A
Post Ø
B
Shackle Pin
Ø
57 mm Carbo X X 6 mm
75 mm Carbo X 6 mm
75 mm Carbo X X 5/16" (8 mm)
Small Boat X X 7/16" (12 mm) 1/4" (6 mm)
Midrange X X X X 9/16" (14.5 mm) 5/16" (8 mm)
57 mm ESP Single X 5/16" (8 mm)
57 mm AirBlock X 9/16" (14.5 mm) 1/4" (6 mm)
57 mm AirBlock X X 5/16" (8 mm)
Use These Car Control Blocks with 1638
Use these Carbo Blocks End Controls Purchase
2650 (deadend on control) X 1631/E2730 2:1
2650 (deadend on block) X 1632/1633/E2740, E2746 3:1
342/2638 (deadend on control) X 1632/1633/E2750/E2756 4:1
1. Remove stainless toggle from
car.
Tip: mark top of toggle to
make installation of new
stand-up device easier.
2. Use pliers to squeeze circular
base of stand-up device; work
device up and out the side.
3. To install replacement piece,
squeeze circular base of
stand-up device and insert
from side of toggle.
Note: do not use pliers to
squeeze new stand-up device
while installing. This will
damage part.
Tip: use soap on circular
portion of stand-up device. Block Swivel Post
13/16"
21 mm
1"
25 mm
1638
13/16"
21 mm
1"
25 mm
B
A
5/16"
8 mm
Large Hole
1/4"
6 mm
Small Hole
1561
Top
Top
Bottom
Bottom
Strictly follow all instructions to avoid an accident, damage to
your vessel, personal injury or death. See www.harken.com/
manuals for additional safety information.
Traveler Cars: Clean by frequently flushing with fresh water. Periodically clean car by
squirting a detergent/water solution into center openings. Roll car back and forth to
distribute evenly then flush bearings with fresh water.
Do not use spray lubricants because ball bearings may skid not roll. Apply
one to two drops of McLube®OneDrop™to ball contact surfaces of track.
Roll car back and forth through OneDrop™several times to distribute
onto bearings. Wipe remaining OneDrop™off track. OneDrop™is preferred
but you can also use one to two drops of a light machine oil. Too much oil
attracts dirt.
Track: Clean with detergent and water.
Important! Exposure to some teak cleaners and other caustic solutions can result
in discoloration of part and is not covered under the Harken warranty.
For additional safety, maintenance and warranty information see www.harken.com/
manuals or the Harken®catalog.
Maintenance
Warranty
Inspect
Frequently inspect shackles and control block fittings for signs of fatigue and replace as
necessary. Make sure every installation includes Harken track end stops. Arrange control
tackle so cars do not hit end stops under load.
2
1
3
5
4
5
6
8
7
W15N24983 Bluemound Rd • Pewaukee, WI 53072-4974 USA.
Tel: (262) 691-3320 • Fax: (262) 701-5780
Web: harken.com • Email: [email protected]
No. Description
Part No.
1561
1 Stand-up toggle H-17353C
2 Polyurethane stand-up device MP-1838
35/16" Clevis pin HCP208
41/4" Clevis pin HCP211
5 Bushings (2) MP-1837
6 Large cotter pin HFS181
7 Small cotter pin HFS220
8 Blue Loctite®833
Loctite®is a trademark of Henkel AG & Company KGaA.
McLube®is a registered trademark of McGee Industries, Inc.
Printed in USA 4501 11/13

Install Mainsheet Block on 1561/1638 Toggle
Tools
• 2 Small slotted screwdrivers
Clevis pin 1/4" (6 mm) only
• Needle-nose pliers
5/16" (8 mm) Clevis Pin
1. Remove block shackle.
Insert block.
Insert
5/16" (8 mm) clevis
pin through toggle.
4. Install one (1) plastic set
screw so it is flush with
top of car.
Install 1561/1638 Toggle on Car
Tools
•Small slotted screwdriver
•Icepick
•Phillips screwdriver
1. Remove control blocks
or swivel ears on wind-
ward assembly.
2. Remove two (2) plastic
set screws on top of car
and use icepick to push
pivot pin to one side
and remove shackle.
Install Control Blocks on 1638 Toggle
2. Install the pins and split
rings.
3/16" (5 mm) Clevis Pin
1. Remove pins from tangs
on toggle. Place block
headpost between tangs.
Note: If you are using
double control blocks
add the U-Lock to align
blocks and keep them
from swiveling.
5. Insert toggle so large flat
end of rubber is up. Press
down and push pivot pin
into place.
6. Secure with set screw or
swivel ear screw. Assemble
control blocks using blue
Loctite®on screws.
2. Secure with cotter pin.
Note: Use Loctite®on stainless
screws only. Do not use on
plastic set screws.
Note: 1638 Only–do not
reinstall car control blocks.
2
1
3
1010
684 8
7
9
No. Description
Part No.
1638
1Toggle with tangs H-34293C
2Polyurethane stand-up device MP-1838
31/4" Clevis pin HCP211
45/16" Clevis pin HCP208
53/16" Clevis pin H-35241A
6Large cotter pin HFS118
7Small cotter pin HFS181
8Bushings (2) MP-1837
9 Blue Loctite®833
10 Split rings MS-002
11 Replacement set screw (2) HFS971
11 11

This manual suits for next models

1

Other Harken Marine Equipment manuals

Harken GT326S User manual

Harken

Harken GT326S User manual

Harken 8685 User manual

Harken

Harken 8685 User manual

Harken UNIT 2 MKIII User manual

Harken

Harken UNIT 2 MKIII User manual

Harken MKIV User manual

Harken

Harken MKIV User manual

Harken 35.2 ST E Manual

Harken

Harken 35.2 ST E Manual

Harken 3214 User manual

Harken

Harken 3214 User manual

Harken MKIV Unit 1 User manual

Harken

Harken MKIV Unit 1 User manual

Harken T2 Loop 2148 User manual

Harken

Harken T2 Loop 2148 User manual

Harken Carbo Air 79735 User manual

Harken

Harken Carbo Air 79735 User manual

Harken 1618 Midrange Assembly instructions

Harken

Harken 1618 Midrange Assembly instructions

Harken 3386 User manual

Harken

Harken 3386 User manual

Harken 1634 Assembly instructions

Harken

Harken 1634 Assembly instructions

Harken FlatWinder 250 Manual

Harken

Harken FlatWinder 250 Manual

Harken 1635 User manual

Harken

Harken 1635 User manual

Harken 3387 User manual

Harken

Harken 3387 User manual

Harken 3160 User manual

Harken

Harken 3160 User manual

Harken T2 User manual

Harken

Harken T2 User manual

Harken HC7906 User manual

Harken

Harken HC7906 User manual

Harken 1567 User manual

Harken

Harken 1567 User manual

Harken 3195 User manual

Harken

Harken 3195 User manual

Harken 3299 User manual

Harken

Harken 3299 User manual

Harken Carbo OneTouch User manual

Harken

Harken Carbo OneTouch User manual

Harken Black Magic Series User manual

Harken

Harken Black Magic Series User manual

Harken 9000 User manual

Harken

Harken 9000 User manual

Popular Marine Equipment manuals by other brands

POWERWINCH 825 Operation manual

POWERWINCH

POWERWINCH 825 Operation manual

JRC JLN-628 brochure

JRC

JRC JLN-628 brochure

DIGITAL YACHT PilotLink2 Product handbook

DIGITAL YACHT

DIGITAL YACHT PilotLink2 Product handbook

Clarion CMS2 Owner's manual & installation manual

Clarion

Clarion CMS2 Owner's manual & installation manual

EBS M7000 installation manual

EBS

EBS M7000 installation manual

Kongsberg M3 Bathy installation manual

Kongsberg

Kongsberg M3 Bathy installation manual

NPK SCS-1002 operating manual

NPK

NPK SCS-1002 operating manual

Furuno FE-800 installation manual

Furuno

Furuno FE-800 installation manual

Simrad DD15 manual

Simrad

Simrad DD15 manual

Notifier FS-BSO Installation and maintenance instructions

Notifier

Notifier FS-BSO Installation and maintenance instructions

Raymarine ST40 Quick reference guide

Raymarine

Raymarine ST40 Quick reference guide

Raymarine Maxiview ST80 Owner's handbook

Raymarine

Raymarine Maxiview ST80 Owner's handbook

E2S E2XS112UL Instructions/service manual

E2S

E2S E2XS112UL Instructions/service manual

GUIDANCE MARINE 20- Series Installer's guide

GUIDANCE MARINE

GUIDANCE MARINE 20- Series Installer's guide

R2Sonic 2026 Operation manual

R2Sonic

R2Sonic 2026 Operation manual

COBHAM SAILOR 6000 installation manual

COBHAM

COBHAM SAILOR 6000 installation manual

Raymarine ST60 Tridata Owner's handbook

Raymarine

Raymarine ST60 Tridata Owner's handbook

Furuno Navtex NX-700-A Operator's manual

Furuno

Furuno Navtex NX-700-A Operator's manual

manuals.online logo
manuals.online logoBrands
  • About & Mission
  • Contact us
  • Privacy Policy
  • Terms and Conditions

Copyright 2025 Manuals.Online. All Rights Reserved.