Jegs 79000 User manual
Installation Instructions for 79000
2-Ton Hydraulic Jack
SPECIFICATIONS
Capacity (Ton)
Lift Range
2
5-1/8" to 13"
1-800-345-4545 jegs.com
Owner and/or Operator Responsibility
The owner and/or operator shall read, study and understand the
product instructions and retain them for future reference.
Operation
The owner and/or operator shall have an understanding of the product
and safety operating instructions before operating the product. Safety
information shall be emphasized and understood. If the operator is not
fluent in English, the product warnings/cautions and instructions shall
be read to and discussed with the operator in operator’s native
language by purchaser/owner or his designee, insuring that the
operator comprehends their content.
Inspection
(a) Visual inspection MUST be made prior to each use of the jack.
Check for cracks, cracked welds, missing or damaged parts.
(b) Keep all moving parts clean and well lubricated.
(c) Owners and/or operators should be aware that repair of this
equipment may require specialized knowledge and facilities. It
is recommended that an annual inspection of the product be
made by a manufacturer or supplier’s authorized repair facility
and that any defective parts, decals, or safety labels and signs
be replaced with manufacturer or supplier’s specified parts.
Damaged Equipment
Any jack that appears to be damaged in any way or is found to be worn
or operates abnormally SHALL BE REMOVED FROM SERVICE
IMMEDIATELY UNTIL REPAIRED. It is recommended that a
manufacturer or supplier’s authorized repair facility make necessary
repairs if the manufacturer or supplier permits repairs
Alterations
Because of potential hazards associated with the misuse of equipment
of this type, NO MODIFICATIONS/ALTERATIONS shall be made to the
product.
Attachments and Adaptors
Only attachments and/or adaptors supplied by the manufacturer shall
be used.
Read, study and understand all instructions before operating
this device.
Do not exceed rated capacity. Over-loading may cause damage
to/or failure of the jack.
Always use only on hard, level surface. Do not use equipment
on slopes or angles.
Lifting device only. Jack must not be used as a jack stand to
hold loads for prolonged periods of time.
Immediately after lifting, support the vehicle with appropriate
means. Use jack stands in pairs to support loads. Inspect jack
stands before use as indicated by the manufacturer’s owner’s
manual.
Lift only on areas of the vehicle as specified by the vehicle
manufacturer’s owner’s manual.
Center load on the jack saddle. Off center loads can cause loss
of load or damages to load and/or equipment.
Never work directly under a supported load.
Do not move or dolly the vehicle while on the jack.
Place wheel chocks under vehicle wheels on both sides to
prevent rolling.
Use in dry, well lit areas.
Keep children and bystanders away. Children must never be
allowed in work area. Do not let children play on or around jack
or lifted load.
Any jack that appears to be damaged in any way or is found to
be worn or operates abnormally SHALL BE REMOVED FROM
SERVICE IMMEDIATELY UNTIL REPAIRED. It is
recommended that a manufacturer or supplier’s authorized
repair facility make necessary repairs if the manufacturer or
supplier permits repairs.
Because of potential hazards associated with this type of
equipment, NO ALTERATIONS SHALL BE MADE to this
product.
Only attachments and/or adapters supplied by the manufacturer
shall be used.
Failure to heed these warnings may result in property damage,
personal injury and/or death.
WARNING
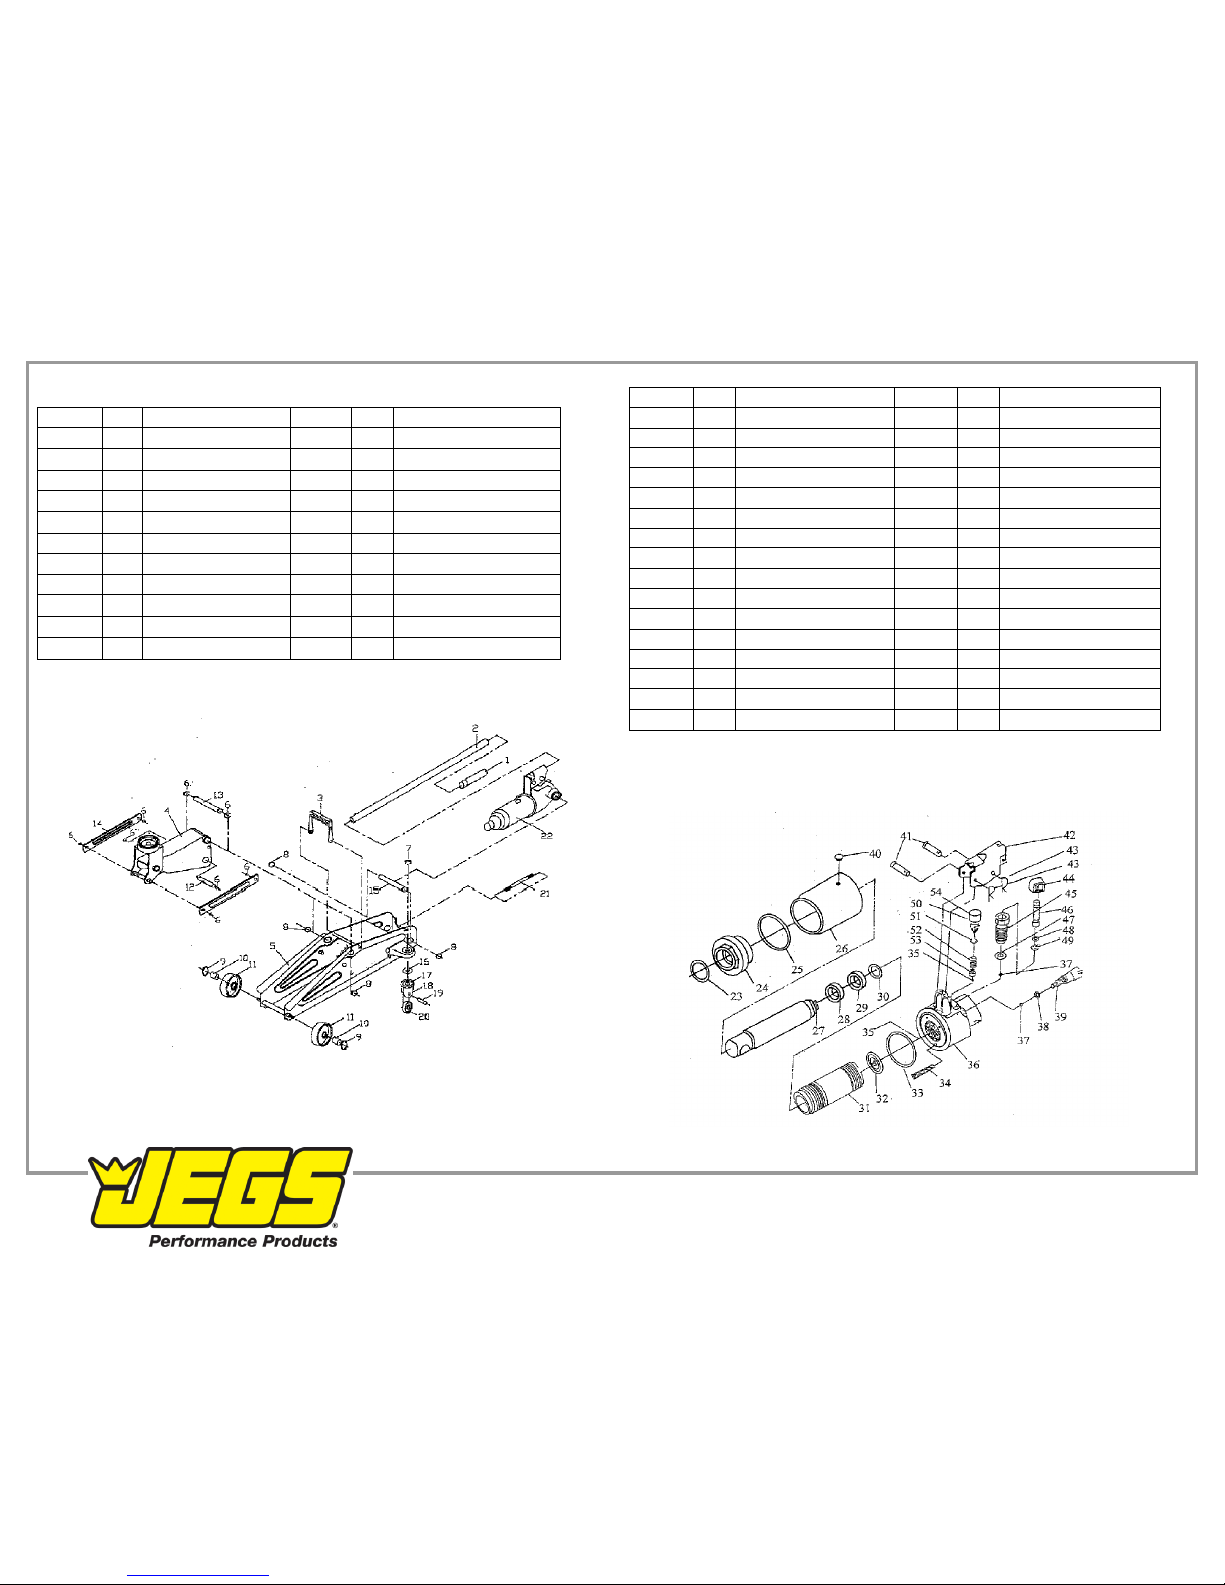
Main Jack Parts List
Main Jack Parts Diagram
Power Unit Parts List
Part #
Qty
Description
Part #
Qty
Description
1
1
Cap & Release Valve
12
1
Cross Head Pin
2
1
Handle
13
1
Spindle, Lifting Arm
3
1
Portable Handle
14
2
Radius Link
4
1
Lifting Arm
15
1
Anchor Bolt
5
1
Side Board
16
2
Steel Ball Bearing
6
8
Circlip
17
2
Bolt, Caster Wheel
7
2
Nut
18
2
Fork, Caster Wheel
8
4
Circlip
19
2
Spindle, Caster Wheel
9
2
Flat Washer
20
2
Caster Wheel
10
2
Spacer, Front Wheel
21
1
Return Spring
11
2
Front Wheel
22
1
Hydraulic Unit Assembly
Part #
Qty
Description
Part #
Qty
Description
23
1
Top Nut O-Ring
39
1
Release Valve
24
1
Top Nut
40
1
Filler Plug
25
1
Small Nylon Washer
41
2
Connector Pin
26
1
Oil Reserve
42
1
Operating Link
27
1
Ram
43
2
Split Pin
28
1
Collar
44
1
Spring Clip
29
1
Cup Seal Ram
45
1
Pump Cylinder
30
1
O-Ring Seal
46
1
Piston
31
1
Cylinder
47
1
Copper Washer
32
1
Copper Washer
48
1
Back Up Ring
33
1
Large Nylon Washer
49
1
O-Ring
34
1
Screen Filter Body
50
1
Overload Valve Screen
35
2
Steel Ball 3/16”
51
1
Overload Valve O-Ring
36
1
Power Unit Casting
52
1
Spring Overload Valve
37
2
Steel Ball ¼”
53
1
Spring Guard
38
1
Release Valve O-Ring
54
1
Cap
1-800-345-4545 jegs.com
Power Unit Parts Diagram

Problem
Possible Cause
Remedy
Saddle won’t rise
Lifts only half way
Lifts, then lowers out
of control
Erratic lift.
1. Release valve open.
2. Oil Exhausted.
3. Defective suction
and/or exhaust valve.
4. Packing worn out or
defective.
1. Insufficient oil.
1. Air in system.
2. Defective suction
and/or release valve.
3. Defective piston
packing.
1. Defective plunger
packing and/or valve.
1. Tighten release
valve.
2. Fill tank with oil.
3. Check for dust
or foreign
matter inside
and clean.
4. Replace
packing.
1. Check oil
supply and fill.
1. Open oil plug
on the front of
cylinder. Hold
saddle down.
Open release
valve and pump
handle several
times.
2. Clean valves
and adjust
valve contact.
3. Replace the
piston packing.
1. Clean valves
and/or packing.
1-800-345-4545 jegs.com
Operation
Prior to each use, visually inspect jack. Check for cracks, cracked welds, and
missing and/or damaged parts. Any jack that appears to be damaged in any of
these ways must not be used.
To Lift
(d) Turn the release valve clockwise to the closed
position. Do not over tighten.
(e) Consult the vehicle owner’s manual to determine the
location of jack points and position the jack under the
prescribed lift point. Be sure to set the vehicle parking
brake and lock the wheels.
(f) Be sure that the vehicle and the jack are on a hard,
level surface.
(g) Begin lifting by pumping the handle up and down.
(h) Always use jack stands in pairs to support loads at
locations recommended by the vehicle manufacturer.
Jacks are not designed to maintain heavy loads for
prolonged periods of time.
(i) Turn the release valve slowly counterclockwise to
lower the vehicle onto jack stands.
To Lower
(a) Turn the release valve clockwise to the closed
position. Do not over tighten.
(b) Pump the handle up and down to lift vehicle off jack
stands.
(c) Remove the jack stands. Do not get under or let
anyone under the vehicle while lowering.
(d) Turn the release valve slowly counterclockwise to
lower the vehicle onto the ground.
Maintenance
(a) Visual inspection MUST be made prior to each use of jack.
Check for cracks, cracked welds, missing or damaged parts.
(b) Keep all moving parts clean and well lubricated.
(c) Owners and/or operators should be aware that repair of this
equipment may require specialized knowledge and facilities. It
is recommended that an annual inspection of the product be
made by a manufacturer or supplier’s authorized repair facility
and that any defective parts, decals, or safety labels and signs
be replaced with manufacturer or supplier’s specified parts.
Troubleshooting

1-800-345-4545 jegs.com
Check and refill oil
Use hydraulic jack oil only. Do not use brake or transmission
fluids or regular motor oil or any other fluids as they may
damage the seals.
(a) Turn the release valve counterclockwise to allow ram
to fully retract. It may be necessary to apply force to
the saddle for complete lowering.
(b) With the jack in the level position, remove the oil fill
plug. Stand jack in a vertical position with the handle
socket down. The oil should be level with the bottom
of fill hole. If not, top off. Do not overfill. Always fill
with new, clean hydraulic jack oil.
(c) Replace oil fill plug and check jack operation.
(d) Purge air from system as required.
Air Purge Procedure
During shipment or after refilling oil, air may get into the
hydraulic system causing poor lift performance. Purge system
for better performance.
(a) Turn the release valve fully counterclockwise to fully
open the release valve.
(b) Pump handle rapidly several times
(c) Turn the release valve clockwise to close the release
valve.
(d) Pump the handle until the lift arm reaches maximum
height and continue to pump several times to remove
trapped air in the ram.
(e) Turn the release valve counterclockwise in one full
turn and lower lift arm to the lowest position. Use
force on saddle if necessary.
(f) Carefully and slowly pinch oil fill plug to release
trapped air.
(g) Turn the release valve clockwise to closed position
and check for proper pump action. It may be
necessary to perform the above steps more than
once to assure air is completely evacuated.
Other Jegs Jack manuals


Popular Jack manuals by other brands

Sealey
Sealey Quality Machinery 30.40 instructions

Daytona
Daytona DS300SB Owner's manual & safety instructions

Vigor
Vigor V 2477 operating instructions

Cornwell Tools
Cornwell Tools CSE-ATV operating manual

Beta
Beta 3050/K Operation manual and instructions

Omega Lift Equipment
Omega Lift Equipment 22101C operating instructions


Sunex HD
Sunex HD 66037A owner's manual

Westward
Westward 1VW32 Operating instructions manual

Bannon
Bannon 55828 owner's manual

Lippert Components
Lippert Components LCI owner's manual

Clarke
Clarke CTJ1250AC Operation & maintenance instructions

Clarke
Clarke STRONG-ARM CTJ2500QLGB Operating & maintenance instructions