Jenx GAMMA GA1 User manual
1
Note: Gamma is a Prescribed Medical Device.
To be used only with the guidance of
Therapist or Prescribing Practitioner.
Please read these instructions carefully before use.
All Users
GB
Section 2 Pages 9 - 21
Technical User - Physiotherapist, Occupational Therapist.
Section 3 Pages 23 - 27
Home User - Home or School Carer.
Section 4 Pages 29 - 33
Re-Issue - Stores Personnel.
FOR FREE ADVICE ON THE USE OF THIS PRODUCT, PLEASE CONTACT OUR SALES SUPPORT TEAM
Jenx Limited, Wardsend Road, Sheffield, S6 1RQ, Tel: +44 (0)114 285 3376 Fax: +44 (0)114 285 3528 [email protected] www.jenx.com
Ver; 004 June 2009 SJB
Section 1 Pages 2 - 8
All Users - Safety Information
GAMMA
Instruction For Use
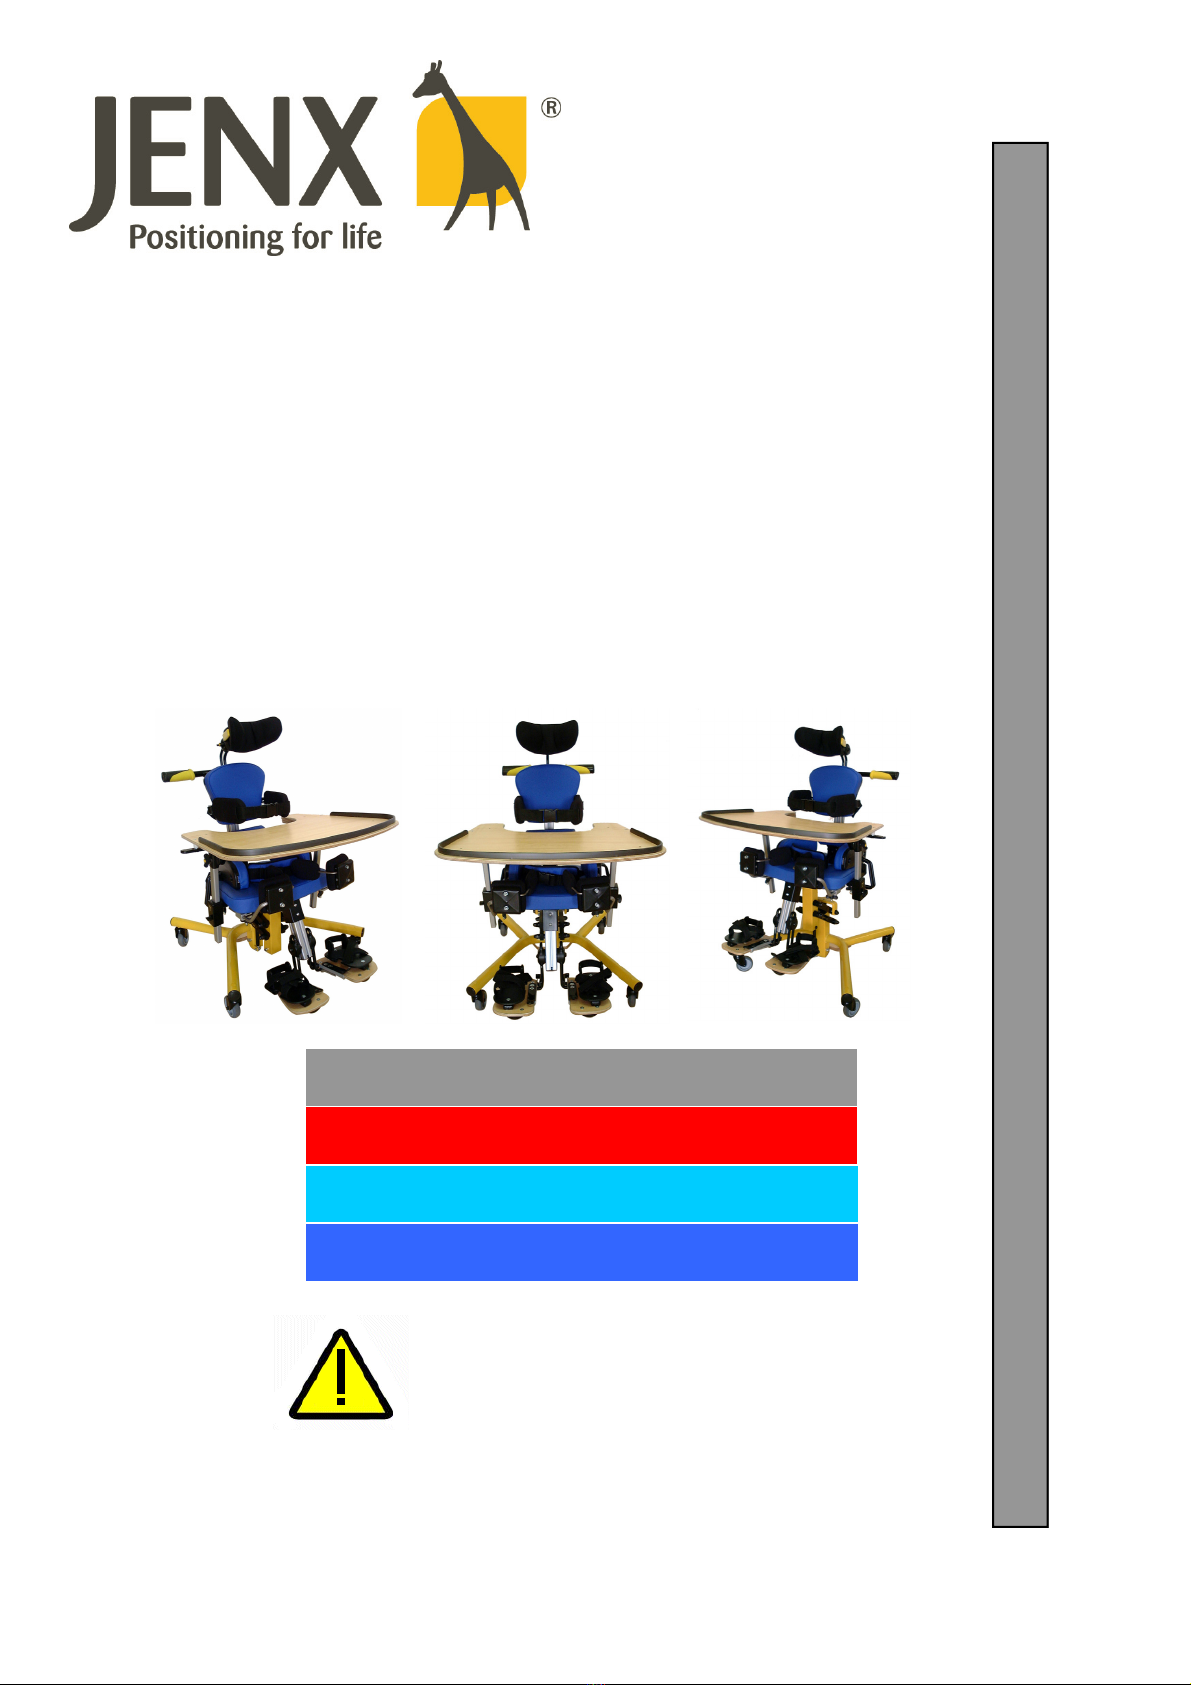
Gamma offers supportive seating with an unrivalled
range of adjustments.
GA1
1 - 5 years
Max weight 45 Kg
GA3
5 - 10 years
Max weight 45 Kg
GA2
3 - 8 years
Max weight 45 Kg

2
Any service or repair carried out by persons other than a Jenx authorised service person
will invalidate the guarantee and Jenx can accept no liability for any injury or damage so
caused.
IMPORTANT SAFEGUARDS
NEVER LEAVE CHILD UNATTENDED WHILE THEY ARE USING THIS PRODUCT.
FOR FREE ADVICE ON THE USE OF THIS PRODUCT, PLEASE CONTACT OUR SALES SUPPORT TEAM
Jenx Limited, Wardsend Road, Sheffield, S6 1RQ. Tel: +44 (0)114 285 3376. Fax: +44 (0)114 285 3528. [email protected] www.jenx.com
Failure to follow instructions, especially with regard to moving parts may pose a risk to the
user. Always read instructions before use.
Do not use this product if you suspect it is faulty or broken.
Contact Jenx Limited immediately for advice. +44 (0) 114 285 3376
This product should be used on a level floor and never on raised or uneven surface.
Do Not use this product as a Mobility Device.
This product contains small parts which could present a choking hazard to small children.
All Users
GB
All Jenx Limited products are tested to current fire regulations. Always keep products away
from naked flames, cigarettes and sources of heat. E.g. Radiators, Heaters etc.
Jenx supply tools to adjust certain products. The tools are supplied for adjustments to be
made by the therapist only. Store in a safe place. Keep Away from children.
Do Not make adjustments, other than instructed to do so.
Secure the child by using the 45° pelvic strap before you begin to make any other
adjustments. Ensure the belt is adjusted for each child and for changes of clothing.
Ensure the straps are routed under the hip pads.
Assemble product fully before use. Please contact Jenx Limited if you have any problems
at this stage.
Look after your product well, clean regularly and do not use abrasive cleaners.
This product conforms to the European Medical Devices Directive. It has not been tested
in conjunction with other manufacturers products. Do not add any accessories other than
Jenx Limited accessories to this product.
If in doubt, contact us for advice. +44 (0)114 285 3376
When not in use store this product in a dry place that is not subject to extremes of
temperature. E.g. Places not to store this product are attics or garden sheds.
Ensure your Therapist has signed the inspection log as “Set Up” before using
the product. If this product has not been set up by your Therapist
DO NOT USE THE PRODUCT
All belts and harnesses should be used at all times. For therapy purposes it may be
necessary to deviate from this rule and any deviation should be fully documented as part
of a Risk Assessment or Therapy Programme and all relevant staff and carers
appropriately trained. Secure client with straps before adjusting product. Ensure finger’s
width between safety strap and client to prevent over tightening or client moving to
inappropriate position. Adjust straps for each client and changes of clothing. Minimum
Velcro overlap: 3 inches (7.5cm) on all straps. If strap is not long enough, DO NOT USE
PRODUCT

3
FOR FREE ADVICE ON THE USE OF THIS PRODUCT, PLEASE CONTACT OUR SALES SUPPORT TEAM
Jenx Limited, Wardsend Road, Sheffield, S6 1RQ, Tel: +44 (0)114 285 3376 Fax: +44 (0)114 285 3528 [email protected] www.jenx.com
All Users
GB
Each Jenx product has a pictorial safety label
attached. Refer to explanation below.
Warning / Attention. Please read Instructions
Please read Instructions
Always fasten and adjust positioning straps and belts to suit the child.
Adjust to suit changes in clothing. Ensure a fingers width between the
belt and the child to prevent over tightening or the child moving to an
inappropriate position.
Never use product on rough ground
Only use indoors
Do not leave child unattended
Conforms to CE Marking Regulations
Medical Devices Directive (MDD) 93/42 EEC
Maximum user weight
SAFETY LABEL
Batch number
The batch number is written on
the fire label (see picture below)
which is located on the inside of
the product body. Or in some
instances on the underside of
the seat. Please quote this
number on all correspondence.

4
CARE AND CLEANING INSTRUCTIONS
Fabrics, Vinyl's and Cloth covers
1. Minor spills can be removed with kitchen roll and the area wiped with clean water.
2. Staining should be removed as quickly as possible after contact.
3. Do not rub, rubbing will spread the stain over a larger area and may distort the
surface texture of the fabric.
4. For water based spills such as food, drink and vegetable oils, blot up the spill by
applying pressure with non-coloured paper towels, tissues or dry absorbent cloths.
Soak a small piece of cloth in a solution of mild detergent and warm water (use
cold water for blood), using a small amount of the solution at a time and with a
dabbing or blotting motion, work inwards from the edge of the stain to prevent it
spreading. Do not over wet. Excessive soaking may cause rings on the surface
spreading the stain further and may also damage the fabric or foam.
5. This step may need to be repeated and is dependent on the nature of the stain and
the amount of staining present. Continue treatment until stain is removed, always
remembering to remove excess moisture from the fabric prior to the next
treatment.
6. Rinse by applying clear tepid water using a small piece of non-coloured sponge or
clean white cloth, again working inwards from the edge of the treated area.
7. Disinfectants which do not contain organic solvents may be used according to the
manufacturer’s directions. Antibacterial spray or wipes can be used, be sure to dry
the product before use.
8. Do not soak the fabric.
9. Do not use organic solvents or dry cleaning fluids. Do not use abrasive cleaners.
10. For disinfectant purposes, a small quantity of household bleach diluted with water
(no more than 3% bleach) can be used, take care to rinse with water.
11. Do not use industrial bleaches such as Caustic Soda or Sodium Hypochlorite
12. Always ensure that the product is dry before use.
Wooden Products and Parts
1. For deep cleaning a low pressure Steam Cleaner can be used.
2. Do Not use solvents of any kind to clean Jenx Products.
3. Soap and water or antibacterial spray can be used.
4. Check for breaks or splintering of the wood before re-issuing.
5. Daily cleaning: Spray polish or wax polish can be used.
Metal Frames and Coated Parts.
1. For deep cleaning a low pressure Steam Cleaner can be used.
2. Do Not use solvents of any kind to clean Jenx Products.
3. Soap and water or antibacterial spray can be used.
4. Daily cleaning: wipe framework down with a damp cloth.
FOR FREE ADVICE ON THE USE OF THIS PRODUCT, PLEASE CONTACT OUR SALES SUPPORT TEAM
Jenx Limited, Wardsend Road, Sheffield, S6 1RQ, Tel: +44 (0)114 285 3376 Fax: +44 (0)114 285 3528 [email protected] www.jenx.com
All Users
GB
Do not use this product if you suspect it is faulty or broken.
Contact Jenx Limited immediately for advice. +44 (0) 114 285 3376

5
MAINTENANCE
Daily Checks of the equipment should be carried out by carers. These checks are
not technical but a basic understanding of the product is needed. Multiple daily
checks may be needed in schools or therapy rooms where the products are used by
multiple users.
Daily Checks
• Replace any lost or worn washers or bolts.
• Check tray for damage. Ensure that the tray edging is secure and that the tray
is clean and free of any rough or sharp corners.
• Check all upholstery for any signs of wear and tear.
• Brush Velcro® to remove fluff.
• Check wooden parts for splitting or splintering.
• Check straps for fraying and missing or broken buckles.
• Clean any stains or spillages.
• Contact Jenx Limited if any accessories not manufactured by Jenx Limited
have been attached to the product. Unauthorised accessories may affect the
safety of this product and invalidate your warranty.
We recommend that on a monthly basis a competent person who is familiar with
this piece of equipment and who has been trained in its use should carry out a more
detailed check
Monthly Checks
• Check all nuts and bolts are secured and that none is missing.
• Check all mechanical movements operate fully.
• Check the structure of the product for signs of fatigue or splintering.
• Castors: Lift base and check each wheel to ensure it is not loose or worn.
Remove any grease or dirt that has built up on the wheels, check that the
brake stops the wheels rotating (where applicable).
• Check gas springs for creep by placing a weight on the chair at the highest
setting, (simulating the child) and leave for 1 hour. If the product has reduced
significantly in height contact our Customer Service Department for advice.
Please ensure the name of the therapist who recommended the equipment is noted
on the check/inspection log, along with the competent person who has been trained
in the use of the equipment. Please also ensure that this is updated for changes in
staff. Please note any “Set up” procedures should always be recorded.
FOR FREE ADVICE ON THE USE OF THIS PRODUCT, PLEASE CONTACT OUR SALES SUPPORT TEAM
Jenx Limited, Wardsend Road, Sheffield, S6 1RQ, Tel: +44 (0)114 285 3376 Fax: +44 (0)114 285 3528 [email protected] www.jenx.com
All Users
GB
Do not use this product if you suspect it is faulty or broken.
Contact Jenx Limited immediately for advice. +44 (0) 114 285 3376

6
PRODUCT INDUCTION and HAND OVER
This product is a Prescribed Medical device as such it is important that all users understand the
use and adjustments this product offers. This booklet shows the range of adjustments and gives
guidelines for each type of user to follow.
Technical users
This section refers to Physiotherapist, Occupational Therapist.
Ensure you read all sections in this booklet and are fully familiar with all adjustments.
As well as the selection, prescription and set up of the product to suit the child’s needs.
The technical user has the responsibility for the induction of the Home User or Carer, ensuring
that the Home user has:
• Familiarity with the product. What to use and what not to use.
• Understanding of the care and cleaning procedures.
• Understanding all of the safety aspects of the product.
• Tools issued with Jenx Limited products are for Technical users only, Do Not issue
Home Users with adjustment tooling.
A formal handover procedure should be adopted for this product. Use the recording sheet at the
rear of this booklet to record set ups and changes to the product.
Jenx Limited offer Product Courses for Technical Users please contact us for more information.
Home User
This section refers to Home or School Carer.
This product is a Prescribed Medical device it should only be used with the guidance of a
Physiotherapist or Occupational Therapist.
Do not perform any other adjustment than instructed to do so.
The Home User section of this guide gives the adjustments needed to aid the daily use only.
Any other adjustments are only to be preformed by the therapist.
Do not make any other adjustments that are not included in this Home User Section.
Re-Issue
This section refers to Stores Personnel.
Stores personnel must follow the checks and maintenance guide before re issue. The MHRA
release regular bulletins regarding product updates and issues, these should be regularly
monitored.
• Records should be kept on all products serviced or re-issued. Repairs or replaced parts
should be traceable.
• The batch number identifier should always stay with the product and never be removed.
• Instructions should always be issued with the product. Copies are available from Jenx
limited or can be downloaded from www.jenx.com
• Technical users should always be informed when a product is issued to a home for set up
purposes.
• If the product is to be redelivered ensure adequate and secure packaging is used.
• If in any doubt to the safety of this product do not issue, contact Jenx Limited for advice.
Jenx Limited offer Stores Courses for Stores Personnel. The course gives guidance for:
• Maintenance
• Inspection the products
• Regulatory information
• Cleaning
Please contact us for more information.
FOR FREE ADVICE ON THE USE OF THIS PRODUCT, PLEASE CONTACT OUR SALES SUPPORT TEAM
Jenx Limited, Wardsend Road, Sheffield, S6 1RQ, Tel: +44 (0)114 285 3376 Fax: +44 (0)114 285 3528 [email protected] www.jenx.com
All Users
GB

7
SPECIFICATIONS
FOR FREE ADVICE ON THE USE OF THIS PRODUCT, PLEASE CONTACT OUR SALES SUPPORT TEAM
Jenx Limited, Wardsend Road, Sheffield, S6 1RQ, Tel: +44 (0)114 285 3376 Fax: +44 (0)114 285 3528 [email protected] www.jenx.com
All Users
GB
Measurement Gamma 1 Gamma 2 Gamma 3
MIN MAX MIN MAX MIN MAX
Seat to floor 335 520 335 520 335 520
Seat length 185 265 220 320 270 370
Tilt-in-space (prone /
recline)
15º
Prone
25º
Recline
15º
Prone
25º
Recline
15º
Prone
25º
Recline
Back column angle
(prone / recline)
-15º +15º -15º +15º -15º +15º
Armrest to floor 415 765 440 790 395 780
Tray size 640 x 540 640 x 540 672 x 600
Thoracic pad width 170 260 170 260 170 260
Hip width 160 330 180 330 180 330
Lower leg length 170 310 170 360 170 360
Back height 350 455 390 495 430 535
Footprint 550 x 590 550 x 590 550 x 590
Max weight of child 45 kg 45 kg 45 kg
Overall product weight 31 kg 32.5 kg 34 kg

8
WARRANTY
Jenx Limited warrants that the goods manufactured by Jenx
Limited will be free from defects in material and workmanship
for a period of 24 months* from the date of purchase.
Jenx Limited has sole obligation under this warranty to repair
or replace, at our discretion for any part or goods proving
defective within the terms of this period. The buyer must
provide immediate notice of the claimed defect.
Jenx Limited reserves the right to inspect the part or goods at
the buyer’s premises.
In the event of an exchange or return, where a certain model
under this warranty is discontinued, Jenx Limited reserves the
right to replace with a new model of a similar quality and price.
The warranty does not cover the product for repair or
replacement due to failure or damage through; abuse, neglect,
accident, improper repair, exposure to corrosive or abrasive
material, weather, failure to follow care and cleaning
instructions or alterations or modifications carried out by any
person other than a Jenx Limited authorised person.
*For purchases placed on or after the 1st January 2006. Previous purchases will have 12 month warranty
from date of purchase
FOR FREE ADVICE ON THE USE OF THIS PRODUCT, PLEASE CONTACT OUR SALES SUPPORT TEAM
Jenx Limited, Wardsend Road, Sheffield, S6 1RQ, Tel: +44 (0)114 285 3376 Fax: +44 (0)114 285 3528 [email protected] www.jenx.com
All Users
GB
9
Technical User
GB
FOR FREE ADVICE ON THE USE OF THIS PRODUCT, PLEASE CONTACT OUR SALES SUPPORT TEAM
Jenx Limited, Wardsend Road, Sheffield, S6 1RQ, Tel: +44 (0)114 285 3376 Fax: +44 (0)114 285 3528 [email protected] www.jenx.com
Note: Gamma is a Prescribed Medical Device.
To be used only with the guidance of Therapist
or Prescribing Practitioner
Please read these instructions carefully before use.
Section 2 Pages 9 - 21
Technical User - Physiotherapist, Occupational Therapist.
Section 3 Pages 23 - 27
Home User - Home or School Carer.
Section 4 Pages 29 - 33
Re-Issue - Stores Personnel.
Section 1 Pages 2 - 8
All Users - Safety Information
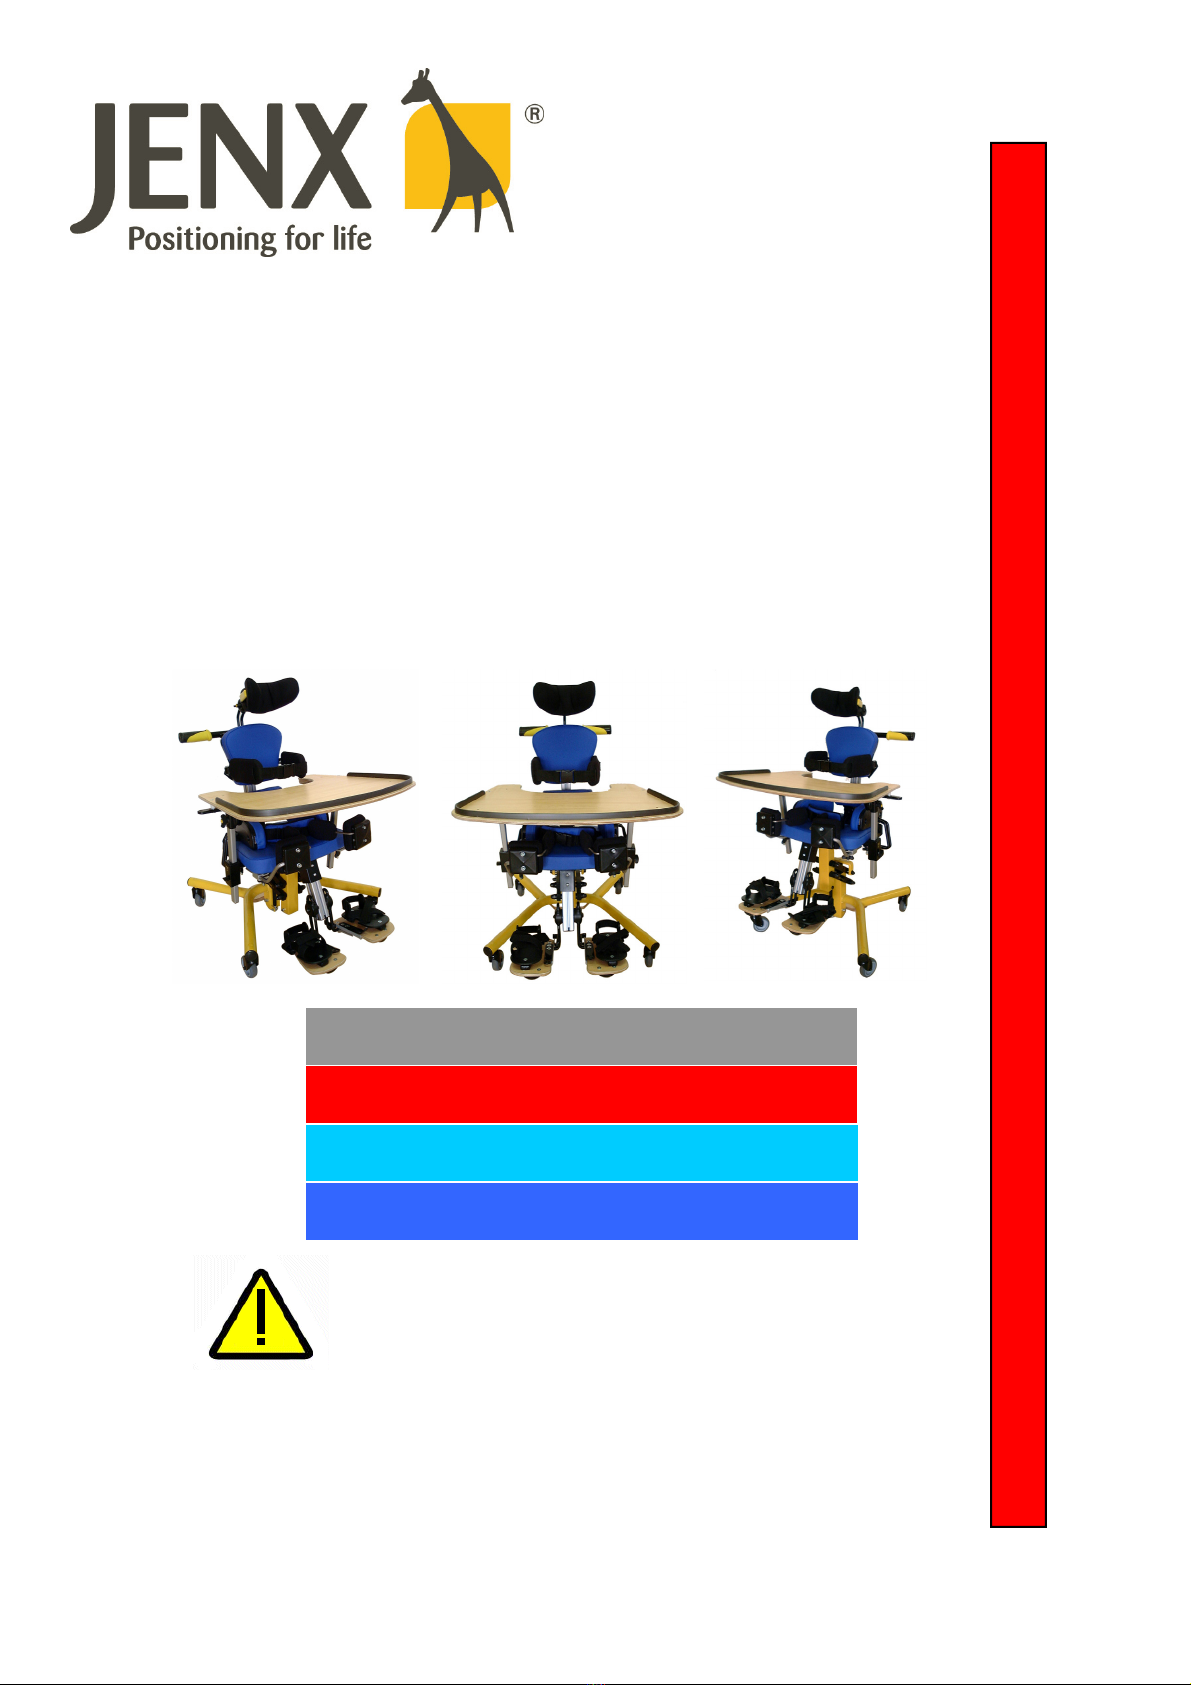
Gamma offers supportive seating with an unrivalled
range of adjustments.
GA1
1 - 5 years
Max weight 45 Kg
GA3
5 - 10 years
Max weight 45 Kg
GA2
3 - 8 years
Max weight 45 Kg
GAMMA
Instruction For Use
10
Technical User
GB
FOR FREE ADVICE ON THE USE OF THIS PRODUCT, PLEASE CONTACT OUR SALES SUPPORT TEAM
Jenx Limited, Wardsend Road, Sheffield, S6 1RQ, Tel: +44 (0)114 285 3376 Fax: +44 (0)114 285 3528 [email protected] www.jenx.com
Do not use this product if you suspect it is faulty or broken.
Contact Jenx Limited immediately for advice. +44 (0) 114 285 3376
NEVER LEAVE YOUR CHILD UNATTENDED WHILE USING THIS PRODUCT
*Please note: do not loosen the index clamp by more than 2 full turns as this may cause the
index clamp to detach from the chair. After tightening the index clamp, move the adjustment to
check that the teeth have locked together securely. If not, tighten further.
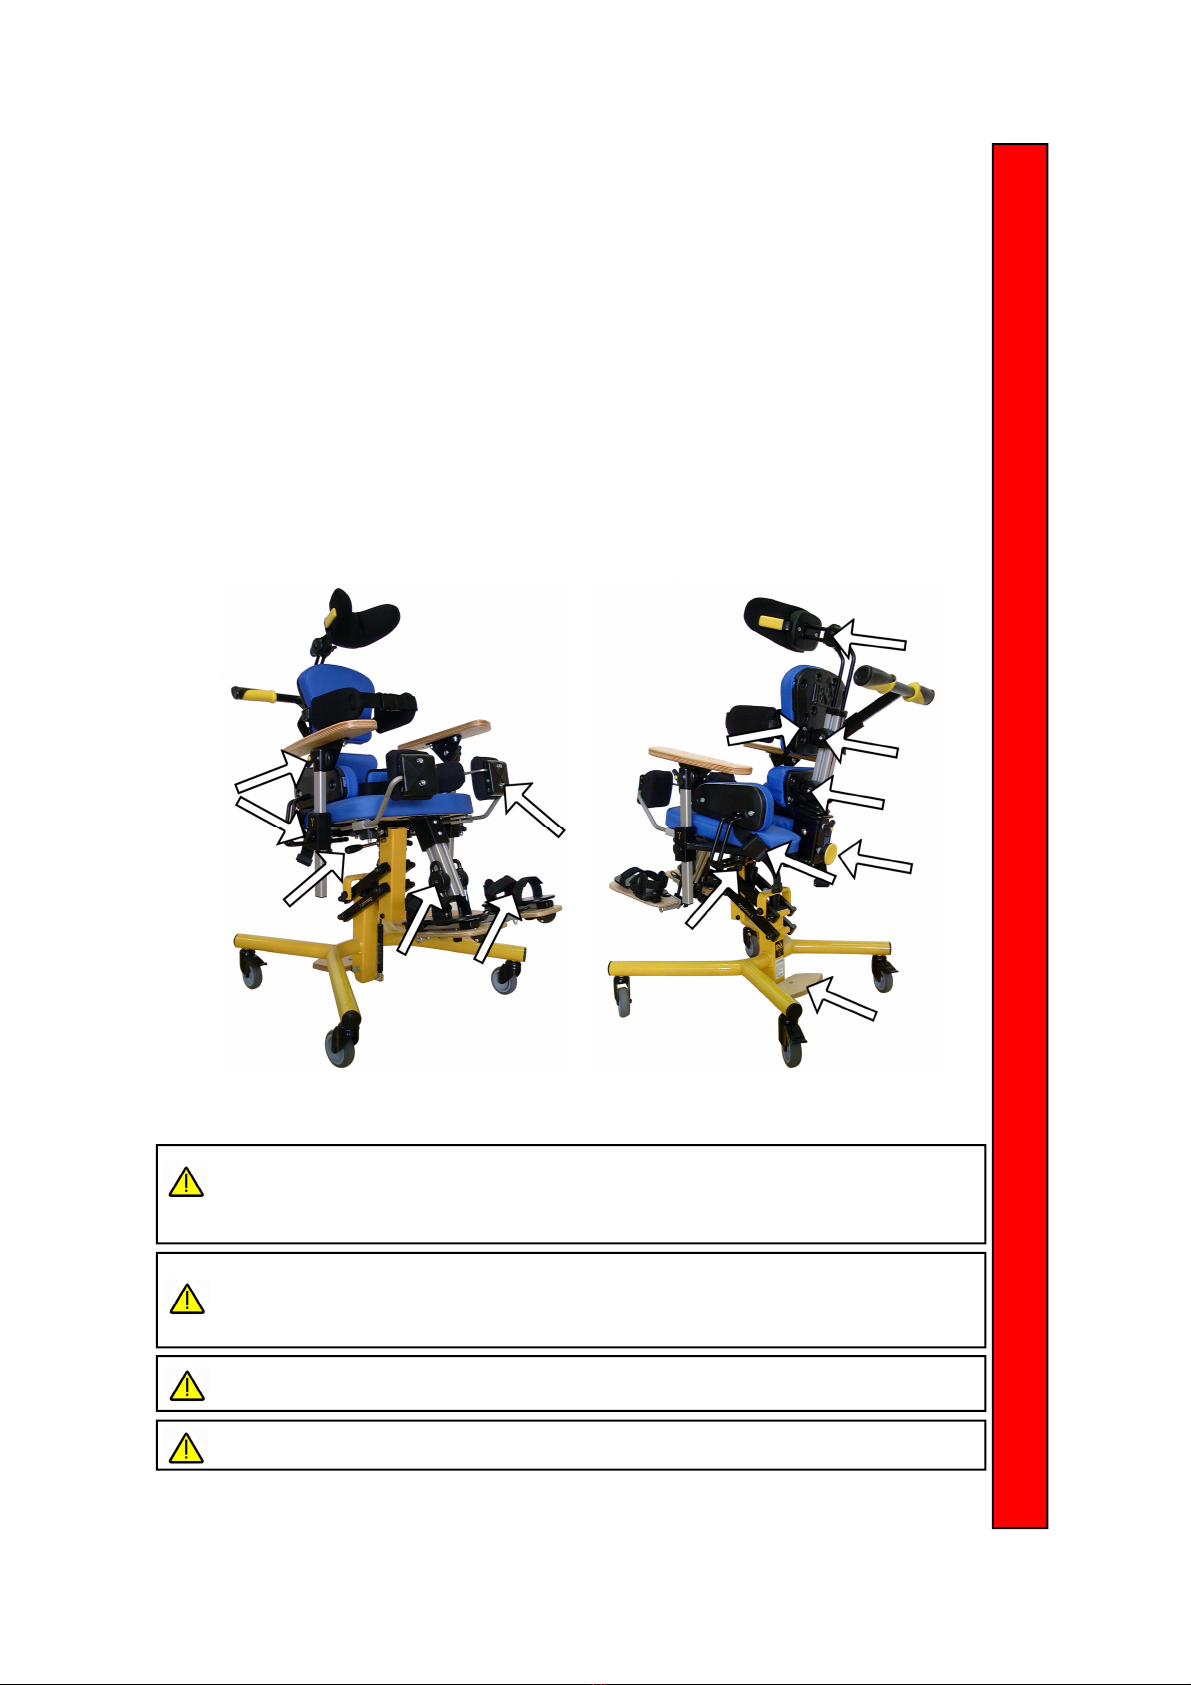
1. Headrest: This can be adjusted for height, angle, width and depth.
2. Chest strap and thoracic pads: The chest strap can be adjusted for length and the thoracic pads can be
adjusted for height and width.
3. Upper back pad: This can be set for height, angle and depth.
4. Lumbar support pad: This can also adjust for height, angle and depth.
5. Lap strap: Adjusts for length.
6. Hip pads: These adjust for width and angle.
7. Back column angle: This adjusts 15˚forward and 15˚backward from vertical.
8. Tilt-in-space: The chair can be put into prone (up to 15˚) or tilted backwards (up to 25˚).
9. Height adjustment pedal: The pedal sets the overall height of the chair.
10. Arm rests and tray: These can be raised, lowered and adjusted for angle.
11. Knee cups: These can be adjusted for width, angle, height and depth. They can be used to control
abduction, adduction or a windswept position.
12. Footplates: These can be raised, lowered or angled. They can also be flipped out of the way when not
needed.
13. Sandals: These can be positioned anywhere on the surface of the footplate and you can also rotate it to
any angle
Where to Adjust
5
6*
10*
8
2
1*
9
7
4*
3*
11
12*13
Secure the child by using the 45° pelvic strap before you begin to make any other adjustments.
Ensure the belt is adjusted for each child and for changes of clothing.
Ensure the straps are routed under the hip pads. Ensure a finger’s width between the belt and
the child to prevent over tightening or the child moving to an inappropriate position.

11
Technical User
GB
FOR FREE ADVICE ON THE USE OF THIS PRODUCT, PLEASE CONTACT OUR SALES SUPPORT TEAM
Jenx Limited, Wardsend Road, Sheffield, S6 1RQ, Tel: +44 (0)114 285 3376 Fax: +44 (0)114 285 3528 [email protected] www.jenx.com
Do not use this product if you suspect the Lap Strap or Thoracic Pads are faulty or broken.
Contact Jenx Limited immediately for advice. +44 (0) 114 285 3376
NEVER LEAVE YOUR CHILD UNATTENDED WHILE USING THIS PRODUCT
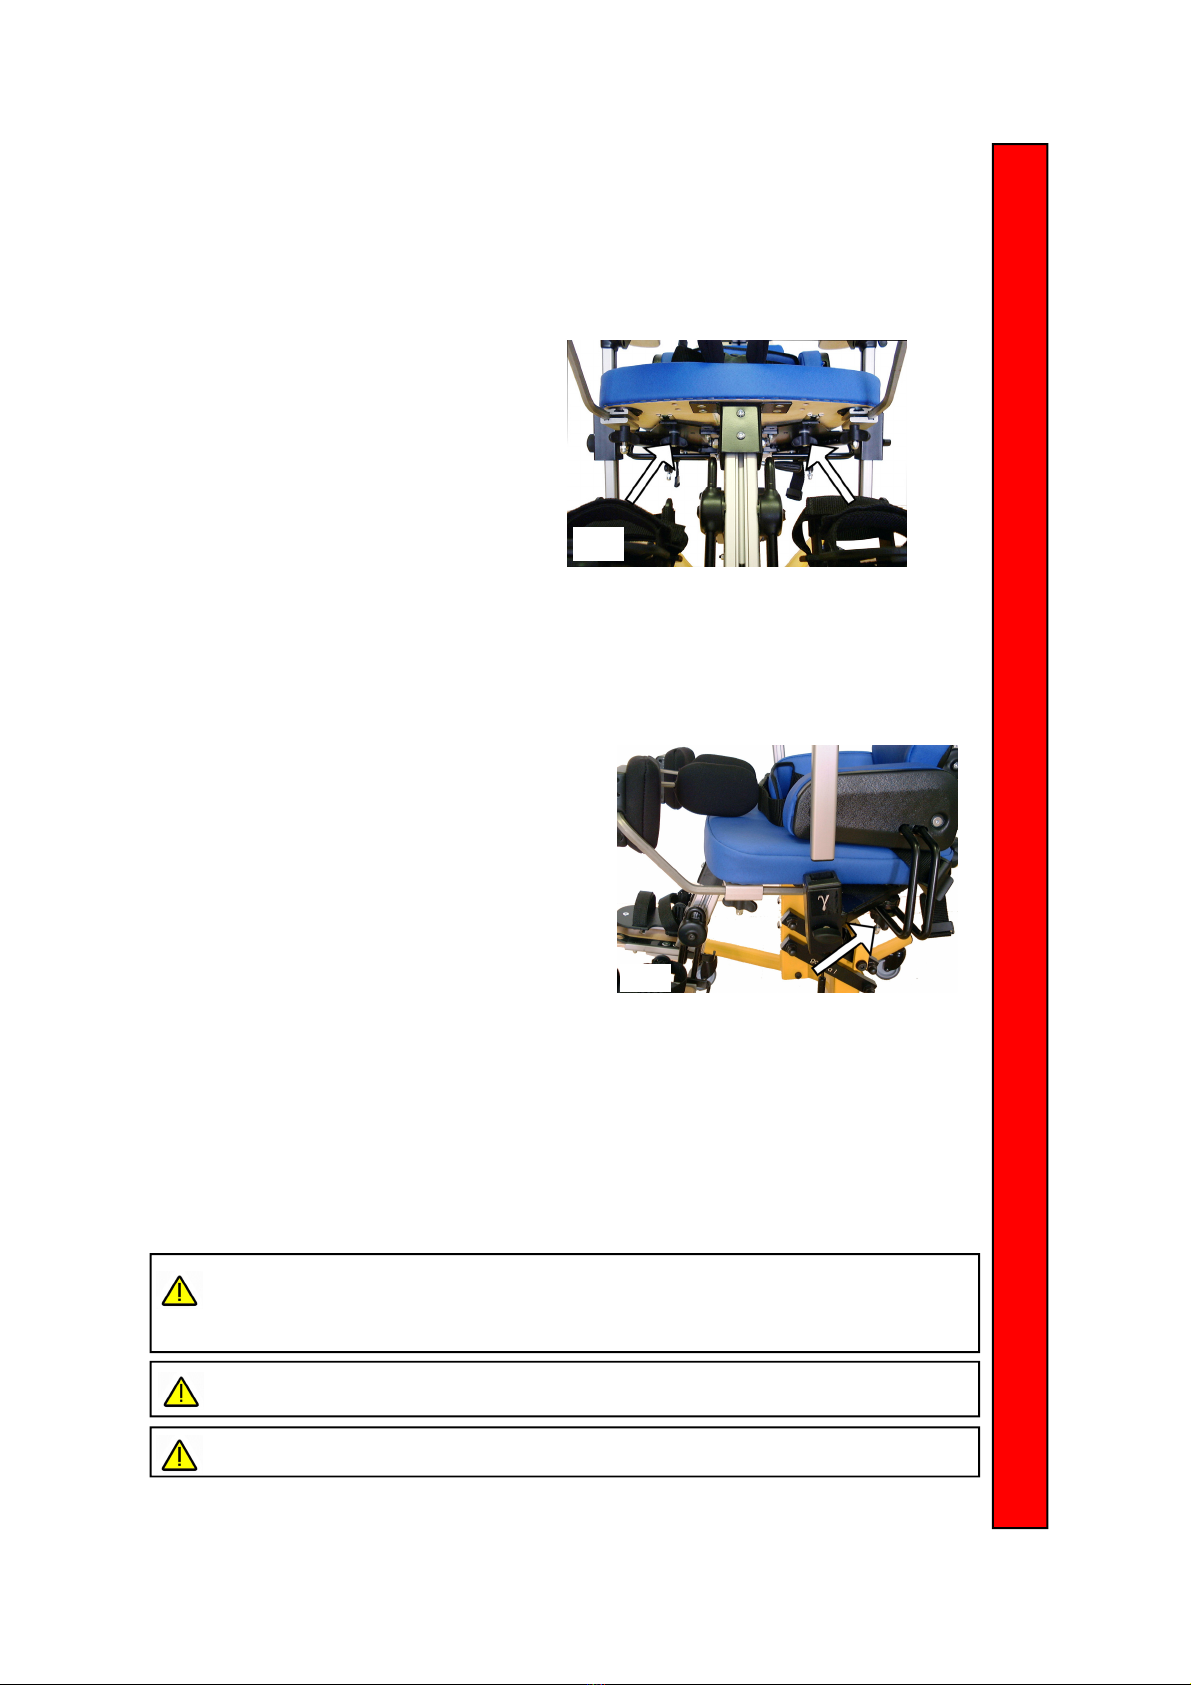
45˚pelvic strap
HOW?
Clip the buckle in the centre of the strap to secure your
child. The strap length is altered by opening the swiss
locks beneath the back the seat (fig 6) and pulling the two
straps until the right length is achieved. Always make sure
that you pull evenly from both sides, and that the buckle
stays in the middle of your child, and is covered by the
fabric pad. This helps to keep them sitting straight and
comfortable.
Ensure a fingers width between the belt and the child to
prevent over tightening or the child moving to an inappro-
priate position.
Note: Always route this strap under the hip pads
The Chest Strap/Thoracic Pads
HOW?
The chest strap length can be adjusted easily using the Swiss lock buckles (fig 7). The thoracic pad height
can be adjusted by moving the thoracic pad bar into the appropriate channel. Simply remove the screw in
fig 8, move the thoracic pad bar to the required height and re-insert the screws in the relevant holes to lock
the bars in place.
WHY?
The pelvic strap not only holds your child safely in the seat but also holds their hips in place in the back of
the seat. This gives them a stable base for sitting. The position of your child’s hips is important as it is the
base of their posture. Weight should be evenly distributed on either side and their pelvis should be level
and not rotated.
A 5mm T-bar Allen key is provided for adjusting Gamma.
Fig 6
Making & Using the Adjustments
WHY?
The strap and pads have been designed to mould around your child’s upper trunk to offer maximum
support when seated. They should fit snugly around your child’s upper body and be secure but not too
tight. If your child needs specific support in certain areas, please consult your therapist for advice.
Fig 7 Fig 8
Secure the child by using the 45° pelvic strap before you begin to make any other adjustments.
Ensure the belt is adjusted for each child and for changes of clothing.
Ensure the straps are routed under the hip pads. Ensure a finger’s width between the belt and
the child to prevent over tightening or the child moving to an inappropriate position.
POSITIONING SUGGESTIONS GIVEN IN THIS SECTION SHOULD ONLY BE TREATED AS A GUIDE. YOU
SHOULD ALWAYS CONSULT YOUR THERAPIST OR MEDICAL PRACTITIONER BEFORE USING GAMMA.
12
FOR FREE ADVICE ON THE USE OF THIS PRODUCT, PLEASE CONTACT OUR SALES SUPPORT TEAM
Jenx Limited, Wardsend Road, Sheffield, S6 1RQ, Tel: +44 (0)114 285 3376 Fax: +44 (0)114 285 3528 [email protected] www.jenx.com
Technical User
GB
Do not use this product if you suspect the Seat Depth Adjustment or Hip Pads are faulty or broken.
Contact Jenx Limited immediately for advice. +44 (0) 114 285 3376
NEVER LEAVE YOUR CHILD UNATTENDED WHILE USING THIS PRODUCT
Making & Using the Adjustments
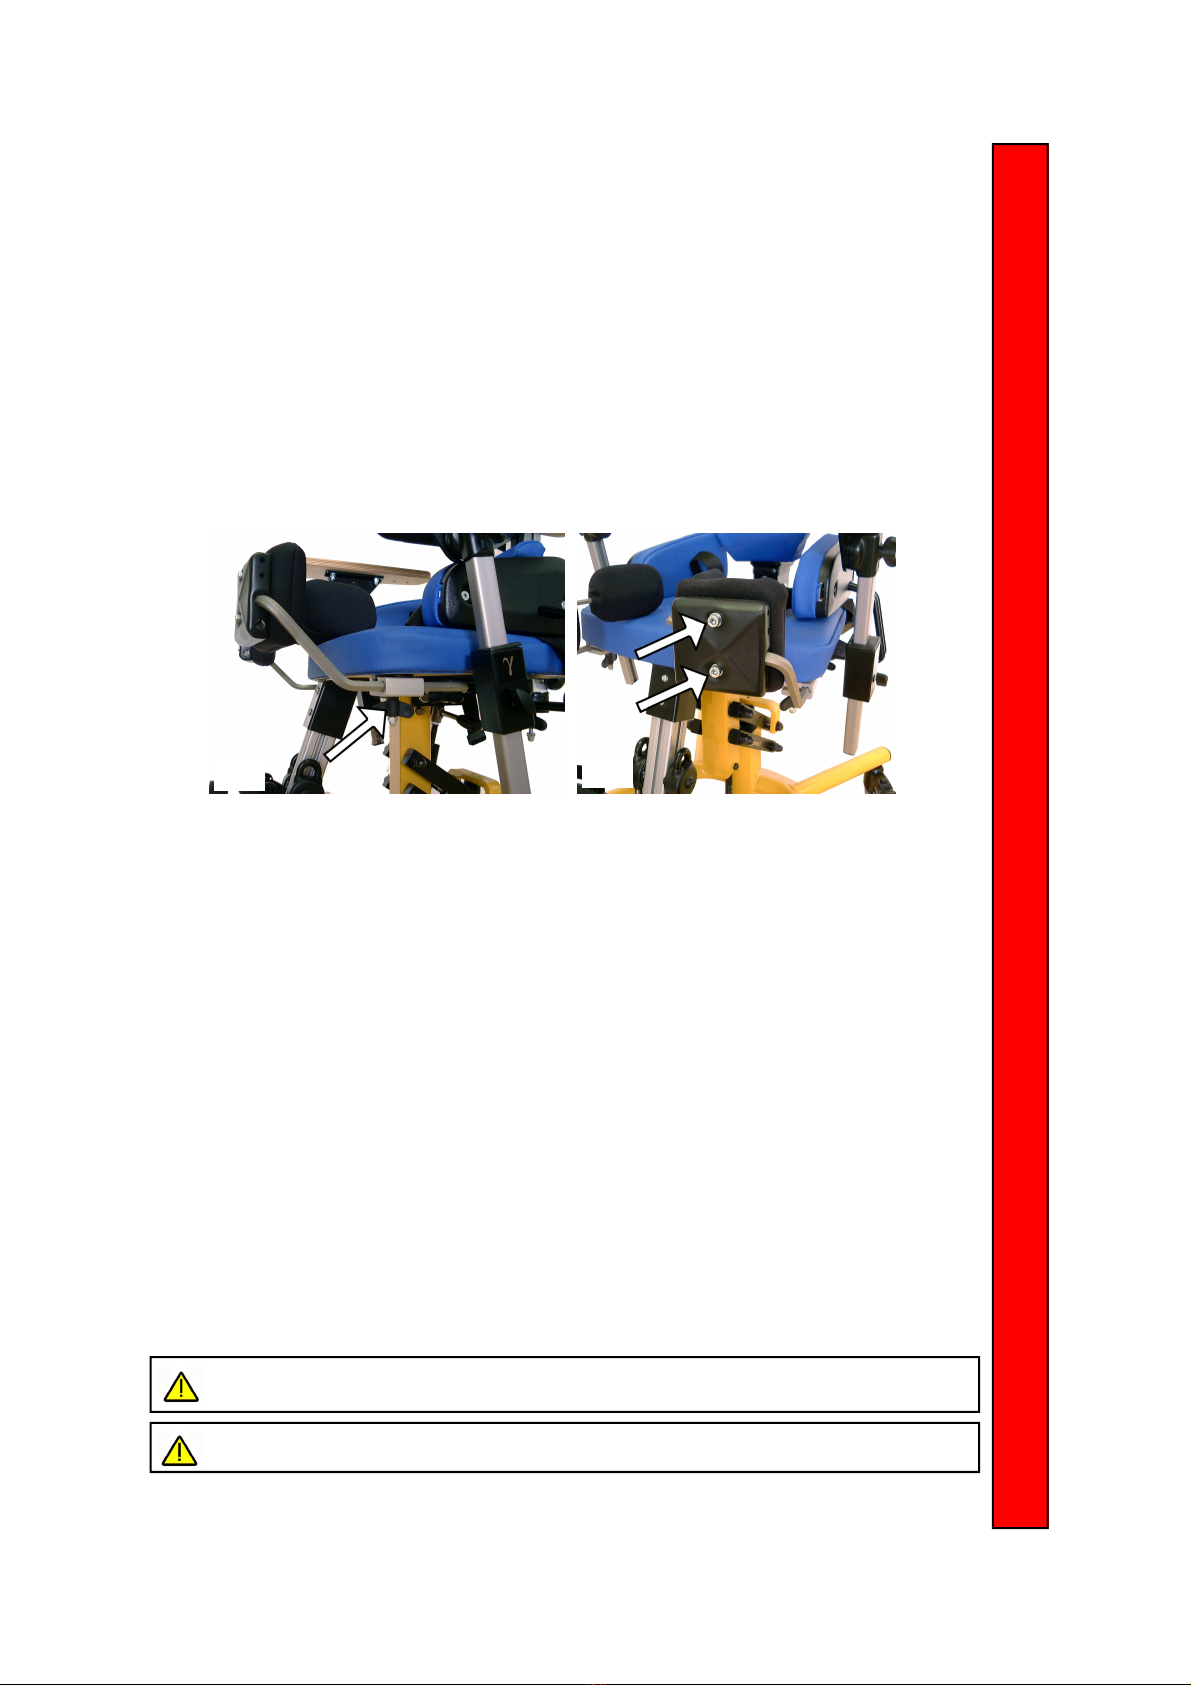
The hip pads
HOW?
The width and angle of the hip pads can be adjusted by
loosening the wing nut underneath the seat (fig 10).
WHY?
The width of the hip pads should be set depending on the size of your child. The angle of these pads will
help to keep your child’s hips in a position with the correct amount of abduction or adduction.
WHY?
Set the seat depth to suit the child’s upper leg length. Ensure there is some space between the back of
the knee and the front edge of the seat so that the sitting position is comfortable. As the child grows,
adjust the seat depth accordingly.
The Seat Depth
HOW?
Loosen the two black wing nuts underneath the
seat (fig 9). Slide the seat to the required position
and re-tighten the wing nuts securely.
Secure the child by using the 45° pelvic strap before you begin to make any other adjustments.
Ensure the belt is adjusted for each child and for changes of clothing.
Ensure the straps are routed under the hip pads. Ensure a fingers width between the belt and the
child to prevent over tightening or the child moving to an inappropriate position.
Fig 10
Fig 9

13
Technical User
GB
FOR FREE ADVICE ON THE USE OF THIS PRODUCT, PLEASE CONTACT OUR SALES SUPPORT TEAM
Jenx Limited, Wardsend Road, Sheffield, S6 1RQ, Tel: +44 (0)114 285 3376 Fax: +44 (0)114 285 3528 [email protected] www.jenx.com
Do not use this product if you suspect that the Upper Back Pad or Headrest are faulty or broken.
Contact Jenx Limited immediately for advice. +44 (0) 114 285 3376
NEVER LEAVE YOUR CHILD UNATTENDED WHILE USING THIS PRODUCT
The headrest
HOW?
To angle the headrest up or down and to move it forwards and backwards, loosen the wing nut shown in
(fig 12). Adjust as necessary and re-tighten.
The shape of the headrest can be altered by adjusting the 2 bars with the yellow ends; loosen the screw(s)
at the back of the pad, slide the bar(s) to the required position and re-tighten the screw(s).
If you need more height for the headrest, loosen the screw shown in (fig 13), raise the headrest to the
desired height and re-tighten the screw. If required, the headrest assembly can be removed, rotated 180°
and replaced to give greater flexibility with forwards/backwards movement (see fig 12 to 13B for alternative
position). The screw shown in (fig 13) will need to be completely removed in order to do this. Once rotated
loosen the wing nut in (fig 12) and flip the headrest pad around so that it faces forward. It can also be
removed altogether if necessary.
Making & Using the Adjustments
The Upper Back Pad
HOW?
The upper back pad can be adjusted by loosening the index
clamp (fig 11) with the Allen key. Set the height, depth and
angle as required and re-tighten the clamp.
WHY?
The upper back pad provides a firm support for your child’s
back. In conjunction with the lumbar support pad, you can
use it to manage the posture of your child and correct any
kyphosis or extension.
WHY?
The headrest should be positioned to stop the child's head from falling by giving it control from the side
and back. For children with good head control you may wish to remove the headrest altogether. If the
child’s head tends to turn to one side you may only need to use one half of the headrest and leave the
other side more open.
Fig 11
Fig 13
Fig 12
Secure the child by using the 45° pelvic strap before you begin to make any other adjustments.
Ensure the belt is adjusted for each child and for changes of clothing.
Ensure the straps are routed under the hip pads. Ensure a fingers width between the belt and the
child to prevent over tightening or the child moving to an inappropriate position.
Please note: do not loosen the index clamp by more than 2 full turns as this may cause the index
clamp to detach from the chair. After tightening the index clamp, move the adjustment to check
that the teeth have locked together securely. If not, tighten further.
Fig 13A Fig 13B
14
Technical User
GB
FOR FREE ADVICE ON THE USE OF THIS PRODUCT, PLEASE CONTACT OUR SALES SUPPORT TEAM
Jenx Limited, Wardsend Road, Sheffield, S6 1RQ, Tel: +44 (0)114 285 3376 Fax: +44 (0)114 285 3528 [email protected] www.jenx.com
CAUTION: Do not loosen the bolt in (fig 15) by more than 2 full turns as this may result in the
footplate becoming detached from the chair.
Do not use this product if you suspect the Lumbar Support Pad or the Footplates & Sandals are faulty or
broken. Contact Jenx Limited immediately for advice. +44 (0) 114 285 3376
NEVER LEAVE YOUR CHILD UNATTENDED WHILE USING THIS PRODUCT
The Lumbar Support Pad
HOW?
The lumbar support pad can be adjusted by loosening
the clamp with the Allen key as shown in (fig 14). Set the
height, depth and angle as required and re-tighten the
clamp.
WHY?
The lumbar support pad helps to support and maintain the correct position of the pelvis. By making
sure that this pad is set correctly your child’s posture can be managed more effectively.
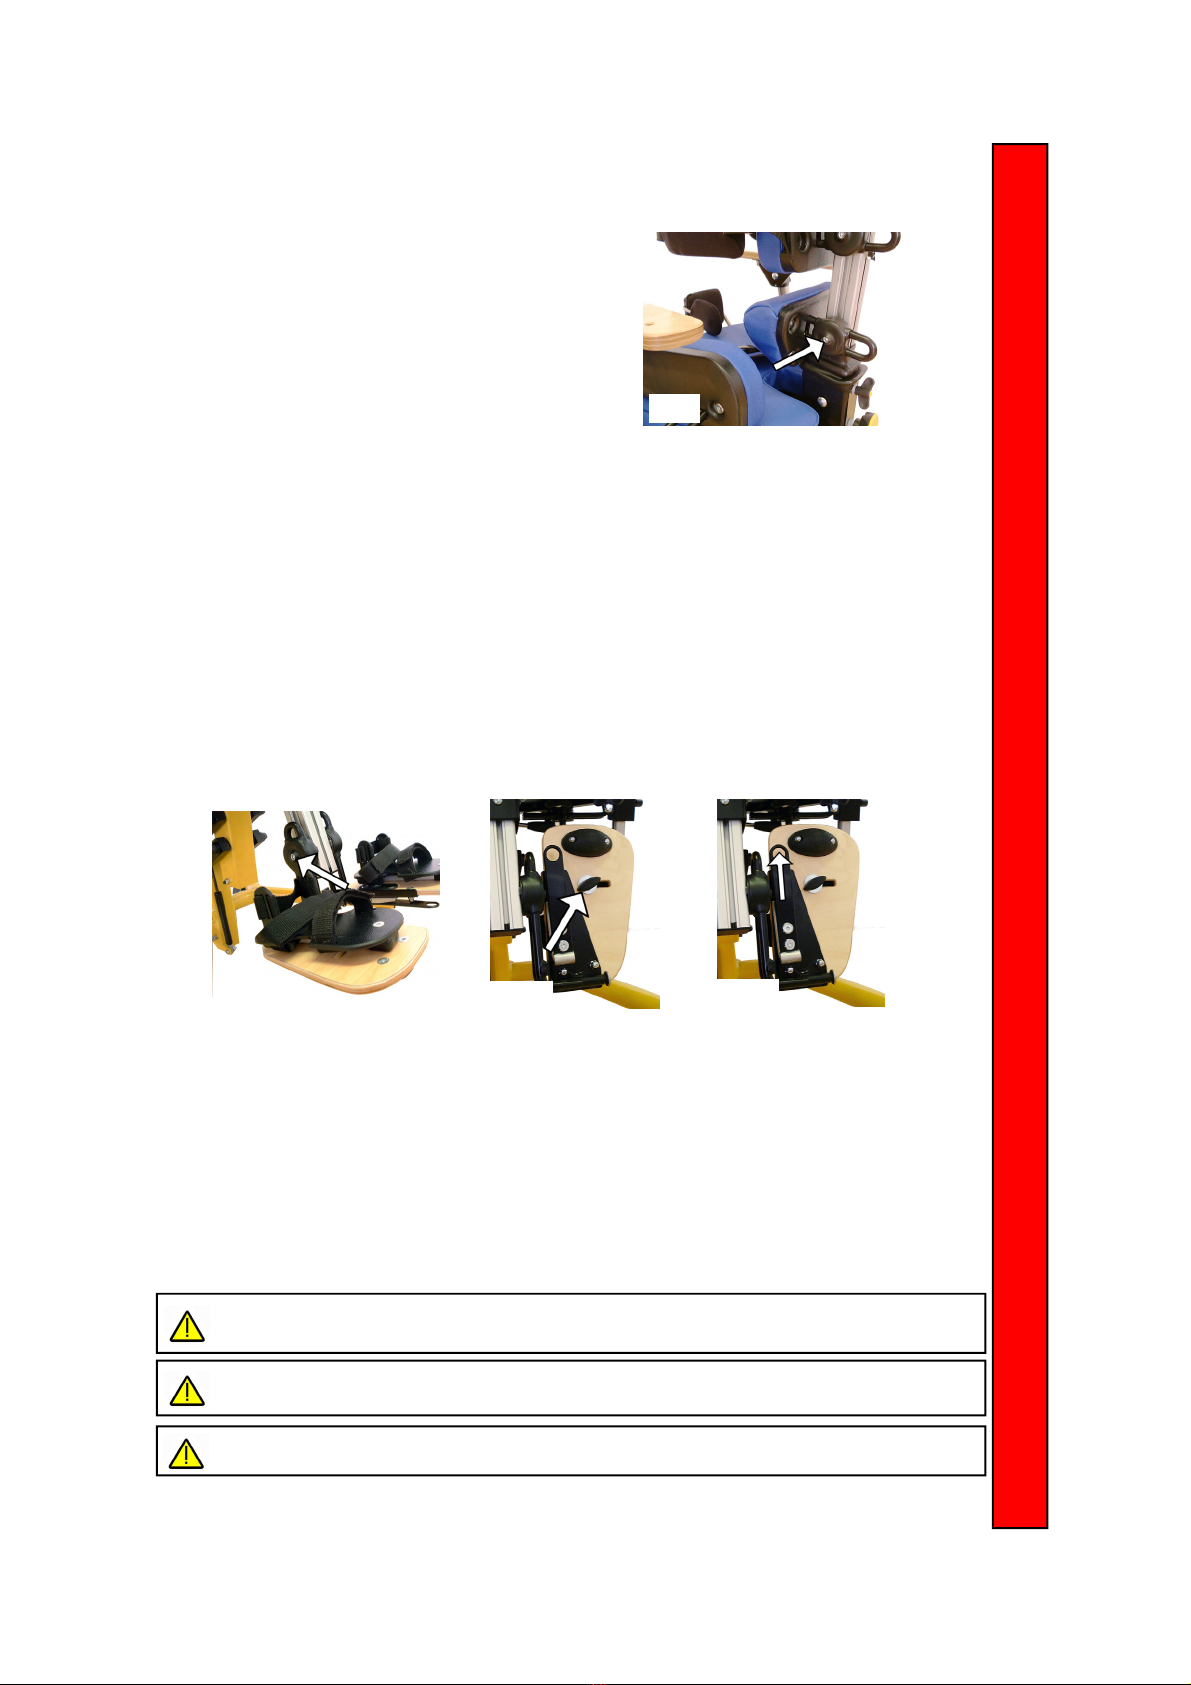
The Footplates & Sandals
HOW?
To set the height and angle of the footplate, loosen the clamp shown in (fig 15) with the Allen key, set
the footplate to the required position and re-tighten the clamp. By loosening the wing nut underneath
the sandal as shown in (fig 16a) you can position the sandal anywhere on the surface of the footplate
and you can also rotate it to any angle.
If the footplates are not required they can be flipped up out of the way by pulling the lever (fig 16b) and
lifting the footplate upwards.
Making & Using the Adjustments
WHY?
You can set the footplate and sandals to suit your child’s specific therapeutic needs. You can create plantar
flexion/dorsi flexion, internal and external rotation and thereby correct the position of the feet.
Fig 14
Fig 15 Fig 16a Fig 16b
15
Technical User
GB
FOR FREE ADVICE ON THE USE OF THIS PRODUCT, PLEASE CONTACT OUR SALES SUPPORT TEAM
Jenx Limited, Wardsend Road, Sheffield, S6 1RQ, Tel: +44 (0)114 285 3376 Fax: +44 (0)114 285 3528 [email protected] www.jenx.com
Do not use this product if you suspect the Knee Cups are faulty or broken.
Contact Jenx Limited immediately for advice. +44 (0) 114 285 3376
NEVER LEAVE YOUR CHILD UNATTENDED WHILE USING THIS PRODUCT
The Knee Cups
HOW?
To adjust the distance from the chair, loosen the wing nut under the seat (fig 17). Slide the knee cup to the
required distance and re-tighten. To alter the height of the knee cup, loosen the bolts shown in (fig 18) with
the Allen key, slide the knee cup off the bar, select the desired channel (choice of two height settings) and
re-tighten the bolt. To alter the distance between the knee cups, loosen the wing nut under the seat (fig 17)
and set the distance required. You can also flip the knee cup totally away to make transferring easier. The
angle of the knee cup arm can be adjusted by loosening the bolts shown in (fig 18), and adjusting the knee
cup arm to the required angle, and re-tightening.
WHY?
For children with a leg length discrepancy, you would set one knee cup nearer to the seat than the other.
Aim to have the knee cups supporting your child’s knees in a comfortable but secure position. The knee
cup extensions can be used on either side of the knee cup to offer adduction, abduction or to correct a
windswept posture.
Making & Using the Adjustments
Fig 17 Fig 18
16
Technical User
GB
FOR FREE ADVICE ON THE USE OF THIS PRODUCT, PLEASE CONTACT OUR SALES SUPPORT TEAM
Jenx Limited, Wardsend Road, Sheffield, S6 1RQ, Tel: +44 (0)114 285 3376 Fax: +44 (0)114 285 3528 [email protected] www.jenx.com
Do not use this product if you suspect the Arm Rest or the Tray are faulty or broken.
Contact Jenx Limited immediately for advice. +44 (0) 114 285 3376
NEVER LEAVE YOUR CHILD UNATTENDED WHILE USING THIS PRODUCT
Clear all items from the tray before adjustment.
Do not use hot or cold drinks on the product while using the angled tray.
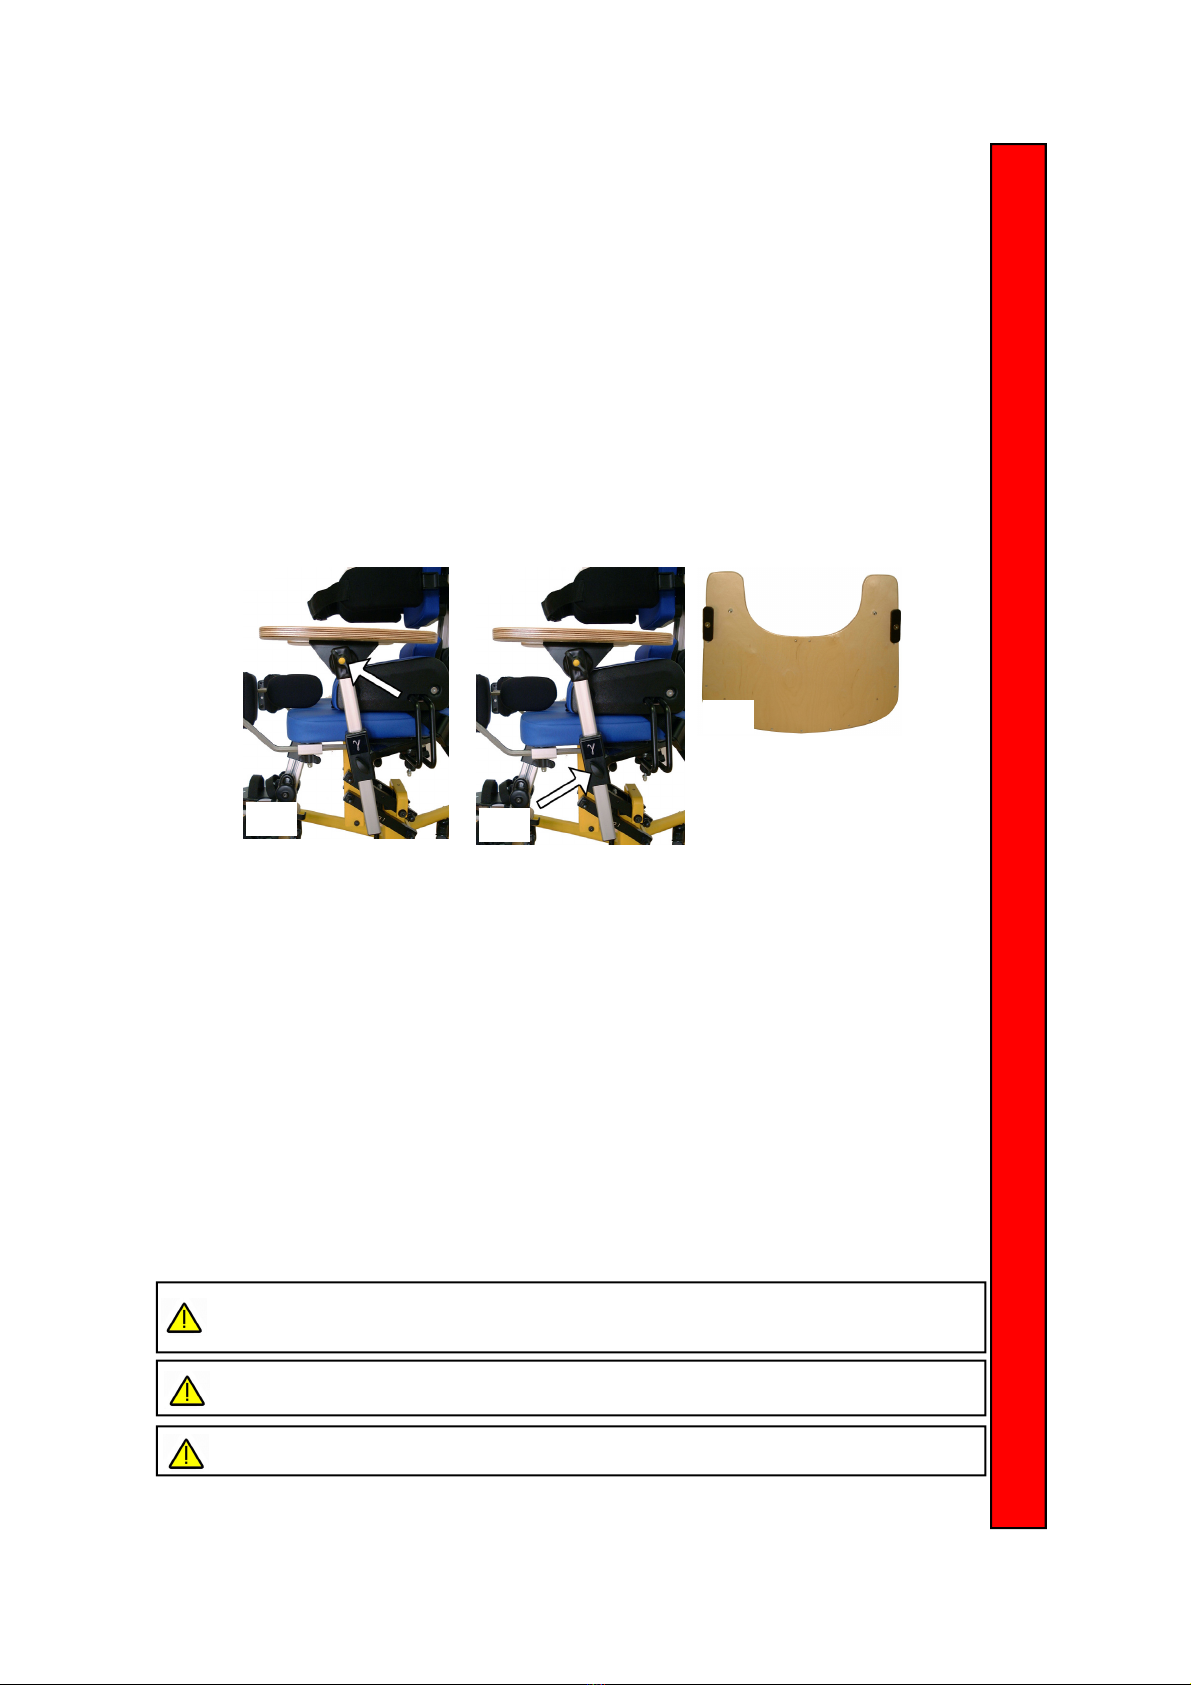
The armrests & tray
HOW?
Loosening the wing nut (fig 19) allows the angle of the armrest to be adjusted. The wing nut below the
armrest (fig 20) allows the height to be altered. The grade scale on the arm rest carrier makes it easy to
get the two arm rests at the same height. This is important because the tray fixing requires both arm rests
to be at the same height.
To attach the tray, ensure the black tabs are horizontal (fig 21) and the arm rests are both at the same
height and angle. Place the nuts on the underside of the tray into the required holes in the tray arms.
The tray can then be locked in place by rotating the bars to grip underneath the arm rest.
WHY?
Tray position can affect your child’s hand function. Often the best height is waist height but consult your
therapist to choose the best position for your child. You can alter the tray angle to give an inclined surface
or a flat surface even when the chair is tilted.
Making & Using the Adjustments
Fig 19 Fig 20
Fig 21

17
Technical User
GB
FOR FREE ADVICE ON THE USE OF THIS PRODUCT, PLEASE CONTACT OUR SALES SUPPORT TEAM
Jenx Limited, Wardsend Road, Sheffield, S6 1RQ, Tel: +44 (0)114 285 3376 Fax: +44 (0)114 285 3528 [email protected] www.jenx.com
Do not use this product if you suspect the Back Angle or Tilt in Space are faulty or broken.
Contact Jenx Limited immediately for advice. +44 (0) 114 285 3376
NEVER LEAVE YOUR CHILD UNATTENDED WHILE USING THIS PRODUCT
Clear all items from the tray before adjustment.
Do not use hot or cold drinks on the tray while using Tilt in Space
The back column angle
HOW?
First loosen the black wing nut (fig 22) and set the back column angle by rotating the large yellow knob
(fig 23). Turning the knob clockwise will make the back column go forwards, turning it anti-clockwise will
make the column go backwards. Remember to re-tighten the black wing nut again to lock the back column.
WHY?
Setting the back angle independently of the seat allows you to control the angle of the hips. For children
with an extensor thrust, you have the facility to close the angle and achieve the right posture. For children
with low tone however, you can open up this angle to offer more support to their upper body and head.
Fig 22
Tilt-in-space
HOW?
To alter the angle of the chair, lift the lever underneath the
left side of the seat and set the chair to the required position
(fig 24). Releasing the lever will lock the chair in that posi-
tion. Tilt–in-space keeps the child’s position exactly the same
within the chair.
Fig 23
WHY?
By altering the position of your child in space, you can help them to perceive the environment that
surrounds them in different ways and thereby help their cognitive development. By putting the chair into
prone you may improve your child’s head control and arm function.
Making & Using the Adjustments
Fig 24
18
Technical User
GB
FOR FREE ADVICE ON THE USE OF THIS PRODUCT, PLEASE CONTACT OUR SALES SUPPORT TEAM
Jenx Limited, Wardsend Road, Sheffield, S6 1RQ, Tel: +44 (0)114 285 3376 Fax: +44 (0)114 285 3528 [email protected] www.jenx.com
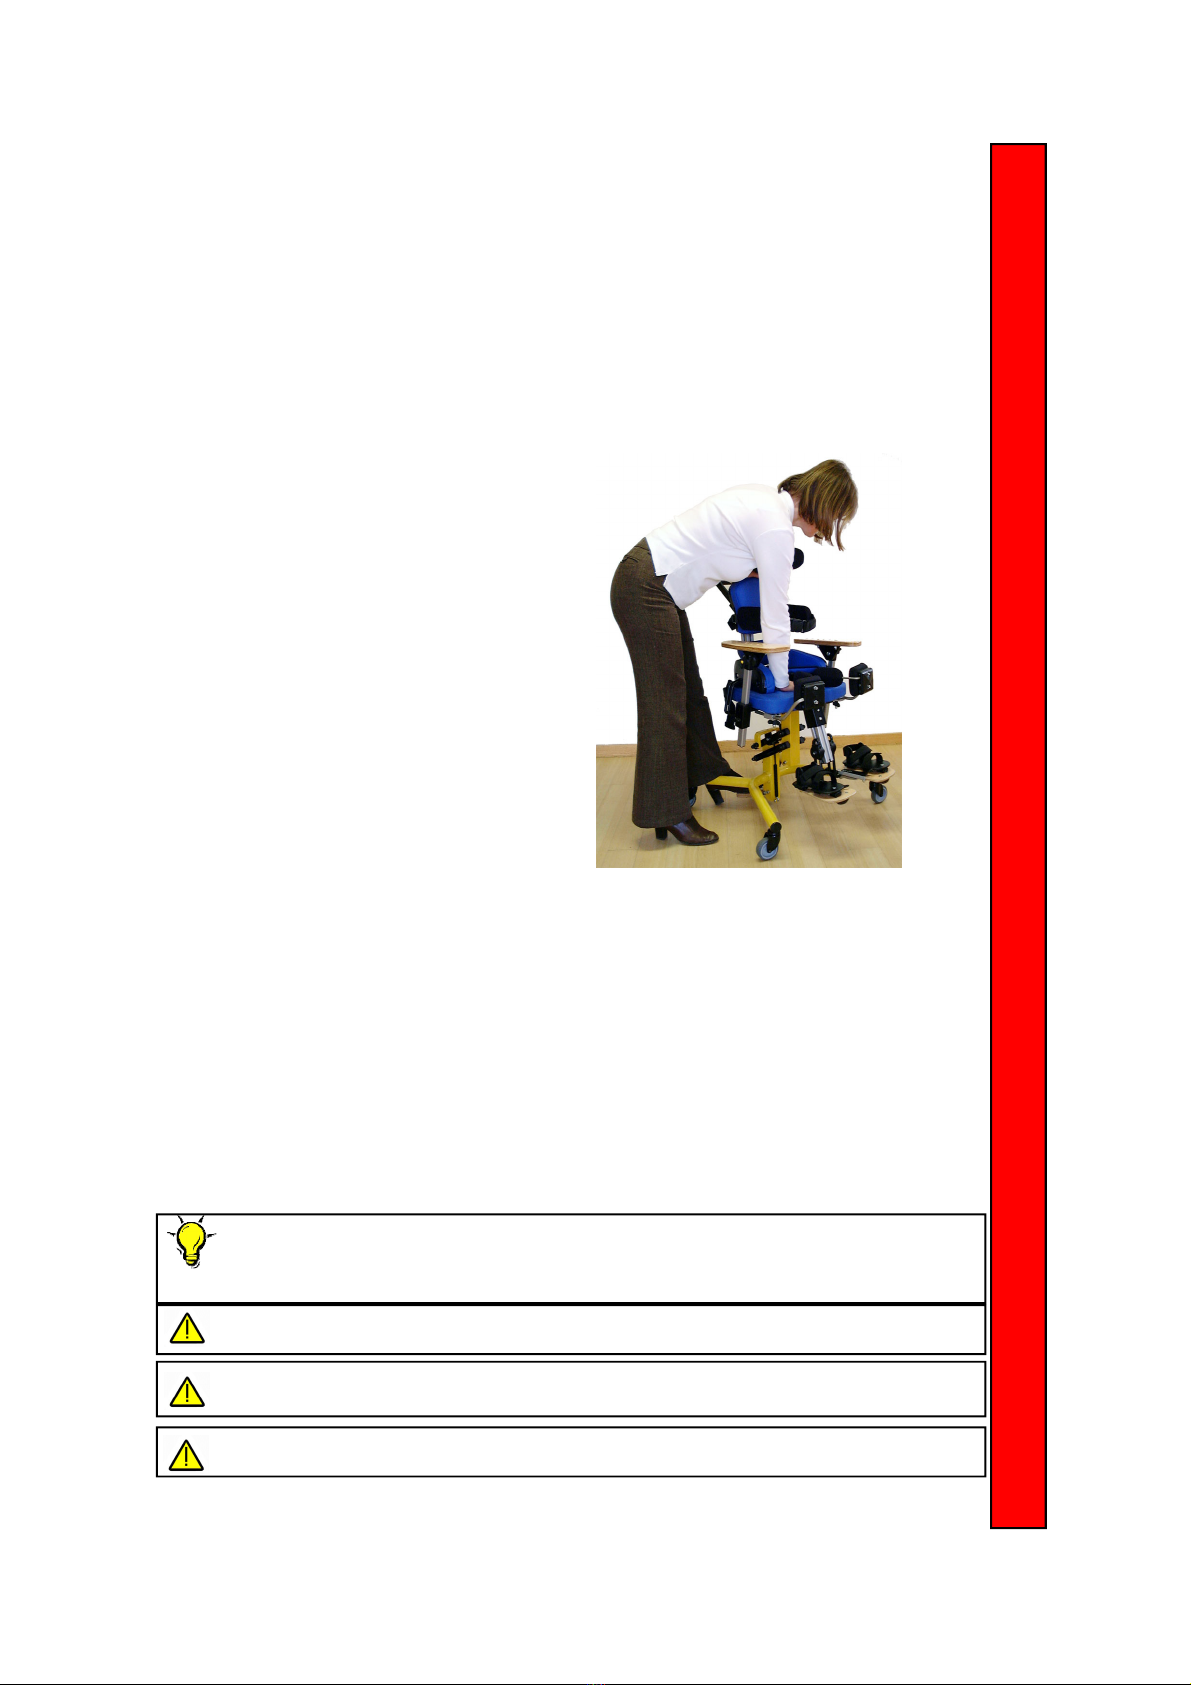
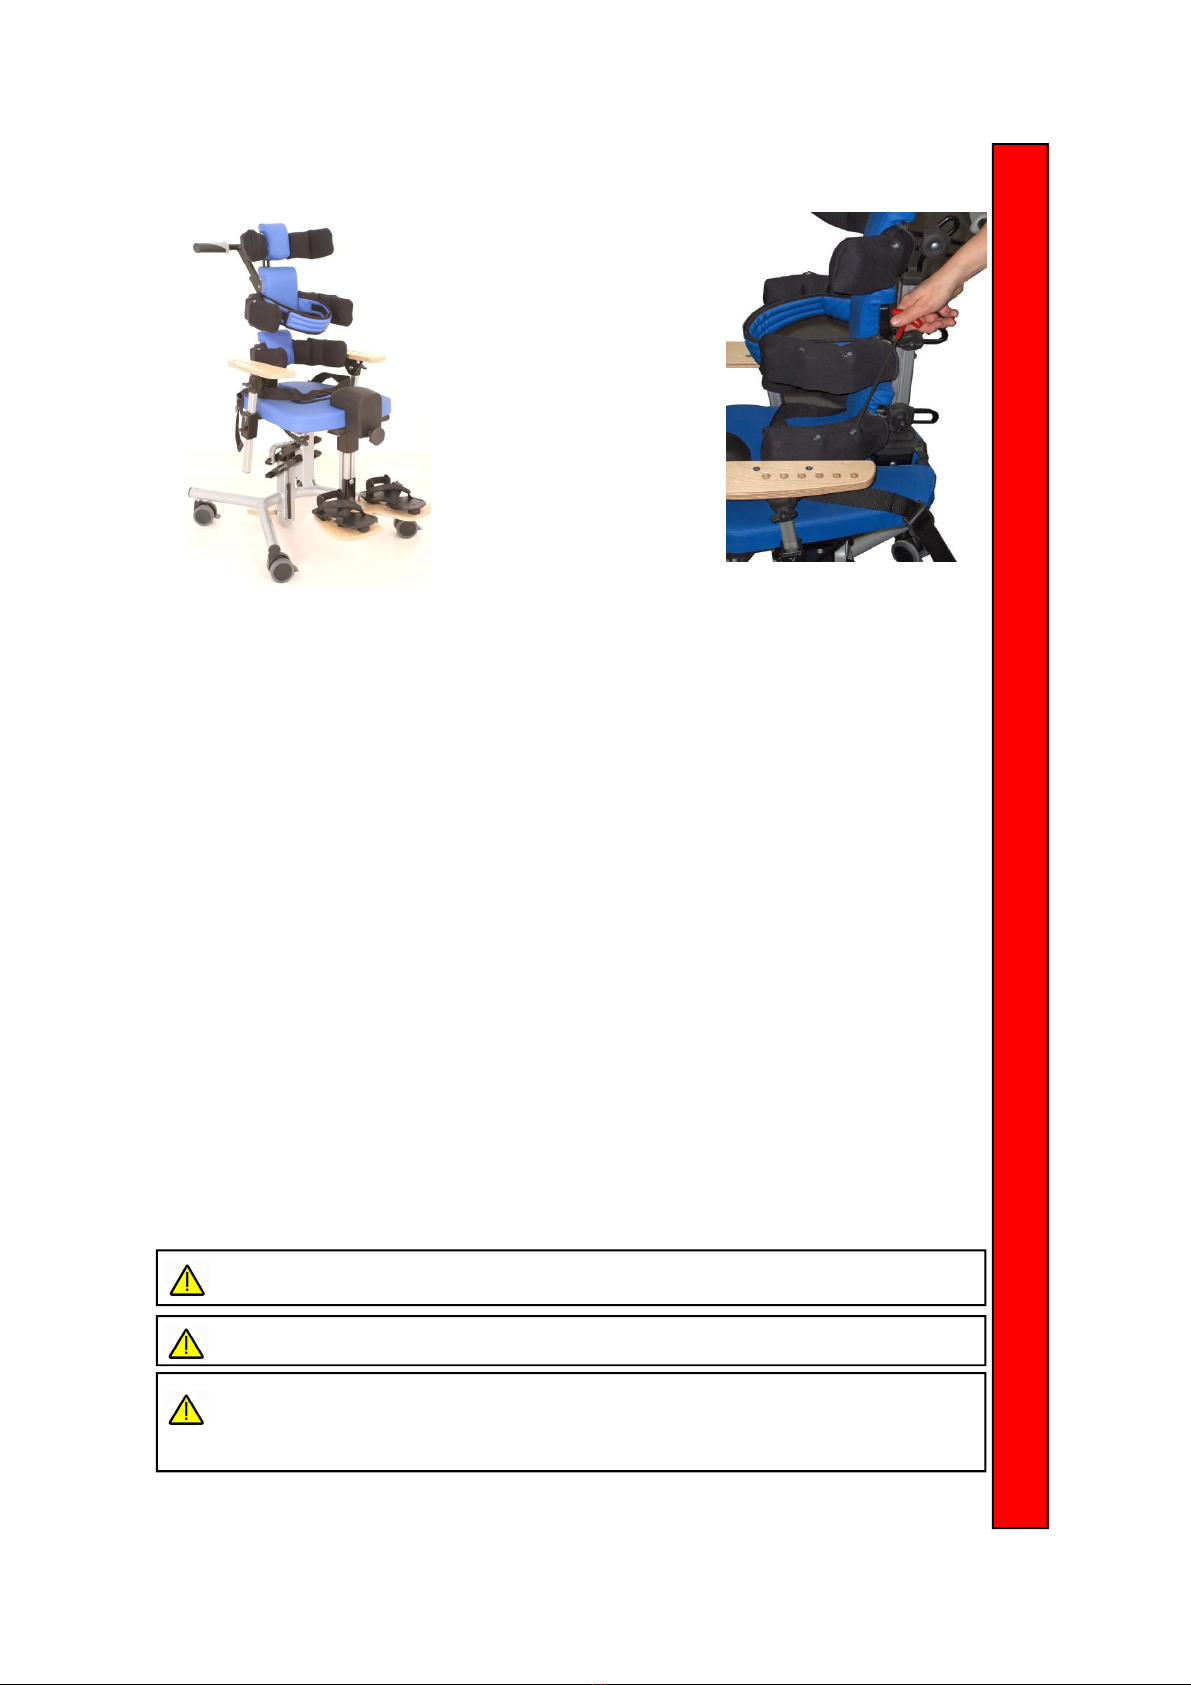
Adjusting the chair height
HOW?
When the chair is empty:
To lower the seat, depress the pedal and push down firmly on the centre of the seat (fig 25).
Lowering the seat is usually easier when standing at the side (fig 25).
Minimum height is only achieved when the seat is level or slightly prone.
TIP
When the chair is occupied:
To lower the seat hold the handle bars and depress the pedal. Gently guide the chair to the desired
height. If the child is not heavy enough to cause the seat to lower unassisted, apply gentle pressure
to the top of the hip pads.
To raise the seat, simply depress the pedal and lift the handle bars gently.
Fig 25
To raise the seat, depress the pedal and the chair will
automatically rise. If this does not happen, simply lift
the handle bars gently.
Making & Using the Adjustments
Do not use this product if you suspect the Height Adjustment is faulty or broken.
Contact Jenx Limited immediately for advice. +44 (0) 114 285 3376
NEVER LEAVE YOUR CHILD UNATTENDED WHILE USING THIS PRODUCT
Never press on the handle bars to lower the seat as this may damage the chair.
19
Technical User
GB
FOR FREE ADVICE ON THE USE OF THIS PRODUCT, PLEASE CONTACT OUR SALES SUPPORT TEAM
Jenx Limited, Wardsend Road, Sheffield, S6 1RQ, Tel: +44 (0)114 285 3376 Fax: +44 (0)114 285 3528 [email protected] www.jenx.com
Multi Gamma
Multi-grip™ Headrest
WHY?
The headrest should be positioned to support the child’s head. For children with good head control,
straighten out the multi-grips to provide a fairly smooth back surface. Never use the headrest to force a
child’s head into position as this will cause discomfort and can trigger reflexes which will result in poor
posture. The unique Multi-grip™ supports can be moulded to the shape of the child and can be splayed
at the end to support under the child’s chin.
Fig 14
Multi-grip™ Thoracic HOW?
Ensure the chest strap is used. Velcro should overlap by at least 3 inches
(7.5 cm)
.
To adjust the height of the thoracic supports loosen the thumb screw on the back column adjust to the
desired height and re-tighten. The width of the Multi-grip can be adjusted by loosening the bolts with the
Allen key provided then using your hands to create the contour you want. Tighten to finger tight only.
These fingers can be re-contoured as often as you like to vary the support offered.
Multi-grip™ Thoracic WHY?
The chest strap and Multi-grip™ thoracic support are designed to hold the child’s body straight whilst
sitting. Gravity then helps to develop their bones and their muscle tone. Ensure two fingers space between
the thoracic supports and the child’s armpit and a finger width from the child. Floppy children should be
supported by a combination of thoracic supports and hip supports to keep the spine straight. This helps to
prevent the child sitting with a curved spine.
A Multi-grip™ version of the Gamma
is available. Multi-grip™ supports
are positioned for the Headrest,
Thoracic and Hip Supports.
Multi-grip™ Headrest
HOW?
Using the Allen Key provided loosen
the bolts, then use your hands to
create the contour you want. Tighten
to finger tight only. These fingers can
be re-contoured as often as you like
to vary the support offered. These
“fingers” make it easy to cradle the
child’s head. No other products offer
this versatile option. Take the time
to practise with the “fingers” to
create a contour as individual as
each child.
Multi-grip™ Hip Support HOW?
To adjust the height of the thoracic supports loosen the thumb screw on the back column adjust to the
desired height and re-tighten. The width of the Multi-grip can be adjusted loosening the bolts with the Allen
key provided then use your hands to create the contour you want. Tighten to finger tight only. These
fingers can be re-contoured as often as you like to vary the support offered.
Multi-grip™ Hip Support WHY?
The Multi-grip™ Hip supports offer more control over the position of the hips and upper leg movement.
Secure the child by using the 45° pelvic strap before you begin to make any other adjustments.
Ensure the belt is adjusted for each child and for changes of clothing.
Ensure the straps are routed under the hip pads. Ensure a fingers width between the belt and the
child to prevent over tightening or the child moving to an inappropriate position.
Do not use this product if you suspect the Multi-grip™ Gamma is faulty or broken.
Contact Jenx Limited immediately for advice. +44 (0) 114 285 3376
NEVER LEAVE YOUR CHILD UNATTENDED WHILE USING THIS PRODUCT

20
FOR FREE ADVICE ON THE USE OF THIS PRODUCT, PLEASE CONTACT OUR SALES SUPPORT TEAM
Jenx Limited, Wardsend Road, Sheffield, S6 1RQ, Tel: +44 (0)114 285 3376 Fax: +44 (0)114 285 3528 [email protected] www.jenx.com
Technical User
GB
Optional Accessories
Flip Away Thoracic Pads
Flip Away Shoulder Protractors
Abduction Block
Flip Away Elbow Blocks
This manual suits for next models
2
Table of contents
Other Jenx Medical Equipment manuals


Popular Medical Equipment manuals by other brands


Getinge
Getinge Arjohuntleigh Nimbus 3 Professional Instructions for use

Mettler Electronics
Mettler Electronics Sonicator 730 Maintenance manual

Pressalit Care
Pressalit Care R1100 Mounting instruction

Denas MS
Denas MS DENAS-T operating manual

bort medical
bort medical ActiveColor quick guide

AccuVein
AccuVein AV400 user manual


