Jikel UPGO User manual

UPGO

1. UNIVERSAL 0+ (0-13kg): 3-POINT BELT
2. UNIVERSAL I (9-18kg): 3-POINT BELT
3. UNIVERSAL II+III (15-36kg): 3-POINT BELT
5. SEMI-UNIVERSAL II+III (15-36kg): ISOFIT+3-POINT BELT
Thank you for trust to our company and products!
2
This Child restraint is classified for “(Semi-Universal)”use and is suitable for fixing
into the seat positions of the following cars:
CAR FRONT REAR
Outer
No
(Apply to all vehicles
with ISOFIX anchroages)
Outer
Yes No
Centre
Seat positions in other cars may also be suitable to accept this child restraint.
If in doubt, consult either the child restraint manufacturer or the retailer.
1
4. SEMI-UNIVERSAL I (9-18kg): ISOFIT+3-POINT BELT

Table Of Contents
Know Your CAR Seat (Front) 5……………………………………………
Know Your CAR Seat (Opposite) 6………………………………………
Selection Criteria for Baby Car Seat 7…………………………………
Group 0+ Installation 8……………………………………………………
Group I Installation 9………………………………………………………
Group 0+I: 5-Point Harness Installation 11………………………………
Group 0+I: 5-Point Harness Removal 13…………………………………
Group II+III Installation and Using method 15…………………………
Removing the Cover 17………………………………………………………
Cleaning and Maintenance 18………………………………………………
3 4
Seat positions in other cars may also be suitable to accept this child restraint.
If in doubt, consult either the child restraint manufacturer or the retailer.
Seat positions in other cars may also be suitable to accept this child restraint.
If in doubt, consult either the child restraint manufacturer or the retailer.

Know Your CAR Seat (Front) Know Your CAR Seat (Opposite)
Headrest setting key Seat body Button
Locking device
Group I
Guiding slot
Harness guider
Locking
device
Shoulder
pads
Harness guider
for Group II+III
Group II+III
Harness guider
Group II+III
Guiding hole
Instruction slot
Harness adjustment strap
Harness yoke
Gear bar
Harness shaft
Harness strap
Gear indicator
for setting posture
Headrest
Guiding hook
for Group II and III
Harness
buckle
Setting Knob
Central
adjuster
Pillow
Cushion
(Used less than 13kg)
Buckle
pad
Harness
adjuster
strap
Guiding path
for Group 0+
Seat base
Cushion
(Used less
than 9kg) ISOFIT Connector
Release button
5 6
Rear cover
Guide path
for Group 0+

Selection Criteria for Baby Car Seat Group 0+ Installation
This type baby car seat is applied to Group 0+/I/II/III and the
requirement for weight is form 0 to 36kg. It is suitable for
around 0 to12 year-old children. It
only can be suitable to use in the listed vehicles fitted 3
point/with retractor safety-belts, approved to ECE Regulation
No.16 or GB14166.
Different installation methods should be applied to children in
defferent group. Please follow the below standards to match the
right group installation.
Do not use any load bearing contact points other than those
Only can apply to the vehicle that has ISOFIX anchroages and 3-point safety belts.
7 8
Group Body
weight Age Children s
restraining
system
Installation
method
Direction
of
installation
Requirement for vehicles
0+ 0-13kg 0-15
months
Rearward
Facing
Forward
Facing
Forward
Facing
Forward
Facing
5-point
harness
5-point
harness
vehicle s
3-point
seat belt
9months-
4years old
4-12
years old
4-12
years old
9-18kg
15-36kg
15-36kg
I
II+III
II+III
The vehicle equipped with
3-point belt, and cannot be
used if the vehicle seat is
equipped with only 2-point
belt.
The vehicle equipped with
3-point belt, and cannot be
used if the vehicle seat is
equipped with only 2-point
belt.
The vehicle equipped with
3-point belt, and cannot be
used if the vehicle seat is
equipped with only 2-point
belt.
The vehicle equipped with
ISOFIX anchroages, and
cannot be used if the vehicle
seat is equipped with only
2-point belt.
The vehicle equipped with
ISOFIX anchroages, and
cannot be used if the vehicle
seat is equipped with only
2-point belt.
’
’
vehicle s
3-point
seat belt
’
vehicle s
3-point
seat belt
’
vehicle s
3-point
seat belt
’
Forward
Facing
5-point
harness
9months-
4years old
9-18kgI
vehicle s
3-point
seat belt
’
ISOFIT+
vehicle s
3-point
seat belt
’
ISOFIT+
vehicle s
3-point
seat belt
’
Attention
1. The installation for Group 0+ is rearward facing and is applied to children from 0 to 13kg.
2. This car seat for Group 0+ only has one sitting posture and it is level 4.
3.
Baby car seat for Group 0+ can not be installed in the position which is equipped with airbag.
4. Please place the cushion for Group 0+ into the car seat when using rearward facing.
5.
Important - If your child's weight is less than 9kg, you cannot make forward facing installation.
1 2
Step 1: As shown in figure 1, push the setting
knob and adjust the angle of seat to the level 4.
Step 2: As shown in figure 2, placing the
safety car seat rearward in the car seat and
make it cling to car seat back.
Step 3: As shown in figure 3, the car safety belt passes through the hole of the safety seat
according to the blue direction. Put the car safety belt tongue into the car buckle. Pull horizontal
car belt tight and place oblique car belt into locking device, then pull belt tight again. Next,
put oblique car belt into guiding slot for Group 0+ and put remainder belt into seat belt
retractor. Finally, shake the safety seat to ensure whether car seat is already fixed.
Front Opposite
3
click

Group I Installation Group I Installation
Attention
1. The installation for Group I is forward facing and is applied to children from 9 to 18kg.
2. This car seat for Group I has three sitting postures and they are level 1/2/3.
3. After adjusting, make baby car seat cling to car seat back and strain safety belt.
Step 1: As shown in figure 1, push the setting
knob and adjust the angle of seat to the right
level.
Step 1: As shown in figure 1, push the setting
knob and adjust the angle of seat to the right
level.
Step 3: As shown in figure 3, the car safety belt passes through the hole of the safety seat
according to the red direction. Put the car safety belt tongue into the car buckle. Place
horizontal car belt into limit hook tightly and place oblique car belt into Group 1 guiding slot,
then pull belt tight again, put remainder belt into seat belt retractor. Finally, shake the safety
seat to ensure it is already fixed.
Step 2: As shown in figure 2, place the safety
car seat forward in the car seat and make it
cling to car seat back.
9 10
Step 3: As shown in figure 3, before inserting the two ISOFIT connectors firmly into the ISOFIX
fixed point in the car seat, ISOFIT indication window will show red sign. Then, insert the two
ISOFIT connectors firmly into the ISOFIX fixed point in the car seat with a clicking noise on both
side. In the meantime, ISOFIT indication window will become green. In order to release ISOFIT
connectors, push the white button and pull the ISOFIX releasing button, the indication window
will become red.
1. UNIVERSAL I (9-18kg): 3-POINT BELT
1 2
3
click
Front Opposite
click
2. SEMI-UNIVERSAL I (9-18kg): ISOFIT+3-POINT BELT
12
3
4
click
Step 2: As shown in figure 2, rotate ISOFIT
connector outward, if you want to return
the connector, you can rotate it back.
Front Opposite

Group
0+1
Group
II+III
Group
II+III
Group
0+1
Group 0+I: 5-Point Harness Installation
Step 6: Non-rethread harness system adjustable with headrest: according to different height
of children, there are 8 levels to adjust the height of headrest and shoulder belt in Group 0+I.
There are 5 levels to adjust the height of headrest and shoulder belt in Group II+III. Before
adjustment, please loosen 5-point safety belt. Attention: after sitting, adjust the headrest to
the right position.
Step 7: If the red line in the side of headrest exceeds the height of side car seat body, you
should use Group II+III installation.
6
Attention: One or two fingers is the best
distance from the bottom of headrest to
child's shoulders.
7
Higher than the base line
for the side car seat body
The base line for the side car seat body
Lower than the base line
for the side car seat body
Group 0+I: 5-Point Harness Installation
1 2
Step 1: Press the central adjuster and
meanwhile, pull out the harness strap
to release shoulder belt.
Step 2: Press the red button to open the
harness buckle.
Step 3: Pull out both of the shoulder belts
to both sides of the child safety seat.
Step 4: Place your child into seat and make
sure the lap belt can restrict the position of
pelvis. Please check the height of shoulder
belts. It is better to make shoulder belts be
a little bit higher than child's shoulders.
Step 5: Pull harness adjustment strap outward to fix child and avoid harness strap to constrict
child too much. Adult palm can insert between harness strap and child's chest. Make sure the
tightness is comfortable for your child and ensure the lap belt restrict the position of pelvis.
Methods to use harness buckle: Guide the two buckle
latches together and engage them before putting them
into the harness buckle, this should make a click nose.
The buckle latches will be released if you press the red
button.
1
3 4
5
123
11 12

Notice
Step 3: Separate the shoulder belt with strap yoke: Put strap yoke into the rear cover and
draw out the belt forward.
Step 6: Separate harness buckle and car seat (see 1 and 2 ).
Step 7: Separate the strap with the seat: Separate strap yoke from the seat by hands or small
tools. Then draw out the belt and fix the strap yoke with the strap according to picture 1-2-3-4-5.
Step 8: Close the rear cover, finish the removal of the 5-point safety belt like pictures.
Step 4: Separate shoulder pads with belt: Draw out shoulder pads firstly, open the shoulder
pads and separate shoulder belts with strap yoke, then draw out the shoulder pads.
Step 5: Open harness buckle,
put the buckle pad and cushion
aside.
Group 0+I: 5-Point Harness Removal
3
7
4
5
1
1
1
2
23
Group 0+I: 5-Point Harness Removal
1
1 2
Attention: When you install shoulder belt
and harness yoke, do not twist the strap.
Attention: When you install shoulder belt
and strap, you must make belts pass the
harness shaft.
13 14
1 2 3
4
5
Step 1: Adjust the baby car
seat to level 1.
Step 2: Push central adjuster
and loosen the belt. Then,
adjust headrest to level 3 or
level 4 or level 5.
6
12
8
1

Group II+III Installation and Using method
1. There is only one level for Group II+III and it is first level.
2. Before using Group II+III, please remove the 5-point safety belt and cushion.
3. Pull the belt in the buckle tightly to make sure buckle in the right position.
4.
Universal installation and semi-universal installation are equipped with 3-point belt which
is certified by GB14166 or ECE R16.
5.
Semi-universal installation is equipped with ISOFIX which is certified by GB14166 or ECE R16.
Group II+III Installation and Using method
15 16
Attention
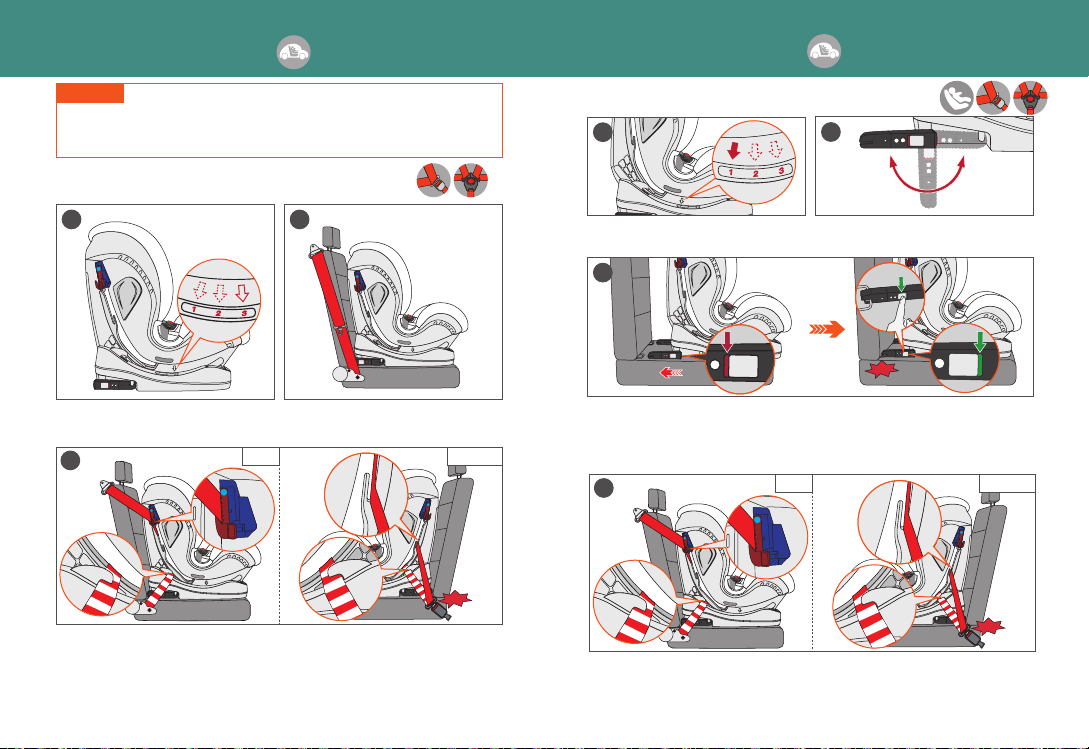
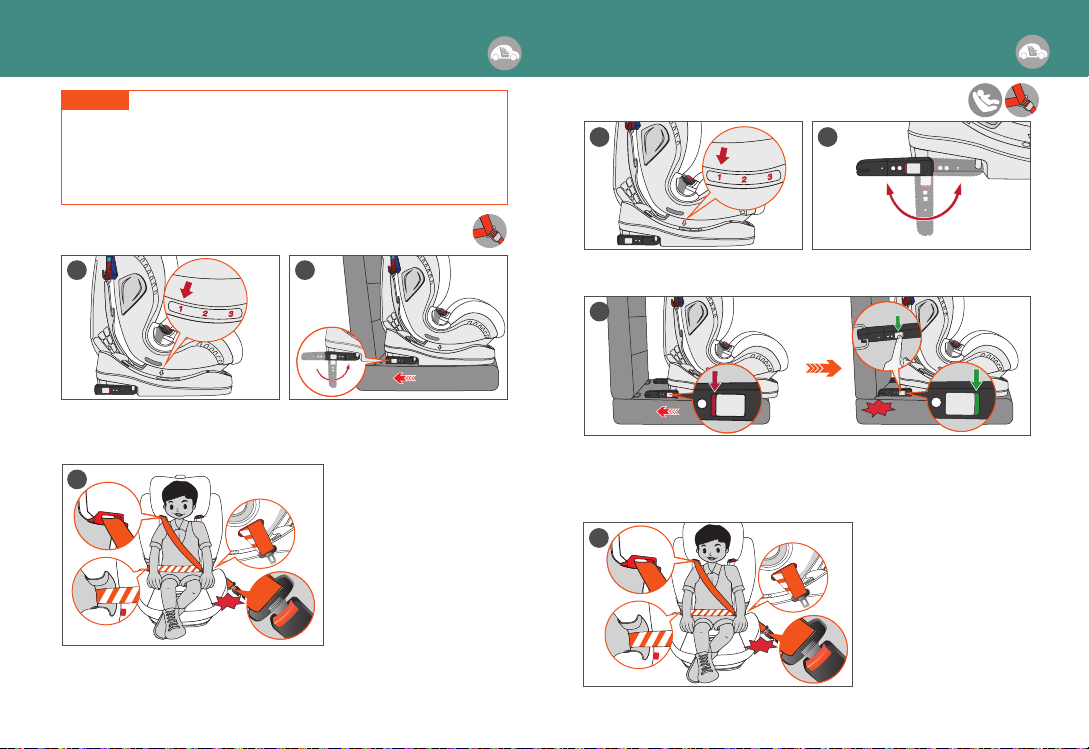
Step 1: As shown in figure 1, adjust the baby
car seat to level 1.
Step 2: As shown in figure 2, return ISOFIT
connector, then put baby car seat to the right
place.
Step 1: As shown in figure 1, adjust the car
seat to level 1 before installation. Step 2: As shown in figure 2, rotate ISOFIT
connector outward, if you want to return
the connector, you can rotate it back.
Step 3:
As shown in figure 3, have
your child sit on the seat and adjust
headrest to the comfortable position.
Then make the oblique belt through
the guiding hook for Group II and III,
horizontal belt through the harness
guider and pass through the guiding
hole. Then, insert car belt tongue to
car buckle with click sound. Finally,
make sure the lap belt can restrict
the position of pelvis.
Step 4:
As shown in figure 4, have
your child sit on the seat and adjust
headrest to the comfortable position.
Then make the oblique belt through
the guiding hook for Group II and III,
horizontal belt through the harness
guider and pass through the guiding
hole. Then, insert car belt tongue to
car buckle with click sound. Finally,
make sure the lap belt can restrict
the position of pelvis.
1. UNIVERSAL II+III (15-36kg): 3-POINT BELT
2.
SEMI-UNIVERSAL II+III (15-36kg): ISOFIT+3-POINT BELT
21
click
3
1 2
click
3
Step 3: As shown in figure 3, before inserting the two ISOFIT connectors firmly into the ISOFIX
fixed point in the car seat, ISOFIT indication window will show red sign. Then, insert the two
ISOFIT connectors firmly into the ISOFIX fixed point in the car seat with a clicking noise on both
side. In the meantime, ISOFIT indication window will become green. In order to release ISOFIT
connectors, push the white button and pull the ISOFIX releasing button, the indication window
will become red.
click
4

Removing the Cover
1. Removing the cover of car body
2. Removing the cover of headrest
Washing Instructions
Do not use solvents, chemical cleaners and lubricants
Hand Wash
using the water
under 30℃
Do not Bleach Do not
Machine Dry
Do not Iron
12
1 1
AttentionWhen you are ready to refit, make the steps in the opposite order.
1
2
3
4
5
6
Cleaning and Maintenance
17 18
Step 1: As shown in figure 1, open the snap
button in the headrest.
Step 2: As shown in figure 2, separate the
elastic with the headrest (see point 2).
According to point 3, separate elastic with
the frame. Then, remove the cover as shown
in Arrow 4.
As shown in picture, remove the
cover according to the order of
1, 2, 3, 4, 5.
Regularly check all important parts for damage. Make sure that
the mechanical components in particular are all in perfect
working order. If there is damage about your child safety seat
in the event of an accident, in this case the safety seat must
be replaced.
Store the child safety seat in a safe, dry place when it will
not be used for an extended period of time.
Brush away loose debris using a soft bristled brush to clean
the safety belt and plastic components, and then ventilate or
dry them.
If food or beverage drips on your seat belt, thoroughly rinse
it using warm water and then ventilate or dry it.
Remove and wash the cover see the instructions of cleaning.
If wash the cover in the fist time, the cover might fade a
little bit, It is a normal phenomenon.
In the circle 2, take the cover
down from the four plastic
hooks in the buttom of car
seat. When you refit the cover,
you also should fix the cover
by four plastic hooks.
Attention
Table of contents
Other Jikel Car Seat manuals