Jireh Rotix User manual

ROTIX
Manual Weld Frame Scanner
CE0120 Rev 05

PAGE i of iv CE0120 Rev 05
SAFETY WARNINGS / PRECAUTIONS
DANGER! The ROTIX is designed for a specic use. Using the
ROTIX outside of its intended use could cause damage to the product.
Read and understand this manual before using.
KEEP THIS MANUAL – DO NOT LOSE
THIS MANUAL IS PART OF THE ROTIX AND MUST BE RETAINED FOR THE LIFE OF
THE PRODUCT. PASS ON TO SUBSEQUENT OWNERS.
Ensure any amendments are incorporated with this document.
WARNING! MAGNETIC MATERIAL. The wheels of this device
produce a magnetic eld which may cause failure or permanent damage to
items such as watches, memory devices, CRT monitors, medical devices or
other electronics.
People with pacemakers or ICD’s must stay at least 25 cm (10 in) away at all
times.
WARNING! Do NOT operate scanner in an explosive environment.
Do NOT operate scanner in the presence of volatile substances.
The WEEE symbol indicates that the product must not be disposed of as
unsorted municipal waste, but should be collected separately.
(see Disposal on page 49 for additional details).
WARNING! HOT SURFACE. The ROTIX may reach
temperatures that may cause burns if contacted with bare skin. Wear heat
resistant safety gloves when handling.

PAGE ii of iv
Chapter1 Identification 1
1.1. Product Brand 1
1.1.1. Manufacturer 1
Chapter2 Product Specifications 2
2.1. Intended Use 2
2.1.1. Operating Limits 2
2.1.2. Operating Environment 2
2.2. Dimensions and Weight 2
2.3. Environmental Sealing 3
2.4. Performance Specifications 3
Chapter3 Definitions 4
3.1. Definition of Symbols 4
Chapter4 System Components 5
4.1. Component Identification 5
4.2. Tools 8
4.2.1. Included Tools 8
4.2.2. Optional tools 8
4.3. Overhead Adjustable Link 9
4.4. Wheel Block with Handle 10
4.4.1. Wheel Removal/Installation 10
4.5. Double Chain Mount 11
4.6. Cable Clips 11
4.7. Spring-Loaded Encoder 12
4.8. Frame Bar 12
4.9. Pivot Buttons 12
4.10. Chain Connection 13
4.11. Ratchet Lever 13
4.12. Slip Joint Probe Holder 14
4.12.1. Probe Holder Setup 14
4.12.2. Probe Holder Adjustment 16
4.12.3. Probe Holder Force Adjustment 16
TABLE OF CONTENTS

PAGE iii of iv CE0120 Rev 05
4.12.4. Slip Joint Probe Holder Left/Right Conversion 18
4.13. Cable Management System 20
4.13.1. Cable Management Dovetail Mount 20
4.13.2. Cable Management Setup 21
4.13.3. Clamp Setup 22
4.14. Reduced Width Scanning Kit 22
4.15. Vertical Probe Holder 23
4.15.1. Probe Holder Setup 23
4.15.2. Probe Holder Vertical Adjustment 24
4.15.3. Probe Holder Transverse Adjustment 25
4.15.4. Probe Holder Longitudinal Adjustment 26
4.15.5. Probe Holder Left/Right Conversion 27
4.16. High Temperature Weld Frame Scanner 29
4.17. Magnetic Wheel Kit 30
4.18. Pre-amp Bracket 31
Chapter5 Configurations 32
5.1. Two Probe Scanning 32
5.2. Four Probe Scanning 32
5.3. Four Probe Cantilever Scanning 33
Chapter6 Operation 34
6.1. Setup of ROTIX on a Scanning Surface 34
Chapter7 Maintenance 38
Chapter8 Troubleshooting 39
8.1. Technical Support 39
Chapter9 Spare Parts 40
9.1. Standard Kit Components 40
9.2. High Temperature Kit Components 41
9.2.1. Encoder Connector Type 42
9.3. Accessories 42
9.3.1. Cable Management, Dovetail Mount 42
9.3.1.1 Cable Management Sleeving 42
9.3.2. High Temperature Cable Management, Dovetail Mount 43
9.3.3. Pre-Amp Bracket 43

PAGE iv of iv
9.3.4. Magnetic Wheel Kit 43
9.3.5. Reduced Width Scanning Kit 44
9.3.6. Probe Holders 45
9.3.7. Slip Joint Probe Holder Parts 45
9.3.8. Vertical Probe Holder Parts 46
9.4. Probe Holder Components 47
9.4.1. Arm Style 47
9.4.2. Yoke Style 47
9.4.3. Swing Arm Style 47
9.4.4. Pivot Button Style 47
9.5. Variable Components 48
9.5.1. Frame Bars 48
Chapter10 Disposal 49
Chapter11 Limited Warranty 50
Chapter12 Appendix 52
12.1. Two Probe Chain Configuration Setup Chart 52
12.2. Four Probe Chain Configuration Setup Chart 53

PAGE 1 of 53 CE0120 Rev 05
Chapter 1
IDENTIFICATION
1.1. Product Brand
This user manual describes the proper safety precautions, setup and use of the ROTIX
weld frame scanner.
1.1.1. Manufacturer
Jireh Industries Ltd.
53158 Range Road 224
Ardrossan, Alberta, Canada
T8E 2K4
780.922.4534
jireh.com
DISTRIBUTOR: MANUFACTURER:

PAGE 2 of 53
Chapter 2
PRODUCT SPECIFICATIONS
2.1. Intended Use
The ROTIX chain scanner is a manually operated scanner which provides encoded
probe positions of two or four probes. The double wheel chain components straddle
the weld and fasten a scanning frame circumferentially around pipe or tubing.
2.1.1. Operating Limits
Minimum Maximum
Pipe/Tube range (2 Probe) 10.1 cm (4 in) 96.5 cm (38 in)
Pipe/Tube range (4 Probe) 11.4 cm (4.5 in) 96.5 cm (38 in)
2.1.2. Operating Environment
The ROTIX chain scanner is designed for use in an industrial environment that is
between -20° C (-4°F) and 50° C (122°F).
The ROTIX - High Temperature Kit is required for surface temperatures between
50°C - 150°C (122°F - 302°F).
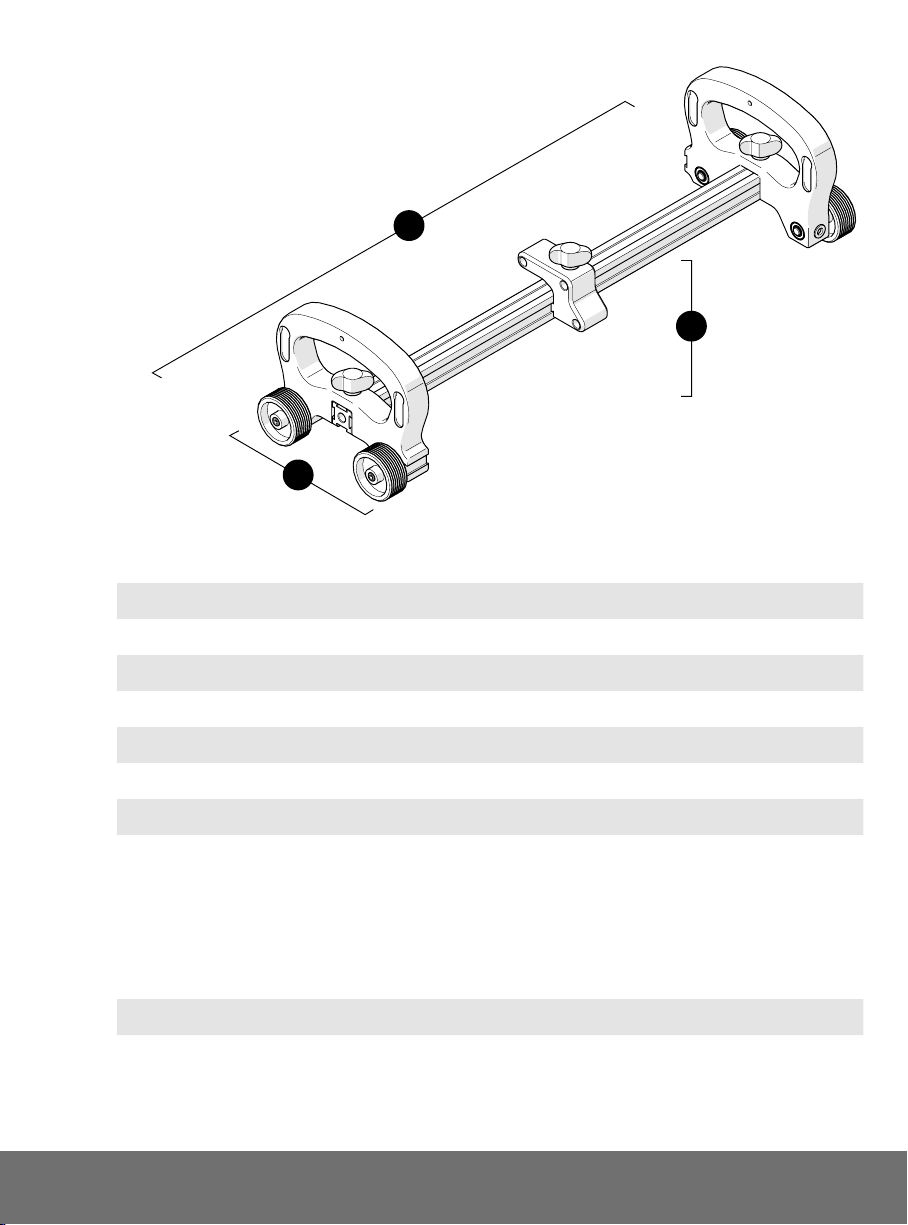
2.2. Dimensions and Weight
3
1
2
Fig. 1 - Frame dimensions

PAGE 3 of 53 CE0120 Rev 05
1: Frame width (Fig. 1-1): 38.5 cm (15.2 in)
2: Frame depth (Fig. 1-2): 17.5 cm (6,9 in)
3: Frame height (Fig. 1-3): 10.5 cm (4.1 in)
4: HT frame width (Fig. 2-4) 43.5 cm (17.1 in)
5: HT frame depth (Fig. 2-5) 12.5 cm (4.9 in)
6: HT frame height (Fig. 2-6) 10.5 cm (4.1 in)
Encoder cable length 5 m (16.4 in)
2.3. Environmental Sealing
Watertight (submersible) (contact Jireh Industries Ltd. on page 1 for details).
2.4. Performance Specifications
X-Axis encoder resolution 9.05 counts/mm (230.0 counts/in)
High Temperature X-Axis encoder
resolution
4.28 counts/mm (108.7 counts/in)
4
5
6
Fig. 2 - High temperature frame dimensions

PAGE 4 of 53
Chapter 3
DEFINITIONS
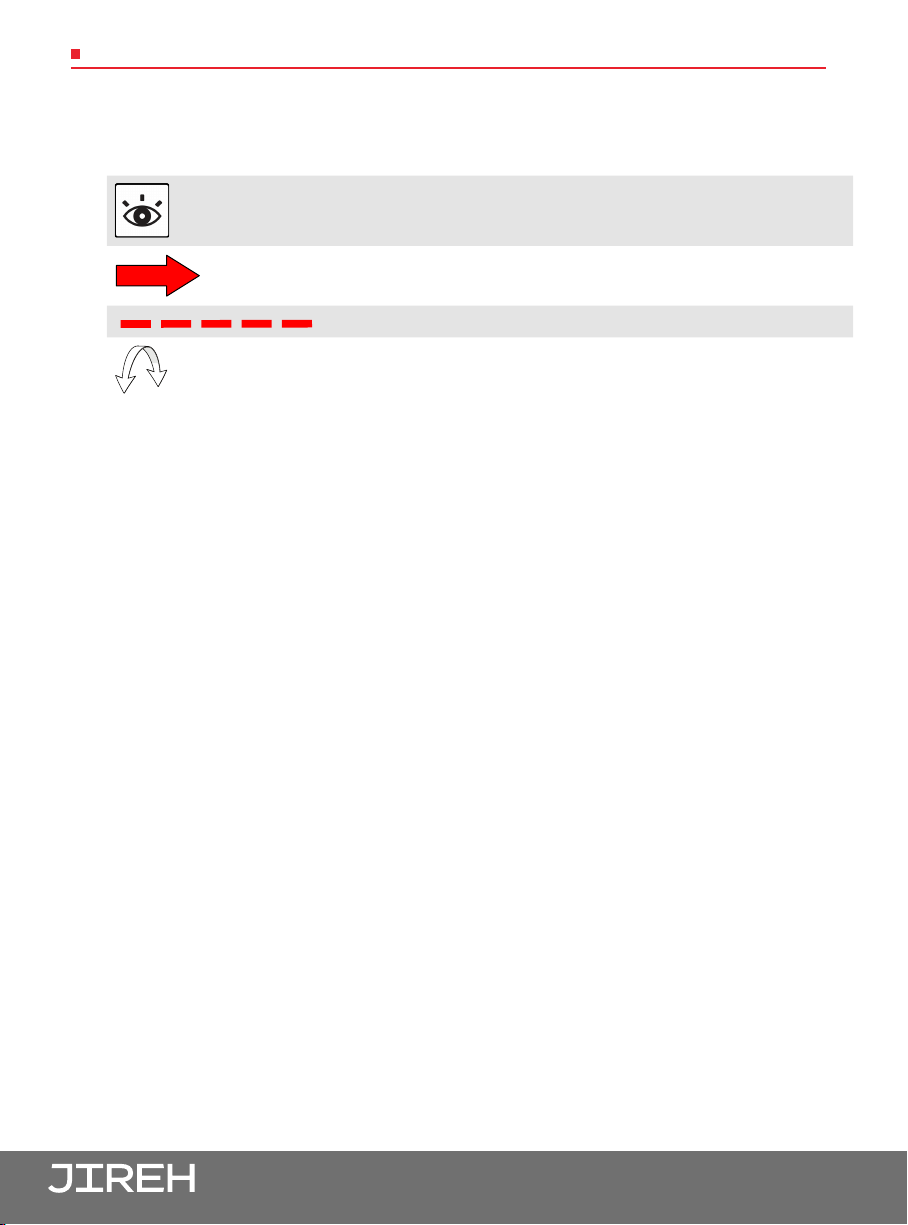
3.1. Definition of Symbols
Instructions to ‘look here’ or to ‘see this part’.
Denotes movement. Instructing user to carry out action
in a specified direction.
Indicates alignment axis.
Alerts user that view has changed to a reverse angle.

PAGE 5 of 53 CE0120 Rev 05
Chapter 4
SYSTEM COMPONENTS
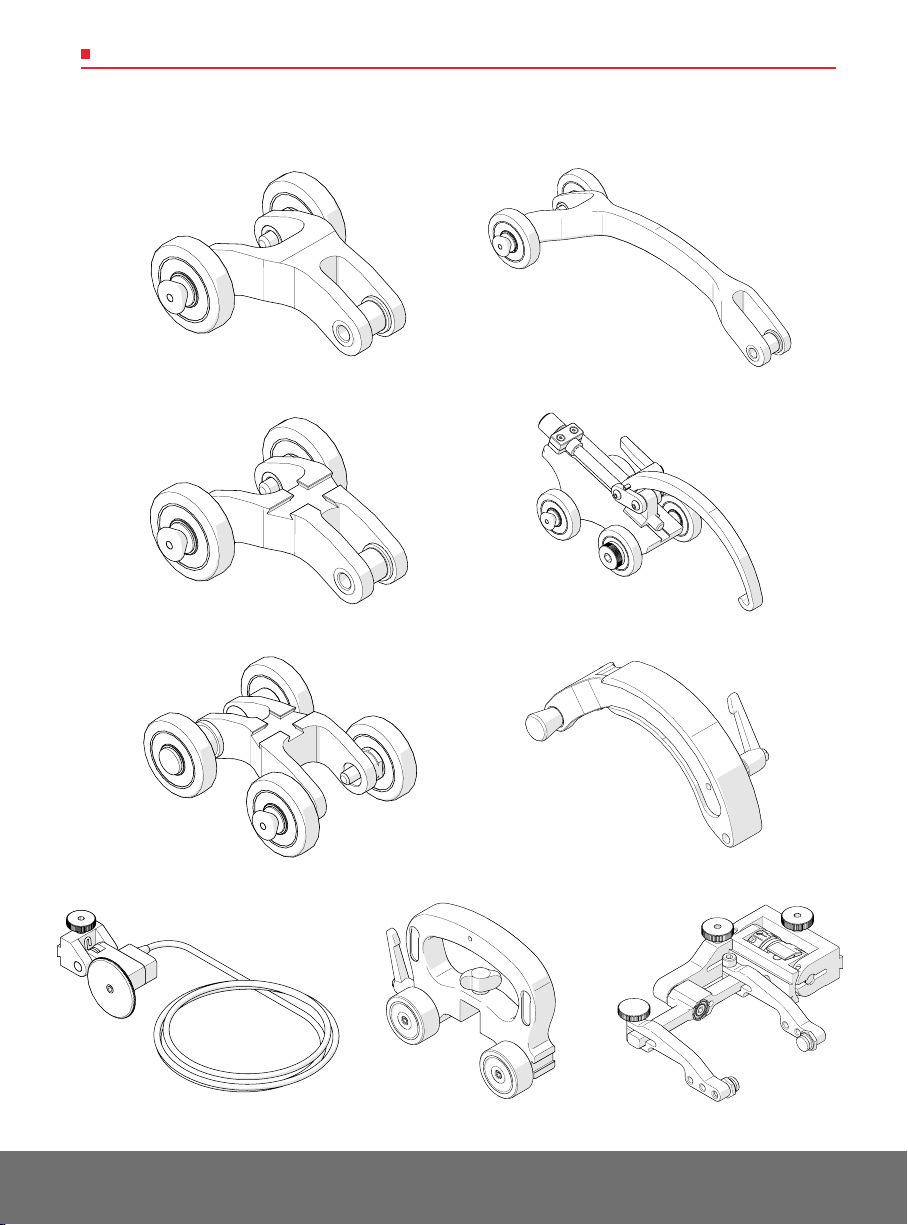
4.1. Component Identification
Fig. 3 - Short link
CES033
Fig. 4 - Long link
Fig. 5 - Dovetail link
CES040
Fig. 6 - Buckle
CES035
Fig. 7 - Catch link
CES035
Fig. 8 - Overhead adjustable link
CES031
Fig. 9 - Spring-loaded encoder
BGS053-
Fig. 10 - Wheel block with handle
CES070
Fig. 11 - Slip joint probe holder
PHA012-

PAGE 6 of 53
Fig. 12 - High temperature short link
CES074
Fig. 13 - High temperature long link
CES075
Fig. 14 - High temperature short link
CES076
Fig. 15 - High temperature buckle
CES078
Fig. 16 - High temperature catch link
CES077
Fig. 17 - High temperature wheel block with handle
CES071
Fig. 18 - High temperature spring-loaded
encoder
BGS071-
Fig. 19 - High temperature cable management,
dovetail mount
CES089-
Fig. 20 - Cable management, dovetail mount
CES044-

PAGE 7 of 53 CE0120 Rev 05
Fig. 21 - 3/8 in wrench
EA470
Fig. 22 - 3 mm hex driver
EA414
Fig. 23 - Frame bar
BG0038-
Fig. 24 - ROTIX case
CEA011
Fig. 25 - Irrigation kit
CMG007
Fig. 26 - ROTIX high temperature case
CEA030

PAGE 8 of 53
4.2. Tools
4.2.1. Included Tools
The 3 mm hex driver (Fig. 27) is sucient for all typical operations and adjustments of
the ROTIX. The 3/8 in wrench (Fig. 28) is used to remove and install buttons on the
probe holders.
4.2.2. Optional tools
Some specialized adjustments require tools that are not included with this kit.
Fig. 27 - 3 mm hex driver Fig. 28 - 3/8 in wrench
Fig. 29 - 1.5 mm hex
wrench
Fig. 30 - 2 mm
hex wrench
Fig. 31 - 2.5 mm
hex wrench
Fig. 32 - 3 mm
hex wrench

PAGE 9 of 53 CE0120 Rev 05
4.3. Overhead Adjustable Link
The overhead adjustable link
provides clearance for probes
and wedges.
When low profile scanning is
required, the ratchet lever is
adjustable.
Loosen the rachet handle
(Fig. 33) and extend or retract
the link as required. Tighten the
rachet handle (Fig. 34).
(see Ratchet Lever on page 13)
Fig. 33 - Loosen ratchet lever
Fig. 34 - Adjust link and tighten rachet lever

PAGE 10 of 53
4.4. Wheel Block with Handle
The wheel block provides stability and braking to the ROTIX system.
The ratchet lever located on the wheel block with handle operates the brake.
Install the wheel block with handle by loosening the black wing knob and sliding the
wheel block with handle’s dovetail nut onto the frame bar (Fig. 35). Tighten the black
wing knob (Fig. 36).
4.4.1. Wheel Removal/Installation
Tightly grip the wheel to be removed
by hand. Using the supplied
3 mm hex driver (Fig. 27), loosen the
wheel from the axle.
TIP: When the brake is engaged
and the scanner is moved, this
may loosen the wheels from
the axle. Grip the wheel tightly
and retighten the axle with the
3 mm hex driver.
NOTE: The spring-loaded encoder can NOT be mounted to the wheel block with
handle when the diameter of the scan surface is less than 30.4 cm (12 in).
Fig. 35 - Attach to frame bar Fig. 36 - Tighten wing knob
Fig. 37 - Wheel removal/installation

PAGE 11 of 53 CE0120 Rev 05
4.5. Double Chain Mount
The double chain mount provides a connection point for links.
Loosen the double chain mount’s dovetail jaw using the black wing knob (Fig. 38).
Secure the double chain mount to the frame bar by tightening the black wing knob.
(Fig. 39).
The lower hole of the double chain mount is used to connect the chain during 2 probe
scanning. When scanning with 4 probes (requiring 2 overhead adjustable links), always
connect the overhead adjustable links to the top holes of the double chain mount.
4.6. Cable Clips
Clips have been provided to assist with cable management. Simply pinch the clip an
and press it into the dovetail groove of the frame bar.
Fig. 38
- Chain mount
Fig. 39
- Chain mount alignment
Fig. 40 - Pinch clip Fig. 41 - Route cables

PAGE 12 of 53
4.7. Spring-Loaded Encoder
The spring-loaded encoder wheel provides vertical travel while maintaining
contact pressure to the scan surface. To install the encoder follow these steps:
1. Loosen the encoder’s dovetail jaw and mount to the frame bar (Fig. 42).
2. Tighten the encoder knob (Fig. 43).
3. Spring tension maintains encoder contact with the scan surface (Fig. 44).
NOTE: The spring-loaded encoder can NOT be mounted to the wheel block with
handle when the diameter of the scan surface is less than 30.4 cm (12 in).
4.8. Frame Bar
Frame bars (Fig. 45) are used to mount
probe holders, probe positioning systems
and other accessories (see Frame Bars on
page 48).
Frame bars are available in a variety of
lengths.
4.9. Pivot Buttons
Available in a variety of shapes and sizes
fitting various wedge dimensions.
Use the supplied 3/8 in wrench (Fig. 28) to
remove and install pivot buttons (Fig. 46).
Fig. 42 - Attach to frame bar Fig. 43 - Tighten knob Fig. 44 - Place on scan surface
Fig. 45 - Frame bar
Fig. 46 - Pivot buttons

PAGE 13 of 53 CE0120 Rev 05
4.10. Chain Connection
To connect chain components, see these following steps:
1. Pull the pins out from the wheels, twist a quarter turn latching the pins in a
retracted state (Fig. 47).
2. Align the pins with the mounting holes of the component to be connected
(Fig. 48).
3. Twist the pins until they unlatch and extend into the hole of the connected
component (Fig. 49).
4.11. Ratchet Lever
The rachet levers are used for various locking and braking functions on the ROTIX
system. Occasionally, movement of the lever locking position is required. The lever
placement can be adjusted by following these steps:
1. Pull the ratchet lever away from the base of which it is connected (Fig. 50).
2. Continue to pull while rotating the lever in the appropriate direction (Fig. 51).
3. Release the lever and utilize the new tightening position.
Fig. 47 - Pull out and twist pins Fig. 48 - Align mounting holes Fig. 49 - Release pins
Fig. 50 - Pull ratchet handle Fig. 51 - Rotate handle Fig. 52 - Tighten handle

PAGE 14 of 53
4.12. Slip Joint Probe Holder
AFrame Bar
BProbe Holder Adjustment Knob
CLatch
DSwing Arm Knob
EYo k e
FProbe Holder Arm Adjustment Knob
GProbe Holder Arm
HArm Clamp Screw
IPivot Buttons
4.12.1. Probe Holder Setup
To mount a UT wedge in the probe holder, follow these steps:
1. Rotate the probe holder adjustment knob and attach probe holder to a
frame bar (Fig. 54).
2. Use the probe holder adjustment knob to position the probe holder along
the frame bar (Fig. 55).
F
I
A
C
BD
E
G
H
Fig. 53 - Slip Joint Probe Holder
Fig. 54 - Attach to frame bar Fig. 55 - Adjust on frame bar
Fig. 56 - Adjust swing arm Fig. 57 - Place pivot buttons

PAGE 15 of 53 CE0120 Rev 05
3. Use swing arm knob to position the swing arm (Fig. 56).
TIP: The swing arm is typically used to adjust TOFD center to center distance
relative to the phased array probes on a four probe conguration (Fig. 119).
4. Using the supplied 3/8 in wrench (Fig. 28), place the pivot buttons as
required (Fig. 57).
TIP: If narrow scanning footprint is required, use pivot button holes closest to
the yoke. Wedge pivoting may be impeded when closer to the yoke.
5. Loosen the probe holder arm adjustment knob (Fig. 58) and remove outer
probe holder arm from yoke.
6. Adjust inner probe holder arm as required to best centre the probe on the
yoke’s pivot axis (Fig. 58).
TIP: The probe holder yoke can accommodate many different probe and wedge
sizes of varying widths. It is best to centre the wedge with the yoke’s pivot
axis to reduce wedge tipping when scanning. Position the inner probe
holder arm accordingly with the centre of the yoke (Fig. 58).
7. Position the wedge on the inner
probe holder arm (Fig. 59).
8. Slide outer probe holder arm
along the yoke pinching the
wedge in place.
9. Tighten probe holder arm
adjustment knob (Fig. 60).
Fig. 58 - Adjust probe holder arms Fig. 59 - Place wedge
Fig. 60 - Pinch wedge with arm
Other manuals for Rotix
8
Table of contents
Other Jireh Diagnostic Equipment manuals