Jobar BLACK FALCON User manual

BLACK FALCON SPY DRONE W/CAM USER MANUAL
Age: 14+
Attention:
1. Read instructions thoroughly before first use and keep them in a safe place for future
reference.
2. Inspect all Drone components before each use and DO NOT operate if any of the
components are damaged.
3. This RC Drone is not suitable for use by children under 14 years of age.
4. The use of included Protection Cover is recommended for added safety and protection
of operator, surrounding persons, property, environment, and animals in the event of
collision.
5. Keep the Drone in sight at all times when operating it to avoid injury or damage to
people, animals, or property.
6. The use of the Drone in some areas may be prohibited. Check whether the use of the
Drone is permitted before using it.
7. The propellers on this item are designed to break away from the Drone upon impact
with a hard surface so they do not break or cause damage. Simply follow the instructions
on page 8 to replace the propeller. We have included extra replacement propellers to use
if one is damaged or lost.
8. DO NOT use the Drone in rain, wind, snow, fog, etc., or if visual conditions are less than
ideal.
If you need assistance please call Tech Services at 310-222-8682, Ext. 147.

MADE IN CHINA
OPEN
BEG
ADV
Photo/Video
Left/Right rotate trimmer
Low/Medium/High speed switch
Forward/Backward & Left/Right
sideway fly
Left/Right sideway trimmer
Forward/Backward trimmer
Up/Down & Left/
Right rotation
BEG
ADV
USB charger
2G TF Card
Power light
Accelerator trimmer
1. Release the screw
2. Take out the cover
3. Install 6 AA batteries (not included)
according to the correct polarities
6 AA 1.5V Batteries
(not included)
CAUTION:
CONTROLLER BATTERY INSTALLATION
Photo/Video instructions
Card Reader
Lithium battery
Under cover
Camera module
Motor ×4
ALL PARTS INCLUDED:
Power switch
2.4G Antenna
Flip key
Battery cover
Black blade A
Cover
Protection cover
(detachable)
Indication LED
Click this button to snap a photo.
Click and hold 2 seconds to start recording
video. Click again to stop recording. The
remote controller will “Beep” to indicate
photo/video is in session or finish.
Red blade A
Black blade B
Red blade B
Note: The 2 red blades are not identical,
nor are the 2 black blades. Each is marked
A or B on the back. In order for the drone
to take off successfully, all 4 blades must
be installed in the correct position. Please
refer to page 8 for detailed instructions.
1. Do not mix old and new batteries
2. Do not mix different types of batteries
3. Do not charge non-rechargeable batteries
4. If battery contents are leaking, discontinue use
and discard in accordance with local regulations
5. Remove exhausted batteries

WARNING CONCERNING THE USE OF THE BATTERY
CHARGE THE BATTERY
NOTE: Non-compliance with the instructions below could result in fire, electric shock or explo-
sion. Follow all directions exactly.
Unplug the wire and connect the battery with the USB charger, then plug the charger into a
computer USB port or other USB power outlet. Do not remove the battery from the Drone body
and do not leave the Drone unattended while charging. The red LED on the USB charger will
light up when charging is complete (approximately 30 minutes). Remove the charger immedi-
ately. Overcharging can damage the battery and/or cause a fire.
1. Lithium Polymer (LiPo) batteries are extremely powerful and can cause serious injuries to
persons or property. The user accepts liability for the use of the Lithium Polymer battery. As the
manufacturer and the distributor cannot ensure the LiPo battery is used properly (charging,
discharging, storage, etc.), they cannot be held liable for damage caused to persons or
property.
2. In the event of battery leakage, avoid the liquid coming into contact with skin and eyes. In
case of contact with the skin, wash thoroughly with soap and water. In case of contact with the
eyes, rinse thoroughly with cold water and consult a doctor. If you notice a suspicious smell or
noise or observe smoke around the USB charger, disconnect it immediately.
3. The LiPo battery shall only be used together with the included USB charger. Examine the
charger regularly for damage to the cord, plug, enclosure or other parts. Never use a damaged
charger. Never charge a swollen battery, a leaky battery or one which has been damaged. Do
not use the Drone charger to charge any battery other than the provided rechargeable battery.
4. Do not overcharge the LiPo battery. When the LiPo battery is fully charged, disconnect it from
the USB charger immediately. Do not put the LiPo battery back on the USB charger once charg-
ing has complete to avoid the risk of overheating.
5. Do not charge the LiPo battery near flammable materials or on a flammable surface, or near
electrical conducting surface. Do not leave the LiPo battery unattended during charging.
6. Never charge the LiPo battery immediately after use while it is still hot. Let it cool down to
room temperature.
7. The LiPo battery is only to be charged under adult supervision.
8. Do place anything on top of your product or its charger while the LiPo battery is charging.
9. Recharge the LiPo battery at a temperature of between 32°F and 104°F.

PREPARE TO FLY
3. Slowly pull up the accelerator (left throttle stick) to fly the Drone. ALWAYS move the controls
G-E-N-T-L-Y! Be aware that control inputs will reduce available lift. Be ready to use a little extra
throttle to maintain height during maneuvers.
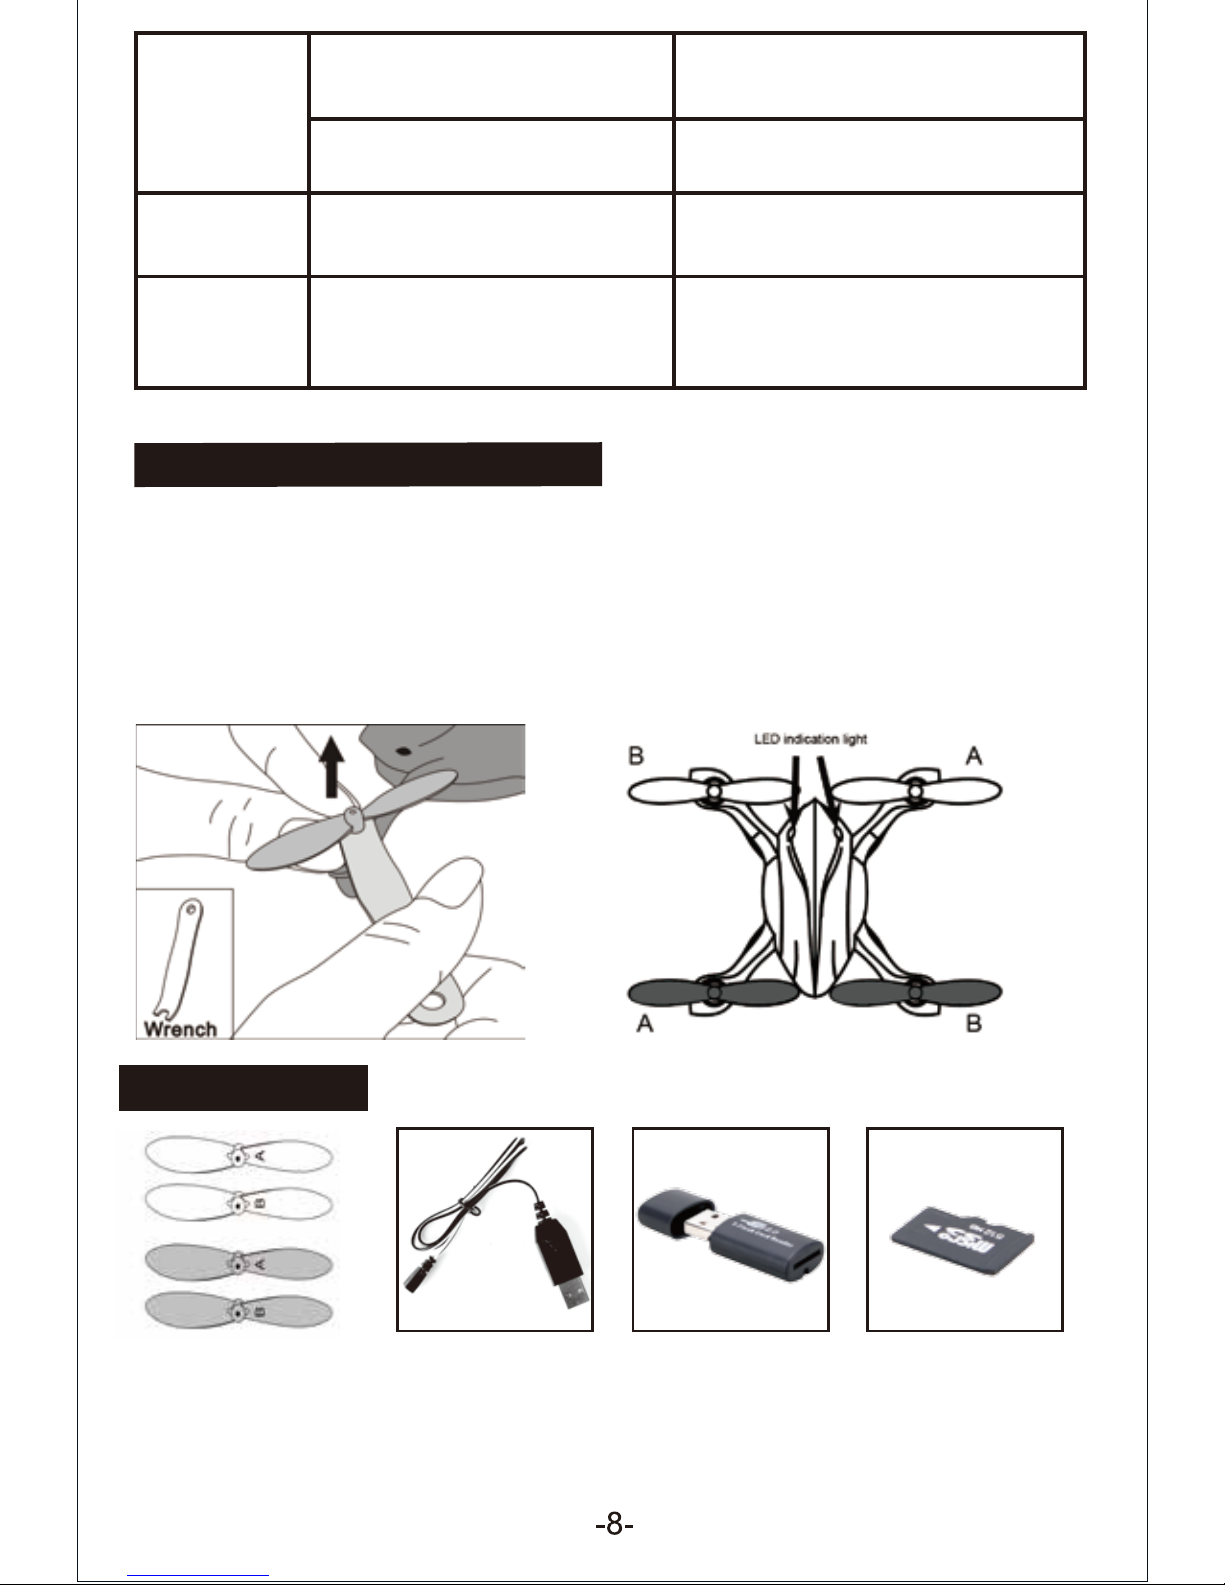
4. Occasionally, the motors may shift in the Drone Housing. Gently press down on the propellers
before each use to ensure the propellers and motors are properly seated
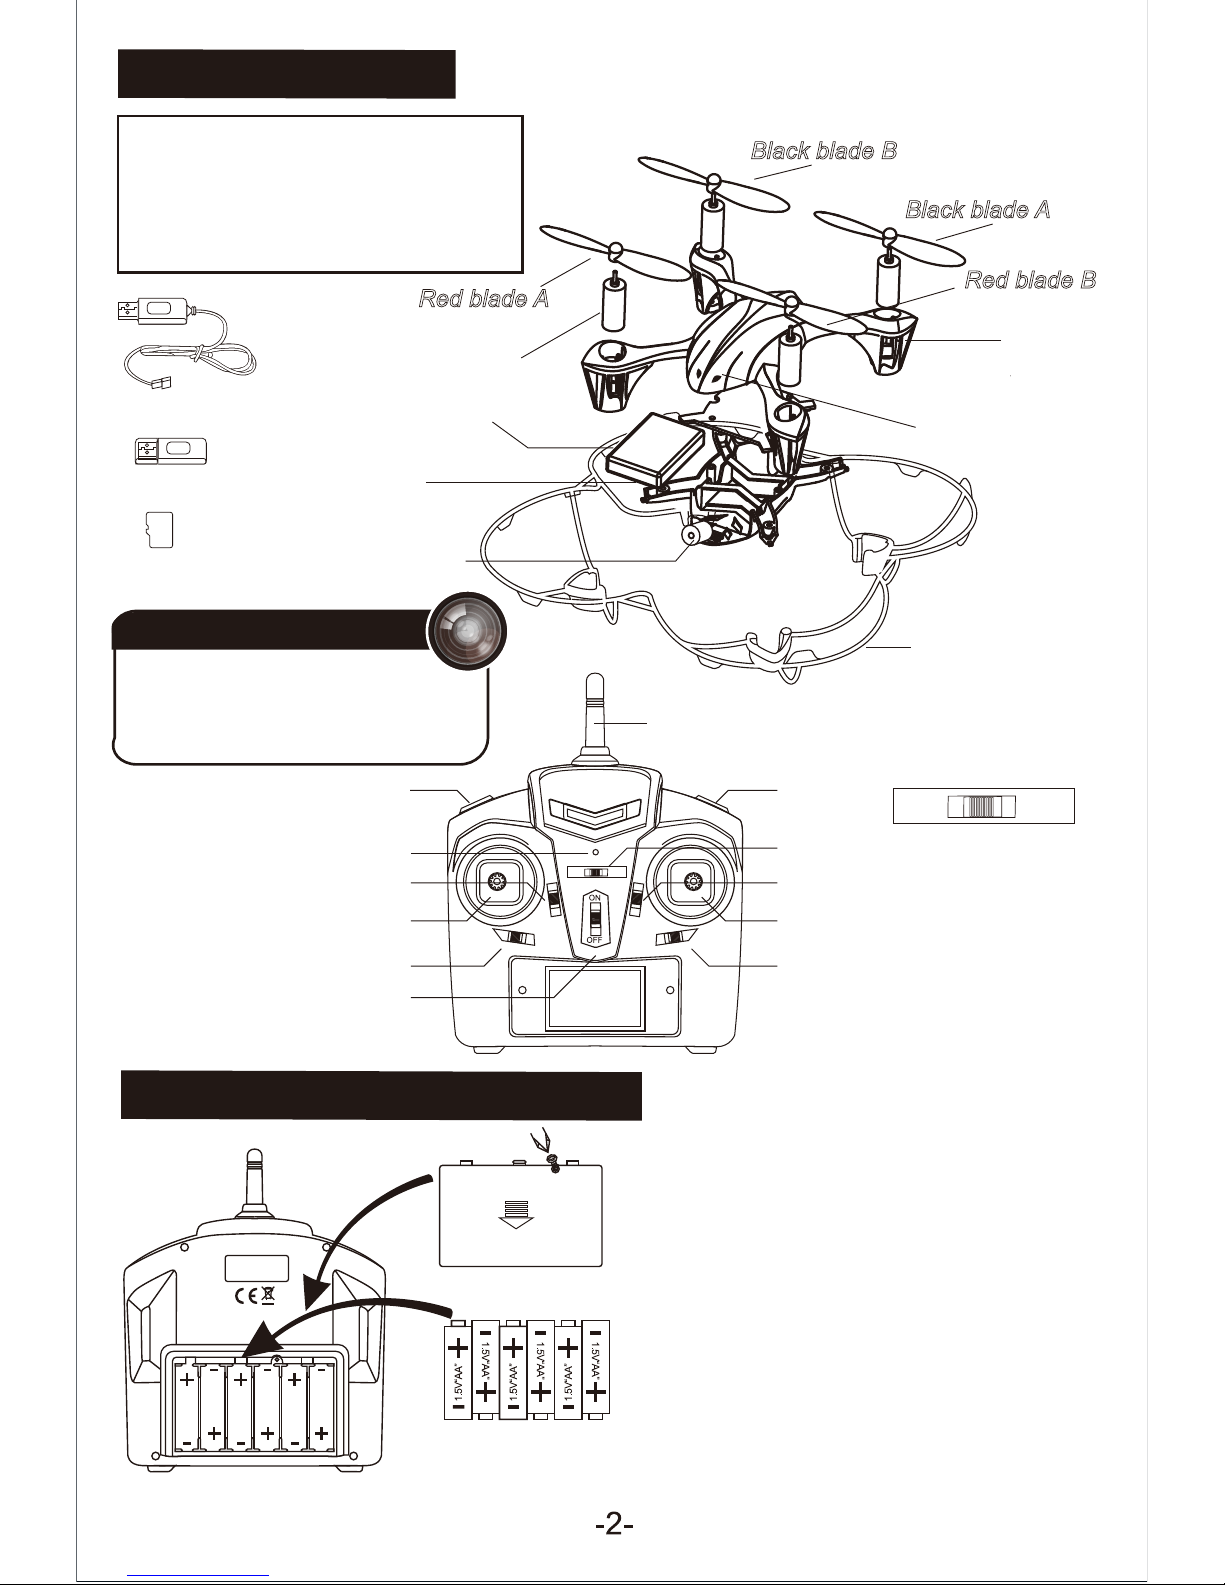
1. Connect the LiPo battery wire and Drone wire as
shown on the left image. Set the Drone on a flat
surface. Do not move the Drone when the indication
LED light on the front of Drone starts blinking.
2. Turn the power button on the controller to the ON
position and aim the controller toward the Drone.
Then pull down on the left throttle stick of controller.
The Drone and controller are linked once the indica-
tion LED light on the front of the front of the Drone
changes to solid light. Allow up to 1 minute for
linking process.
Power on /off procedure:
For power ON, connect the battery to the
Drone first then turn on the controller.
For power OFF, turn off the controller first
then disconnect the battery from the Drone
MEMORY CARD INSTRUCTIONS
Insert the memory card as shown on the left image.
You will hear a “click” when it is in position. Push
again to take it out.
You can view and transfer recorded videos & photos
on your computer via the card reader. Simply insert
the card in the card reader and plug into your
computer’s USB port. You can find them under “My
Computer” / “Removable Disk (X:)” / “VIDEO” and /
“PHOTO” folders respectively.
10. Do not use the LiPo battery if the plastic cover has been torn or compromised in any way. Do
not remove the LiPo battery. Do not expose the LiPo battery to excessive physical shock. Never
use a swollen battery or a leaky battery, or one which is damaged or giving off a unusual odor.
11. Keep the LiPo battery out of the reach of children.
12. Do not expose the LiPo battery to heat, fire, or water. Do not allow the LiPo battery to come
into contact with any kind of liquid. Do not put the LiPo battery in a microwave oven or in a
pressurised container.
13. Do not attempt to dismantle, pierce, distort or cut the LiPo battery and do not attempt to repair
the battery. Do not place any heavy objects on the LiPo battery or USB charger and avoid
dropping the battery.
14. It is essential to avoid short circuits. Avoid direct contact with the electrolyte contained within
the LiPo battery. The electrolyte and electrolysis vapors are harmful.
15. Keep your device at ambient temperature and avoid exposing your device to extreme
temperatures. Do not store your product near a source of heat.
16. Disconnect the USB charger when LiPo battery is not charging.

ON
OFF
BEO ADV
ON
OFF
BEO ADV
ON
OFF
BEO ADV
ON
OFF
BEO ADV
ON
OFF
BEO ADV
ON
OFF
BEO ADV
When the right throttle stick is pushed
to the left, the Drone will fly side way to
the left.
When the right throttle stick is pushed
to the right, the Drone will fly side way
to the right.
Push up the left throttle stick,and the
spinning speed of the main blades will
increase.The Drone begins to ascend.
Pull down the left throttle stick,and the
spinning speed of the main blades will
increase.The Drone begins to descend.
When the right throttle stick is pushed
upward,the Drone swashplate will
downtilt and it advances.
When the right throttle stick is pushed
downward,the Drone will uptilt and it
recedes.
NOTICE Push the throttle level slowly;please press the trimming buttons when
the Drone hovers or leans to different directions in the air.
Forward
Backward
Left
sideward fly
Right
sideward fly
Ascending
Descending
Turn right
Turn left
When in operation, the main and tail rotor blades will be spinning at high speed. The blades
are capable of inflicting serious bodily injury and causing damage to the environment.
Be cautious of your actions and careful to keep your body and loose clothing away.
Push the left throttle stick to the left,
and the Drone will turn to left. Push
the left throttle stick to the right, and
the Drone will turn to the right.
When the Drone spins towards the right, please continu-
ously press the rotate trimming button (left-turn trimming)
until it stops spinning.
When the Drone spins towards the left, please continuously
press the rotate trimming button (right-turn trimming) until it
stops spinning.

6
ON
OFF
BEO ADV
ON
OFF
BEO ADV
ON
OFF
BEO ADV
ON
OFF
BEO ADV
ON
OFF
BEO ADV
ON
OFF
BEO ADV
FLYING ENVIRONMENT
CAREFULLY INSPECT THE SURROUNDING AREA BEFORE REAL FLIGHT
1. Choose a wide open space without obstacles. Do not operate Drone near buildings,
crowds of people, high voltage cables, or trees to ensure the safety of others, yourself and
your Drone.
When the Drone flies sideways
(towards the left) in the process of
hovering, please continuously press
the right sideway trimmer until it
recovers.
When the Drone flies sideways
(towards the right) in the process of
hovering, please continuously press
the left sideway trimmer until it
recovers.
When the Drone flies backward in
the process of hovering, please
continuously press the foward
trimmer until it recovers.
When the Drone flies forward in the
process of hovering, please continu-
ously press the backward trimmer
until it recovers.
If the Drone can’t ascend vertically, you might need to
calibrate the Drone. You should hold the flip button while
pulling both left and right throttle sticks to the right corner.
The LED indication light on the drone will start blinking
rapidly. Release all throttle sticks and flip button after the
LED changes to a solid light, now calibration is completed.
Important notice: The red blade side of the drone is the forward direction. the
black blade side of the drone is the backward direction.
The acceleration trimmer is set at default balance point when
it is made. Please do NOT touch the trimmer unless you found
the following situations occur:
1: When you push the left throttle up to the top but the drone
can’t take off, push the trimmer up untill you hear a long “beep”
sound.
2: When you push the left throttle down to the bottom to stop
the motor but it is still spinning, push the trimmer down untill
you hear a long “beep” sound.

HOW TO FLIP
Flip forward
Flip toward the left
Flip backward
Flip forward the right
PROBLEMS AND SOLUTIONS
PROBLEMS CAUSES SOLUTIONS
Controller
not working
Control
failure
1.The controller switch“OFF”
2.The Drone battery doesn't connect
properly
3. Strong wind force
1.Turn the controller “ON”
2.Reconnect the Drone battery
1.The controller switch is“OFF”
2.Batteries installed improperly
3.Batteries are completely exhausted
1.Turn the controller “ON”
3.Replace with new batteries
2.Reinstall batteries according to the
correct polarities
2. You should ensure that no-one is standing within 1 meter (1 yard) from the Drone
when in operation and that at all times you keep a sufficient distance between the blades
and any person, animal or property.
3. Do not use the Drone in wet conditions nor land it on a wet surface
4. Do not allow sand or dust to penetrate the Drone;
5. Do not use the Drone near strong magnetic fields, radio waves or areas with strong
radiations (this may prevent the camera of the Drone from operating correctly).
Operator might try advanced flying technique such as flipping
once they have mastered the basic skills. First you need to ascend
the drone to the air, about 10ft height above the ground. Press the
flip button on the controller, and then push the right stick in one
direction to the end.
The Drone can flip in four directions as shown in the image below.
3. Do not fly under windy conditions
as strong winds may cause flying
limitation to the Drone or may
hamper your controlling abilities

Blade A Red X 3
Blade A Black X 3
Blade B Red X 3
Blade B Black X 3
ACCESSORIES
HOW TO REPLACE THE BLADES
Out of control
Landing too
Soon
Ascending
failure
Beyond the effective controlling
distance
The left throttle stick is pulled
down too fast
1.The rotation of the main blades
are too slow
2.The Drone battery is exhausted
1.Push the left throttle stick up
2.Recharge the Drone battery
Pull down the left throttle stick slowly
to perform a smooth landing
Make sure there is no controller with
the same frequency in use within
a radius of 30 meters.
USB Charger Card reader 2G TF card
Please use the included wrench to take out the damaged blades as shown in the image
below. Gently push up and remove the blade to prevent damage of the circuit inside the
rotor.(see the image on the left)
Note: In order to successfully take off, you need to choose the correct blade that
matches with the other diagonal side, please follow the below right image to change
blades, note the LED indication light side (camera side) is up.
Technical Support: For assistance setting up or questions call (310)222-8682 ext 147.
Table of contents