Joerns Hoyer Elevate Operator's manual

User Instruction Manual
Hoyer®Elevate
To avoid injury, read user manual prior to use.
Manuel de l’utilisateur
Hoyer®Elevate
Afin d’éviter tout accident, veuillez lire
attentivement la notice avant utilisation.
Manual de Instrucciones
Hoyer®Elevate
Para evitar posibles daños, lea
previamente el manual de usuario.

Hoyer®
Elevate
2
English
Contents
1. Hoyer Elevate Patient Lift...................................................................................... 3
2. Introduction: About Your Lift.................................................................................. 4
3. Assembly and Commissioning Instructions........................................................... 5
4. Sling Guide............................................................................................................ 9
5. Lifting with the Hoyer Elevate................................................................................ 11
6. Safety Precautions ................................................................................................ 12
7. Standard Control Box & Handset.......................................................................... 14
8. Smart Monitor and Handset .................................................................................. 15
9. Operating Instructions ........................................................................................... 19
10. Charging Instructions............................................................................................. 21
11. Digital Weigh Scale ............................................................................................... 22
12. Maintenance Schedule & Daily Check List ........................................................... 25
13. Technical Specifications........................................................................................ 27
14. Warranty................................................................................................................ 30
Hoyer®
Elevate
3
English
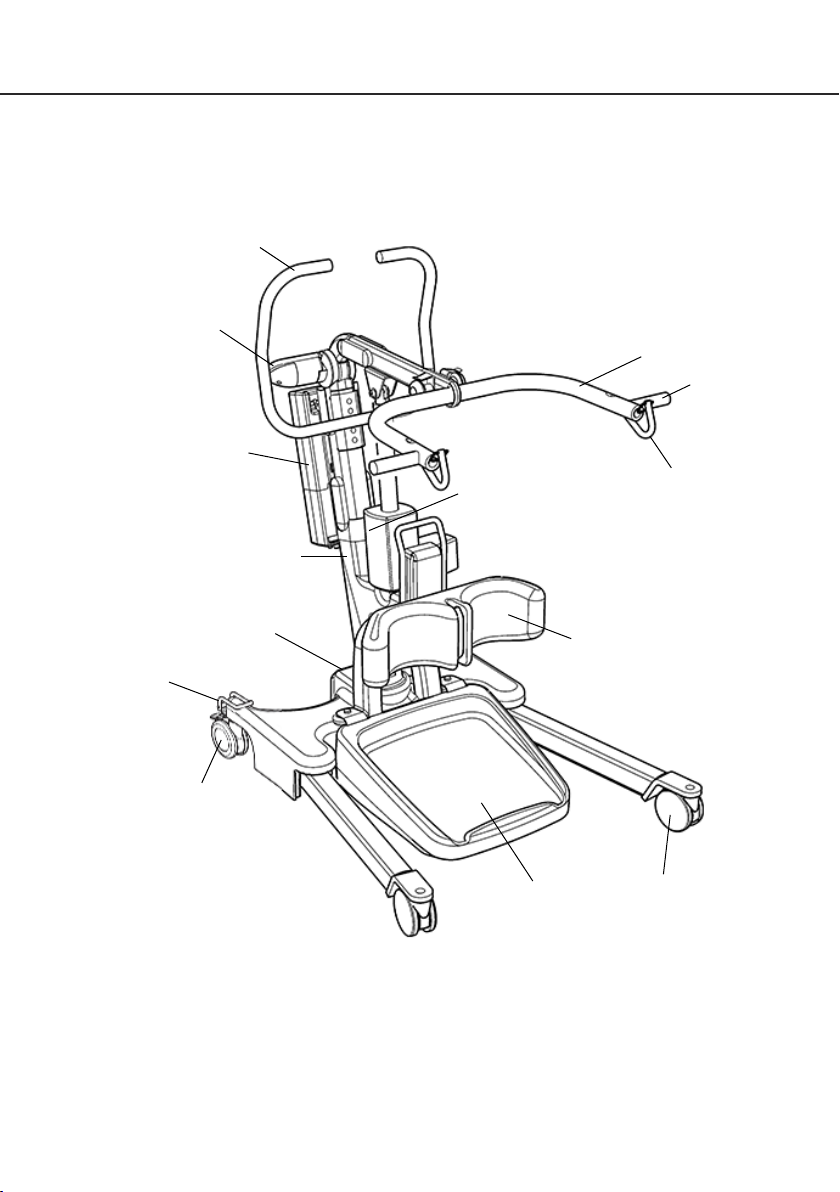
1. The Hoyer Elevate Patient Lift
Removable
Foot Plate
Electric Actuator
Adjustable Knee Pad
Sling Attachment
Points
Spreader Bar
(Cow-horns)
Mast Extrusion
Rear Castor
(braked)
Push
Handle
Battery/
Control Pack
Front Castor
(non-braked)
Digital Weigh
Scale
Handgrips
Straight Line
Steering Device
Foot Push Pad

Hoyer®
Elevate
4
English
2. Introduction: About Your Lift
Each Elevate lift is fully assembled, load tested and certified before being packed/shipped.
The packing consists of a strong, purpose built carton to ensure the safe arrival of the lift. A
number of documents are supplied in a wallet, and packed with each lift and should be kept
safely for future reference:
• TEST CERTIFICATE • USER MANUAL
The TEST CERTIFICATE is an important document and will be required for your insurance
records. It is valid for six months and after it has expired the lift should be inspected and serviced
per the maintenance schedule.
Your authorised dealer can carry out servicing and periodic testing for those countries where this
is a requirement (Europe). Please ensure your lift is included in their maintenance schedule. If
you are at all unsure what your local market servicing requirements are, please check with your
dealer, a local government agency and/or Joerns Healthcare.
Statement of Intended Use
The intended use of this lifting device is for the safe lifting and transfer of an individual from one
resting surface to another (such as a bed to a wheelchair). Joerns Healthcare recommends that
the transfer of a patient is fully risk assessed and conducted safely over a short distance only.
The Hoyer Elevate is suitable for patients in the SITTING position only who have a degree
of weight-bearing ability but require assistance to stand. By removing the foot tray, the Hoyer
Elevate patient lift can also be used as a walking aid following a careful risk assessment.
The Hoyer Elevate is designed to support and promote safe patient handling and transfer for
both the patient and carer. As an option, it incorporates a fully calibrated digital weigh-scale for
patient weight monitoring.
The Hoyer Elevate stand aid is designed to be used in conjunction with the Hoyer range of
slings. The examples of slings suitable for use with this device are listed as follows:
• Hoyer Standing Sling
• Hoyer Transport Sling
Expected Service Life
Hoyer Professional lifts are designed and tested for a minimum service life of ten (10) years,
subject to the use and maintenance procedures stated in this manual. Use, other than in accordance
with these instructions, may compromise service life.
Hoyer®
Elevate
5
English
3. Assembly and Commissioning Instructions
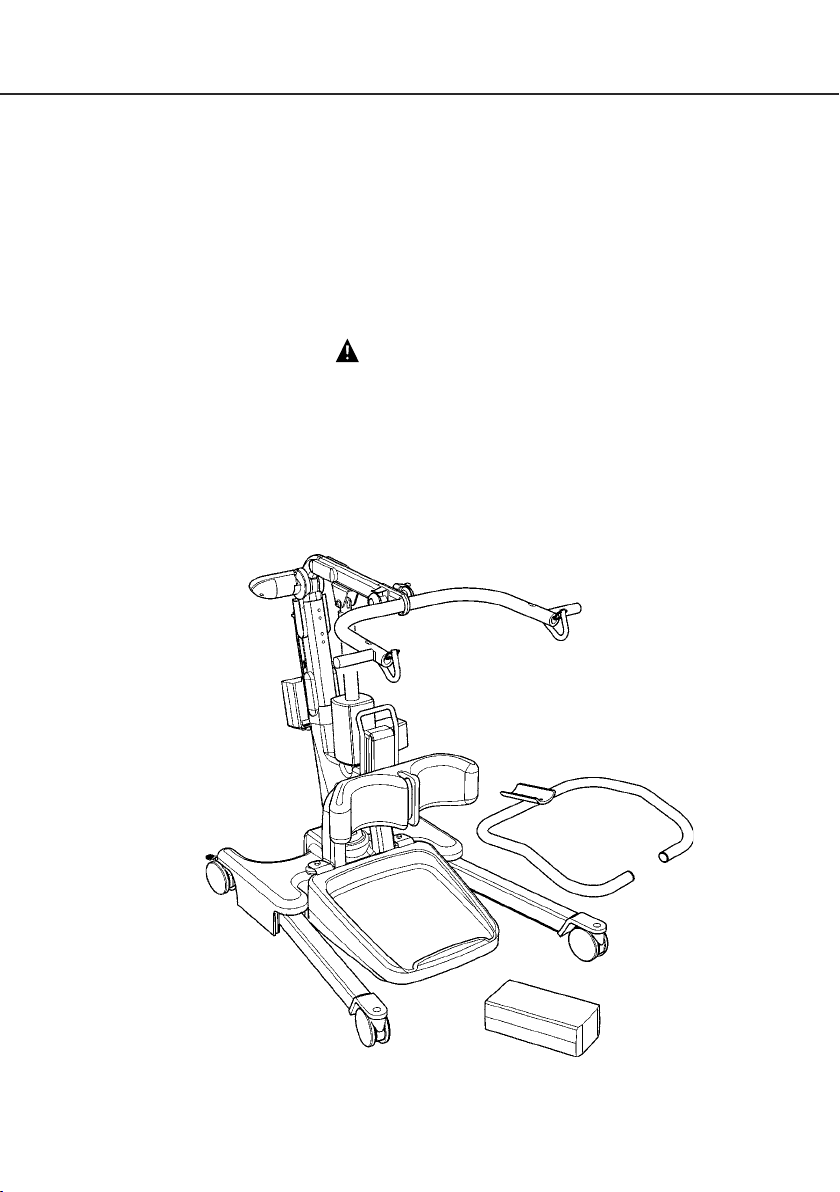
Carton Contents
Place the carton in a clear working area and open carefully. The carton contains:
•HOYER ELEVATE LIFT
•WALLET CONTAINING DOCUMENTS
•HAND CONTROL
•BATTERY PACK
WARNING
The Hoyer Elevate is heavy and will need to be lifted with care. You may need assistance
to lift the Hoyer Elevate from the carton.
Assembly
Remove the Elevate from the carton and place on the floor.
•CHARGING CORD
•DESK TOP CHARGER/STAND
•SPIRIT LEVELLING DEVICE

Hoyer®
Elevate
6
English
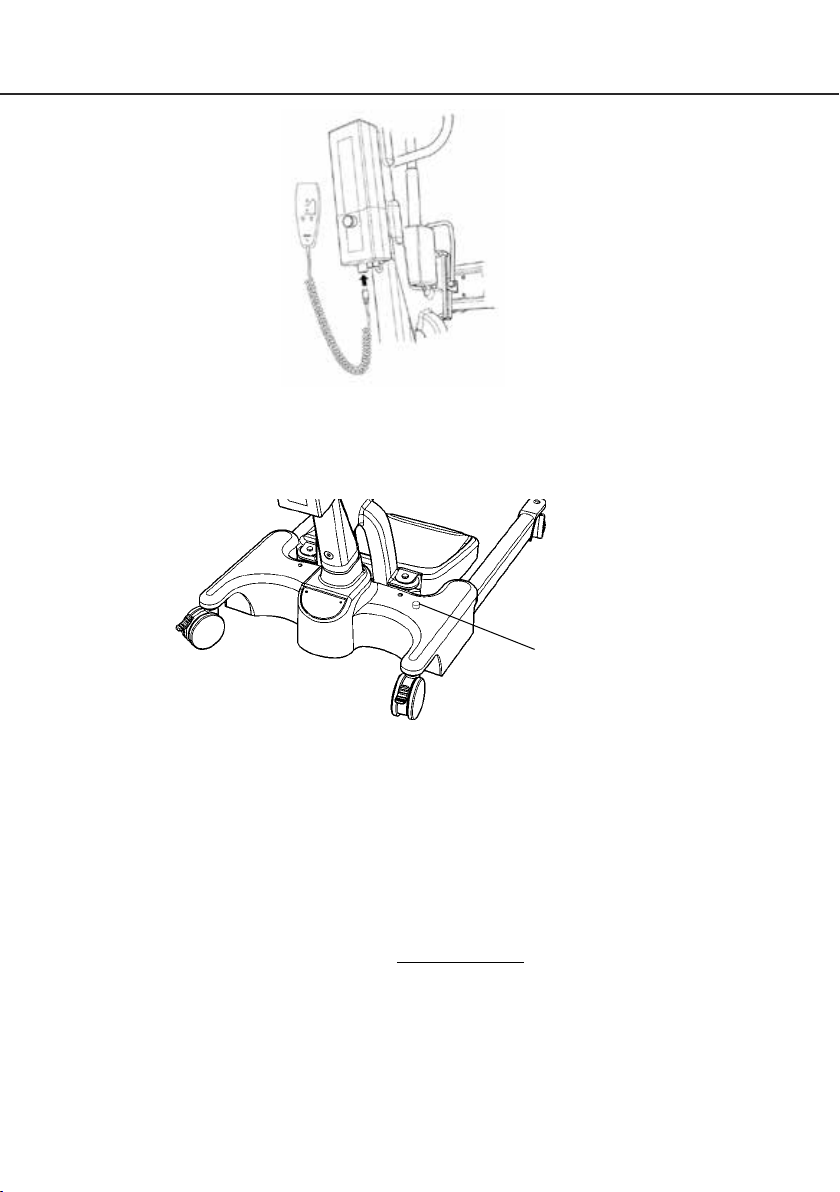
1. Tighten the mast assembly with the mast-locking device, which is located at the front of the chassis.
2. Turn the locking knob until hand tight.
3. Line the handle assembly up to the mast, and attach using the fasteners provided (these can be
found in the mast). The wrench needed to attach the handle is kept in the user instruction
wallet for safe keeping.
CAUTION: Ensure that the handle is secure and in place prior to using lift.
4. Fit power pack to the lift and make sure the latch holding the pack in place is fully engaged.
“Click” in place.
Hoyer®
Elevate
7
English
5. Fit the hand control to the lift as shown. Once complete, check the hand control is
functioning correctly by referring to page 8.
6. A self adhesive spirit levelling device is supplied as a reference tool for use when
maximum weighing accuracy is required. For maximum accuracy when weighing,
centre the spirit level prior to weighing the patient.
Disassembly
The lift should not be disassembled unless for service, repair or transport if necessary.
Therefore follow the assembly instructions in reverse sequence.
Spirit levelling
device

Hoyer®
Elevate
8
English
Always check the following before operation
• The mast is fully locked into position.
• The red emergency stop button, located on the rear of the control box, is in the OFF (out)
position.
• The legs of the lift open and close satisfactorily (This is done via the hand control).
• Push the up and down buttons on the hand control and confirm the boom rises and lowers.
Hoyer®
Elevate
9
English
4. Sling Guide
The Hoyer Elevate is suitable for patients in the SITTING position. The slings suitable for this
device are listed as follows:
• Hoyer Transport sling
• Hoyer Standing sling
User Guide For Standaid Slings
The Transport and Standing sling is an easy fit sling, suitable for standing and supporting. It is
not a general purpose sling and patients must be assessed for suitability by a qualified person.
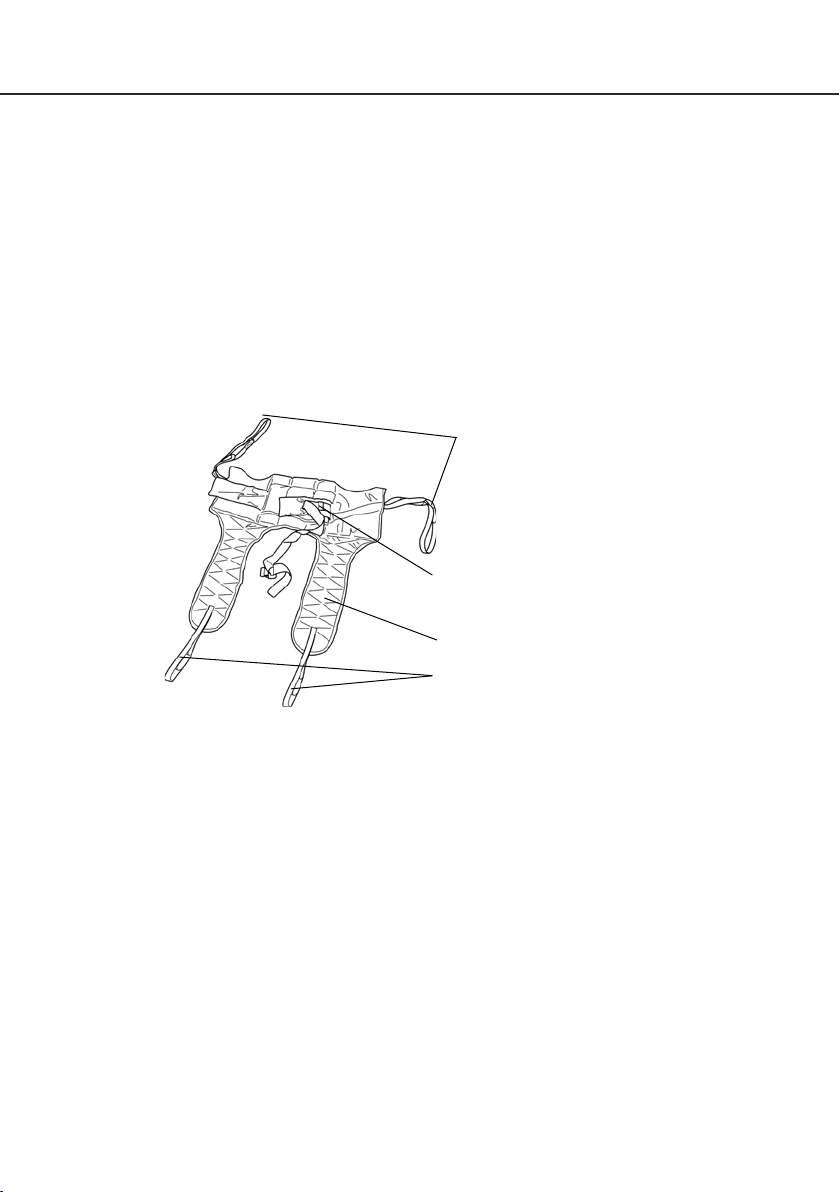
Transport Sling
Feed the sling down the back of the patient leaving the top of the commode aperture at the base of
the spine. Check the roll part of the sling is square across the patient’s back.
Attach the support strap around the chest of the patient. This strap need not be tight. It is there to
hold the sling in position whilst attaching the loops to the Standaid. It may be left off altogether if
preferred. Ensure patient’s arms are on the outside of the sling.
Raise the patient’s leg and feed the leg strap under and up between the legs. Ensure the sling is
not twisted or creased under the thigh. Repeat this procedure for the other leg. Attach the loops
on the roll parts of the sling to the white hooks at the end of the hand grips.
Without crossing the loops on the leg straps, attach to left and right black knobs on the lifting
fork. You would normally use the middle of the three loops. The patient is now ready to be raised
from the seat. Once clear of the seat, the patient will be more comfortable if lowered back in to
the sitting position.
Attachment Loop Straps:
Shoulder
Attachment Loop Straps:
Legs
Chest Supports and Buckle
Leg Supports
Hoyer®
Elevate
10
English
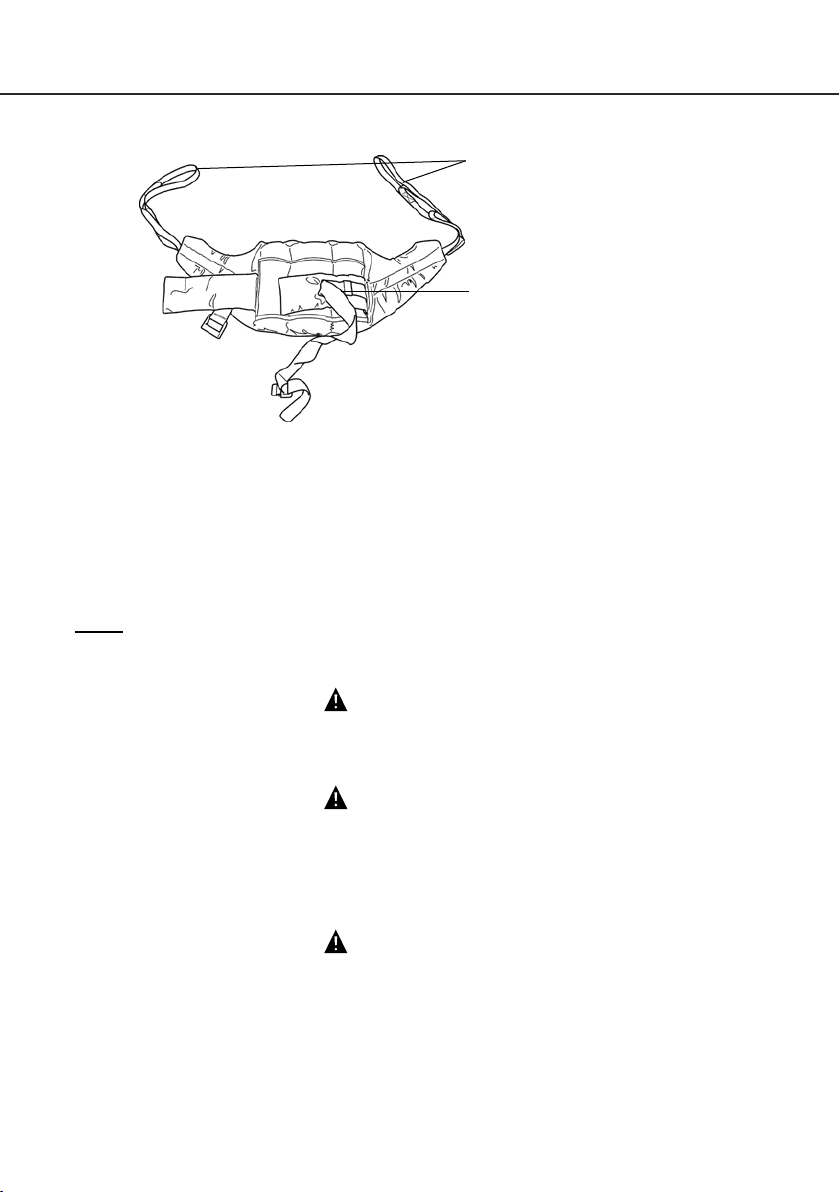
Standing Sling
Place the sling down behind patient’s back between base of shoulder blades and bottom of rib
cage. Attach the support straps around the front of the patient. This strap need not be tight. It is
there to hold the sling in position whilst attaching the sling to the Standaid. It may be left off
altogether if preferred. Ensure that the patient’s arms are outside the sling.
NOTE: For detailed fitting instructions, please refer to the user guide supplied with each
sling.
WARNING
Joerns Healthcare recommends that slings be checked regularly and particularly before
use for signs of fraying or damage. DO NOT use slings that are worn or damaged.
WARNING
HOYER RECOMMENDS THE USE OF GENUINE HOYER PARTS. Hoyer slings and lifters
are not designed to be interchangeable with other manufacturer’s products. Using other
manufacturer’s products on Hoyer products is potentially unsafe and could result in
serious injury to patient and/or caregiver.
WARNING
Refer to maximum weight capacity of lift. Sling capacity is limited by the maximum
capacity of the lift.
Attachment Loop Straps
Chest Support
Table of contents
Other Joerns Mobility Aid manuals


Popular Mobility Aid manuals by other brands


Rhythm Healthcare
Rhythm Healthcare B3800F manual

AMF-BRUNS
AMF-BRUNS PROTEKTOR installation manual

Drive DeVilbiss Healthcare
Drive DeVilbiss Healthcare OTTER Instructions for use

Rhythm Healthcare
Rhythm Healthcare C500U Assembly and Fitting Instructions

Lumex
Lumex RJ4200A manual

Rebotec
Rebotec Jumbo user manual