Johnson HORIZON FITNESS 7.0AE User manual

JOHNSON
Issue Date
Edition
01
Doc No.
Revision Date
Edition
Time
01
Total Page
25
Johnson Industries (Shanghai) Co., Ltd
7.0AE(EP703)
Service Manual
Approval
Review
Editor
Hans Kong

PRODUCT BROWSE

CONTENTS
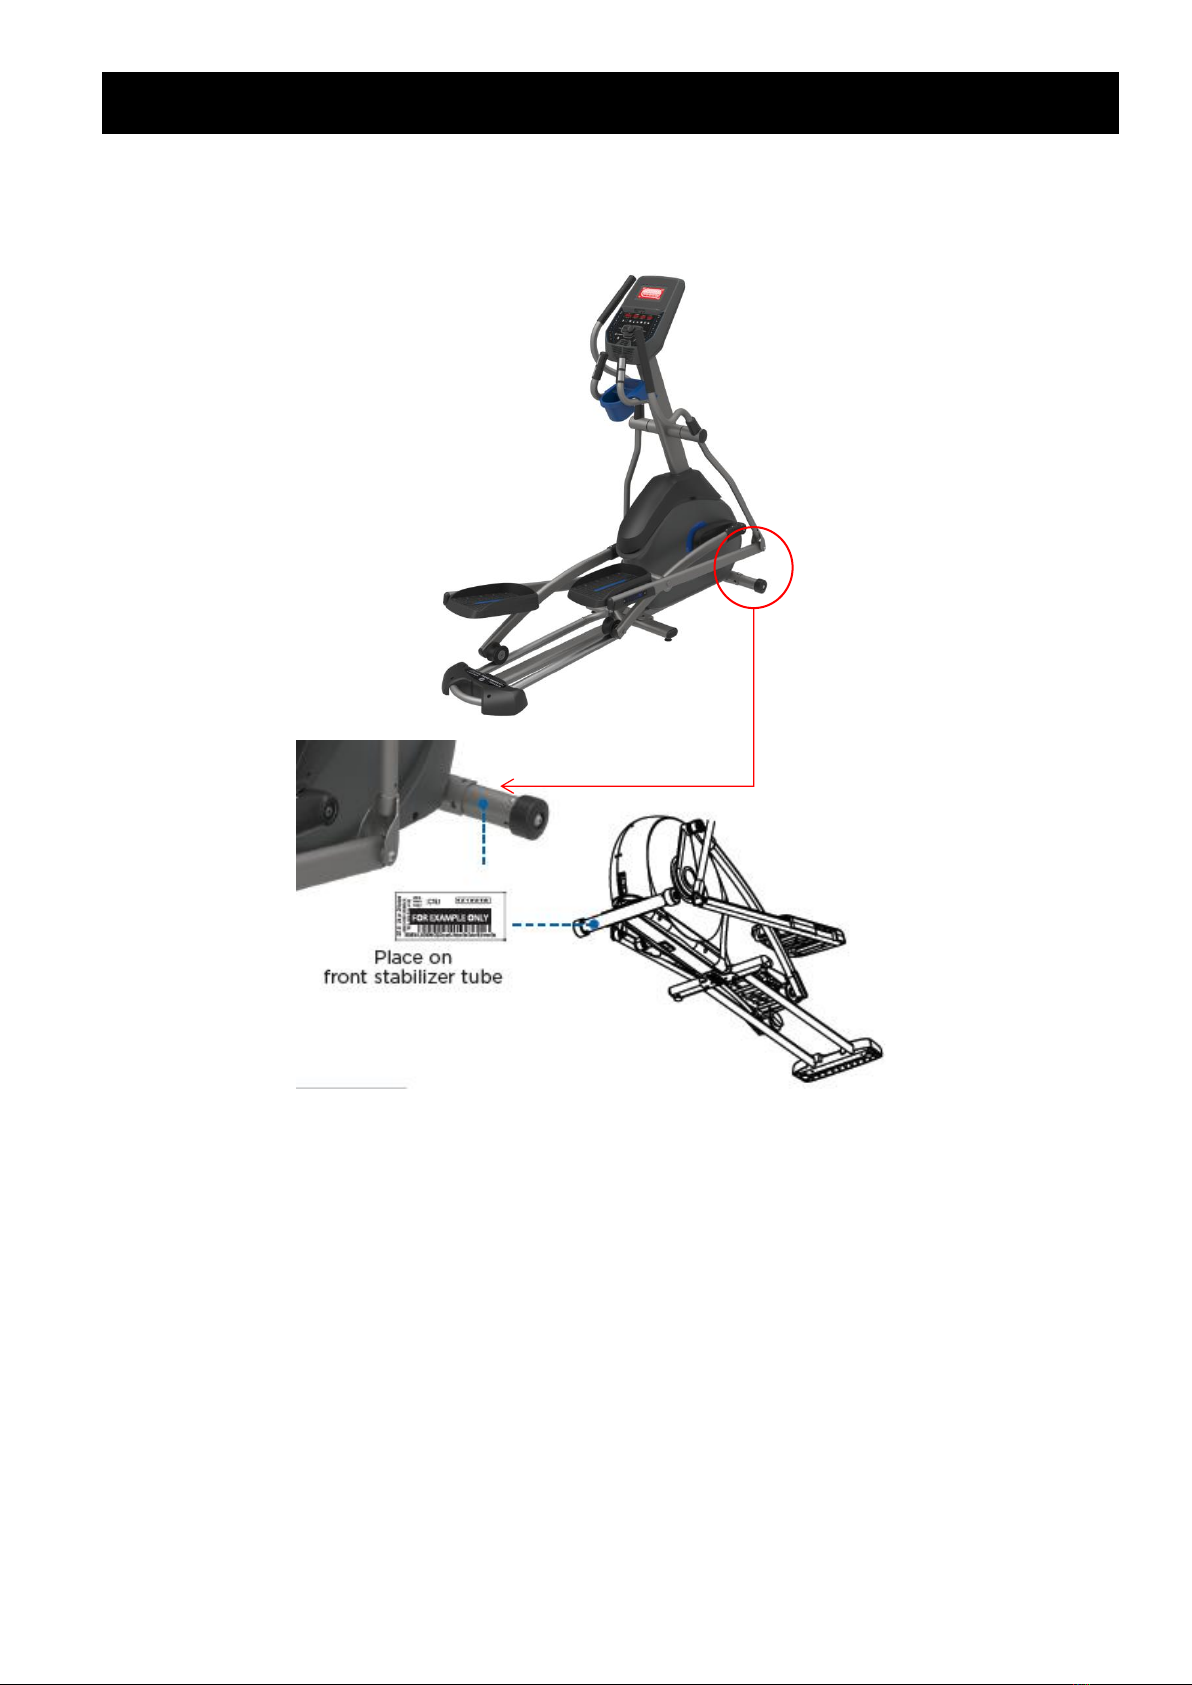
CHAPTER 1: SERIAL NUMBER LOCATION................................................................................... 1
1.1 Serial Number Location........................................................................................................... 1
CHAPTER 2: PREVENTATIVE MAINTENANCE............................................................................. 2
CHAPTER 3: CONSOLE INSTRUCTION.......................................................................................... 3
3.1 Console Operation....................................................................................................................3
3.2 Display Window.........................................................................................................................4
3.3 Getting Started.......................................................................................................................... 4
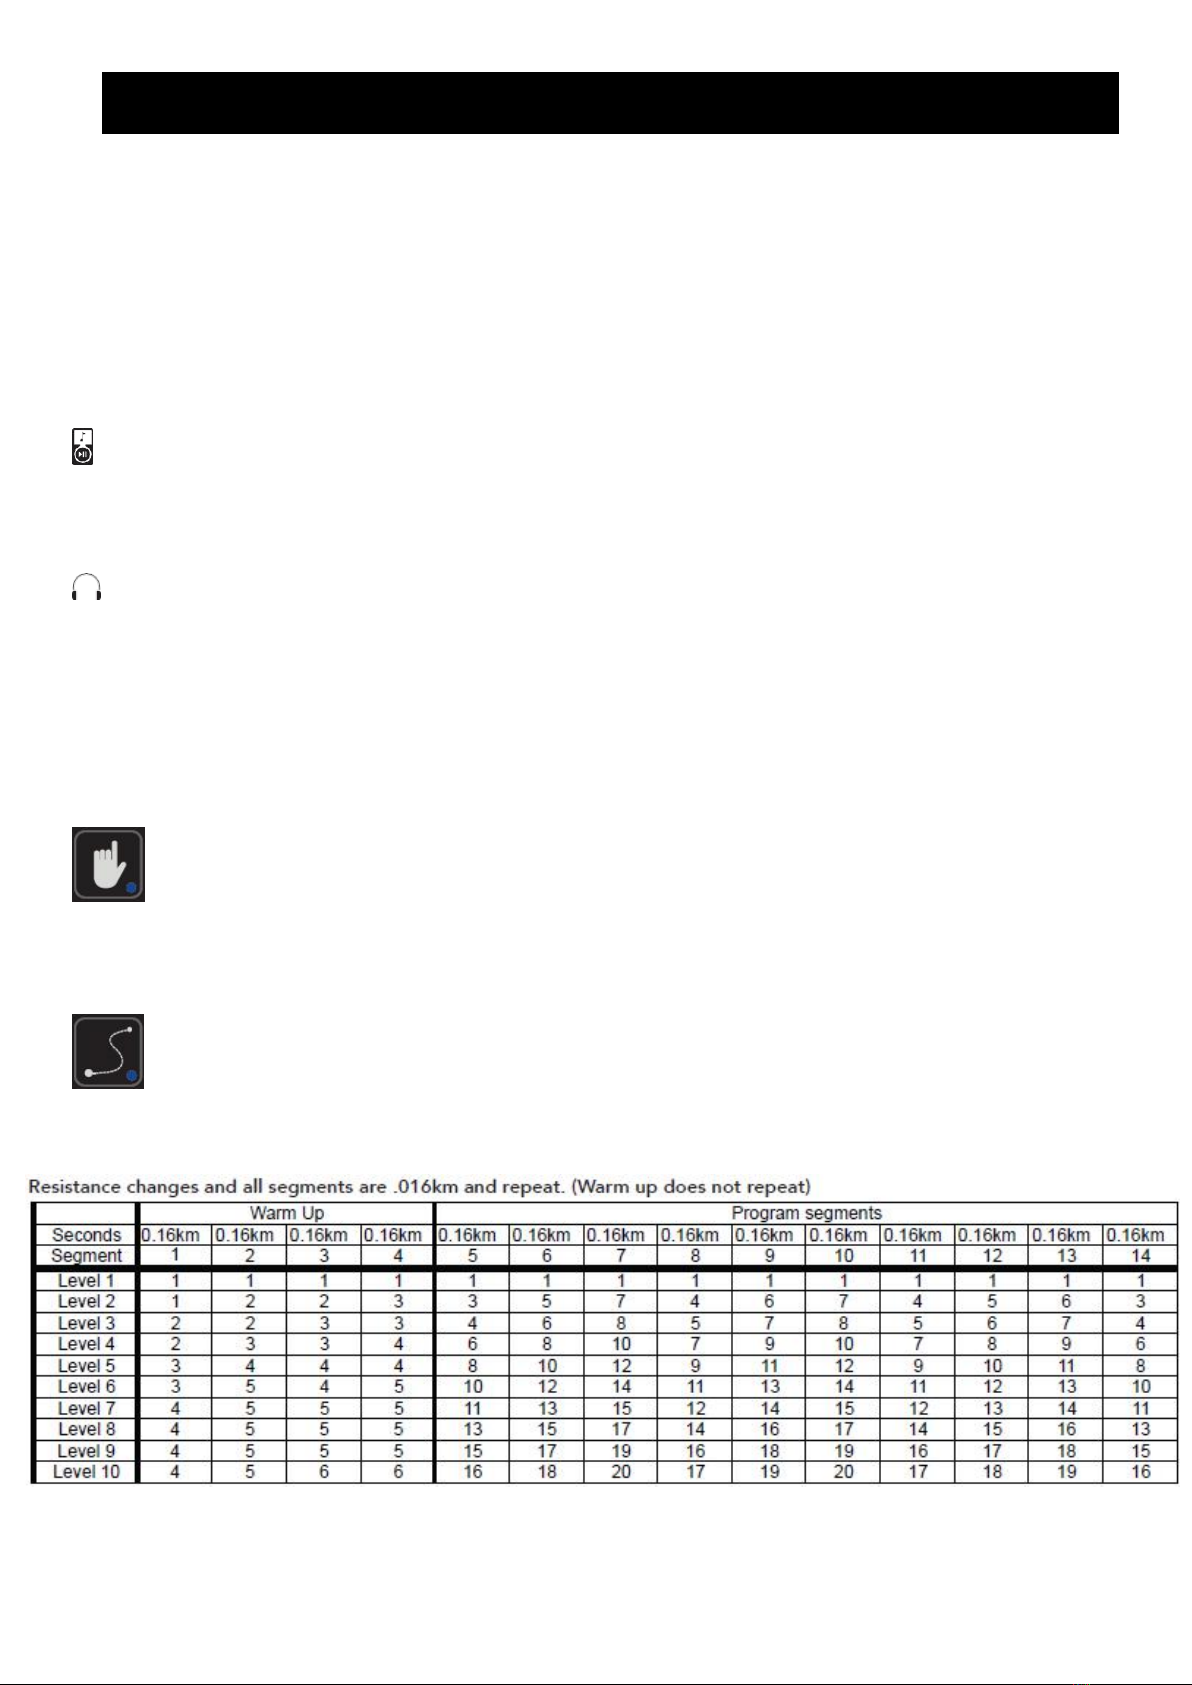
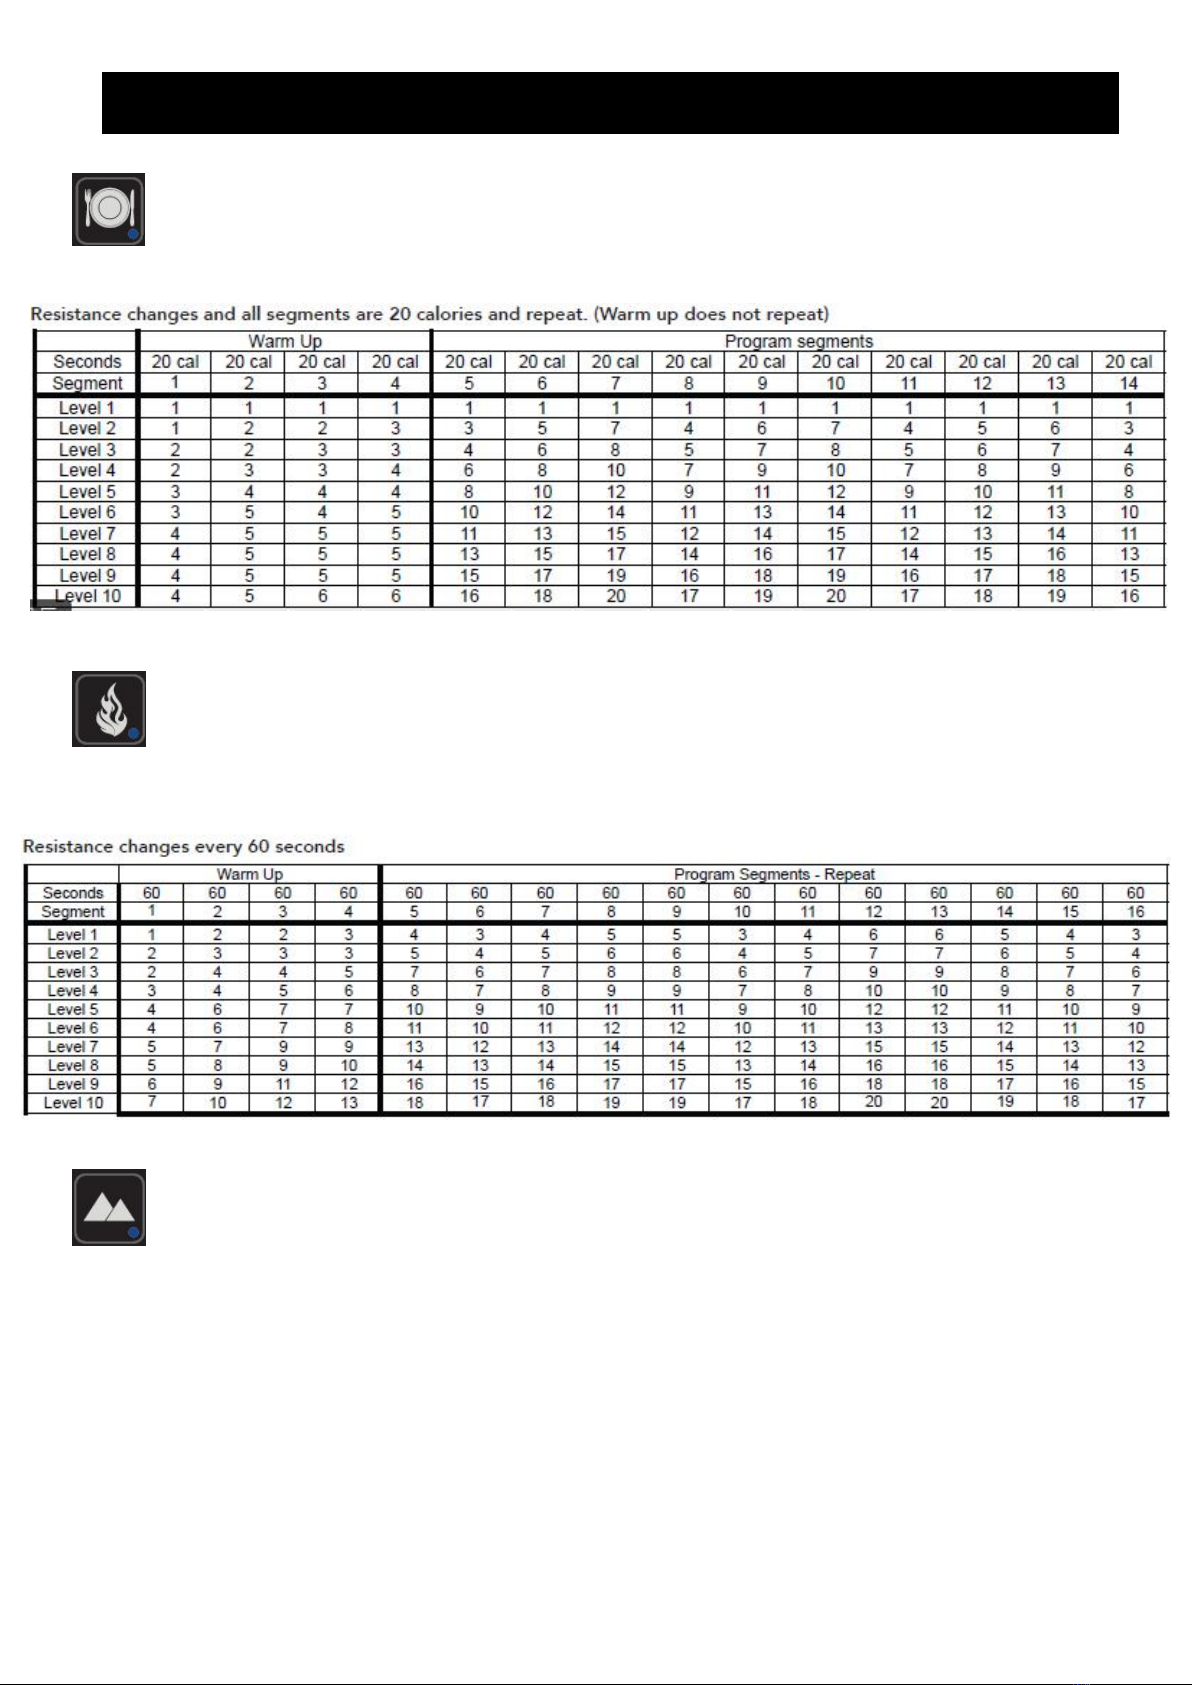
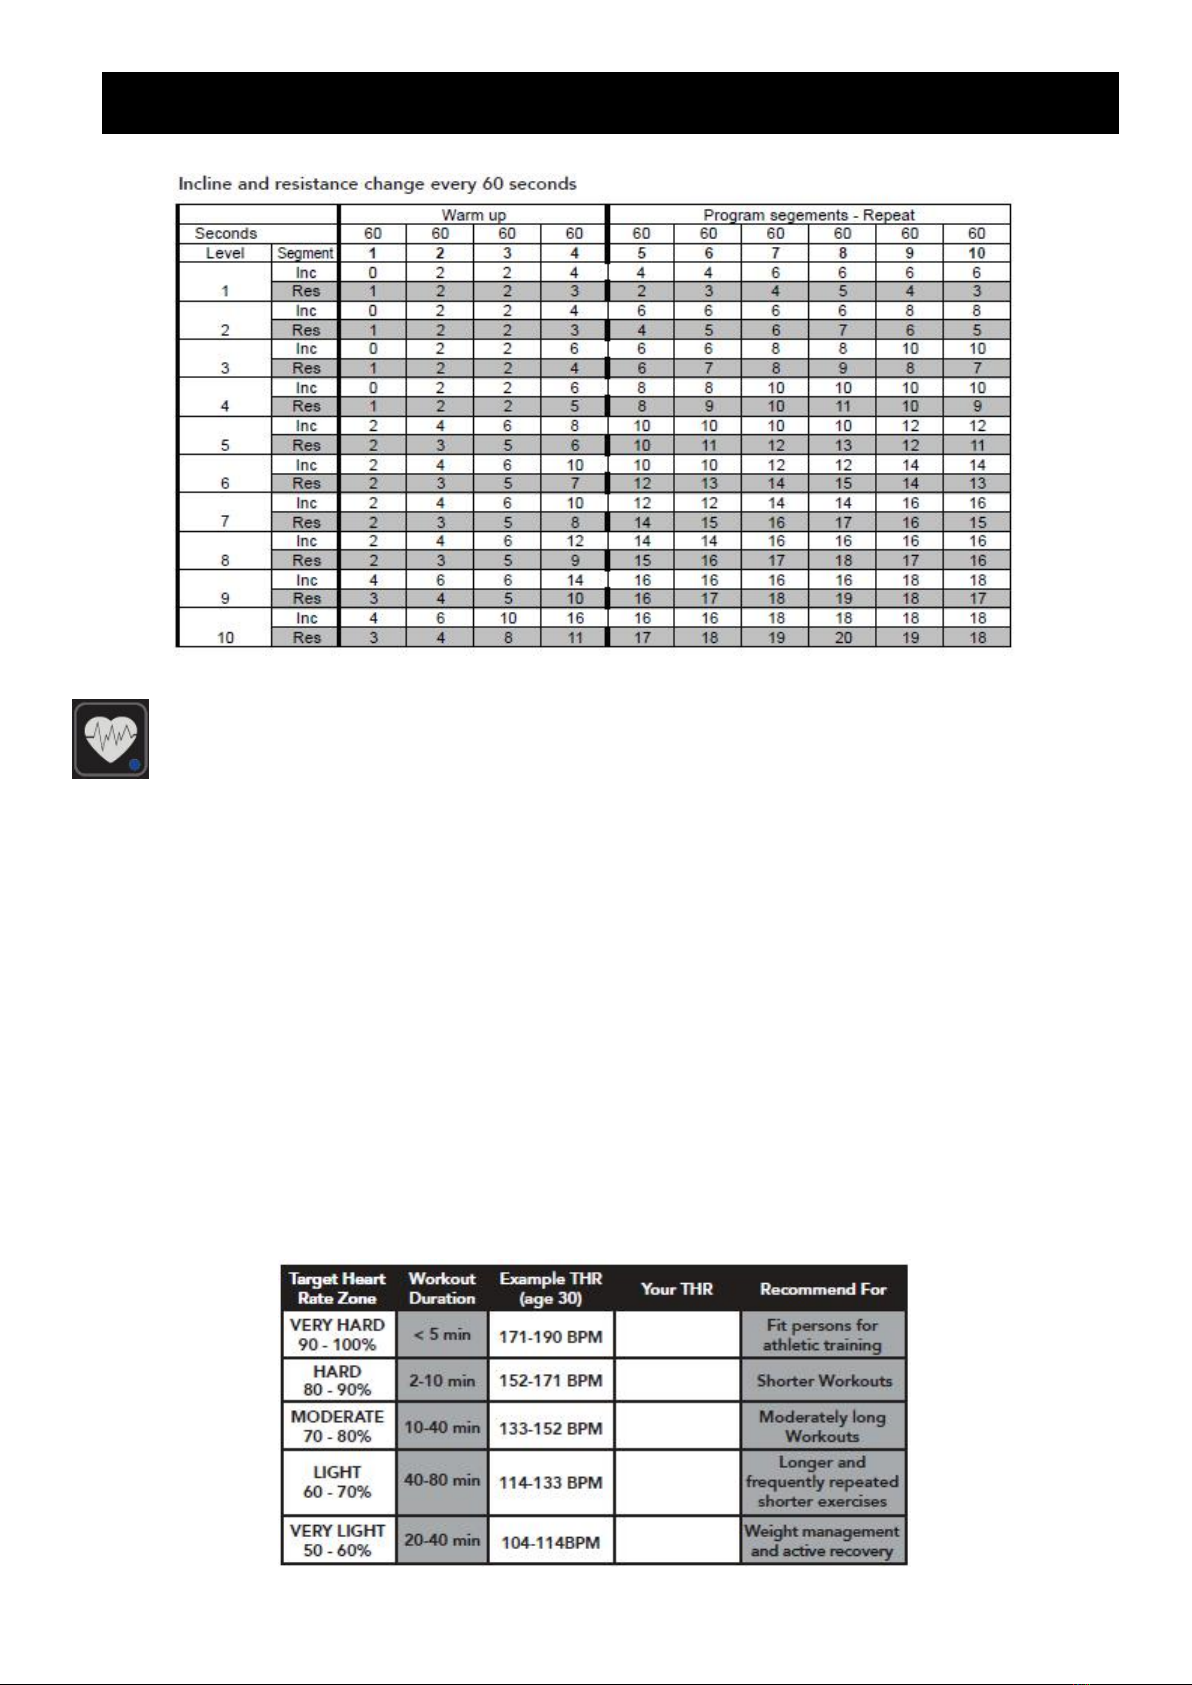
3.4 Program Information.................................................................................................................5
CHAPTER 4: ENGINEERING MODE................................................................................................. 9
4.1 Engineering Mode.....................................................................................................................9
4.2 Engineering Mode Overview.................................................................................................10
CHAPTER 5: TROUBLESHOOTING................................................................................................12
5.1 Wiring Schematic....................................................................................................................12
5.2 No Power To The Console....................................................................................................13
5.3 ECB Controller Instruction.....................................................................................................14
5.4 No RPM Display......................................................................................................................15
5.5 No Resistance Or Incorrect Resistance..............................................................................16
5.6 Heart Rate Function Issues.................................................................................................. 18
CHAPTER 6: PART REPLACEMENT.............................................................................................. 19
6.1 Console Replacement........................................................................................................... 19
6.2 Console Mast Replacement..................................................................................................20
6.3 Arm Set Replacement............................................................................................................21
6.4 Link Arm Replacement.......................................................................................................... 22
6.5 Crank Set Replacement........................................................................................................ 23
6.6 Side Cover Replacement...................................................................................................... 24
6.7 ECB Controller Replacement............................................................................................... 25

1
CHAPTER 1: SERIAL NUMBER LOCATION
1.1 Serial Number Location

2
CHAPTER 2: PREVENTATIVE MAINTENANCE
What Kind Of Routine Maintenance Is Required?
We use sealed bearings throughout our ellipticals so lubrication is not needed. The most important
maintenance step is to simply wipe your perspiration off the trainer after each use.
How Do I Clean My Elliptical?
Clean with soap and water cleaners only. Never use solvents on plastic parts.
Cleanliness of your elliptical and its operating environment will keep maintenance problems and service
calls to a minimum. For this reason, Horizon Fitness recommends that the following preventive maintenance
schedule be followed.
After Each Use (Daily)
Turn off the elliptical by unplugging the power cord from the wall outlet
• Wipe down the elliptical with a damp cloth. Never use solvents, as they can cause damage to the
elliptical.
• Inspect the power cord. If the power cord is damaged, contact Horizon Fitness.
• Make sure the power cord is not underneath the elliptical or in any other area where it can become
pinched or cut.
Weekly
Clean underneath the elliptical, following these steps:
• Turn off the elliptical
• Move the elliptical to a remote location.
• Wipe or vacuum any dust particles or other objects that may have accumulated underneath the
elliptical.
• Return the elliptical to its previous position.
Every Month
• Inspect all assembly bolts and pedals on the machine for proper tightness.
• Clean any debris off of the pedal arm wheels and guide rails.
Warning
To remove power from the elliptical, the power cord must be disconnected from the wall outlet.

3
CHAPTER 3: CONSOLE INSTRUCTION
3.1 Console Operation
Note: There is a thin protective sheet of clear plastic on the overlay of the console that should be removed before use.
A) LCD DISPLAY WINDOWS: Incline, Speed, RPM, Watts, Calories, Time, Distance, Heart Rate, Fan.
B) LED DISPLAY: Time, Resistance, Distance, Calories, Count Down, Incline, Pace, Heart Rate.
C) WORKOUT LED INDICATORS: indicate what workout is set for the current program.
D) SELECT TARGET/WORKOUT KNOB: rotate/press to select your desired workout/target
E) START: press to begin exercising, start your workout, or resume exercising after pause.
F) INCLINE +/- KEYS: used to adjust incline in small increments.
G) RESISTANCE +/- KEYS: used to adjust resistance in small increments.
H) INCLINE QUICK KEYS: used to reach desired incline more quickly.
I) RESISTANCE QUICK KEYS: used to reach desired resistance more quickly.
J) FAN KEY: press to turn fan on and off.
K) FAN: personal workout fan.
L) SPEAKERS: music plays through speakers when your CD / MP3 player is connected to the console.
M) AUDIO IN JACK: plug your CD / MP3 player into the console using the included audio adaptor cable.
N) AUDIO OUT / HEADPHONE JACK: plug your headphones into this jack to listen to your music through the
headphones. Note: when headphones are plugged into the headphone jack the sound will no longer come out
through the speakers. Make sure to unplug input jacks when using Bluetooth.
O) USB INPUT: 1A/5V USB output power.
P) TABLET/READING RACK: holds tablet or reading material.
Q) BLUETOOTH INDICATOR LIGHT: display when machine is paired with a Bluetooth compatible device.
R) INCLINE +/- KEYS: used to adjust incline in small increments (0.5% increments).
S) RESISTANCE +/- KEYS: used to adjust resistance in small increments (0.5% increments).

4
CHAPTER 3:CONSOLE INSTRUCTION
3.2 Display Window
• TIME: Shown as minutes: seconds. View the time remaining or the time elapsed in your workout.
• DISTANCE: Shown as miles. Indicates distance traveled.
• SPEED: Shown as MPH. Indicates how fast the foot pads are moving.
• INCLINE: Indicates the incline level of the power ramp.
• CALORIES: Total calories burned.
• HEART RATE: Shown as BPM (beats per minute). Used to monitor your heart rate (displayed when contact is
made with both pulse grips).
• RESISTANCE: Shows the current level of resistance.
• PACE: Indicates how many minutes it takes to complete a mile while at your current speed.
• RPM: Rotations Per Minute.
• WATTS: Displays current user power output
3.3 Getting Started
1) Check to make sure no objects are nearby that will hinder the movement of the elliptical.
2) Plug in the power cord and turn the elliptical ON. (Switch is located at the bottom-front of the elliptical.) NOTE: Some
Ellipticals may not have a power switch and will turn on when power is supplied.
A) QUICK START UP
Simply press the START key to begin working out. The time will count up from 0:00, the resistance level will default to level
1. OR...
B) SELECT A TARGET AND WORKOUT
1) Select a TARGET using the SELECT TARGET key.
2) Adjust the TARGET settings using the ARROW keys.
3) Press ENTER to advance.
4) Select a WORKOUT using the SELECT WORKOUT key.
5) Press START to begin workout.
NOTE: If no TARGET nor WORKOUT is selected, the program will function as a MANUAL program. All changes in resistance level
will need to be from the user in this setting.

5
CHAPTER 3:CONSOLE INSTRUCTION
TO RESET THE CONSOLE: Hold STOP key for 3 seconds.
FINISHING YOUR WORKOUT: When your workout is complete, the monitor display will flash “FINISHED” and beep. Your workout
information will stay displayed on the console for 30 seconds and then reset.
CLEAR CURRENT SELECTION: To clear the current program selection or screen, hold the STOP button for 3 seconds.
USING YOUR CD / MP3 PLAYER / BLUETOOTH SPEAKERS:
1) Connect the included AUDIO ADAPTOR CABLE to the AUDIO IN JACK on the top right of the console and the headphone
jack on your CD / MP3 player.
2) Use your CD / MP3 player buttons to adjust song settings.
3) Remove the AUDIO ADAPTOR CABLE when not in use.
4) If you don’t want to use the SPEAKERS, you can plug your headphones into the AUDIO OUT JACK at the bottom of the
console.
5) To connect to the Bluetooth speakers open your Bluetooth settings, turn on Bluetooth, scan for new devices, look for Horizon
7.0AE and select connect.
3.4 Program Information
1) Manual: Control everything about your workout – from start to finish. This program is a
basic workout with no pre-defined settings,allowing you to manually adjust the machine at any time.
It begins with a resistance at 1.
2) Distance: Push yourself and go further during your workout with 13 distance workouts.
Choose from 1 mile, 2 miles, 5k, 5 miles, 10k, 8 miles, 15k, 10 miles, 20k, half marathon, 15 miles,
20 miles, and marathon goals. You set your level.

6
CHAPTER 3:CONSOLE INSTRUCTION
3) Calories: Set goals for burning calories from 20 to 980 calories in 20 calorie increments.
You set your level to keep you in your fat burning zone.
4) Fat Burn: Relatively slow and steady is the name of the game to maximize your
weight-loss goals. Promote weight loss by increasing and decreasing the resistance, while keeping
you in your fat burning zone. Resistance changes, segments repeat every 60 seconds.
5) Hill Climb: Simulates a hill ascent and descent. This program helps tone muscle and
improve cardiovascular ability. Incline and resistance change and segments repeat every 60
seconds.

7
CHAPTER 3:CONSOLE INSTRUCTION
6) Target Heart Rate: This program is designed for you to improve your overall
cardiovascular fitness levels. You simply set your target heart rate. The program will then monitor
and adjust the intensity level to maintain your heart rate within your targeted range while you
exercise –a proven method to maximize your weight loss and fitness goals. A chest strap is
required and must be worn during the duration of this program. See below for calculating your
target heart rate:
Calculating Your Target Heart Rate
The first step in knowing the right intensity for your training is to find out your maximum heart rate (max
HR = 220 –your age). The age-based method provides an average statistical prediction of your max HR
and is a good method for the majority of people, especially those new to heart rate training.
The most precise and accurate way of determining your individual max HR is to have it clinically tested by a
cardiologist or exercise physiologist through the use of a maximal stress test. If you are over the age of 40,
overweight, have been sedentary for several years, or have a history of heart disease in your family, clinical
testing is recommended.
This chart gives examples of the heart rate range for a 30 year old exercising at 5 different heart rate zones.
For example, a 30-year-old’
s max HR is 220 –30 = 190 bpm and 90% max HR is 190 ×0.9 = 171 bpm.

8
CHAPTER 3:CONSOLE INSTRUCTION
7) My First 5K: This 9-week program is intended for inexperienced runners looking to run
their first 5k or simply begin an exercise routine. It is designed specifically to keep you motivated
and engaged, gradually building your strength, increasing your stamina and giving you the
confidence it takes to complete your first 5k.
8) Custom: Allows you to create and reuse your perfect workout with a combination of a
specific resistance, incline and time or distance. The ultimate in personal programming. This is a
time or distance based goal program.

9
CHAPTER 4:ENGINEERING MODE
4.1 Engineering Mode

10
CHAPTER 4:ENGINEERING MODE
4.2 Engineering Mode Overview

11
CHAPTER 4:ENGINEERING MODE

12
CHAPTER 5:TROUBLESHOOTING
5.1 Wiring Schematic

13
CHAPTER 5:TROUBLESHOOTING
5.2 No Power To The Console
Symptom:
Console does not light up.
Reason:
1. Adaptor not correct or defective.
2. Console cable defective.
3. Console defective.
Solution:
1. The adaptor for this model is 12V -1A.Make sure to use the correct specification of an adaptor, and
replace the adaptor if it is defective.
2. A) First, try to re-connect the wires.
B) Test pin (1&2) of connector to see if voltage of console cable is 12V-1A(Fig A). If it is not, check if the
DC cable and ECB are connected well. If it’s needed, replace cables.
C) Check the wires in thr console to make sure they are all connected well.
Fig. A
(Console cable’s connectors with PCB)
If output is DC 12V, the console PCB defective. Replace the console set.

14
CHAPTER 5:TROUBLESHOOTING
5.3 ECB Controller Instruction
1. Attach the steel cable here
2. Slip the orange block to adjust the resistance (left side is minimum and right side is MAX)

15
CHAPTER 5:TROUBLESHOOTING
5.4 No Rpm Display
Symptom:
No RPM shown on the console.
Reason:
1. Bad connection between the console cable and the console
2. Speed sensor wire defective
3. Magnet on the pulley is missing
4. Console defective
Solution:
1. Re-connect the console wire.
2. Check the gap between the speed sensor and magnet on pulley. It is normal within 5mm (Fig.
A).Adjust the gap if it is too large.
3. Re-install a new magnet (Fig. B).
4. Replace the console set.
Fig. A Fig. B

16
CHAPTER 5:TROUBLESHOOTING
5.5 No Resistance Or Incorrect Resistance
Symptom:
1. The resistance is not adjustable during exercise.
2. The resistance is reverse or much too heavy.
Reason:
1. Speed sensor wire is defective.
2. Console cable or ECB motor is defective.
3. Steel rope of magnet system not correct.
4. Inside magnet defective.
Solution:
1. Turn on the console, and check the ECB motor.
In resistance level 1, the head of steel rope directs to top right side (around 45 degree).
If the head of steel rope directs to bottom left side, the resistance will be reversed, adjust the head
of steel rope to the correct position.
2. Press key “+” to adjust the resistance.
A) If ECB motor cannot move, the resistance will not be changed. The ECB motor or console cable is
defective. Check the console cable inserted in ECB motor. Re-connect the console cable first, if doesn’t
work, then change a new one. If nothing works, replace the ECB motor.

17
CHAPTER 5:TROUBLESHOOTING
5.5 No Resistance Or Incorrect Resistance
B) If the ECB motor can move, the resistance can be adjusted. If the resistance is still much too
heavy, check the gap between orange block and the bottom. It shall be within 1-2 mm.
If the gap is bigger than 1-2 mm, the resistance will be heavier than normal. Adjust the cable to the correct
gap range.
3. If all above conditions are OK, and the resistance is still much too heavy, the inside
magnet is defective. Replace the ECB Controller as the last step.
This manual suits for next models
1
Table of contents
Other Johnson Elliptical Trainer manuals