JOYCE WELL 3190IB User manual

JOYCE ČR, s.r.o., Venhudova 6, 614 00 Brno, ČR, IČ: 25317571, DIČ: CZ25317571, Tel.: +420 539 088 010
Fax: +420 539 088 000, E-mail:
j
o
y
ce
@j
o
y
ce.cz, Web: www.
j
o
y
ce.cz, www.
j
o
y
ce-ener
g
ie.cz
WELL 3190IB
VoIP telefon, SIP a IAX2, 2xEth.,
NAT, DHCP server, Firewall
Uživatelská příručka

nterprise-class IP phones. You have made an excellent
dard and Interconnection with the majority of SIP interoperability of hardware and
he content of this manual would change without prior notice.
HTTP://www.joyce.cz/
About This Guide
Thank you for your purchase of WELL products ---- 3190IB e
choice, we hope you enjoy all the features of the product.
3190IB is a highly innovative enterprise IP telephone, to provide you plenty of features and beautiful sound quality. 3190IB
fully comply with SIP protocol stan
software equipment of the market.
T

CONTENT
ABOUTTHISGUIDE......................................................................................................................................................2
PARTONEBEFOREUSING3190IBVOIPPHONE.............................................................................................................5
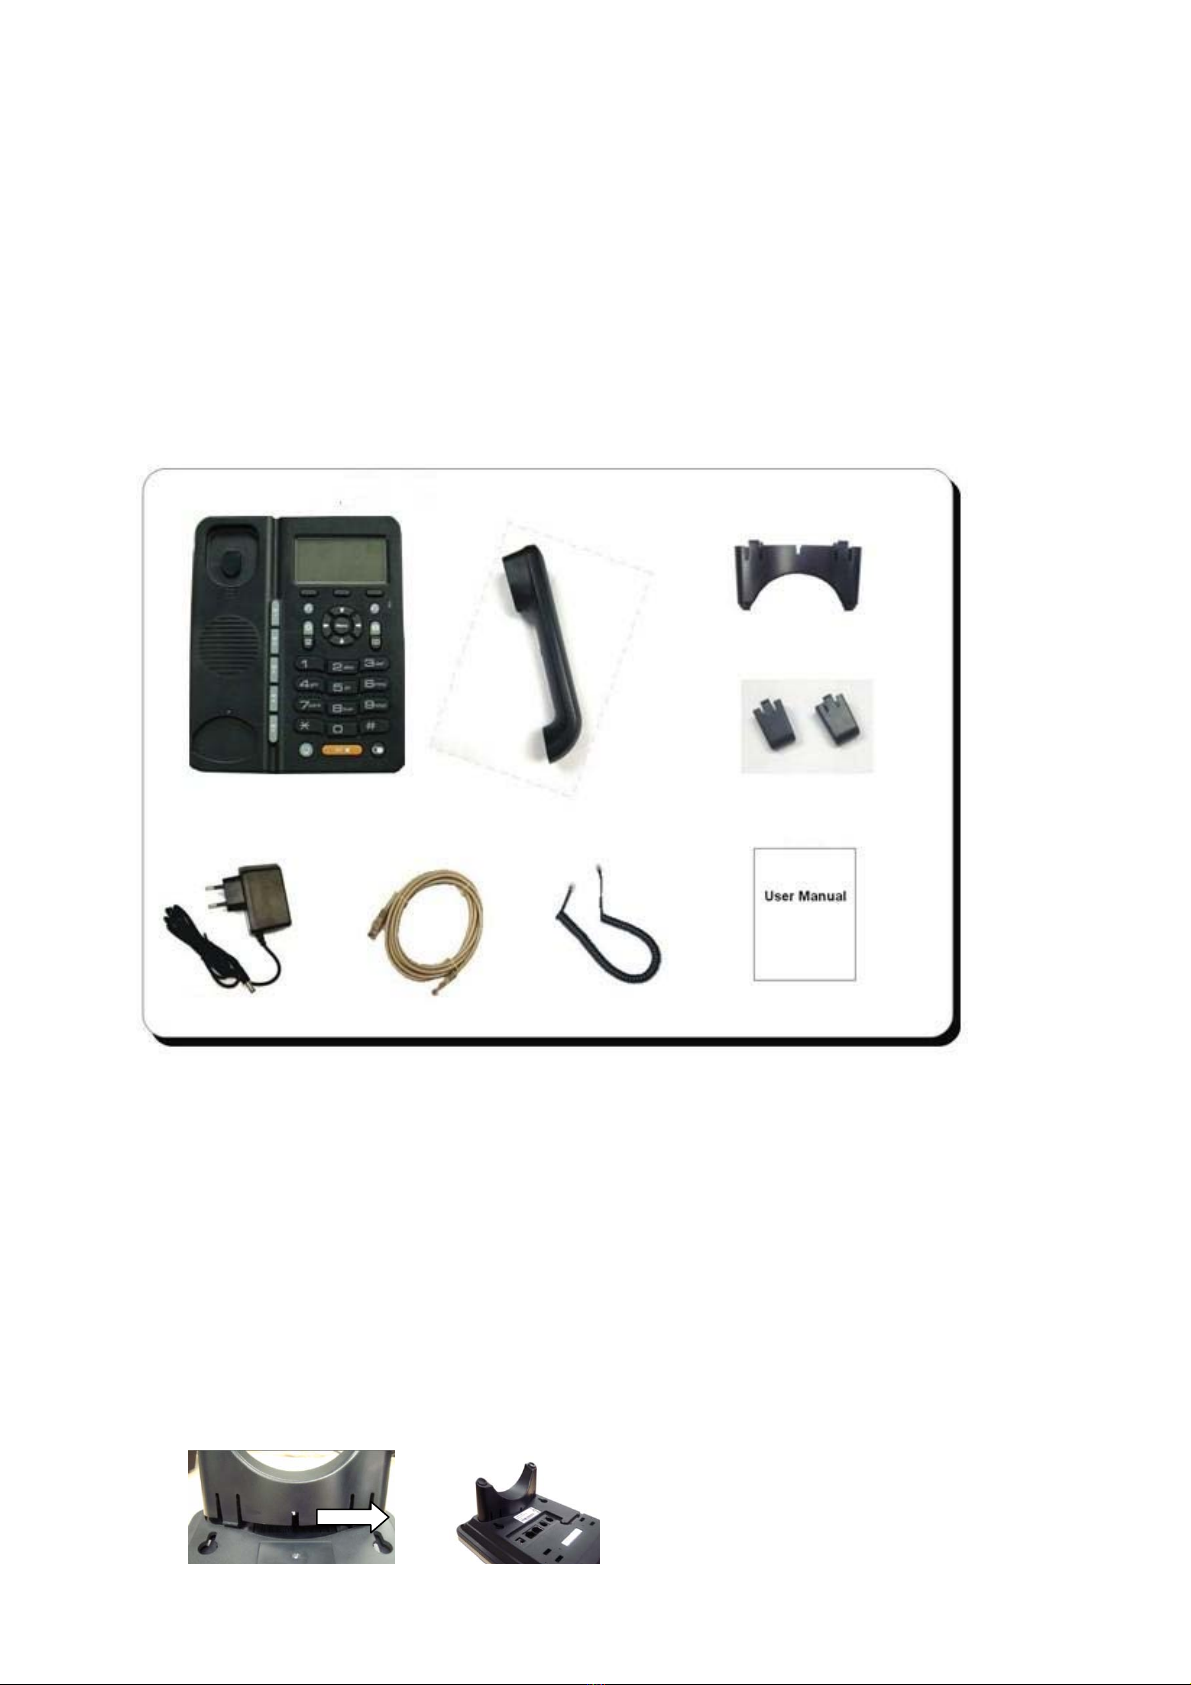
1‐1.PACKAGECONTENT............................................................................................................................................................... 5
1‐2.HOWTOASSEMBLETHEPHONE .............................................................................................................................................. 5
1‐3.GENERALAPPEARANCEOF3190IBPHONE............................................................................................................................... 6
‐LCDDisplay ........................................................................................................................................................................ 6
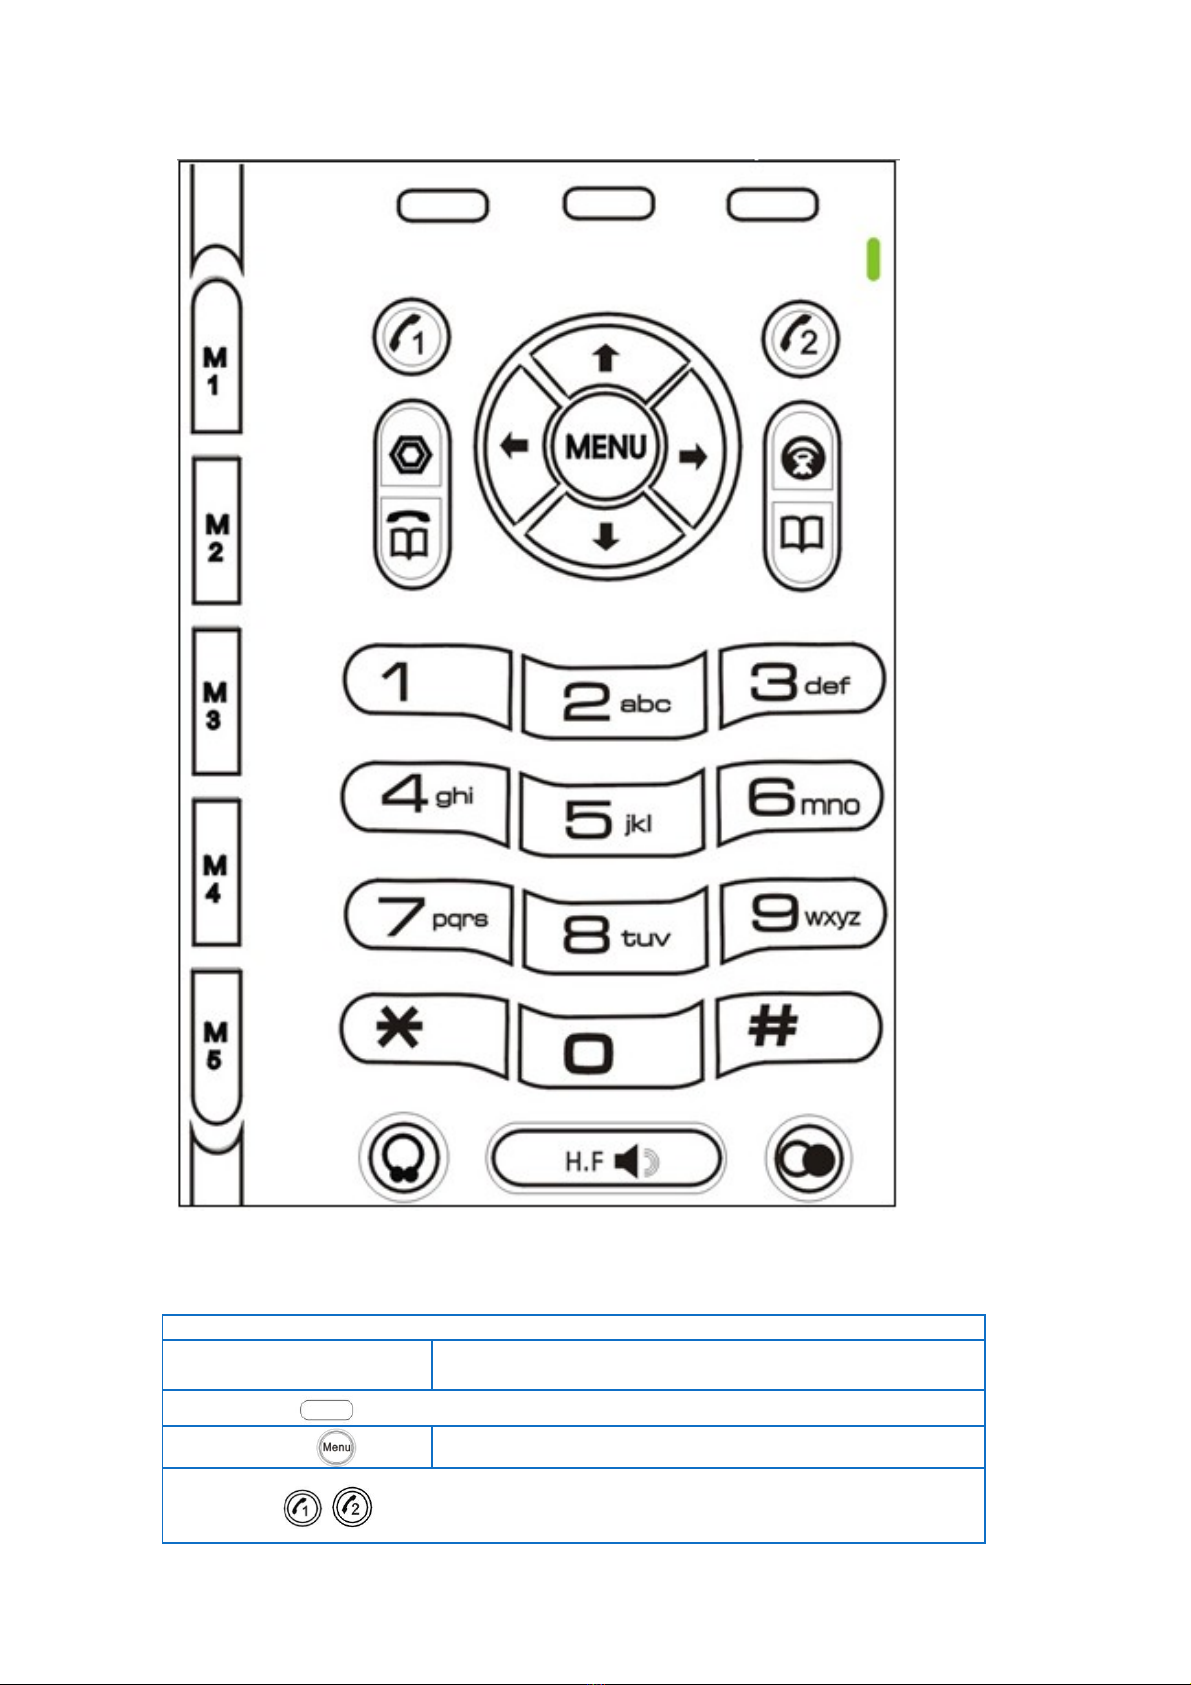
‐KeyDefinitions...................................................................................................................................................................... 8
‐LEDIndicationInstruction .................................................................................................................................................... 9
PARTTWOPHONEINTERFACEOPERATION.................................................................................................................10
OVERVIEWOF3190IBVOIPPHONELCDMENUANDSUBMENUS ...............................................................................10
2‐1.CHANGEDISPLAYEDTIMEANDDATE ...................................................................................................................................... 11
2‐2.CHANGEDISPLAYCONTRAST ................................................................................................................................................ 11
2‐3.CHANGEBACKLIGHTINTENSITY ............................................................................................................................................. 11
2‐4.SELECTRINGTYPE .............................................................................................................................................................. 12
‐Tochangeringtypeforincomingcalls............................................................................................................................... 12
‐Tosetdistinctiveincomingringingtonesforsavedcontacts ............................................................................................. 12
2‐5.CHANGELCDDISPLAYLANGUAGE......................................................................................................................................... 12
2‐6.ACTIVATEMUTEFUNCTION.................................................................................................................................................. 12
2‐7.ADJUSTVOLUME................................................................................................................................................................ 12
‐Toadjustvolumeduringacall............................................................................................................................................ 12
‐Toadjustringervolume...................................................................................................................................................... 13
2‐8.ENABLEHEADSETFUNCTION ................................................................................................................................................ 13
2‐9.PHONEBOOKMANAGEMENT ............................................................................................................................................... 13
‐AddNewItems ................................................................................................................................................................... 13
‐EditSavedItems ................................................................................................................................................................. 13
‐DeleteItems ....................................................................................................................................................................... 13
2‐10.MAKEACALL .................................................................................................................................................................. 14
RegularCall .......................................................................................................................................................................... 14
PointtoPointCall ................................................................................................................................................................. 14
2‐11.REDIALANUMBER ........................................................................................................................................................... 14
‐Redialthelastincomingcall............................................................................................................................................... 14
‐Redialanoutgoingnumber................................................................................................................................................ 15
2‐12.ACTIVATEHOLDFUNCTION ................................................................................................................................................ 15
2‐13.MAKECONFERENCECALL .................................................................................................................................................. 15
2‐14.TRANSFERACALL ............................................................................................................................................................. 15
PerformingaBlindTransfer.................................................................................................................................................. 15
PerformingaHalfAttendedTransfer.................................................................................................................................... 15
PerforminganAttendedTransfer ......................................................................................................................................... 15
2‐15.FORWARDACALL ............................................................................................................................................................. 16
2‐16.ACTIVATEDONOTDISTURBFUNCTION ................................................................................................................................16
2‐17.CONFIGURESPEEDDIALKEYS ............................................................................................................................................. 16
2‐18.VOICEMAILFUNCTION ..................................................................................................................................................... 16
PARTTHREEWEBINTERFACEOPERATION ..................................................................................................................17
3‐1.LOGONWEB ...................................................................................................................................................................... 17
3‐2.BASIC ............................................................................................................................................................................... 17
‐STATUS................................................................................................................................................................................. 17
‐WIZARD............................................................................................................................................................................... 18
‐CALLLOG ............................................................................................................................................................................. 18
‐MMISET.............................................................................................................................................................................. 18
3‐3.NETWORK ......................................................................................................................................................................... 18
‐WAN .................................................................................................................................................................................... 18
‐LAN...................................................................................................................................................................................... 19
‐SERVICEPORT...................................................................................................................................................................... 20
‐DHCPSERVER ...................................................................................................................................................................... 20

‐NAT...................................................................................................................................................................................... 31
‐VPN ..................................................................................................................................................................................... 31
SAFETYNOTICES ........................................................................................................................................................32
‐SNTP.................................................................................................................................................................................... 21
3‐4.VOIP................................................................................................................................................................................ 22
‐SIP ....................................................................................................................................................................................... 22
‐IAX2..................................................................................................................................................................................... 22
‐STUN ................................................................................................................................................................................... 23
‐DIALPEER............................................................................................................................................................................ 23
3‐5.PHONE............................................................................................................................................................................ 25
‐DSP...................................................................................................................................................................................... 26
‐CALLSERVICE....................................................................................................................................................................... 26
‐PHONEBOOK ...................................................................................................................................................................... 26
‐FUNCTIONKEY .................................................................................................................................................................... 27
3‐6.MAINTENANCE............................................................................................................................................................... 27
‐AUTOPROVISION ................................................................................................................................................................ 28
‐CONFIG................................................................................................................................................................................ 28
‐UPDATE ............................................................................................................................................................................... 28
‐ACCOUNT ............................................................................................................................................................................ 29
‐REBOOT ............................................................................................................................................................................... 29
3‐7.SECURITY........................................................................................................................................................................ 29
‐MMIFILTER ......................................................................................................................................................................... 30
‐FIREWALL ............................................................................................................................................................................ 30

P w items
Phone Base Unit.
ng Cord
et Cable
y
ckets
Part One Before Using 3190IB VoIP Phone
1-1. Package Content
hone package should include belo
- 3190IB VoIP
- 1 Handset
- 1 Coiled Handset Connecti
- 1 Straight Ethern
- 1 Power Suppl
- 1 User Guide
- 2 Wall Mount Bra
- 1 Table Bracket
attached Ethernet cable
e unit with coiled cord
- Connect brackets and wedge
1-2. How to Assemble the Phone
- Connect the phone to Internet through WAN port
- Connect the phone to your PC through LAN port, using
- Connect handset to phone bas
As Desktop Phone

one
As Wall Mounting Ph
o ways
Insert with narr as Wa
Insert with narr ay N
Insert the wedge
The wedge could be inserted as below tw
ow side down
ow side up as W
y No.1
o.2
Way No.1 Way No.2
u assemble the phone with wall mount brackets
- Connect power supply, power on the phone
- (Optional) If you has a headset, you could connect headset to realize headset function
1-3. General Appearance of 3190IB Phone
- LCD Display
It is advisable to choose Way No.2 when yo
Time and Date
SIP 1 Registered
SIP 2 Unregistered

LCD illustration
Definitions
Call forwarding enabled
Call on hold
Connected call
Incoming call
Conference call activated
Conference call on hold
Conference call disabled
Outgoing call
Outgoin etedg call not compl
Tra llnsferring a ca
Line 1 (idle)
Line 2 (idle)
Line disabled
Handset in use
Spea usekerphone in
Message waiting
Missed call

- Key Definitions
Key Button
Key Button Definitions
0 - 9, *, # Digital, star and pound keys are also used for setting and
call process.
Soft key 1、2、3 , functions as per LCD menu displays
Menu: to enter the main menu
LINE1 and LINE2: transparent keys. Would be flashing
when calls incoming or on Hold. And would be normal
during the call

Hold: hold th
function in idle st s.
e active call. Or used to enable/disable DND
atu
Call Forward: use to enable/disable call forward and do
relevant settings
Mu nte key: press during the call to enable MUTE functio
Phone Bo e/amendok: Enter to the phonebook to sav
phone No., or to call out saved No.
Navigatio ncreasen key: used as UP in menu or to i
handset / speakerphone volume
Navigation key: used as DOWM in menu or to reduce
handset / speakerphone volume
Navigation key: used as LEFT in menu or to reduce
handset/speaker volume
Na evigation key: used as RIGHT in menu or to increas
handset/speaker volume
Headset: to activate/deactivate headset function
Speaker: activate/deactivate hands-free function
Re g
call.
dial: to dial a new number or redial previous outgoin
M1-M5 Speed dial: to make speed dial calls saved in them
- LED Indic ion
Key light
ation Instruct
Definitions
On (steady)-Active call
For each line:
Blink-Incoming call
On – Speaker in use
On – Headset in use
ctivatedOn – Mute function is a
On – Phone is held
M1~M5
status
inted extension is on line and on
ed extension is off line and not
Indicator
ON:appointed extension is being used
OFF:appo
standby
FLASH:appoint
registered
LCD Backlight
Always light on standby, there is missed call or
voice message.
Always light on using

P
Overvie
art Two Phone Interface Operation
w of 3190IB VoIP phone LCD Menu and Sub Menus

2-
You could set displayed time and date manually, follow
- Press【
1. Change Displayed Time and Date
ing below procedures
】
- Select Configuration Date/Time Edit
Input form is XX(month).XX(day).XXXX(year).XX(hour). te * for . (dot)XX(munite).XX(second). Substitu
- Delete wrong input digits, save the settings or quit by pressing corresponding soft keys as LCD indication
ate and time would synchronize Internet date and time after web
SNTP configu ation. Details refer to Web Interface Operation
Contrast
You could adjust LCD display contrast to a comfort
- Press【
Note: This is not a necessary setting. Since displayed d
r
2-2. Change Display
able level
】
- Select ConfigurationScreen SetContrastEdit
- Press【】or 【 】 to increase or decrease
- Press corresponding soft key to SAVE the settings
LCD display contrast.
-Press Quit to return or【 】to get back to idle status
2-3. Change Backlight Intensity
There are 2 modes for 3190IB backlight intensity
You could modify backlight intensity following belo
- Press【
– On/Off
w procedures
】. Select Configuration>Screen Set>
- Use 【
Brightness>Edit
】or【 】 to select on or off. Then press corresponding soft key to Save or Quit

2-4. Select Ring Type
You co ifferent ring types to distinguish phone calls
- T
Press【
uld set d
o change ring type for incoming calls
】. Select ConfigurationRinger Set Ringer TypeEdit. Use【】or【 】 to select ringer type
t key to
- To acts
Press 【
Press corresponding sof Save or Quit
set distinctive incoming ringing tones for saved cont
】Enter. Use 【 】or【】to select the ringer Item,
Press EnterEditRing. Use【】or【 】 to select your preferable ringer type
Press corresponding soft key to Save or Quit
2-
3190IB VoIP Phone supports many languages. Y following procedures
- Press【
5. Chan LCD Display Languagege
ou could select your preferable language by
uage SetEdit. Use【】or【】】. Select Configuration Lang to select languages
- Press corresponding soft key to Save or Quit
Note: Defa ge is Czech.
2-6. Activate Mute Function
ult langua
During a call, press【】to enable Mute functi
on. Press it again to disable Mute function
2-7. Adjust Vo
- To adjust volume during a call
lume
Press【】or【 】to adjust receiver volume during a call

- To adjust ringer volume
Press【】. Select configurationRinger Set olumeEditRinger V
Use【】or【 】 to select ringer volume, and press corresponding soft key to Save or Quit
IP phone with headset. Press 【
2-8. Enable Headset Function
Connect 3190IB Vo 】key to get access to Headset Mode. Press it again to disable headset
function
N d speaker are inactivated
2-
- Add New Items
To add a contact to the local contact directory manu
ote: When the phone is in Headset Mode, handset an
9. Pho ok Managementne Bo
ally
Press【 】. Select Add soft key. Edit the Name, Tel and Ring. Press corresponding soft key to Save or Quit
To add a co t to the local contact directory from a call list
ntac ss Enter soft key.
- Edit Saved Items
To add a contact to the local contact directory manua
Press【
Press So Call Log. Select missed calls, received Calls or dialed out calls as desired. Preft key
Edit name, Tel and Ring, then Save
lly
】. Select Enter soft key. Select Ente
Press Save or Quite to accept or cancel
r soft key and edit Name, Tel and Ring.
- Delete Items
To delete a contact from the local directory manually
Press【
】. Select Enter soft key. Use 【 】or【】to select contact Item to be deleted

Press DEL soft key
To delete all items, select All. To delete the cu onfirm. Press NO to cancelrrent one, select One. Press YES to c
2-
You could make regular calls or point to point calls with 3190IB
default phone number, if SIP account is not chosen while you are making a call, the phone would dial out
IP 1
Re
- Press a free line (【
10. Make a Call
Note: SIP 1 is
from S
gular Call
】or【 】), do as one of belows to make a call
In on-hook,
Input the number, press 【】or corresponding soft key(LCD displays Dial) to dial out the number. Then you could choose to
pick up the handset or use Hands Free functi not picking up the handset.
off-hook
on by
In
Pick up the handset, input number, press 【】or corresponding soft key(LCD displays Dial) to dial out the number.
Dial out a number from Memory Keys M1-M5
(or other memory key)s, press M1 (or other memory keys), then pick up the handset, or press
corresp t key(LCD displays Dial) to dial out
To dial out the stored number in M1
onding sof
Dial out a number from Phonebook
Press 【】to enter phonebook, choose your desired number following LCD indication, then press 【 】or pick up the
handset to dial out
Dial out a number from CallLog
In on-hook, press corresponding soft key(LCD displays CallLog) to enter CallLog, choose your desired number from Missed
utgoing Call following LCD indication, then press 【Call/Incoming Call/O 】or pick up the handset to dial out
Point to Point Call
- Press a free line (【 】 or【 】), input #Phone IP address**server port# to dial out. Use *(star) to replace .(dot)
ired side is 192.168.0.91For example, IP of your des , your server port is 5060. You should input #192*168*0*91**5060# to dial out
- Redial the last incoming call
2-11. Redial a Number
Press【 】 or【 】, then press 【 】to dial out the last incoming number for corresponging SIP account

- Redial an outgoing number
On standby, press 【】. Use 【 】 and 【 】 to select corresponding call record
Pick up handset or press 【】/【 】/【】/【 】/【 】to dial out
2-12. Activate Hold Function
During conversation, press 【
】to keep line, press it again to release
2-13. Make Conference Call
During conversation,press corresponding soft key <Conf> as LCD displays, then dial another number end with # button. While
g soft key<Conf> to make conference call
Performing a Blind Transfer
- Input the tansferring number to transfer
line is connected, press correspondin
2-14. Transfer a Call
There are three ways to transfer a call
Under this mode, the call would be transferred to the transferee without prior notice
During a c ress corresponding Transfer soft key. Do one of the following stepsall, p
- Press【】. Get access to your desired number as LCD indicates, then press # to transfer
- Press【】. Select the appropriate list, to get access to your desired number, then press # to tran
sfer
Pe
Under this mode, the call woul d after you make sure the transferring number is on line
rforming a Half Attended Transfer
d be transferre
During a call, press 【】. Do one of the following steps
- Enter the number that you want to transfer the call to
- Press transfer soft key, then press【 】. Get access to your desired number as LCD indicates, then press #
- Press transfer soft key, then【】. Select the appropriate list to get access to your desired number, press #
Pe
er the call
Press transfer soft key after you hear the back ring to accomplish transfer
rforming an Attend Transfered
Under this mode, the call would be transferred after you make sure the transferee would like to answ
During a call, press 【】. Do one of the following steps
- Input the number which you want to transfer the call to
【- Press transfer soft key, press 】. Get access to your desired number, then press #

- Press transfer soft key, then press【 】. Select the appropriate list to get access to your desired number, then press #
sferee, to see if he/she would like to answer. Press Transfer soft key if you
2-
number
e is busy
- To forw d incoming calls to another number when nobody answer the current phone number
Before completing the transfer, you could talk to the tran
get positive response. Otherwise, hang up the phone
15. For d a Callwar
There are three modes for forwarding calls
- To forward all incoming calls to another phone
- To forward incoming calls to another number when current phon
ar
Press 【】Option Call Forward Choose Line or Line number as you desired Edit
Press【】or【 】to choose Always/Busy/No answer as you desired
y to
rward
2-16. Activate Do Not Disturb Function
On standby, press 【
Press Save soft ke activate call forwadr
Follow above procedures and choose Off to disable call fo
】to enable DND function. LCD would indicate Do Not Disturb. You would not be abled to answer incoming
calls sinc they would be sent to Missed Calls list directly
To disable DND, press 【
e
】again
2-17. Configure Speed Dial Keys
Press one speed dial key M1-M5
2-18. Voice Mail Function
Voice ma function could be used only if IP-PBX supports voice mail
When th is a voice mail, WMI indicating LED will flash. You could press dedicated key, then dial voice mail number to check voice
massage
Press Edit soft key, do corresponding name and number configuration
Press Save soft key
After above settings, you could press the speed dial key, end with Dial soft key or pick up handset to dial out stored number
il
ere

Part Three Web Interface Operation
IP address to Web Browser Address Field.
Default access through LAN is http://192.168.11.1:9999
You could get access to the web configuration menu of 3190IB by inputting the phone’s
As the phone would obtain by default its IP automatically ing 【(on the WAN side), by press 】【System Info】【Network
Status】, you could see the phone’s IP address.
3-
1.Logon Web
Below logon menu would pop up once you input the correct IP address and click enter
n modes
or account
e is root
There are two logo
-As administrat
Default usernam , default password is blank. You could configure the phone system with this account
e is guest
-As guest account
Default usernam , default password is guest. You could only have a browse of the phone system with this account
low configurations are based on administrator mode only.
as below once you logon in successfully
Note: Be
Web would show
-S
Network: Shows current WAN configuration of the phone.
Includes Connect Mode – DHCP/Static State/PPPoE, MAC Address, phone IP address
3-2.Basic
TATUS

Phone Number
: Shows the status of SIP accounts
-WIZARD
de for phone configuration. You could select Static IP/DHCP/PPPoE MODE. Then do corresponding configuration
– SIP account & network, as you desired
-CALL LOG
Show ou oing call log of the phone
-MMI SET
You could select LCD display language and set greeting messages here
3-3.Network
Choose Networ
This is a quick gui
tg
k of the left column to do network configuration. Web would show as below
-WAN
You could view current network mode of the phone on this page
If you choose Static: You could set network IP address, gateway, DNS etc. here

If you choose DHCP: IP address would be obtained automatically
If y
ou choose PPPoE: Once PPPoE ISP and the account are set, IP address would be obtained automatically
fter above settings, you could switch Static/ DHCP/ PPPoE mode from phone unterface. Press nA umber key 1 for sevaral seconds to
switch to Static Mode, number key 2 is for DHCP mode, while number key 3 is for PPPoE Mode
You could view current LAN status and do corresponding settings
-LAN

You co
-SERVICE PORT
uld set Telnet, HTTP, RTP service port on this page
To set web browse port.HTTP Port: Default is 80. It is advisable that you change it into non-80 standard port if you would like to
enhance system safety
Telnet Port: To configure telnet port. Default is 23
RTP Initial Port: To configure RTP initial port. It would be obtained automatically
TP Port Quantity: To configure maximum quantity of RTP port. Default is 200R
You could set DHCP Lease Table here
-DHCP SERVER
Table of contents
Other JOYCE IP Phone manuals
Popular IP Phone manuals by other brands

Grandstream Networks
Grandstream Networks GXP1620 Configuration guide

Cisco
Cisco 7800 Series Administration guide

Patton electronics
Patton electronics SL4050/10 Getting started guide

Samsung
Samsung SMT-i6011 Quick reference guide

Grandstream Networks
Grandstream Networks GXP-1400 Technical specifications

Epik
Epik Polycom VVX 300 quick start guide