I
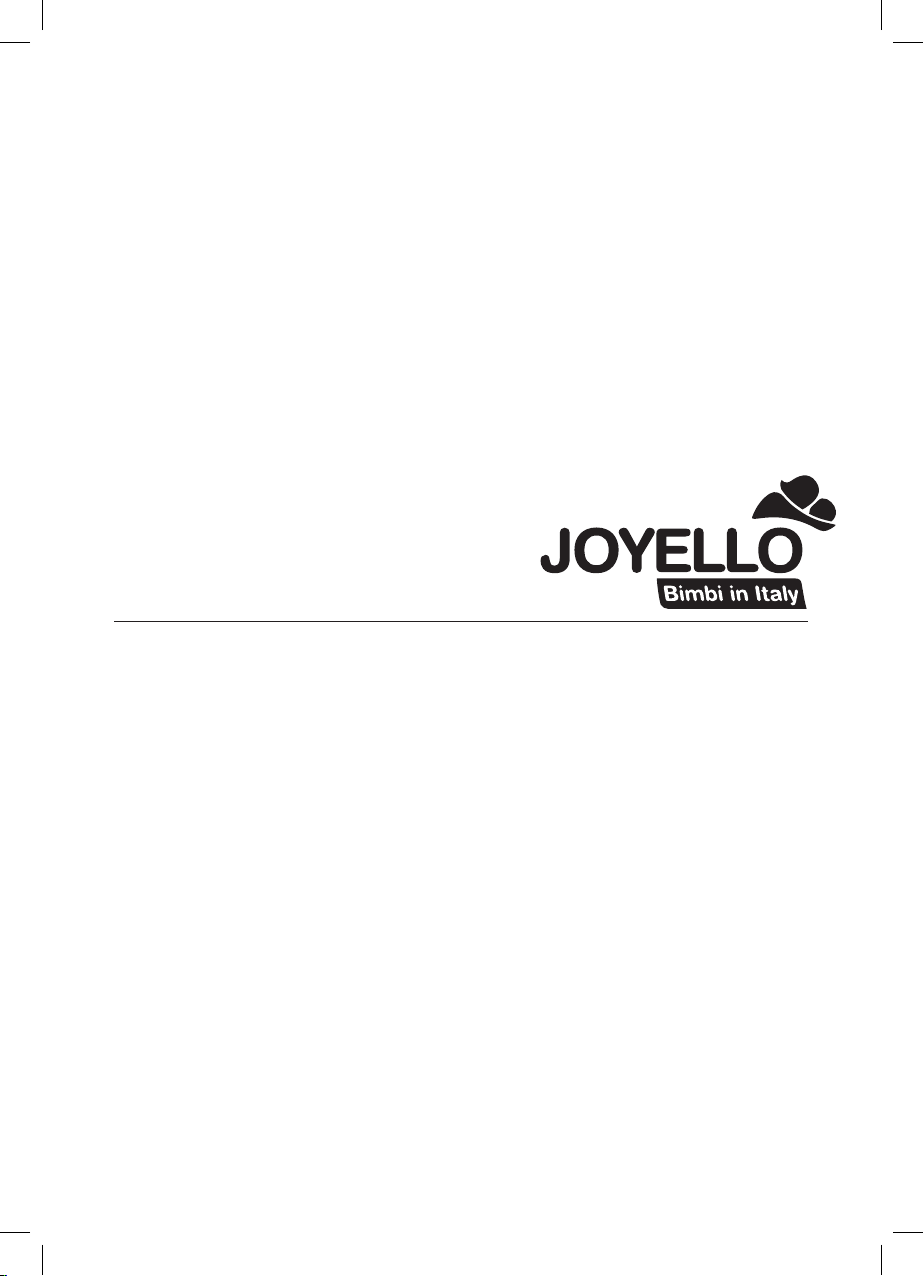
JL-980/981/982 GRUPPO 0 + - I (0-18 Kg)
Dispositivo di trasporto in auto per bambini
AVVERTENZE DI SICUREZZA
Leggere attentamente queste istruzioni dedicando qualche minuto alla sicurezza di vostro
glio. Molti incidenti facilmente evitabili sono causati da negligenza e da un uso scorretto.
• Le istruzioni devono essere conservate sul seggiolino auto per tutto il periodo di utilizzo in caso
di dispositivi di ritenzione incorporati.
• Non usate il seggiolino in casa. Non è per uso domestico e dovrebbe essere utilizzato solo in auto.
• Prima di mettervi in viaggio, controllate che il seggiolino auto sia ben ssato.
• Non modicate il seggiolino auto in nessun modo.
• Non lasciate mai il bambino incustodito senza sorveglianza.
• In caso di emergenza, è importante che il bambino sia liberato rapidamente. Ciò signica che la
bbia può essere facilmente aperta e quindi insegnate al bambino a non giocarci.
• Assicuratevi che tutte le parti siano allacciate correttamente e non restino bloccate nelle portiere
o nei sedili ribaltabili.
• I bagagli o altri oggetti in grado di causare ferite in caso di incidente devono essere opportuna-
mente bloccati.
• Il rivestimento del seggiolino deve essere sostituito esclusivamente con un rivestimento con-
sigliato dal fabbricante.
• Vericate periodicamente l’imbracatura, facendo particolarmente attenzione ai punti di bloccag-
gio, le cuciture e le cinghie di regolazione.
• Non usate il seggiolino se i componenti sono danneggiati o si sono allentati a seguito di un in-
cidente.
• Lo schienale del seggiolino auto deve poggiare di piatto contro lo schienale del sedile dell’auto.
Se necessario, regolate il poggia testa del sedile.
• Consigliamo di utilizzare il seggiolino auto sul sedile posteriore dell’auto.
• Le cinture del seggiolino devono rimanere ben tese e aderenti al corpo, se il bambino indossasse
dei capi troppo voluminosi è consigliabile toglierli per una maggiore tensione e di conseguenza
sicurezza. Per evitare tutti i rischi di caduta, il vostro bambino dovrà sempre essere legato.
• Secondo il regolamento UN/ECE n.16 o equivalente è obbligatorio agganciare il seggiolino al
sedile con le cinture auto. E’ consentito esclusivamente l’utilizzo delle cinture a 3 punti.
AVVISO
1. Questo è un dispositivo di ritenuta per bambini “Universale”, omologato secondo il Regolamento
ECE 44.04 per uso generale su autoveicoli e si adatta alla maggior parte dei sedili auto ma non a tutti.
2. Adatto solamente per l’impiego in veicoli dotati di cintura di sicurezza a 3 punti statica e con
avvolgitore, omologata in base al Regolamento UN/ECE n°16 o altri standard equivalenti.
DESTINAZIONE D’USO
Il seggiolino auto per bambini è adatto a categorie di peso da 0 a I (Gruppo 0+/1), il che signica
per bambini da 0 a 18 kg di peso (da 0 mesi a 4 anni).
3
JL-980/981/982 I