Joyello JOY PAPPA JL-1021 User manual

JL- 1020 / JL-1021
JOY PAPPA
Manuale d’uso
Alzatina da tavola
User manual
Baby booster seat
Manual de instrucciones
Silla de comer portatil plegable
Mode d’emploi
Rehausseur Bebe
сгъваема (бустер) помощна седалка за кола


I
Grazie per aver acquistato l’alzatina da sedia Joyello .
IMPORTANTE: LEGGERE ATTENTAMENTE
E CONSERVARE QUESTE ISTRUZIONI PER
RIFERIMENTO FUTURO.
ATTENZIONE: PRIMA DELL’USO RIMUOVERE ED ELIMINARE
EVENTUALI SACCHETTI DI PLASTICA E TUTTI GLI ELEMENTI
FACENTI PARTE DELLA CONFEZIONE DEL PRODOTTO
O COMUNQUE TENERLI LONTANI DALLA PORTATA DEI
BAMBINI
AVVERTENZE
• ATTENZIONE: Non lasciare mai il bambino incustodito sul rialzo. Assicuratevi sempre che il bambino sia
correttamente assicurato con il sistema di ritenuta.
• Seguire attentamente le istruzioni d’uso. In caso contrario la sicurezza del vostro bambino potrebbe
essere compromessa.
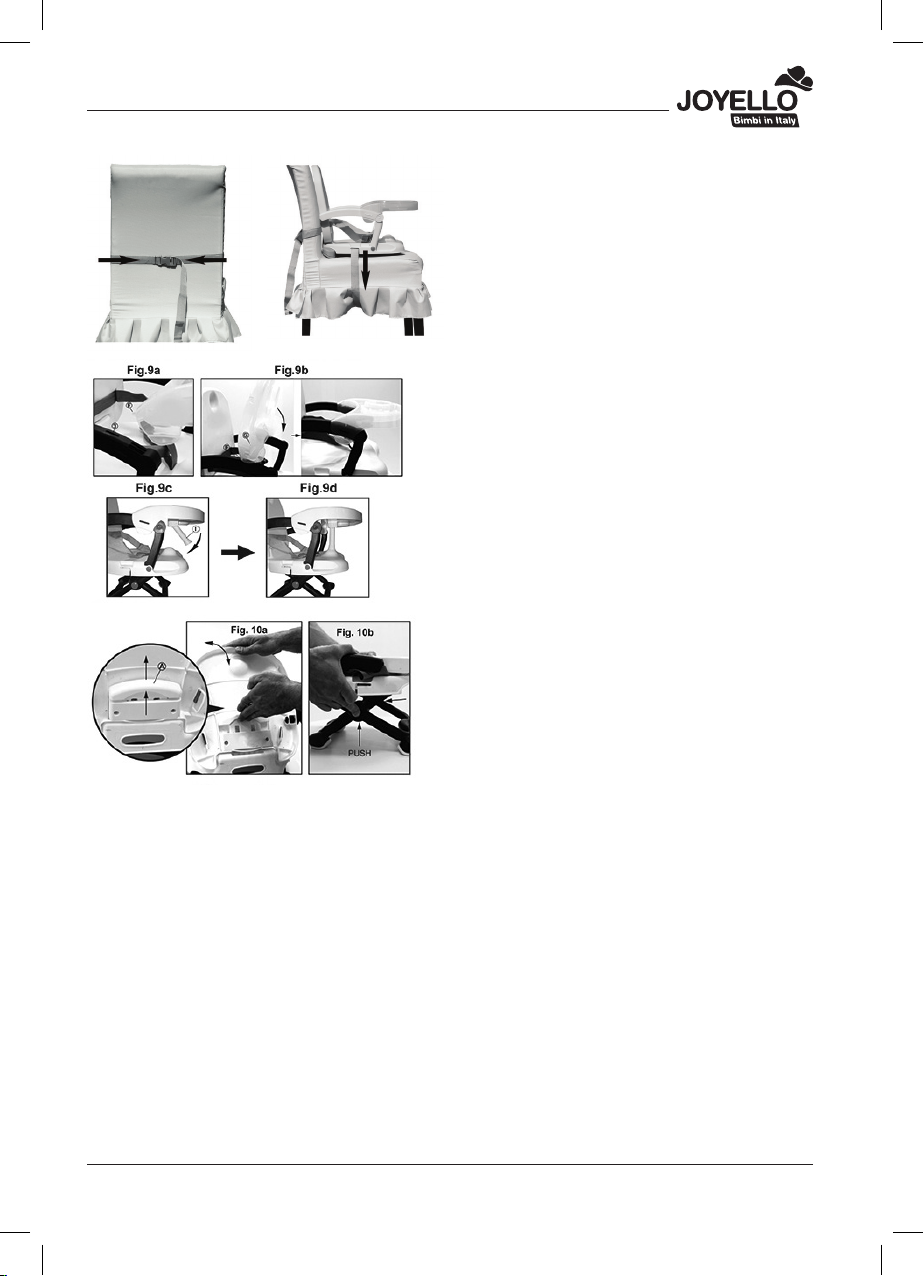
• ATTENZIONE: Utilizzare sempre il sistema di ritenuta e assicurarsi che sia correttamente regolato.
• ATTENZIONE: Utilizzare sempre il sistema di ssaggio alla sedia e assicurarsi che sia montato
correttamente prima dell’uso.
• ATTENZIONE: Prima dell’uso , vericare sempre la sicurezza e la stabilità dell’alzabimbo, sulla sedia da
adulto. Non utilizzare l’alzabimbo su sgabelli o panche.
• ATTENZIONE: Questo prodotto è adatto a bambini capaci di stare seduti da soli e no a 3 anni di età o
un peso massimo di 15 kg.
• Non utilizzare l’alzabimbo se qualsiasi parte è rotta strappata o mancante.
• Non utilizzare accessori o parti di ricambio diverse da quelli approvati del costruttore.
• Il colore o la forma del prodotto indicato nelle istruzioni può dierire rispetto a quello acquistato.
• IMPORTANTE: Fissare sempre l’alzabimbo alla sedia con le cinture di ssaggio in dotazione, realizzate
per tale scopo.
• L’alzabimbo non deve essere più grande della sedia su cui è montato.
• Assicuratevi che il sedile della sedia sia maggiore delle dimensioni dell’alzabimbo.
• Non adatto a bambini con età inferiore ai 18 mesi.
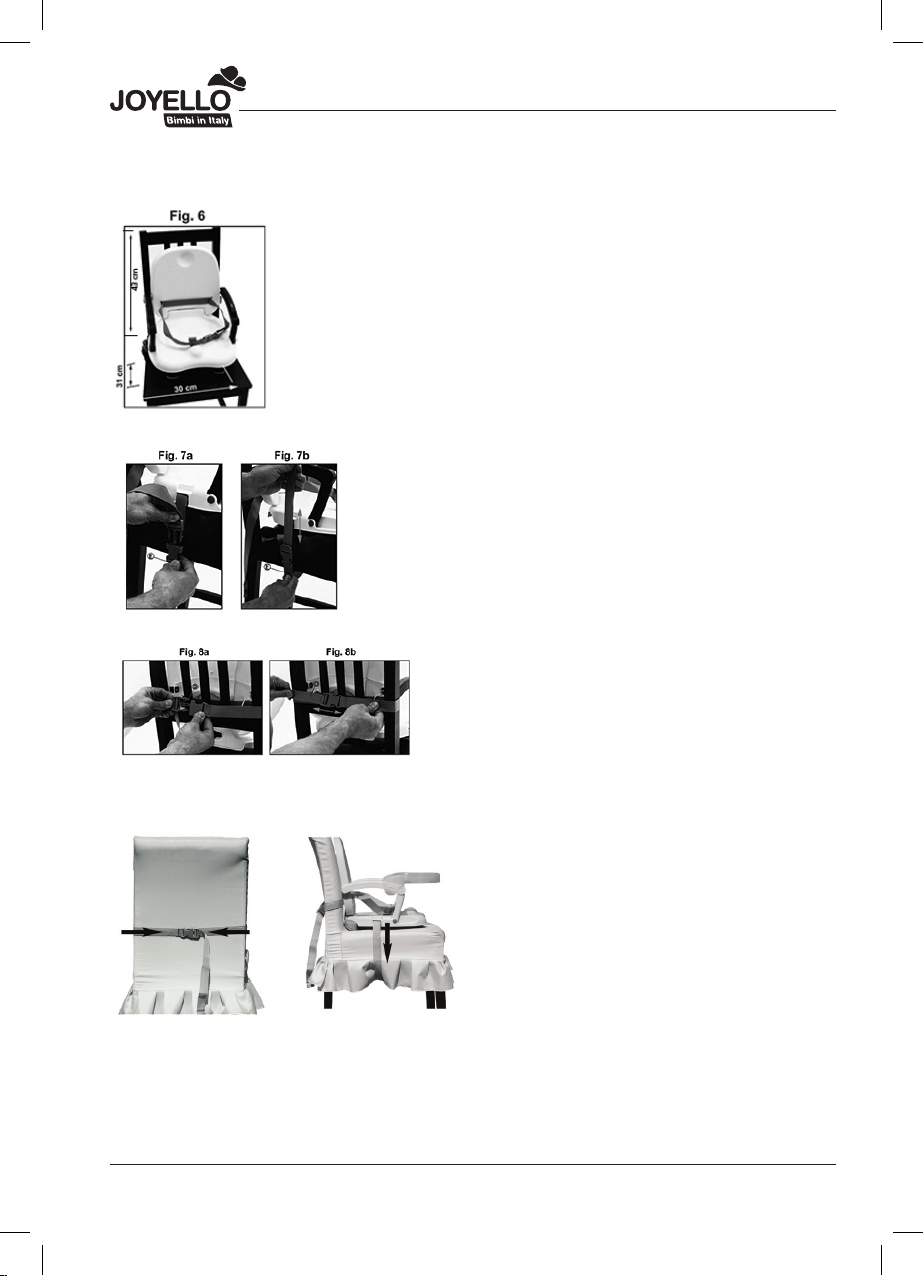
• La dimensione minima del sedile della sedia da adulto utilizzabile deve essere quindi:
30 cm di larghezza, 31 cm di profondità, 43 cm di altezza.
• Prima di ssare il rialzo sedia sulla seduta, controllare sempre che il pavimento e la seduta della sedia
siano perfettamente orizzontali, non utilizzare il prodotto installato sulla sedia su pavimenti in pendenza.
• Dopo il montaggio vericare che l’alzabimbo sia saldamente ssato alla sedia.
• Non utilizzare mail l’alzabimbo su sedie instabili o rotte, una sedie pieghevoli, a dondolo o con braccioli.
• Assicurarsi che la sedia da adulto, dove montato l’alzabimbo sia collocata in una posizione dove il
bambino non è in grado di usare i propri piedi per spingersi contro il tavolo o qualsiasi struttura che
possa essere causa di ribaltamento della sedia da adulti che supporta il rialzo sedia.
• Non utilizzare l’alzabimbo con più di un bambino alla volta.
• Non lasciare giocare altri bambini incustoditi vicino all’alzabimbo.
• Non installare il prodotto su un seggiolone.
3
I

4
I
LISTA DEI COMPONENTI
ISTRUZIONI PER SEGGIOLINO PER BAMBINI CON RIALZO
1. Sollevare completamente lo schienale (Fig.1).
Quando si raggiunge la corretta posizione dello
schienale, si sente un“clic” (Fig.1°). Per completare
l’operazione, tirare in basso la maniglia per impostare il
secondo blocco.
2. Per regolare l’altezza del sedile con rialzo, spingere i due pulsanti rossi sul
lato e spingere verso il basso le gambe per regolare diverse altezze (Fig.2).
IMPORTANTE: ASSICURATEVI CHE I PULSANTI ROSSI SIANO IN
FUORI PRIMA DELL’USO.
3. Fissare la bbia correttamente no a sentire un“clic”
(Fig.3a-3b). La cintura in vita“B” può essere regolata in base
al bambino quando questo è seduto sul seggiolino.
IMPORTANTE: Utilizzare sempre la cintura di sicurezza
quando il bambino è seduto sul seggiolino.
4. Far passare la cinghia di blocco schienale“D”in entrambi
gli anelli D della cintura in vita“B”(Fig.4a-b).

5
I
5. Abbassare lo schienale e capovolgere il seggiolino (Fig. 5). Far passare la cinghia “E” dal lato
destro al sinistro come in Fig.5 e Fig.5b. Seguire la sequenza dalla Fig.5c alla Fig.5f per inserire la
cinghia”E” sia sul lato destro sia sul lato sinistro del seggiolino.
6. Posizionare il seggiolino con rialzo al centro del sedile, assicurandosi che
il sedile sia più grande delle dimensioni del seggiolino con rialzo (30 cm di
larghezza, 31 cm di profondità, 43 cm di altezza).
7. Regolare l’altezza del seggiolino con rialzo e quindi utilizzare
la cinghia”E” per avvolgerla sotto il seggiolino e bloccare la bbia
(Fig.7a). Tirare l’estremità della cinghia per serrarla (Fig.7b).
8. Utilizzare la cinghia posteriore di blocco “D” per avvolgerla
attorno alla parte posteriore dello schienale e bloccare la
bbia (Fig. 8a). Tirare l’estremità della cinghia per serrarla
(Fig.8b).
AVVERTENZA: prima di utilizzare il prodotto, assicurarsi che il seggiolino sia ssato correttamente
sul sedile per evitare che si muova.

6
I
9. (Opzionale) Inserire i due ganci di plastica “F” del
vassoio nelle fessure bracciolo “3” (Fig.9a). Ruotare
il vassoio in alto di 180° e inserire i pulsanti negli
alloggiamenti (Fig.9b). Per sostenere il vassoio
anteriore e renderlo più stabile, girare in basso la
barra di plastica “I” sotto il vassoio anteriore a 90° e
ssarlo nel seggiolino con rialzo (Fig.9c-9d).
10. (Per piegare il prodotto):
• Slacciare tutte le cinture di sicurezza
• Sollevare la maniglia e contemporaneamente
spingere verso il basso la parte posteriore nella
posizione chiusa (Fig.10b).
• Premere contemporaneamente i due pulsanti “A”
posti sotto i braccioli e abbassare lo schienale allo
stesso tempo (Fig.10b).
• Il prodotto ora può essere tenuto nell’apposita
borsetta (FIG. I).
CURA E MANUTENZIONE
Per prolungare la vita del prodotto, assicurarsi che sia sempre pulito, assicurarsi che non rimanga troppo
tempo esposto alla luce diretta del sole. Pulire con un panno umido e sapone neutro.
. Lasciare asciugare completamente, preferibilmente in ombra non alla luce diretta del sole.
Tutte le indicazioni e le immagini si basano sulle ultime informazioni disponibili al momento della stampa e possono
essere soggette a variazioni.

7
GB
GB
Thank you for purchasing the baby booster seat JOYELLO.
IMPORTANT: RETAIN FOR FUTURE
REFERENCE AND READ CAREFULLY.
WARNING: BEFORE USE, REMOVE AND DISPOSE OF ALL
PLASTIC BAGS AND PACKAGING MATERIALS AND KEEP
THEM OUT OF REA-CH OF CHILDREN.
WARNINGS
• WARNING: Not to leave to the single boy without monitoring on the elevator. Always use the
restraint system and ensure it correctly tted .
• Your child may be at risk if above precautions are not adhered to.
• WARNING: Always use the secure system and make sure the booster seat is correctly tied to the
chair.
• WARNING: Always use the locking system of the chair and make sure the booster seat is correctly
tied to the chair.
• WARNING! Always check the security and stability of the booster seat chair before use. Do not use
this portable booster seat on stools or benches .
• WARNING! This product is designed for children who can sit up unassisted and up to 3 years or a
maximum weight of 15kg.
• Do not use if any of parts are broken, damaged or missing.
• Never use accessories that have not been authorized by the manufacturer.
• The colour and form of the product may be dierent from those shown in photos or drawings
• WARNING: Always secure Booster Seat to chair using the straps provided.
• To use exclusively on a chair where the dimensions of the seat are superior to those of the elevator.
• It is not advisable for smaller children of 18 months.
• This product is designed for children who can remain seated themselves, up to a maximum age
of three years or a maximum weight of 15 kg.
• The minimum size of the adult seat used should be greater then:
30 cm width, 31 cm depth, 43 cm height.
• Before fastening the booster seat mounted seat to the chair, always check that the oor and chair
seat are perfectly horizontal; never install the product on chairs which are positioned on a sloping
surface.
• Once installed, to verify that the booster seat is securely attached to the chair.
• Never use the booster seat mounted seat on broken or unstable chairs, folding chairs, rocking
chairs of chairs with armrests.
• Ensure that the adult chair with the booster seat mounted seat is placed in a position where the
child is not able to use its feet to push against the table or any other structure as this can cause the
tip over of the adult chair supporting the chair mounted seat.
• Do not use the booster seat mounted seat for more than one child at a time.
• Do not let other children play unattended near the chair mounted seat.
• Do not install the product on highchairs.

8
GB
PART LIST
INSTRUCTIONS FOR BABY BOOSTER SEAT
1. Lift the backrest completely (Fig.1). When reaching the
correct position of the backrest, you will hear a “click”
(Fig.1°). To complete the operation; pull down the handle
to set the second lock.
2. To adjust booster seat height, push the two red buttons on the side, and pushing down the legs to
adjust dierent heights (Fig.2).
IMPORTANT: MAKE SURE THE RED BUTTONS ARE POP OUT BEFORE USE.
3. Fix the buckle correctly till you hear a“click”(Fig.3a-3b). The
waist strap“B”could be adjusted according to the child when
sitting on it.
IMPORTANT: Always use the secure system when the
child sits on it.
4. Run the backrest locking harness“D” into both D rings of the
waist strap“B”(Fig.4a-b).

9
GB
5. Lower the backrest and turn the booster seat upside down (Fig.5). Run the harness “E” from the
right to the left side as Fig.5 and Fig.5b. Follow the sequence from Fig.%c to Fig.5f to insert harness
“E” on both right and left side of the seat.
6. Please the booster seat on the center of the chair and make sure that the
chair is larger than the booster seat ase (30 cm width, 31 cm depth, 43 cm
height).
7. Adjust the height of the booster seat and then use harness“E”
to loop under the seat and lock the buckle (Fig.7a). Pull the end
of the harness to tighten (Fig.7b).
8. Use the backrest locking harness “D”to loop around at
back of the chair and lock the buckle (Fig.8a). Pull the
end of the harness to tighten it (Fig.8b).
WARNING: before using the product, make sure the booster seat is correctly xed on the
chair to prevent it from moving.

10
ES
9. (Optional) Insert the two plastic hooks “F” of
the tray into the armrest slots “3” (Fig.9a). Turn
the tray up to 180° and insert the buttons into
the housings (Fig.9b). To support the front tray
more stable, turn down the plastic bar “I” under
the front tray to 90° and x it into the booster
seat (Fig.9c-9d).
10. (Folding the product):
• Release all safety belts
• Lift the handle up and simultaneously push down
the back in the closed position (Fig.10b).
• Push simultaneously the two buttons “A” placed
under the armrests and lower the backrest at the
same time (Fig.10b).
• The product now is possible carry in the bag for
easy transportation.
CARE AND MAINTENANCE
To prolong the life of your nursery product keep it clean and do not leave it in the direct sunlight for extended
periods of time. Clean with a damp cloth or mild detergent. Allow it to dry fully, preferably away from direct
sunlight.
Specications and designs are based on the last information available at the time of printing and subject to change
without notice.
ES
Gracias por haber comprado la Silla de comer portatil plegable JOYELLO.
IMPORTANTE: LEA ESTAS INSTRUCCIONES
ATENTAMENTE ANTES DEL EMPLEO
Y CONSÉRVELAS PARA PODERLAS
CONSULTAR EN FUTURO.
ATENCION: ANTES DEL USO QUITARY ELIMINAR LAS BOLSAS
DE PLASTICOYTODOS LOS ELEMENTOS QUE FORMEN PARTE
DE LA CAJA DEL PRODUCTO Y MANTENERLOS FUERA DEL
ALCANCE DE LOS NINOS

11
ES
ADVERTENCIAS
• ADVERTENCIA: nunca deje al niño desatendido. Sujete siempre el niño de manera segura.
• Su hijo podría resultar herido si no sigue estas instrucciones. Siempre utilice el sistema de
retención y asegúrese de que está correctamente jado
• ADVERTENCIA: Utilice siempre el sistema de jación de la silla y asegúrese de que está
correctamente jado antes de cada uso.
• ADVERTENCIA: Siempre revise la seguridad y estabilidad de la silla elevadora portátil antes del uso.
• ADVERTENCIA: No utilice esta silla elevadora portátil en taburetes ni en bancos.
• ADVERTENCIA: Este producto está destinado a niños capaces de sentarse sin ayuda y hasta 3 años
o un peso máximo de 15kg.
• No se debe utilizar el artículo si alguna parte está rota, deteriorada o perdida.
• No se debe usar accesorios no autorizados por el fabricante.
• El color y la forma del producto pueden ser diferentes de los de las fotos o dibujos.
• ADVERTENCIA: Sujete siempre el asiento elevador a la sillita utilizando las correas previstas para tal n.
• Utilizar exclusivamente sobre una silla donde las dimensiones del asiento sean superiores a las
del elevador.
• No es conveniente para niños menores de 18 meses.
• Las dimensiones mínimas de la silla de adultos deben ser mayor entonces:
30 cm ancho, 31 cm profundidad, 43 cm altura.
• Antes de jar el elevador de asiento a una silla, controlar siempre que el suelo y el asiento de la
silla se encuentren perfectamente horizontales, no utilizar el producto instalado en la silla sobre
suelos inclinados.
• Una vez instalado, vericar la rmeza del elevador sobre la silla.
• No utilizar nunca el elevador de asiento sobre sillas instables o rotas, sillas plegables, mecedoras
o sillas con apoyabrazos.
• Comprobar que el asiento para adultos, donde se ha colocado el elevador de asiento, se encuentre
colocado en una posición donde el niño no pueda alcanzar con sus pies la mesa o cualquier otra
estructura que pueda ocasionar el vuelco de la silla de adultos que soporta el elevador de asiento.
• No utilizar el elevador de asiento con más de un niño a la vez.
• No dejar que otros niños jueguen cerca del elevador de asiento sin vigilancia.
• No instalar el producto sobre una trona.
ELENCO DE LOS COMPONENTES
INSTRUCCIONES P/LA SILLA DE COMER PORTATIL PLEGABLE
1. Levantar completamente el respaldo (FIg.1).
Cuando se logra la correcta posición del respaldo,
se sentirá un “click” (Fig. 1a).
Para completar la abertura de la silla, tirar hacia
abajo la manija para ajustar la abertura denitiva.

12
ES
2. Para ajustar la sila para comer, presionar los dos pulsantes rojos situados
en ambos lados empujando hacia abajo la base de apoyo para regularizar
la diferentes alturas (Fig.2).
IMPORTANTE: ASEGURESE DE QUE LOS BOTONES ROJOS ESTAN APAGADOS ANTES DE SU
USO.
3. Sujetar la hebilla correctamente hasta sentir un“click”
(Fig. 3°a-3b). La cintura“B” puede ser regulada quando
el niño está comódamente sentado.
IMPORTANTE: Utilizar SIEMPRE la cintura de seguridad cuando el niño está sentado en la silla
para comer portátil.
4. Pasar las cinturas de jación del respaldo“D”en las dos
hebillas plásticas posteriores ”B”(Fig. 4a y 4b).
5. Bajar el respaldo y hacer pasar la cintura“E” del lado derecho hacia el izquierdo ( Fig.5 y 5b).
Seguir la secuencia de la Fig.c a la Fig. 5f. para colocar la cintura“E”, sea del lado derecho como del
lado izquierdo de la silla.

13
6. Colocar la silla para comer en el centro del asiento, asegurándose que
el asiento sea más grande de las dimensiones de la silla portátil (30 cm
ancho, 31 cm profundidad, 43 cm altura.).
7. Regular la altura de la silla y utilizar la cintura “E” para
ajustarla por debajo de la silla cerrando las 2 partes de la
hebilla (Fig.7a).
Tirar del extremo de la cintura para ajustar (Fig.7B.).
8.Utilizar la cintura de seguridad posterior “D” pasándola
alrededor del respaldo de la silla a utilizar cerrando las 2
partes de la hebilla (Fig.8a).
Tirar del extremo de la cintura para ajustar (Fig. 8b).
ADVERTENCIA: Antes de utilizar la silla para comer, asegurarse que esté jada correctamente
al asiento para evitar que se mueva.
ES

14
9. Colocar los dos ganchos en plástico “F” de la
bandeja , en las correspondientes ranuras de los
apoyabrazos“3” (Fig. 9a).
Bajar la bandeja introduciendo el resto del
mecanismo plástico en las siguientes ranuras
plásticas del apoyabrazos (Fig. 9b).
Para dar mayor apoyo y estabilidad a la bandeja,
bajar la barra plástica (para separar las piernas),
que se encuentra debajo de la bandeja “I” y jarla
apoyándola en la silla (Fig. 9c y 9d).
10. Para plegar la silla de comer:
. Desenganchar todas las cinturas de seguridad.
. Tirar de la palanca y al mismo tiempo empujar
hacia adelante en posición de cierre (Fig. 10b).
. Presionar al mismo tiempo los dos pulsantes
rojos“A”situados debajo de la silla, presionando
la silla con el respaldo incluído, hacia abajo
(Fig. 10b).
. La silla completamente plegada está pronta
para ser colocada dentro de su cómoda bolsa
de transporte.
CUIDADO Y MANTENIMIENTO
Para alargar la duración del producto, manténgalo limpio y no lo deje expuesto a la luz solar directa durante
largos períodos de tiempo. Limpiar con un paño húmedo o detergente suave. Dejar secar completamente,
preferentemente a la sombra.
Las especicaciones y planes están basado en la última información disponibile en el momento de impresion y pueden sujetarse a
cambios sin previo aviso.
Merci d’avoir acheté le lit de la rehausseur bébé Joyello.
IMPORTANTE: LISEZ ATTENTIVEMENT
CES INSTRUCTIONS AVANT D’UTILISER
CE PRODUIT. CONSERVEZ-LES BIEN
POUR TOUTE AUTRE CONSULTATION.
ATTENTION: AVANT L’EMPLOI OTER ET ELIMINER LES
EVENTUELS SACHETS EN PLASTIQUE ET TOUS LES
F

15
F
ELEMENTSQUIFONTPARTIEDEL’EMBALLAGEDUPRODUIT
OU DE TOUTE FAÇON LES TENIR HORS DE LA PORTEE DES
NOUVEAU-NES ET DES ENFANTS
AVERTISSEMENTS
• AVERTISSEMENT: Ne laissez jamais l’enfant seul, sans surveillance, sur le rehausseur. Veillez
toujours à ce que l’enfant soit attaché de manière sûre.
• Respectez ces instructions. Dans le cas contraire, l’enfant risquerait de se blesser
• AVERTISSEMENT: Utilisez toujours le système de retenue et vériez qu’il est correctement conguré.
• AVERTISSEMENT: Destiné aux enfants qui peuvent s’asseoir sans aide, et jusqu’à 3 ans ou d’un
poids maximum de 15kg.
• Ne pas utiliser l’article si des pièces sont cassées, endommagées ou perdues.
• Ne pas utiliser d’accessoires non autorisés par le fabricant.
• La couleur et la forme du produit peuvent diérer de celles gurant sur les photos ou dessins.
• AVERTISSEMENT: xez toujours le rehausseur à la chaise à l’aide des sangles prévues à cet eet.
• Le rehausseur ne doit pas déborder du siège. Veillez à ce que le siège de la chaise soit plus grand
que le rehausseur.
• Ne convient pas aux enfants âgés de moins de 18 mois.
• La taille minimale du siège adulte devrait être supérieur à: <30 cm largeur, 31 cm de profondeur
et 43 cm hauter.
• Avant de xer le siège-rehausseur sur la chaise, toujours vérier que le sol et l’assise de la chaise
sont parfaitement horizontaux, ne pas utiliser le produit installé sur la chaise sur des sols en pente.
• Une fois mis en place, assurez-vous que le rehausseur est bien xé à la chaise.
• Ne jamais utiliser le siège-rehausseur sur des chaises instables ou cassées, des chaises pliantes,
basculantes ou des chaises avec accoudoirs.
• Assurez vous que le siège-rehausseur de chaise est placé dans une position dans laquelle l’enfant
ne peut pas utiliser ses pieds pour s’appuyer contre la table ou toute autre structure, car la chaise
pour adulte qui soutient le rehausseur de chaise pourrait alors se renverser.
• Ne pas utiliser le siège-rehausseur avec plus d’un enfant à la fois.
• Ne pas laisser d’autres enfants jouer sans surveillance à proximité du siège-rehausseur.
• Ne pas installer le siège-rehausseur sur une chaise haute
LISTE DES PIÈCES
INSTRUCTIONS POUR REHAUSSEUR BÉBÉ
1. Relever complètement le dossier (Fig. 1). Un léger «
clic » indiquera que le dossier est dans la bonne
position (Fig. 1°). Pour terminer l’opération, enfoncer
la poignée pour régler le deuxième dispositif de
blocage.

16
F
2. Pour régler la hauteur du rehausseur, appuyer sur les deux boutons rouges
latéraux, tout en appuyant sur les pieds pour ajuster les hauteurs diérentes
(Fig. 2).
IMPORTANT: ASSUREZVOUS QUE LES BOUTONS ROUGES SONT
ÉTEINTS AVANT DE L’UTILISER.
3. La boucle est correctement xée lorsqu’un léger « clic »
retentit (Fig. 3a-3b). La sangle de taille « B » peut être ajustée
en fonction de l’enfant une fois celui-ci assis.
IMPORTANT : Toujours utiliser le système de sécurité
lorsque l’enfant est assis.
4. Faire passer la sangle de blocage du dossier « D »
dans les deux anneaux de la sangle de taille « B » (Fig.
4a-b).
5. Baisser le dossier et mettre le rehausseur à l’envers (Fig. 5). Faire passer la sangle « E » de la droite
vers la gauche comme illustré sur la Fig. 5 et la Fig. 5b. Suivre la séquence décrite de la Fig. %c à 5f
pour faire passer la sangle « E » des deux côtés du siège.
6. Placer le rehausseur au centre de la chaise et vérier que la chaise soit
plus large que le socle du rehausseur (<30cm long. x 31cm larg. x 43cm
hauter).

17
F
7. Régler la hauteur du rehausseur et bloquer le siège en
faisant passer la sangle « E » sous la chaise et en l’insérant
dans la boucle de fermeture (Fig. 7A). Tirer sur l’extrémité de
la sangle pour ajuster le serrage (Fig. 7b)
8. Faire passer la sangle de blocage du dossier « D
» autour de du dossier de la chaise puis l’insérer
dans la boucle de fermeture (Fig. 8a). Tirer sur
l’extrémité de la sangle pour ajuster le serrage
(Fig. 8b).
ATTENTION : avant d’utiliser le rehausseur, vérier qu’il soit correctement xé à la chaise et
qu’il ne bouge pas.
9. (En option) Insérer les deux crochets en
plastique « F » du plateau dans les fentes de
l’accoudoir « 3 » (Fig. 9a). Tourner le plateau de
180° et insérer les boutons dans les logements
(Fig. 9b). Pour mieux soutenir le plateau avant,
abaisser de 90° la barre en plastique « I » située
sous le plateau et la xer sur le rehausseur (Fig.
9c-9d).

18
BG
10. (Pliage du produit) :
• Détacher les sangles de sécurité.
• Soulever la poignée tout en appuyant sur le
dossier pour le fermer (Fig. 10b).
• Appuyer simultanément sur les deux boutons «
A » placés sous les accoudoirs tout en abaissant
le dossier (Fig. 10b).
• Le produit est prêt à être facilement transporté
dans son sac.
ENTRETIEN ET MAINTENANCE
Pour prolonger la durée de vie du produit, veillez à ce qu’il soit toujours propre et évitez qu’il reste trop
longtemps exposé directement à la lumière du soleil. Nettoyez au savon neutre, avec un chion humide.
Laissez-les sécher complètement, de préférence à l’ombre.
Toutes les informations et les images sont basées sur les dernières informations disponibles au moment de
l’impression et sont sujets à modication.
благодарим ви за закупуването на за детската (бустер) помощна седалк Joyello.
ВАЖНО ПРЕДУПРЕЖДЕНИЕ
: ,
.
,
.
: ,
.
ПРЕДУПРЕЖДЕНИЯ
• ВНИМАНИЕ: Не оставяйте детето без наблюдение в седалката. Винаги дръжте детето по
безопасен начин. Вашето дете може да бъде в опасност, ако по-горните мерки не се спазват.
• ВНИМАНИЕ: Винаги използвайте системата за безопасност и се уверете, че (бустер)

19
BG
помощната седалка е правилно закрепена за стола.
• ВНИМАНИЕ: Винаги използвайте системата за заключване на стола и се уверете, че
(бустер) помощната седалка е правилно закрепена към стола.
• ВНИМАНИЕ! Винаги проверявайте сигурността и стабилността на (бустер) помощната
седалка преди употреба. Не използвайте тази портативна седалка за столове или пейки.
• ВНИМАНИЕ! Този продукт е предназначен за деца, които могат да седят без чужда помощ
и до 3 години или с максимално тегло до 15кг.
• Не използвайте седалката, ако някоя от частите й са счупени, повредени или липсващи.
• Никога не използвайте аксесоари, които не са били оторизирани от производителя.
• Цветът и формата на продукта може да се различава от тези, показани в снимките или
чертежите.
• ВНИМАНИЕ: Винаги поставяйте (бустер) помощната седалка стабилна към столчето с
помощта на предвидените презрамки.
• Да се използва изключително за столчета, чиито размери са по-големи от тези на
седалката.
• Не е препоръчително за деца по-малки от 18 месеца.
• Този продукт е предназначен за деца, които могат да стоят седнали самостоятелно, до
максимална възраст от три години или с максимално тегло от 15 кг.
• Минималният размер на използваната седалката за възрастни, трябва да бъде по-голям
от: 30 см ширина, 31см височина, 43 см .
• Преди да закрепите (бустер) помощната седалка за монтиране върху седалка, винаги
проверявайте пода и седалката на стола да бъдат напълно хоризонтални, никога не
инсталирайте седалката върху столове, които са разположени на наклонени повърхности.
• След като бъде инсталирана, уверете се, че (бустер) помощната седалка е сигурно
закрепена към столчето.
• Никога не използвайте (бустер) помощната седалка за монтиране върху седалка на
счупени или нестабилни столове, сгъваеми столове, люлеещи се столове на столове с
подлакътници.
• Уверете се, че столът за възрастни с (бустер) помощната седалка за монтиране върху
седалка е поставен в позиция, при която детето не е в състояние да използва краката си, за
да блъсне маса или някаква друга конструкция, тъй като това може да доведе до обръщане
на стола за възрастен, върху който е монтирана (бустер) помощната седалка.
• Да не се използва (бустер) помощната седалка за монтиране върху седалка за повече от
едно дете в даден момент.
• Не позволявайте на други деца да играят без надзор в близост до монтираната седалка.
• Не инсталирайте уреда върху столчета за хранене.
()
1. Повдигнете облегалката напълно (фиг.1). При
достигане на правилната позиция на облегалката,
ще чуете “щракване” (фиг.1°). За да завършите
операцията, свалете дръжката, за да настроите
втората ключалка.

20
BG
2. За да регулирате височината на (бустер) помощната седалка,
натиснете двата червени бутони отстрани, и натиснете надолу
краката, за да регулирате различни височини (фиг.2).
: ,
.
+
3. Фиксирайте катарамата правилно, докато не чуете
“щракване”(фиг.3a-3b). Презрамката за кръста“B”може
да се коригира в зависимост от детето, когато седне на
седалката.
: , .
4. Поставете колана за стягане на облегалката“D”в двата
D пръстена на презрамките за кръста“B”(фиг.4а-б).
5. Спуснете облегалката и завъртете (бустер) помощната седалка с главата надолу (Фиг.5).
Прекарайте колан “Е” от дясната към лявата страна, както на фиг.5 и фиг.5b. Следвайте
последователността от фиг.5С до фиг.5f, за да вмъкнете колан “E” както от дясната, така и от
лявата страна на седалката.
6. Моля, поставете (бустер) помощната седалка в центъра на стола и се
уверете, че столът е по-голям от (бустер) помощната седалка (30 х 31x
43 см).
This manual suits for next models
1
Table of contents
Languages:
Other Joyello Car Seat manuals