manuals.online logo
Brands
  1. Home
  2. •
  3. Brands
  4. •
  5. Joyolight
  6. •
  7. Lighting Equipment
  8. •
  9. Joyolight CON-WH-1Z User manual

Joyolight CON-WH-1Z User manual

Five-year warranty
Contact us for complete terms
and conditions.
Joyolight reserves the rights change our products and specifications
at anytime without prior notice and such modification shall be effective
immediately. Contact Joyolight for the latest product information.
JOYOLIGHT GROUP INC.
#12, 5200 Dixie road
Mississauga, ON, L4W 1E4
www.joyolight.ca
sales@joyolight.com
1-877-849-1942 (US)
647-496-8107 (CA)
INS 2022-05
CON-WH-1Z
CON-WH-1Z USER MANUAL
DIM/CCT
2022-05
#12, 5200 Dixie Rd,
Mississauga, ON
Canada L4W 1E4
www.joyolight.ca
[email protected]
1 ZONE CONTROLLER
Five-year warranty
Contact us for complete terms
and conditions.
Joyolight reserves the rights change our products and specifications
at anytime without prior notice and such modification shall be effective
immediately. Contact Joyolight for the latest product information.
JOYOLIGHT GROUP INC.
#12, 5200 Dixie road
Mississauga, ON, L4W 1E4
www.joyolight.ca
[email protected]
1-877-849-1942 (US)
647-496-8107 (CA)
INS 2022-05
CON-WH-1Z
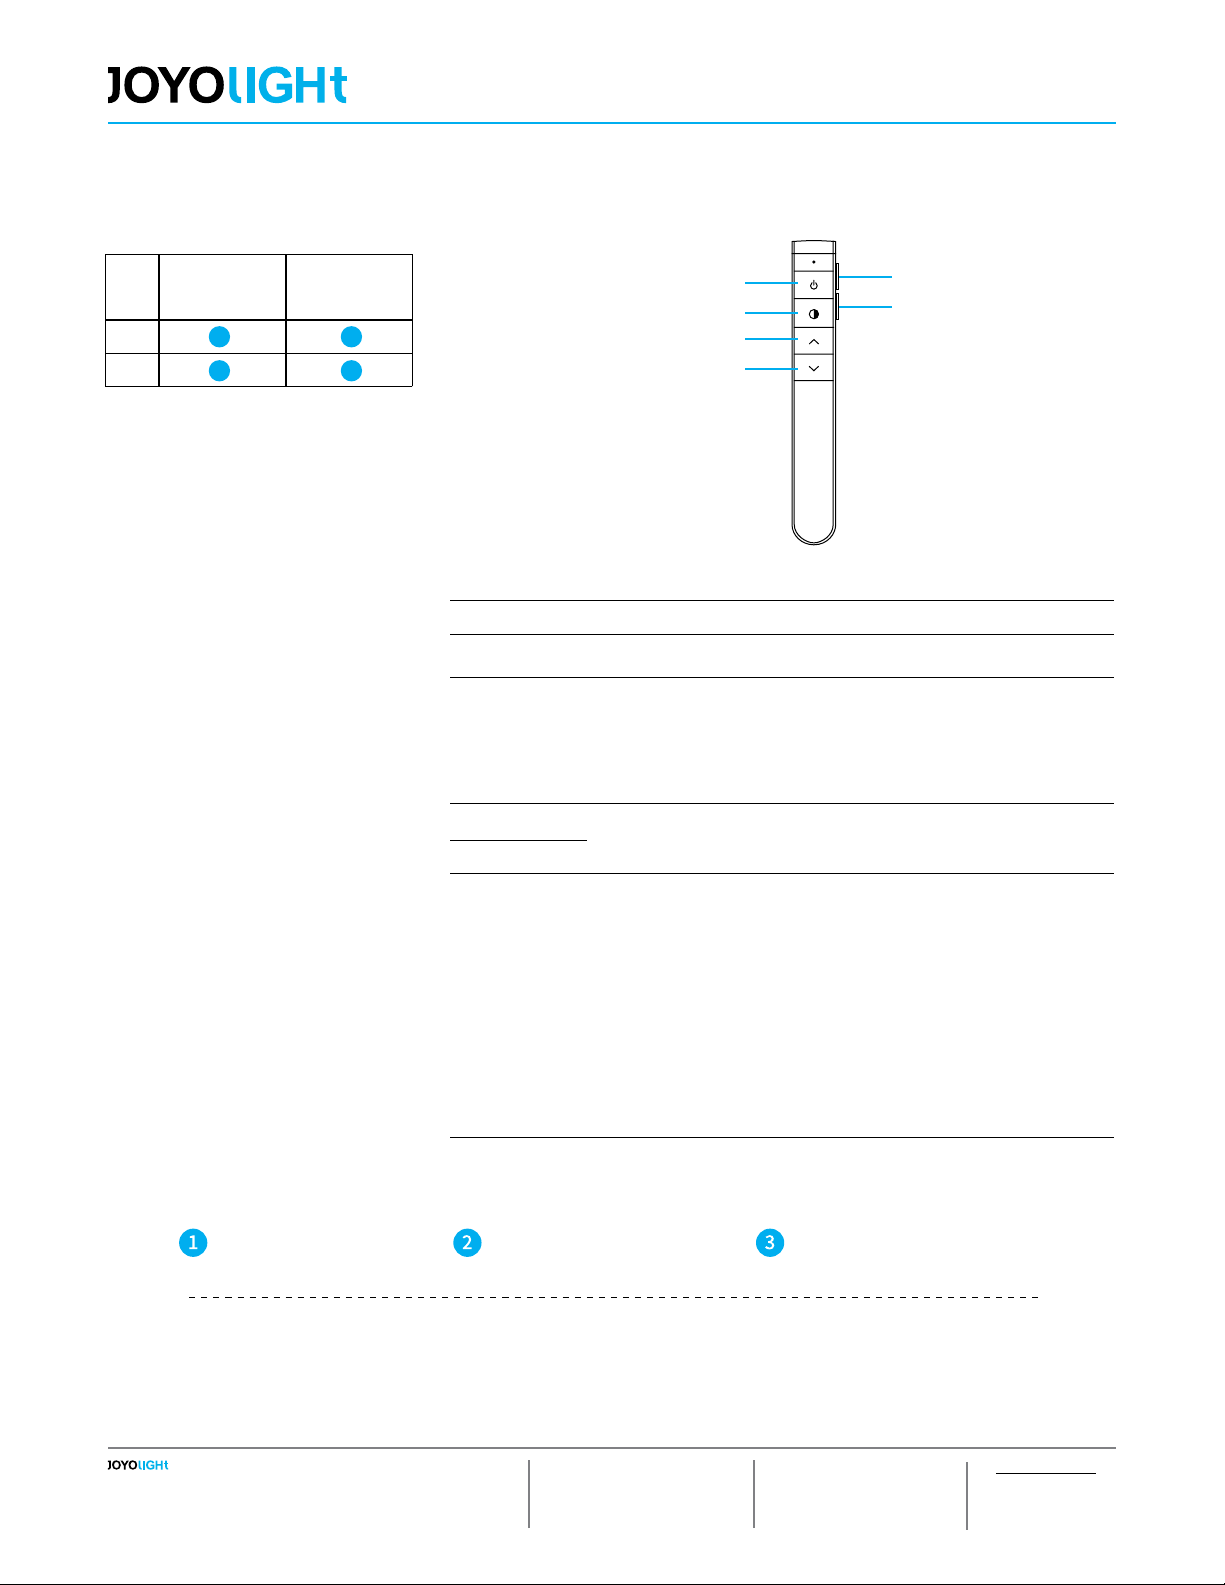
Technical Parameters
Voltage: 3V (2* AAA battery)
RF Frequency: 2.4GHz
Remote Control Distance: up to 30m
Dimension: L140mm*W20mm*H18
Net weight: 46g
ON/OFF DIY 1
DIY 2
Brightness+
DIM/CCT
Brightness-
CONTROLLER 3
CON-WH-1Zone
For DIM/CCT
RECEIVER
RE-501-WIFI
RECEIVER
RE-401-2.4G
DIM
CCT
Name of Key Description
ON/OFF on/off at any time
DIM/CCT
For single color: 20%, 50%, 100% brightness hot key
For CCT: 1)Short pressing: 100%CW, 50%CW+50%WW, 100%WW
hot key
2)Long pressing: Color temperature increase/reduce stepless in
turn
Brightness+ Short press for fast adjustment, long press for ne adjustment
Brightness-
DIY 1- DIY 2
Short press once to call out the previously stored light state;
DIY lighting operation (take DIY1 key as an example):
1) Short press the DIY1 key three times within 3 seconds to
enter the custom operation;
2)Customize the light setting through the “DIM/CCT/Bright-
ness+/Brightness -” key
3)After the lighting is set, press the DIY1 button once to save, or
press the “ONOFF/DIY2 button” to exit without saving.
Note: The entire DIY setting process needs to be completed within 30S,
it will automatically exit after timeout.
Please pay attention to the following 3
points before operation:
1) All equipment in the complete system after
installation should have a unied and unique
code value, so as to achieve the security and
stability of the system.
2) The receiver can only store one code value
and cannot be overwritten. Before learning
the new code value, it is necessary to clear
the original code of the receiver; the remote
controller can only save one code value but
can be overwritten and can also restore the
factory settings. In order to facilitate the later
maintenance, the three components that may
be involved in the system (including receivers,
hand-held remote controllers, and panel re-
mote controllers) can realize mutual learning
of code values.
3) Since the receiver performs code value
learning in the power-on state, in order to
avoid confusion in the area, it is recommend-
ed that each area has an independent power
switch so that the power of other areas can
be easily cut off when the code is being
operated.
Code Pairing
Connecting the load to
the receiver and power
on it.
1.It is necessary to clear the
code rst, if the receiver was
coded before.
2.Batch operation can be
performed within the remote
control range.
Press and hold “DIY 1“ on
the remote control for 5
sec.
Once the indicator of the
remote control ashed quickly,
and the load light ashed 3
times and returned to the ini-
tial state, it enters the pairing
code transmission status.
Press any key to exit and
end the operation.
It will automatically exit code
transmission status after
60 sec.
the receiver will only be controlled by the value code remote controller.
Five-year warranty
Contact us for complete terms
and conditions.
Joyolight reserves the rights change our products and specifications
at anytime without prior notice and such modification shall be effective
immediately. Contact Joyolight for the latest product information.
JOYOLIGHT GROUP INC.
#12, 5200 Dixie road
Mississauga, ON, L4W 1E4
www.joyolight.ca
[email protected]
1-877-849-1942 (US)
647-496-8107 (CA)
INS 2022-05
CON-WH-1Z
Code Clearing
Connecting the load to the
receiver and power on it.
1. The clearing operation
should be nished within 1
minutes after the receiver is
powered on.
2. Batch operation can be
performed within the remote
control range.
Press and hold “ON/
OFF“ key for 20s until
the indicator of remote
control process the state
as 100%-off-100%.
Press and hold “DIY 2“ on the
remote control for 5 sec.
1. Once the indicator of the
remote control ashed quickly,
and the load light ashed 3 times
and returned to the initial state,
it enters the clearing code trans-
mission status.
2. If the original remote control is
lost, the new remote control can
be used for clearing operation.
Press “DIY 2“ to submit
and nish the operation.
The indicator of the remote
control will ash 3 times after
successful operation
Press any key to exit
and end the operation.
It will automatically exit code
transmission status after 60 sec.
The original code value of the receiver needs to be cleared before learning a new code.
Restoring factory settings of remote control
Used to unify system code values or copy a new
remote controls. Each remote controller has its own unique
code at the time of delivery. When there are multiple remote
controllers in a system, one of them must be selected as
a main. The others should copy its RF code.
Code learning operation
between remote controls:
Turn off the power sup-
ply of the controllers.
Press and hold “ON/OFF“
for 5 sec until indicator of
remote control turns off
Once the indicator of the
remote control ashed quickly,
and the load light ashed 3
times and returned to the ini-
tial state, it enters the pairing
code transmission status.
Turn on the power supply of
the controllers. Its indicator
will ash 3 times after suc-
cessful code leaning
It will automatically exit code
transmission status after 60 sec.
1. Main Remote Control: Press and hold “DIY 1“ for 5 sec. Remote
control enters the pairing code transmission status when its indicator
ashes quickly.
2. New remote control: Press and hold “ON/OFF“ for 5 sec. The re-
mote control enters learning status when its indicator turn from 100%
to off.
3. The indicator of the new remote control will ash 3 times after
successful code learning.
Remote Control RF code
learning from controllers
Five-year warranty
Contact us for complete terms
and conditions.
Joyolight reserves the rights change our products and specifications
at anytime without prior notice and such modification shall be effective
immediately. Contact Joyolight for the latest product information.
JOYOLIGHT GROUP INC.
#12, 5200 Dixie road
Mississauga, ON, L4W 1E4
www.joyolight.ca
[email protected]
1-877-849-1942 (US)
647-496-8107 (CA)
INS 2022-05
CON-WH-1Z
Restoring factory settings
of remote control0
1. Press and hold “B“ key for 20 sec until the indicator of re-
mote control process the state as 100%-off-100%.
2. Press “D“ to submit and nish the operation.
The indicator of the remote control will ash three times after
successful operation.
Linking & Unlink
Linking
Unlinking
Connecting the load to
the receiver and power
on it.
1. It is necessary to clear
the code if the receiver was
coded before.
2. Batch operation can be
performed within the remote
control range.
3. Please remember to cut
off other un-code zones’
power, or they will be paired
together.
It will also automatically exit
code transmission status
after 60 sec.
Connecting the load to
the receiver and power
on it.
1. The clearing operation
should be nished within 1
minute after the receiver is
2. Batch operation can be
performed within the remote
control range.
Press and hold “C“ on the
remote control for 5 sec.
The indicator of the remote
control will ash quickly.
Matching coding nishes when
you see the load light ashes
3 times and return to the initial
state.
Press and hold “D“ on the
remote control for 5 sec.
Matching coding nishes when
The load light ashes 3 times
Press any key to exit and
end the operation.
It will also automatically exit
code transmission status
after 60 sec.
Press any key to exit and
end the operation.
It will also automatically exit
code transmission status
after 60 sec.
Code learning operation
between remote controls:
Used to unify system code values or copy a new remote con-
trol. Since each remote control has its own unique RF code at
the time of delivery, when there are multiple remote controls
in one system, one of them must be selected as a main, and
others should copy its RF code.
1. Main remote control: Press and hold “C“ key for 5 sec.
The indicator of the remote control will ash quickly.
That means it enters the pairing mode
2. New remote control: Press and hold “B“ key for 5 sec.
The indicator will turn from 100% to off means it enters
learning code status.
3. The indicator of the new remote control will ash
three times after successful code learning.
Remote control RF code
learning from controllers
1.Turn off the power supply of the controllers.
2.Press and hold “B“ for 5 sec until the indicator of remote
control turns off.
3.Turn on the power supply of controllers. The indicator of the
remote control will ash three times after successful code
learning.
Note: The distance from controllers to remote controls
should be less than 2m.

This manual suits for next models

2

Other Joyolight Lighting Equipment manuals

Joyolight LL2P-IP55 User manual

Joyolight

Joyolight LL2P-IP55 User manual

Joyolight CON-RGB User manual

Joyolight

Joyolight CON-RGB User manual

Joyolight LC2P-IP55 User manual

Joyolight

Joyolight LC2P-IP55 User manual

Popular Lighting Equipment manuals by other brands

Jetson AMBER Volt TBH Guide

Jetson

Jetson AMBER Volt TBH Guide

SOMFY Pergola sc io installation guide

SOMFY

SOMFY Pergola sc io installation guide

Hoftronic Double Radiance User instructions

Hoftronic

Hoftronic Double Radiance User instructions

Stairville Stage TRI LED Bundle Extension user manual

Stairville

Stairville Stage TRI LED Bundle Extension user manual

LIGMAN FUN-50022 installation manual

LIGMAN

LIGMAN FUN-50022 installation manual

Lampo SQLED Series instructions

Lampo

Lampo SQLED Series instructions

Singercon SPIDER user manual

Singercon

Singercon SPIDER user manual

Ikan LB10-2PT-KIT quick start guide

Ikan

Ikan LB10-2PT-KIT quick start guide

Unex RISP 12 W One operating manual

Unex

Unex RISP 12 W One operating manual

Energetic Lighting E2WPA Series installation instructions

Energetic Lighting

Energetic Lighting E2WPA Series installation instructions

TECshow NEBULA FLAT 162 user manual

TECshow

TECshow NEBULA FLAT 162 user manual

Philips ED231 manual

Philips

Philips ED231 manual

Phantom PHOTOBIO VP user manual

Phantom

Phantom PHOTOBIO VP user manual

TOPP C160 Installation and user instructions

TOPP

TOPP C160 Installation and user instructions

Titanium TT-ACC-FASTCLIP-2 manual

Titanium

Titanium TT-ACC-FASTCLIP-2 manual

Lightolier Aleron A-8 datasheet

Lightolier

Lightolier Aleron A-8 datasheet

Beamz Pro NEUTRON-DOT user manual

Beamz Pro

Beamz Pro NEUTRON-DOT user manual

LIGMAN MIC 5 MI-50393 installation manual

LIGMAN

LIGMAN MIC 5 MI-50393 installation manual

manuals.online logo
manuals.online logoBrands
  • About & Mission
  • Contact us
  • Privacy Policy
  • Terms and Conditions

Copyright 2025 Manuals.Online. All Rights Reserved.