Juice DIRECTOR 2 User manual

Benutzerhandbuch | JUICE DIRECTOR 2 | 1
User Manual
JUICE DIRECTOR 2
IMPORTANT
Read this manual before you start using the device!
Failure to comply with these instructions may result in injury or death,
damage to the device and harm to the environment. Keep the manual in a
safe place for future reference.

User Manual | JUICE DIRECTOR 2 | 2
Content
Safety Instructions........................................................................... 3
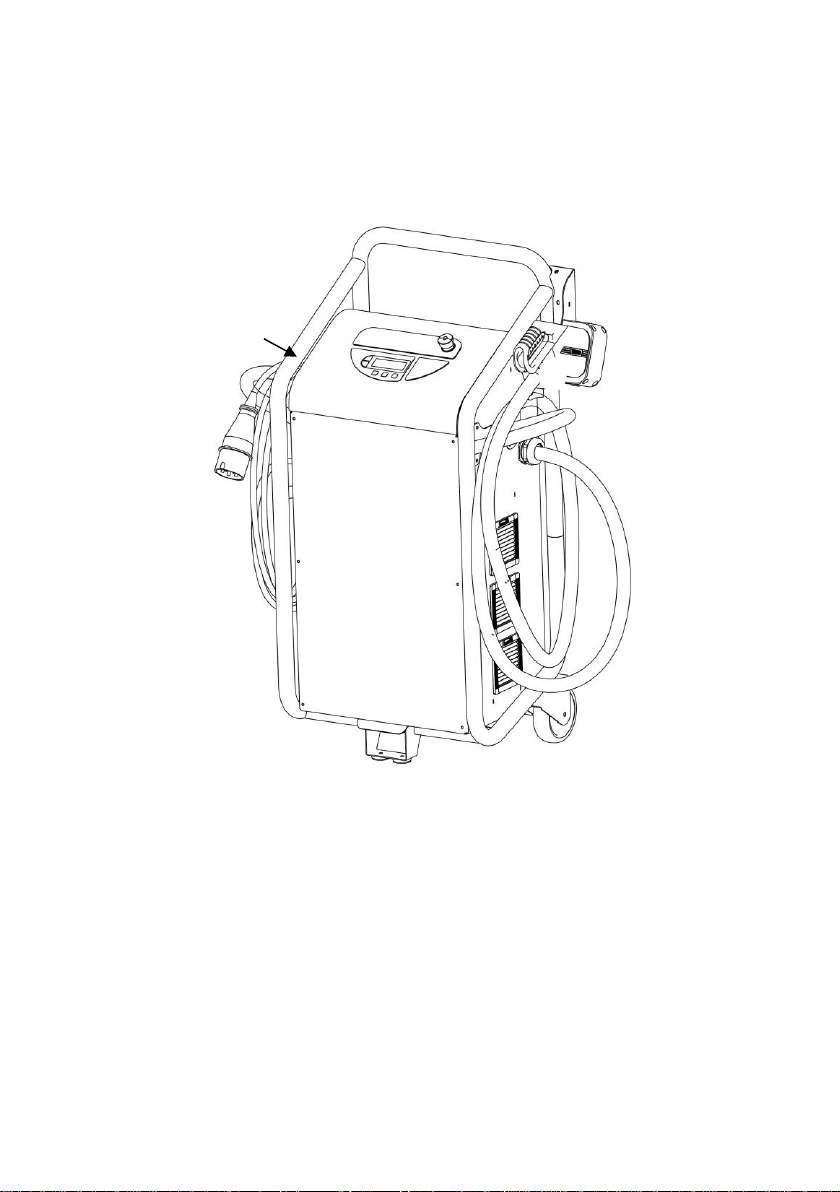
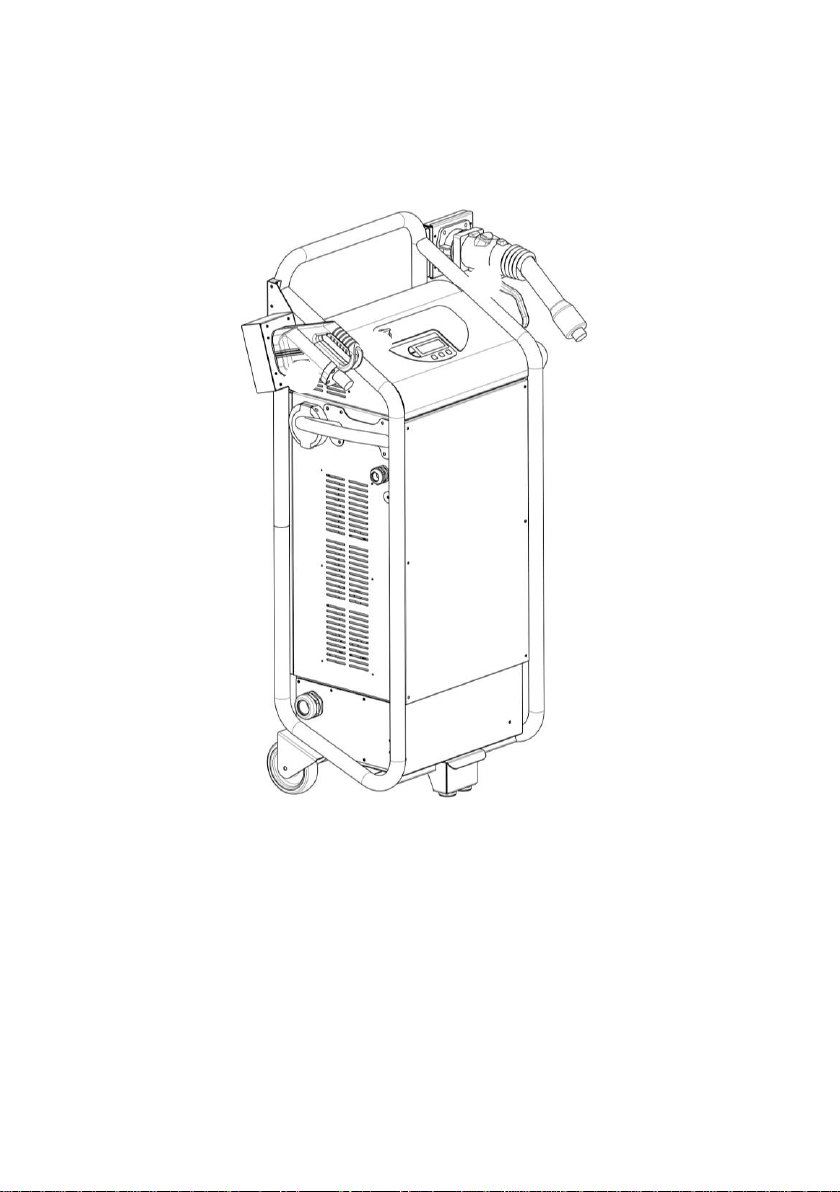
View of the device ........................................................................... 6
Operating panel .............................................................................. 9
Start-up ........................................................................................ 10
Charging process.......................................................................... 11
Select charging technology (plug selection) ............................... 11
Start DC CCS charging operation .............................................. 12
Start DC CHAdeMO charging operation..................................... 14
Explanations of the display in DC charging mode....................... 16
Start AC Type 2 charging operation ........................................... 17
Explanations of the display in AC charging mode ....................... 18
Complete the charging process or end it before it is completed.. 19
Settings ........................................................................................ 21
Navigation in the Service Menu.................................................. 23
Function Text Input.................................................................... 23
Function Value Selection ........................................................... 25
Selecting the language settings ................................................. 26
Adjust the device to the actual mains power............................... 28
RFID Train Whitelist ................................................................... 29
Enter License Key...................................................................... 30
Troubleshooting ............................................................................ 31
Error description........................................................................ 31
Technical Data.............................................................................. 37
Instructions for disposal................................................................. 39
Manual version 3.0 EN
Suitable for ECP Version 2.x

3
ATTENTION
Read manual before you start using the device!
Safety Instructions
For your safety and for the optimal use of the device, read this user
manual carefully before installing and using the device. To avoid any
unnecessary errors and accidents, it is important that all persons
using the device are familiar with its operation and the safety regula-
tions. Keep this user manual in a safe place, and pass it on to any
subsequent owners of this device.
GEFAHR
For trained users only!
This device is designed for professional use only by instructed busi-
ness users.
General safety instructions
•No changes may be made to the technical features or the product
itself for reasons of safety.
•Only specialists are allowed to carry out any repairs to the device.
Contact the manufacturer or distributor of the device. Always insist
on the use of original spare parts.
•The device is tested and approved in accordance with the standard
for the charging infrastructure of electric vehicles (IEC 61851-1).

User Manual | JUICE DIRECTOR 2 | 4
WARNING
Risk of injury!
Start-up
•When unpacking, check if the device is damaged. If in doubt, con-
sult the manufacturer or distributor of the device. Do not use the de-
vice if it is damaged.
•Remove all the packaging materials before use.
•If any installation work is required to connect the device, this must
be done by a qualified installer or another qualified individual.
DANGER
Mortal danger!
Use
•The components inside the device are always live when the device
is in use. Under no circumstances should you open the device when
it is connected to the network/mains. Furthermore, all plugs must be
unplugged and stored on the cable holders (CCS, type 2,
CHAdeMO).
•Never use the device if the power cord, charging cable, plug, control
panel or the housing of the device is damaged.
•People (including children) who are unable to use this device safely,
due to their lack of experience or knowledge, or due to their physical
or mental ability, should not use this device without the supervision
or instruction of a responsible person.

5
ATTENTION
Risk of damage!
•Do not unplug the device from the mains socket whilst it is charging.
•Only press the Emergency stop button in an emergency!
To end a normal charging session see section “Charging proce-
dure” p. 11

User Manual | JUICE DIRECTOR 2 | 6
View of the device
JUICE DIRECTOR 2 CHAdeMO
:
Operating panel, Emergency stop switch, Plug holder
Optional: AC type2 charging socket (AC interface for your
charging cable: Renault, Smart, Tesla, etc),
CHAdeMO plug (DC quick charger plug for your electric vehi-
cle: Citroen, Mitsubishi, Nissan, Peugeot, Subaru, Toyota, etc.),
Cable holder, Grid connection, Front cover

7
JUICE DIRECTOR 2 Combo2
Operating panel, Emergency stop switch, Plug holder
Optional: AC type2 charging socket (AC interface for your
charging cable: Renault, Smart, Tesla, etc),
CCS plug (DC quick charger plug for your electric vehicle:
BMW, GM, VW etc.), Cable holder, Grid connection,
Front cover

User Manual | JUICE DIRECTOR 2 | 8
JUICE DIRECTOR 2 3in1
Operating panel, Emergency stop switch, Plug holder
AC type2 charging socket (AC interface for your charging cable:
Renault, Smart, Tesla, etc),
CCS plug (DC quick charger plug for your electric vehicle:
BMW, GM, VW etc.), CHAdeMO plug (DC quick charger plug
for your electric vehicle: Citroen, Mitsubishi, Nissan, Peugeot, Sub-
aru, Toyota, etc.), Front cover

9
Operating panel
Display,
Charging plug display,
Charge indicator,
Error indicator,
Selection keys up / down,
Start key,
Stop key,
Diamond key (home screen)

User Manual | JUICE DIRECTOR 2 | 10
Start-up
A CEE 32A connector (IEC 60309-2, 400 V AC, 45-65 Hz) is sufficient
for single-user charging stations.
A CEE 63A connector and/or the corresponding installation terminals
are required for two-user and three-user charging stations.
The self-test starts once the quick charging station is connected with
the mains power. The following screen display appears (the display
may vary slightly depending on the version of the device):
Home screen
You are now in the home screen and can carry out a “Charging oper-
ation” p. 11.
If nothing appears on the display, check whether the mains voltage is
on. If there is an error message on the display, you can find help in the
section “Troubleshooting” p. 31.
Plug selection
▶DC CCS
>DC CHAdeMO
>AC Type 2

11
Charging process
Select charging technology (plug selection)
Please note that charging from 80% to 100% can take longer
than the quick charging process from 0% to 80%(to protect
the vehicle batteries against overloading).
Depending on which version of the charging station you have, you
can choose between one to three charging technologies.
Usually by using the Diamond key you return to the Home
screen. Otherwise please follow the instructions on the dis-
play.
Home screen
1. Use the Selection keys / to select the charging technol-
ogy you want to use to charge your vehicle.
2. Confirm your selection by pressing the Start key .
Plug selection
▶DC CCS
>DC CHAdeMO
>AC Type 2

User Manual | JUICE DIRECTOR 2 | 12
The different charging processes are described in the following chap-
ters.
Start DC CCS charging operation
With the DC CCS process, the batteries of your vehicle are charged
with DC. The quick charging process charges the batteries of your ve-
hicle up to 100%. The charging operation can also be terminated man-
ually before it is completed.
1. Make sure that the charging station is prepared as described
in the section "Start-up" p. 10 and that you have selected
the DC CCS charging technology p. 11.
2. Set your vehicle to Charging mode (follow the instructions in
the user manual of your vehicle for this purpose).
3. Insert the CCS plug into the corresponding quick charging
socket of your vehicle.
4. The charging station checks the connection and establishes a
communication line with your vehicle (the green charging plug
indicator lights up). This takes about 15 seconds. Then a
display similar to the following one will appear:

13
5.
The charging process will now start. The charging indicator
will be flashing on the control panel. Depending on the
temperature conditions and vehicle configuration, the cooling
system in your vehicle, and the one in the charging station,
will start running.
Remaining 00:36:30
Energy 0.01kWh
Power 20.1kW
█████░░░░░░░░░░░░░░▕

User Manual | JUICE DIRECTOR 2 | 14
Start DC CHAdeMO charging operation
With the DC CHAdeMO process, the batteries of your vehicle are
charged with DC. The quick charging process charges the batteries of
your vehicle up to 80%.
1. Make sure that the charging station is prepared as described
in the section "Start-up" p. 10 and that you have selected
the DC CHAdeMO charging technology p. 11.
2. Set your vehicle to charging mode (follow the instructions in
the user manual of your vehicle for this purpose).
3. Insert the CHAdeMO plug into the corresponding quick
charging socket of your vehicle. To do this, put the CHAdeMO
plug directly in the charging socket of your vehicle and lock
the connection with the lever.
FIRST press plug
into vehicle socket
Then pull
lever to lock

15
4. Press the Start key on the operating panel. The charging
station checks the connection and establishes a communica-
tion line with your vehicle (the green charging plug indicator
lights up). This takes about 10 seconds. Then a display
similar to the following one will appear (the green charging
plug indicator will go off):
The charging process will now start. The charging indicator
will be flashing on the control panel. The LED display on
the CHAdeMO plug will light up red. Depending on the tem-
perature conditions and vehicle configuration, the cooling
system in your vehicle, and the one in the charging station,
will start running.
Remaining 00:46:34
Energy 0.01kWh
Power 18.5kW
██░░░░░░░░░░░░░░░░░▕

User Manual | JUICE DIRECTOR 2 | 16
Explanations of the display in DC charging mode
“Remaining” (in the example “00:36:30”) indicates in hours, minutes
and seconds the time until when the battery will be fully charged.
“Energy” (in the example “0 01kWh”) indicates how many kilowatt
hours have already been charged in the battery of your vehicle during
the current charging process.
“Power” (in the example “20.1kW”) indicates how much power the
batteries of your vehicle are currently taking up.
The charge power adjusts itself depending on the charging
phase, cooling capacity and the power consumption of the
vehicle batteries that is currently possible.
Remaining 00:36:30
Energy 0.01kWh
Power 20.1kW
█████░░░░░░░░░░░░░░▕

17
Start AC Type 2 charging operation
With the AC charging, the batteries of your vehicle are charged with an
alternating current. The charge power depends on the onboard
charger.
1. Make sure that the charging station is prepared as described
in the section "Start-up" p. 10
2. Set your vehicle to Charging mode (follow the instructions in
the user manual of your vehicle for this purpose).
3. Use your entrained charging cable (either type 2 to type 2 or
type 1 to type 2). Insert the type 2 plug into the AC charging
socket on the charging station. Next connect your vehicle with
the charging cable.
4. The charging station checks the connection and establishes a
communication line with your vehicle (the green charging plug
indicator lights up). This takes between 1 –30 seconds
depending on the vehicle. Then a display similar to the follow-
ing one will appear:

User Manual | JUICE DIRECTOR 2 | 18
The charging indicator will be flashing on the control
panel. Depending on the temperature conditions and vehicle
configuration, the cooling system in your vehicle, and the one
in the charging station, will start running.
Explanations of the display in AC charging mode
“Charging period” (in the example “00:00:01”) indicates the charging
time that has elapsed up to now in hours, minutes and seconds.
The charge power adjusts itself depending on the charging
phase, cooling capacity and the power consumption of the
vehicle batteries that is currently possible.
Charge Time 00:00:01
Cancel with █ button
Charge Time 00:00:01
Cancel with █ button

19
Complete the charging process
or end it before it is completed
After the charging period has finished, the charging station automati-
cally stops charging. The blue charge indicator goes out.
ATTENTION
Risk of damage!
Please do NOT use the Emergency stop switch to stop the charging
operation, ONLY USE IT IN AN EMERGENCY to cancel a charging
process!
To end (when completed)…
a. ... the DC CCS charging process, remove the CCS plug from
your vehicle. Insert the CCS plug into the plug holder.
b. ... the DC CHAdeMO charging process, remove the
CHAdeMO plug from your vehicle, by pressing the release
button at the top of the CHAdeMO plug and carefully pull the
plug out of the socket. Insert the CHAdeMO plug into the
plug holder.
FIRST press button
➔Then pull plug and
release lever

User Manual | JUICE DIRECTOR 2 | 20
c. …the AC Type 2 charging process, remove the charging ca-
ble from your vehicle. Then you can pull the plug out of the
type 2 AC charging socket on the charging station.
If you want to stop an active charging process before it has fully com-
pleted, then follow the steps below:
1. Select the charging technology that you want to stop,
“Select Charging Technology (plug selection)“ p. 11.
2. Press the Stop key and wait until the charging station has
disconnected the connection to the vehicle. The green charg-
ing plug indicator will light up during the disconnection
process and the blue charge indicator will go out. The
summary of the charging process will appear on the display
after the disconnection process (after approx. 5 seconds).
3. To end the charging process when it is fully completed, pro-
ceed as described on the previous page p. 19Fehler!
Textmarke nicht definiert..
Table of contents
Languages:
Other Juice Batteries Charger manuals

Juice
Juice JUI-MAINS-PD-PLUG-3.6A User manual

Juice
Juice ULTRA User manual

Juice
Juice JUI-MAINS-PD-PLUG-USBA/C-30W User manual

Juice
Juice EL-JCME User manual

Juice
Juice JUI-MAINS-TYPEC-25W-ECO User manual

Juice
Juice JUI-MAINS-PD-GAN-USBA/C-65W User manual

Juice
Juice Travel User manual

Juice
Juice Charger Easy User manual

Juice
Juice JUI-MAINS-MICRO-1A User manual
Popular Batteries Charger manuals by other brands

Infinite Peripherals
Infinite Peripherals LINEA PRO 6 quick start guide

DeWalt
DeWalt DCB1104 Original instructions

Sunoptic Technologies
Sunoptic Technologies LIT-210 Operation manual

DEFA
DEFA 125A user manual

Chargetek
Chargetek RTIC-1120-W installation manual

Metabo HPT
Metabo HPT UC 18YFSL Safety instructions and instruction manual