JUKI MO-735 User manual

Instruction Manual
Instrukcja obsługi
Bedienungsanleitung
Manuel d’instructions
MO-735
2-Needle,2/3/4/5-ThreadOverlock+CoverStitchSewingMachine
2-igłowa, 2/3/4/5-owerlokowa maszyna do szycia + krycie ściegów
Überwendlich-NähmaschineMit2Nadeln,2/3/4/5Fäden+CoverStich
Surjeteuse-Raseuse2Aiguilles,2/3/4/5Fils+PointEnveloppant
IMPORTANT:
Avant de mettre la machine en marche, lire
attentivement et assimiler les regles de securite
de ce manuel.
Conserver le manuel afin de pouvoir le consulter
ul terieurement.
WAŻNE:
Uważnie, ze zrozumieniem przeczytaj wszystkie
zasady bezpieczeństwa przed użyciem maszyny.
Zachowaj tę instrukcję dla przyszłego użytku.
WICHTIG:
Alle sicherheitsvorschriften vor gebrauch der
nähmaschine sorgfältig durchlesen.
Bewahren Sie diese bedienungsanleitung für
weitere bezüge auf.
IMPORTANT:
Read all safety regulations carefully and under-
stand them before using your sewing machine.
Retain thisinstruction manual for future reference.
®

1
“IMPORTANT SAFETY INSTRUCTIONS”
When using an electrical appliance, basic safety precautions should always be followed, including the following: Read all instructions before
using this overlock sewing machine.
“DANGER_____To reduce the risk of electric shock:”
1. The appliance should never be left unattended when plugged in.
2. Always unplug this appliance from the electric outlet immediately after using and before cleaning.
3. Always unplug before re-lamping. Replace bulb with same type rated max.15W (120V), max.10W (220-240V) for model MO-735.
“WARNING_____To reduce the risk of burns, fire, electric shock, or injury to persons:”
1. Do not allow this appliance to be used as a toy. Close attention is necessary when this appliance is used by or near children and infirm
persons.
2. Use this appliance only for its intended use as described in this manual. Use only attachments recommended by the manufacturer as
contained in this manual.
3. Never operate this appliance if it has a damaged cord or plug, if it is not working properly, if it has been dropped or damaged, or dropped
into water. Return the appliance to the nearest authorized dealer or service center for examination, repair, electrical or mechanical
adjustment.
4. Never operate the appliance with any air openings blocked. Keep ventilation openings of the sewing machine and foot control free from
the accumulation of lint, dust, and loose cloth.
5. Keep fingers away from all moving parts. Special care is required around the sewing machine needle and knife.
6. Always use the proper stitch plate. The wrong plate can cause the needle to break.
7. Do not use bent needles.
8. Do not pull or push fabric while stitching. It may deflect the needle causing it to break.
9. Switch the sewing machine off ''O'' when making any adjustments in the needle area, such as threading needle, changing needle,
threading looper, or changing presser foot and the like.
10. Always unplug the machine from the electrical outlet when removing covers, when covers are opened to raise the knife or thread the
loopers, when lubricating or when making any other user servicing adjustments mentioned in the instruction manual.
11. Never drop or insert any object into any opening.
12. Do not use outdoors.
13. Do not operate where aerosol (spray) products are being used or where oxygen is being administered.
14. To disconnect, turn all controls to the off ''O'' position, then remove plug from outlet.
15. Do not unplug by pulling on cord. To unplug, grasp the plug, not the cord.
16. Basically, the machine should be disconnected from the electricity supply when not in use.
17. If the power cord of this appliance is damaged, it must be replaced with a special cord by your nearest authorized dealer or service
center.
18. This appliance is provided with double insulation. (except USA/CAN)
Use only identical replacement parts. See instructions for servicing double insulated appliances.
19. If oil gets in eyes, immediately, rinse the oil out with water. If you swallow oil by mistake, immediately consult a medical doctor.
“SERVICING DOUBLE-INSULATED PRODUCTS
(USA and Canada version excepted)”
In a double-insulated product, two systems of insulation are provided instead of grounding. No grounding means is provided on a double-
insulated product nor should a means for grounding be added to the product. Servicing a double-insulated product requires extreme care
and knowledge of the system and should only be done by qualified service personnel. Replacement parts for a double-insulated product
must be identical to those parts in the product. A double-insulated product is marked with the words DOUBLE INSULATION or DOUBLE
INSULATED.
The symbol may also be marked on the product.
“SAVE THESE INSTRUCTIONS”
''This overlock sewing machine is intended for household use only.''

“WANE INSTRUKCJE EZPIECZESTWA”
Używając urządzeń elektrycznych, należy zawsze przestrzegać podstawowych zasad bezpieczeństwa, łącznie z poniższymi.
Przeczytaj całą instrukcję przed użyciem owerlokowej maszyny do szycia.
“NIEEZPIECZESTWO!________ W celu zmniejszenia ryzyka porażenia prądem.”
1. Nigdy nie należy pozostawiać podłączonego urządzenia bez nadzoru.
2. Zawsze odłączaj urządzenie od źródła zasilania natychmiast po użyciu i przed czyszczeniem.
3. Zawsze odłączaj przed wymianą lamp. Zastąp żarówkę tym samym typem maks. W (), maks. W() dla modelu O.
“OSTRZEENIE!________ W celu zmniejszenia ryzyka poparzeń, pożaru, porażenia prądem lub obrażeń.”
1. aszyna nie jest przeznaczona do zabawy. Zachowaj szczególną ostrożność, gdy urządzenie jest używane przez lub przy dzieciach i chorych.
2. Używaj maszyny wyłącznie zgodnie z przedstawionym w instrukcji przeznaczeniem. Używaj tylko dodatków zalecanych przez producenta,
zgodnie ze wskazaniami instrukcji.
3. Nigdy nie używaj maszyny, jeśli ma uszkodzony przewód lub wtyczkę, nie działa właściwie, została upuszczona, uszkodzona lub wpadła do
wody. Przekaż maszynę do najbliższego autoryzowanego punktu sprzedaży/naprawy do sprawdzenia, naprawy lub modyfikacji (mech./elektr.).
4. Nigdy nie używaj urządzenia z zablokowanymi otworami wentylacyjnymi. Chroń otwory wentylacyjne maszyny i pedału kontrolnego
przed nagromadzeniem kłaczków, kurzu i ścinków materiału.
5. Trzymaj palce z dala od poruszających się części. Okolice igły i noża maszyny wymagają zachowania szczególnej ostrożności.
6. Zawsze używaj właściwej płytki ściegowej. Zła płytka może spowodować złamanie igły.
7. Nie używaj wygiętych igieł.
8. Nie ciągnij i nie pchaj materiału w czasie szycia. oże to spowodować odchylenie igły i doprowadzić do jej złamania.
9. Wyłącz mazynę nastwiając ją na "" przy wykonywaniu jakichkolwiek modyfikacji w okolicach igły, takich jak nawlekanie igły, zmienianie igły,
nawlekanie sczepiarki, zmienianie stopki itp.
10. Zawsze odłączaj maszynę od źródła zasilania przed usunięciem pokryw, kiedy pokrywy są otwarte by unieść nóż lub nawlec sczpiarkę, przed
naoliwianiem lub wykonywaniem innych czynności serwisowych wspomnianych w instrukcji.
11. Nigdy nie wkładaj ani nie upuszczaj niczego do żadnego z otworów.
12. Nie używać na zewnątrz.
13. Nie używaj w miejscach, w których stosowane sa produkty w aerozolu lub gdzie dostarczany jest tlen.
14. W celu wyłączenia ustaw wszystkie kontrolki na "O", a następnie wyjmij wtyczkę z gniazdka.
15. Nie odłączaj przez ciągnięcie kabla. W celu odłączenia chwyć wtyczkę, nie przewód.
16. Kiedy maszyna nie jest używana, powinna być odłączona od źródła prądu.
17. W razie uszkodzenia przewodu musi on zostać zastąpiony przez specjalny kabel w najbliższym autoryzowanym punkcie sprzedaży/naprawy.
18. Urządzenie jest wyposażone w podwójną izolację (poza USA/Kanadą).
Używaj tylko identycznych części zamiennych (patrz instrukcje serwisowania urządzeń z podwójną izolacją).
19. Jeśli olej dostanie się do oczu, natychmiast spłucz go wodą. Jeśli przez pomyłkę połkniesz olej, natychmiast skonsultuj się z lekarzem.
“SERWISOWANIE PRODUKTÓW Z
PODWÓJNĄ IZOLACJĄ”
W produktach z podwójna izolacją zamiast uziemienia stosuje się dwa systemy izolacji. Urządzenia nie są wyposażone w żadne środki
uziemiania, nie powinny one też być dodawane do produktu. Serwisowanie urządzeń z podwójną izolacją wymaga niezwykłej ostrożności
i znajomości systemów i powinno być wykonywane tylko przez wykwalifikowany personel. Części zamienne muszą być identyczne z
występującymi w produkcie. Urządzenie jest oznaczone słowami PODWÓJNA IZOLACJA lub PODWÓJNIE IZOLOWANE.
Ten symbol również może się pojawić na produkcie.
“ZACHOWAJ INSTRUKCJĘ”
Ta owerlokowa maszyna do szycia jest przeznaczona wyłącznie do użytku domowego.
2

3
“WICHTIGE SICHERHEITSHINWEISE”
Beim Gebrauch eines elektrischen Gerätes sind folgende Sicherheitsmassnahmen zu beachten:
“GEFAHR_____Zum Schutz vor elektrischem Schlag:”
1. Die Overlockmaschine nie unbeaufsichtigt stehen lassen, solange sie am Stromnetz angeschlossen ist.
2. Nach Gebrauch und vor einer Reinigung die Maschine immer vom Stromnetz trennen.
3.VoreinemGlühlampenwechselimmerNetzsteckerherausziehen.MO-735:max.15W(120V),max.10W(220-240V),Glühlampenverwenden.
“ACHTUNG_____Zum Schutz vor Verbrennungen, Brand, elektrischem Schlag und Verletzungen von
Personen:”
1. Die Overlockmaschine nicht als Spielzeug benutzen. Erhöhte Vorsicht ist geboten, wenn die Maschine von Kindern oder in derNähe von
Kindern gebraucht wird.
2. Die Overlockmaschine nur zu dem in diesem Anleitungsbuch beschriebenen Zweck benutzen. Es ist nur das vom Hersteller empfohlene
Zubehör zu verwenden.
3. Die Overlockmaschine nicht benutzen, falls Kabel oder Stecker beschädigt sind, die Maschine nicht störungsfrei näht, sie auf den Boden
oder ins Wasser fallengelassen oder beschädigt wurde. Bringen Sie Ihre Overlockmaschine zum nächstgelegenen Händler oder
entsprechenden Fachmann zur Überprüfung oder Reparatur.
4. Bei Gebrauch der Overlockmaschine Lüftungsschlitze nicht blockieren und diese freihalten von Fusseln, Staub und Stoffrückständen.
5. Finger von allen beweglichen Teilen fernhalten. Spezielle Vorsicht ist im Bereich der Overlock-Nadeln und-Messer geboten.
6. Immer eine original Overlock-Stichplatte benutzen. Eine falsche Stichplatte kann zu Nadelbruch führen.
7. Keine krummen Nadeln benutzen.
8. Während des Nähens den Stoff weder ziehen noch stossen. Das kann zu Nadelbruch führen.
9. Hauptschalter immer auf „O“ stellen bei Tätigkeiten im Bereich der Nadeln wie Einfädeln, Nadeln wechseln, Nähfuss wechseln, usw.
10. Bei den im Anleitungsbuch aufgeführten Unterhaltsarbeiten bei geöffneter Maschine, wie Greifer einfädeln, Messer hochstellen, Ölen,
Glühlampen wechseln usw. die Overlockmaschine vorher immer vom Stromnetz trennen.
11. Keine Gegenstände in Öffnungen an der Maschine stecken.
12. Die Overlockmaschine nicht im Freien benutzen.
13. Die Overlockmaschine nicht benutzen wo Treibgasprodukte (Sprays) oder Sauerstoff verwendet werden.
14. Zum Ausschalten Hauptschalter auf „O“ stellen und Stecker herausziehen.
15. Beim Trennen vom Stromnetz immer am Stecker und nicht am Kabel ziehen.
16. Grundsätzlich sollte das Gerät bei Nichtgebrauch durch Ausziehen des Steckers vom Stromnetz getrennt werden.
17. Wenn das elektrische Kabel beschädigt ist, muss es durch ein original Kabel von Ihrem nächstgelegenen Händler oder ServiceCenter
ersetzt werden.
18. Wenn Öl ins Auge eindringt, dann sofort das Öl mit wasser ausspülen. Wenn Sie Öl versenentlich schlucken,dann sofort einen
Art beraten.
“WARTUNG DOPPELISOLIERTERPRODUKTE”
Ein doppelisoliertes Produkt ist mit zwei Isolationseinheiten anstelle einer Erdung ausgestattet. Ein Erdungsmittel ist in einem doppelisolierten
Produkt nicht enthalten und sollte auch nicht eingesetzt werden. Die Wartung eines doppelisolierten Produktes erfordert höchsteSorgfalt und
beste Kenntnisse des Systems und sollte daher nur von qualifiziertem Personal vorgenommen werden. Verwenden Sie für Service und
ReparaturnurOriginal-Ersatzteile.Ein doppelisoliertesProduktistfolgendermassengekennzeichnet: „Doppelisolierung“oder„Doppeltisoliert“.
Das Symbol kann ebenfalls ein solches Produkt kennzeichnen.
“SICHERHEITSHINWEISESORGFÄLTIGAUFBEWAHREN”
Diese Overlockmaschine ist nur für den Haushaltgebrauch bestimmt.

4
“PRESCRIPTIONS DE SECURITE IMPORTANTES”
L’emploi d’un appareil électrique exige d’observer les mesures de sécurité suivantes:
“DANGER_____Pour la protection contre tout choc électrique:”
1. Ne pas laisser la surjeteuse sans surveillance tant qu’elle est raccordée au réseau.
2. Après usage et avant un nettoyage, séparer toujours la machine du réseau.
3. Retirer la fiche du réseau pour changer une ampoule. Employer des ampoules pour modèle MO-735: max. 15W (120V), max. 10W (220
- 240V).
“ATTENTION_____Pour éviter des brûlures, un feu, un choc électrique ou des blessures de
personnes:”
1. Ne pas prendre la surjeteuse pour un jouet. La plus grande prudence estde mise quand la machine est utilisée par des enfants ou se trouve
à leur proximité.
2.Utiliserlasurjeteuseseulementdanslebutd’accomplirlestravauxdécritsdanscemoded’emploi.N’employerquelesaccessoiresrecommandés
par le fabricant.
3. Ne pas employer la surjeteuse, si les cordons ou les prises sont abîmés, si elle ne fonctionne pas sans problèmes, si elleest tombée par terre
ou dans l’eau, ou bien a été endommagée. Apporter votre surjeteuse pour réparation ou vérification auprès de l’agent le plus proche ou du
spécialiste correspondant.
4. Durant l’emploi de la surjeteuse, ne pas boucher les fentes d’aération ainsi que la pédale par des bouts de fil, de la poussière et des déchets
de tissu.
5. Eloigner les doigts de toute pièce en mouvement. Une prudence toute particulière s’impose à proximité des aiguilles et descouteaux de la
surjeteuse.
6. Utiliser toujours la plaque à aiguille originale de la surjeteuse. Une plaque erronée peut provoquer la cassure de l’aiguille.
7. Ne pas utiliser d’aiguilles courbées.
8. Durant la couture, ne pas tirer sur le tissu, ni le pousser, cela peut provoquer la cassure de l’aiguille.
9. Placer l’interrupteur principal sur «O» lors de toute activité à proximité des aiguilles, par ex. pour enfiler, changer d’aiguille ou de pied-de-biche,
etc.
10. Prière de toujours retirer la prise du réseau lorsque vous effectuez, sur la surjeteuse ouverte, des travaux d’entretien mentionnés dans le mode
d’emploi, comme l’enfilage des boucleurs, le relèvement du couteau, l’huilage, le changement des ampoules, etc.
11. Ne pas introduire d’objets dans les ouvertures de la machine.
12. Ne pas employer la surjeteuse en plein air.
13. Ne pas employer la surjeteuse dans un local où l’on utilise des produits avec gaz propulseur (spray) ou de l’oxygène.
14. Pour la mise hors service, placer le commutateur principal sur «O» et retirer la fiche du réseau.
15. Débrancher en tirant sur la fiche et non sur le cordon.
16. En cas de non utilisation, l’appareil doit, en principe, être séparé du réseau en retirant la prise.
17. Si le câble électrique est endommagé, il doit être remplacé par un câble original chez l’agent le plus proche ou dans un centre du service
après-vente.
18. Si de I’huile vient en cntact avec les yeux, les rincer immëdiatement avec de I’eau. En cas d’absorption accidentelle d’huile,
consulter immëdiatement un mëdecin.
“ENTRETIENDESPRODUITSADOUBLE ISOLATION ”
Un produit à double isolationest équipé de deux isolations au lieu d’une mise à la terre. La mise à la terre n’est pas prévuesur un produit à
doubleisolationetnedevraitdoncpasêtreemployée.L’entretiend’unproduitàdoubleisolationquiexigedegrandssoinsetdesconnaissances
poussées sur le système, doit donc être réalisé seulement par du personnel qualifié. N’employer que des pièces de rechange originales
pour l’entretien et la réparation. Un produit à double isolation est désigné de la manière suivante: “Isolation double” ou “A double isolement”.
Le symbole peut également caractériser un tel produit.
“PRIERE DE CONSERVER SOIGNEUSEMENT LES
PRESCRIPTIONS DE SECURITE”
Cette surjeteuse est destinée seulement à un usage familial.

5
Co n t e n t s / In h o u d
Saf ety regulations .................................. 1
Contents ................................................ 5
D etails of the m ac hine......................... 7,8
• Ac c essories ........................................ 8
Preparing the m ac hine...........................9
• Attac hing the f oot c ontrol..................... 9
• Thread stand .................................... 10
• Plac ing the spool holder f or the c hain
thread ............................................... 10
• Thread, c ones, spools....................... 11
Us i n g t h e m a c h i n e
• Power/ light switc h ............................ 12
• Raising the upper k nif e ..................... 12
• Two step presser f oot lif ter with
integrated f ront f oot lif t....................... 13
• Changing the presser f oot.................. 13
• L ooper c over .................................... 14
• Cloth plate ........................................ 14
• Handwheel ....................................... 14
• Inserting needles / Needles
/ Threads .....................................15-17
Ad j u s t m e n t s a n d s e t t i n g s
• Stitc h length ...................................... 18
• Cutting width ..................................... 18
• D if f erential f eed.................................19
• G athering.......................................... 20
• Upper looper c onverter ..................... 21
• Roll hem m ing ...................................21
• Presser f oot pressure ....................... 22
• Sewing in tape .................................. 22
S e t t i n g / Pr a c t i c a l s e w i n g
• Thread b reak age .............................. 23
• Unpic k ing seam s ..............................23
• Preparation/ Tips ............................... 24
Stitc h c hart...................................... 25,26
Th r e a d i n g 4 / 3 Th r e a d OL
• Upper looper..................................... 33
• L ower looper..................................... 34
• Right needle ..................................... 35
• L ef t needle........................................ 36
• Threading Chain looper .................... 37
Threading c hainstitc h needle ............... 38
Threading Chainstitc h and OL .............. 39
Trial sewing, thread tension.............40-42
Cover/ c hain stitc h f unc tions ................. 43
• G eneral operating instruc tions .......... 44
• Knif e guard / c over and c hain stitc h
ex tension plate.................................. 45
Co v e r s t i t c h t h r e a d i n g
• Threading c over stitc h looper ............ 46
• Cover stitc h R needle ....................... 47
• Cover stitc h C needle ....................... 48
• Cover stitc h L needle ........................ 49
Threading 3 thread c over stitc h (wide) . 50
Threading 3 thread c over stitc h
(narrow) ............................................. 51
Threading c hain stitc h .......................... 52
Cover stitc h sewing test ....................... 53
Chainstitc h sewing test ........................ 53
Tension adjustm ents ............................ 54
Pr a c t i c a l s e w i n g - Co v e r s t i t c h
• Sec uring the seam end..................... 55
• Unpic k ing seam s .............................. 55
• Sim ple hem ...................................... 56
• Flat joining seam .............................. 56
• E dge with elastic ............................... 57
• B inding ............................................. 57
• Top stitc hing seam s/ rib b ing/ yok es..... 58
Pr a c t i c a l s e w i n g - c h a i n s t i t c h
• G athering.......................................... 59
• B inding ............................................. 59
M a i n t e n a n c e
• Changing the upper k nif e.................. 60
• Changing the lower k nif e................... 60
• Replac ing the b ulb ............................ 61
• Cleaning and lub ric ating ................... 61
Troub le shooting guide......................... 62
Tec hnic al data...................................... 66
Optional ac c essories............................ 68
Zasady bezpieczeństwa........................1
Spis treści..........................................................5
Elementy maszyny..................................7, 8
- Akcesoria....................................................8
Przygotowanie maszyny.9
- Dołączanie pedału kontrolnego...............9
- Statyw niciowy.........................................10
- Umieszczanie obsadki szpulki
dla łańcuchowej nici.........................11
.....................................11
- Nić, cewki stożkowe, szpulki.......11
U
- Wyłącznik zasilania/światła..............................12
- Unoszenie górnego noża.................12
- Dwuetapowy podnośnik stopki ze
zintegrowanym podnośnikiem przedniej stopki...13
- Zmienianie stopki......................13
- Pokrywa sczepiarki...................................13
- Płytka materiałowa...................................14
-.......................................................14
- Pokrętło.......................................................14
- Wkładanie igieł........................15
- Igły i nici ......................................16, 17
D
- Długość ściegu...................................................18
- Szerokość cięcia.................................................18
-Transporter różniczkowy...................................19
- romadzenie.......................................................20
-Konwerter górnej sczepiarki.............21
-Obrębianie okrągłe.....................................................21
-Nacisk stopki...............................................22
- Wszywanie taśm.......................................22
U
- ozerwanie nici...................23
- ozpruwanie szwów..............................................23
- Przygotowania/wskazówki.............24
- Tabela ściegów .....................................27, 28
- órna sczepiarka.................................................33
- Dolna sczepiarka..................................................34
- Lewa igła...............................................35
- Nawlekanie sczepiarki łańcuchowej....................36
- Nawlekanie ściegu łańcuchowego i OL .............37
- Próbne szycie, naprężenie nici ..............
-
- unkcje ściegu łańcuchowego i krytego......43
- Ogólne instrukcje działania...........44
- Osłona/pokrywa noża i płytka przedłużająca
ściegu łańcuchowego..............................................45
N
- Nawlekanie sczepiarki ściegu krytego.........46
- Prawa igła ściegu krytego.....................47
- rodkowa igła ściegu krytego......................48
-.Lewa igła ściegu krytego.......................49
Nawlekanie trójniciowego ściegu krytego (szerokiego) ..50
Nawlekanie trójniciowego ściegu krytego (wąskiego)....51
Nawlekanie ściegu łańcuchowego..............52
cieg kryty szycie próbne...........................................53
cieg łańcuchowy szycie próbne .........................................53
Dopasowywanie naprężenia ......................54
- Zabezpieczanie końca szwu
...........................................55
- ozpruwanie szwów.........................55
- Proste obrębianie........................................56
- Płaski szew łączący................................56
- rzeg z taśmą gumową.....................................57
- Obszycie..............................................................57
- ciegi górnego szwu/użebrowanie/
wodziki................................58
- romadzenie....................59
- Taśma..............................................................59
U
- Zmienianie górnego noża..........................60
- Zmienianie dolneg noża...........................60
- Wymienianie żarówki..........................61
- Czyszczenie i oliwienie..........................61
Przewodnik po problemach...................................63
Dane techniczne........................................66
Dodatkowe akcesoria.......................................68
S

6
Inhalt / Table des matières
Sicherheitsvorschriften ........................... 3
Inhalt...................................................... 6
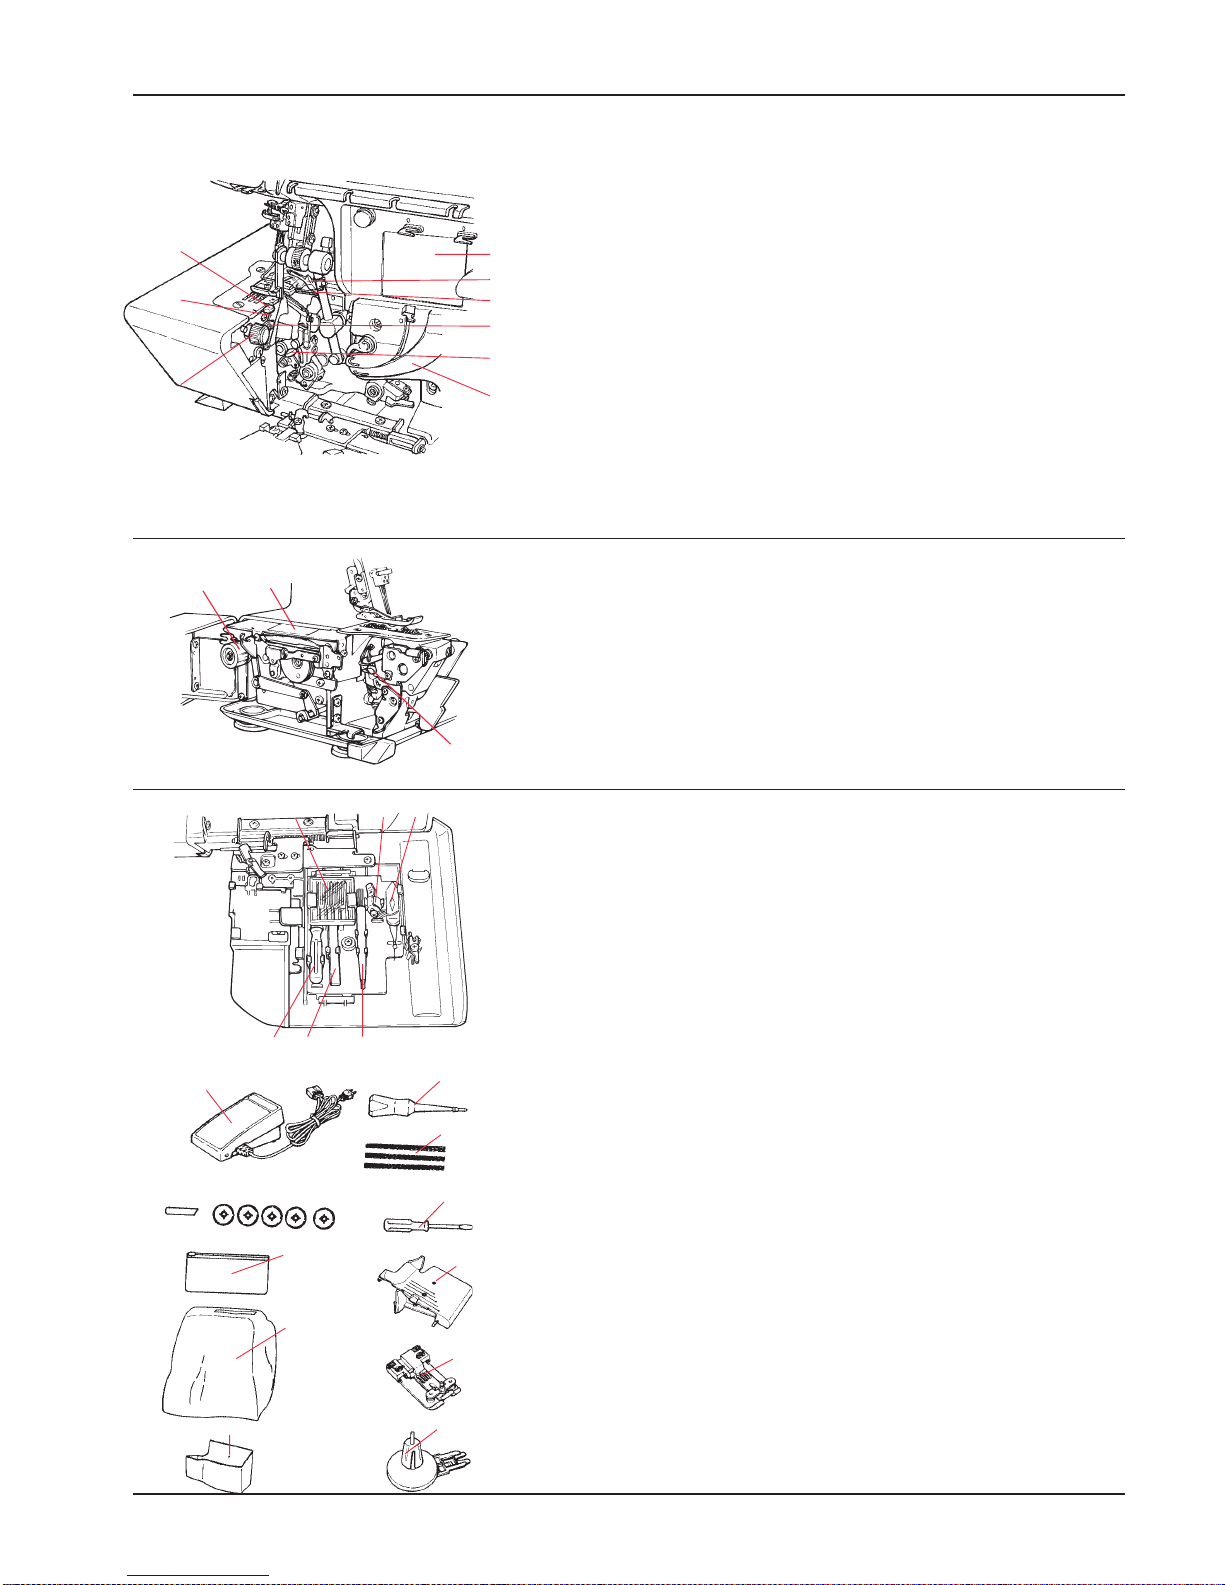
Details der Maschine .......................... 7,8
• Zubehöre ............................................8
Maschine bereitstellen /
Inbetriebnahme .................................. 9
• Fussanlasser anschliessen................. 9
• Fadenführung................................... 10
• Befestigen des Spulenhalters für
Kettenfaden ...................................... 10
• Fadenspulen aufsetzen .................... 11
Inbetriebnahme
• Haupt- und Lichtschalter ................... 12
• Zweistufen Nähfusslifterhebel mit
integriertem Nähfussspitzen
- Anheber .......................................... 13
• Nähfuss auswechseln....................... 13
• Greiferdeckel .................................... 14
• Stoffauflagedeckel ............................ 14
• Handrad ........................................... 14
• Obermesser hochstellen/senken ...... 12
• Nadeln einsetzen / Nadlen /
Faden.......................................... 15-17
Einstellen und Bedienen
• Stichlänge ........................................ 18
• Messerposition ................................. 18
• Differentialtransport .......................... 19
• Einreihen .......................................... 20
• Obergreiferabdeckung...................... 21
• Rollsäumen ...................................... 21
• Nähfussdruck ................................... 22
• Band annähen.................................. 22
Bedienen, Praktisches Nähen
• Fadenreissen während des
Nähens............................................. 23
• Stiche auftrennen ............................. 23
• Einfädeln vorbereiten / Tipps ............ 24
Stichübersicht ................................. 29,30
Einfädeln 4/3 Faden OL
• Oberer Greiferfaden.......................... 33
• Unterer Greiferfaden......................... 34
• Rechte Nadel.................................... 35
• Linke Nadel ...................................... 36
• Kettenstich Greifer einfädeln ............ 37
Einfädeln kettenstich Nadel.................. 38
Kettenstich einfädeln und OL ............... 39
Nähprobe, Fadenspannung ............40-42
Cover Stich Funktionen ........................ 43
• Allgemeine Bedienungshinweise ....... 44
• Messerabdeckung / Cover-/ Kettenstich-
Abdeckung wechseln ........................ 45
Cover Stich einfädeln
• Cover Stich Greifer einfädeln ............ 46
• Cover Stich Nadel R einfädeln .......... 47
• Cover Stich Nadel C einfädeln .......... 48
• Cover Stich Nadel L einfädeln ...........49
3 Faden Cover Stitch einfädeln (Breit)..50
3 Faden Cover Stitch einfädeln
(Schmal)........................................... 51
2 Faden Kettenstich einfädeln.............. 52
Cover Stich Nähprobe und
Sticheinstellung................................. 53
Kettenstich Nähprobe .......................... 53
Fadenspannung anpassen................... 54
Cover Stich praktisches Nähen
• Nähende, Stiche sichern ................... 55
• Stiche auftrennen.............................. 55
• Einfacher Saum ................................56
• Flache Verbindungsnaht ................... 56
• Saum mit eingenähtem Elast ............ 57
• Einfassungen.................................... 57
• Naht / Bund / Besatz absteppen........ 58
Kettenstich Praktisches Nähen
• Kräuseln mit Kettenstich ................... 59
• Einfassungen.................................... 59
Wartung
• Achtung: Beachten Sie die
Sicherheitshinweise! ......................... 60
• Untermesser auswechseln ............... 60
• Glühlampe wechseln ........................ 61
• Reinigen und Ölen............................ 61
Hilfe bei Störungen............................... 64
Technische Daten ................................ 67
Sonderzubehör .................................... 68
Consignes de sécurité ........................... 4
Table des matières................................. 6
Détails de la machine.......................... 7,8
• Accessoires ........................................ 8
Préparation de la machine
/ mise en service ................................. 9
• Raccordement de la pédale ................9
• Guide-fil ............................................ 10
• Fixer le support de bobine prévu pour
le fil de point chaînette ...................... 10
• Mise en place des bobines de fil ....... 11
Mise en service
• Commutateur principal et interrupteur
de lumière ......................................... 12
• Levier du pied-de-biche à deux positions
avec releveur intégré des pointes du
pied-de-biche .................................... 13
• Remplacement du pied-de-biche ...... 13
• Couvercle du boucleur ...................... 14
• Plateau de travail .............................. 14
• Volant ............................................... 14
• Relever et abaisser le couteau
supérieur........................................... 12
• Mettre les aiguilles en place
/ Aiguilles / Fill ..............................15-17
Réglage et utilisation
• Longueur de point............................. 18
• Position du couteau .......................... 18
• Entraînement différentiel ................... 19
• Fronçage .......................................... 20
• Recouvrement du boucleur
supérieur .......................................... 21
• Ourlets roulés ................................... 21
• Pression du pied-de-biche ................ 22
• Pose de ruban .................................. 22
Couture pratique
• Cassure du fil durant la couture ........ 23
• Découdre une couture ...................... 23
• Préparer l’enfilage / conseils ............. 24
Récapitulation des points ................ 31,32
Enfilage du point de surjet à 4/3 fils
• Fil de boucleur supérieur .................. 33
• Fil de boucleur inférieur .................... 34
• Aiguille de droite ............................... 35
• Aiguille de gauche............................. 36
• Enfiler le boucleur pour le point
de chaînette ...................................... 37
Enfilage point de chaînette................... 38
Enfilage point de chaînette et surjet ..... 39
Essai de couture, tension de fil........40-42
Fonctions du point enveloppant............ 43
• Chaînette et indications générales sur
son utilisation .................................... 44
• Plaquette de recouvrement du point
enveloppant/de chaînette .................. 45
Enfilage pour le point enveloppant
• Enfilage du boucleur pour le point
enveloppant ...................................... 46
• Enfiler l’aiguille (droite) R pour le point
enveloppant ...................................... 47
• Enfiler l’aiguille (centre) C pour le point
enveloppant ...................................... 48
• Enfiler l’aiguille (gauche) L pour le point
enveloppant ...................................... 49
Enfilage pour le point enveloppant
à 3 fils (large) .................................... 50
Enfilage pour le point enveloppant
à 3 fils (étroit) .................................... 51
Enfilage du point de chaînette à 2 fils ... 52
Test de couture et réglages du point
enveloppant ...................................... 53
Test du point de chaînette ....................53
Adapter la tension ................................ 54
Couturepratiqueaveclepointenveloppant
• Extrémité de la couture, arrêter les
points, point enveloppant .................. 55
• Défaire les points.............................. 55
• Ourlet simple .................................... 56
• Couture d’assemblage plate ............. 56
• Ourlet avec un élastique fixé par une
couture ............................................. 57
• Entourages....................................... 57
• Couture / Ceinture / Surpiquer une
parmenture....................................... 58
Couturepratiqueaveclepointdechaînette
• Fronces avec point de chaînette.......59
• Entourages....................................... 59
Maintenance
• Attention: respecter les prescriptions
de sécurité........................................ 60
• Remplacement du couteau inférieur . 60
• Remplacement de l’ampoule ............ 61
• Nettoyage et huilage......................... 61
Comment éliminer soi-même les
pannes ............................................. 65
Caractéristiques ................................... 67
Accessoires spéciaux .......................... 68

7
D e t a i l s o f t h e m a c h i n e / D e t a i l s v a n d e m a c h i n e
D e t a i l s d e r M a s c h i n e / D é t a i l s d e l a m a c h i n e
D e t a i l s o f t h e m a c h i n e
1. L ooper c over with b uilt in k nif e guard
2. L ooper c over opening indent
3. Cloth plate
4. Sewing light
5. Thread tak e-up c over
6. Presser f oot pressure regulating
k nob
7. L ef t needle thread tension dial
8. Right needle thread tension dial
9. Upper looper thread tension dial
10. L ower looper thread tension dial
11. Retrac tab le support rod
12. Thread guide support
13. Open thread guide
14. Spool holder pin
15. Foam pad
16. Anti - vib ration c one
17. Thread stand
18. Stitc h length adj ustm ent dial
19. D if f erential f eed adj ustm ent dial
20. Handwheel
21. Side c over
22. M atc hing up m ark s
23. M ac hine soc k et
24. Power/ L ight switc h
25. Knif e guard
D e t a i l s o f t h e m a c h i n e
1. Thread cutter
2. Presser foot lifter
3. Stitch plate
4.Presser foot
5.Upper knife
6.Needle clamp
D e t a i l s d e r M a s c h i n e
1. G reif erdec k el m it integrierter
M esserab dec k ung
2. Fü hrung z um ö f f nen des
G reif erdec k els
3. Stof f auf lagedec k el
4. Nä hlic ht
5. Fadenheb el-Ab dec k ung
6. Nä hf ussdruc k - Regulierk nopf
7. L ink e Nadelf adenspannung
8. Rec hte Nadelf adenspannung
9. Ob ergreif er Fadenspannung
10. Untergreif er Fadenspannung
11. Ausz iehb arer Fadenf ü hrungsstab
12. Fadenf ü hrungsauf satz
13. Of f ene Fadenf ü hrung
14. Spulenhalterstif t
15. Sc haum stof f auf lage
16. V ib rationshem m er
17. G arnrollenstä nder
18. W ahlk nopf f ü r Stic hlä nge
19. W ahlk nopf f ü r D if f erentialtransport
20. Handrad
21. Seitenab dec k ung
22. M ark ierung an Handrad und
Seitenab dec k ung
23. M asc hinenstec k dose
23. Haupt- und L ic htsc halter
25. M esserab dec k ung
D e t a i l s d e r M a s c h i n e
1. Fadenab sc hneider
2. Nä hf usslif terheb el
3. Stic hplatte
4. Nä hf uss
5. Ob erm esser
6. Nadelhalter
D é t a i l s d e l a m a c h i n e
1. Coupe-f il
2. L evier du pied-de-b ic he
3. Plaq ue à aiguille
4. Pied-de-b ic he
5. Couteau supé rieur
6. Porte-aiguille
D é t a i l s d e l a m a c h i n e
1. Couverc le des b ouc leurs avec
rec ouvrem ent du c outeau inté gré
2. G uide pour ouvrir le c ouverc le des
b ouc leurs
3. Plateau de travail
4. E c lairage / am poule
5. Couverc le du tendeur de f il
6. B outon de ré glage de la pression du
pied
7. Tension du f il d’ aiguille de gauc he
8. Tension du f il d’ aiguille de droite
9. Tension supé rieure du f il de b ouc leur
10. Tension inf é rieure du f il de b ouc leur
11. Support de guide-f il té lesc opiq ue
12. G arniture de guidage
13. G uide-f il ouvert
14. B roc he
15. Soc le en m ousse
16. Antivib reurs
17. Support de b roc hes à b ob ines
18. Sé lec teur pour longueur de point
19. Sé lec teur pour entraî nem ent dif f é rentiel
20. V olant
21. Capot laté ral
22. Repè res sur le volant et le c apot laté ral
23. Prise de la m ac hine
24. Com m utateur princ ipal et interrupteur
de lum iè re
25. Rec ouvrem ent du c outeau
1
2
3
4
5
678910
11
12
15 16
17
18
19
20
21
22
23
24
25
13
14
1
2
3
4
5
6
E
1. Pokrywa sczepiarki z wbudowaną
gosłoną noża
2. Otwieranie pokrywy sczepiarki
3. Płytka materiałowa
4. wiatło do szycia
5. Pokrywa prowadnicy nici
6. Pokrętło regulacji nacisku stopki
7. Pokrętło naprężenia nici lewej igły
8. Pokrętło naprężenia nici prawej igły
9. Pokrętło naprężenia górnej sczepiarki
10. Pokrętło naprężenia dolnej sczepiarki
11. Wciągany drążek wspomagania
12. Wspomaganie prowadnicy nici
13. Otwarta prowadnica nici
14. olec uchwytu szpulki
15. Wkładka piankowa
16. Stożek antywibracyjny
17. Statyw niciowy
18. Pokrętło dopasowania długości ściegu
19. Pokrętło transporteru różniczkowego
20. Pokrętło
21. Pokrywa boczna
22. Dopasowywanie znaków
23. niazdo wtykowe maszyny
24. Wyłącznik maszyny/światła
25. Osłona noża
E
1. rez do gwintowania
2. Podnośnik stopki
3.Płytka ściegowa
4. Stopka
5. órny nóż
6. Zacisk igły

8
Accessories
1. Needle set 130/ 705H (SCHM E TZ )
2. Sm all sc rewdriver
3. Tweez ers
4. Upper looper c onverter
5. Needle threader
6. B rush/ needle inserter
7. E lec tronic f oot c ontrol
8. Oiler
9. Nets
10. L ower k nif e
11. Spool c aps
12. Ac c essory b ag
13. D ust c over
14. L arge sc rewdriver
15. Cover/ c hain stitc h ex tension plate
16. Cover stitc h presser f oot
17. W aste c ollec tor
18.Spoolholder
V
1. Chain-looper auto-threader
2. Chain-looper thread tension dial
3. Threading diagram f or c hain-looper thread
V i e w w i t h l o o p e r c o v e r o p e n
1. Selec tion lever f or overloc k ing or roll
hem m ing
2. L ower k nif e
3. Cutting width adj usting dial
4. L ower looper auto threader
5. L ower k nif e setsc rew
6. L ower looper
7. Upper looper
8. Threading diagram
9. Slit type looper threading system
An s i c h t b e i g e ö f f n e t e m
G r e i f e r d e c k e l
1. Stic hwahlheb el f ü r Overloc k en oder
Rollsä um en
2. Unterm esser
3. W ahlk nopf f ü r M esserposition
4. Untergreif er-E inf ä delautom atik
5. Stellsc hraub e f ü r unteres M esser
6. Untergreif er
7. Ob ergreif er
8. E inf ä delsc hem a
9. Sc hlitz f ü hrung
V u e , l e c o u v e r c l e d u b o u c l e u r o u v e r t
1. L evier sé lec teur pour point de surj et
ou ourlets roulé s
2. Couteau inf é rieur
3. Sé lec teur pour la position du c outeau
4. E nf ilage autom atiq ue du b ouc leur
inf é rieur
5. V is de ré glage pour le c outeau inf é rieur
6. Croc het inf é rieur
7. Croc het supé rieur
8. Ré pertoire d’ enf ilage
9. G uide
An s i c h t b e i g e ö f f n e t e m
S t o f f a u f l a g e d e c k e l
1. Kettengreif er-E inf ä delautom atik
2. Fadenspannung f ü r Kettengreif er
3. E inf ä delsc hem a f ü r Kettengreif er
V u e d e l ’ i n t é r i e u r , r é c u p é r a t e u r d e
d é c h e t s o u v e r t
1. D ispositif d’ enf ilage autom atiq ue pour
b ouc leur de c haî nette
2. Tension du f il pour b ouc leur de c haî nette
3. Sc hé m a d’ enf ilage du f il pour b ouc leur
de c haî nette
Z u b e h ö r e
1. Nadelset 130/ 705H (SCHM E TZ )
2. Kleiner Sc hraub enz ieher
3. Pinz ette
4. Ob ergreif erab dec k ung
5. Nadeleinf ä dler
6. Pinsel/ Nadeleinsetz er
7. E lek tronisc her Fussanlasser
8. Ö ler
9. Netz e
10.Unterm esser
11. G arnab leitersc heib en
12. Z ub ehö rtasc he
13. Staub sc hutz hü lle
14. G rosser Sc hraub enz ieher
15. Cover-Ab dec k ung
16. Coverstic h Nä hf uss
17. Ab f allb ehä lter
18. G arnrollenstä nder
Accessoires
1. Jeu d’ aiguilles 130/ 705H (SCHM E TZ )
2. Petit tournevis
3. Pinc ette
4. Rec ouvrem ent du b ouc leur supé rieur
5. E nf ile-aiguille
6. Pinc eau / pose-aiguille
7. Pé dale é lec troniq ue
8. Huileur
9. Ré seaux
10. Couteau inf é rieur
11. Rondelles de m aintien
12. Poc hette d’ac c essoires
13. Housse de protec tion
14. G rand tournevis
15.
Plaq ue de rec ouvrem ent pour point enveloppant
16. Pied pour point enveloppant
17. Ré c upé rateur de c hutes
18. Support de b ob ine
1
23
45
6
D e t a i l s o f t h e m a c h i n e / E
D e t a i l s d e r M a s c h i n e / D é t a i l s d e l a m a c h i n e
1
2
34
6
7
8
9
5
1
3
2
8
9
14
10 11
15
18
16
17
13
12
17
W
1. Drążek wyboru obrębiania
okrężnego lub owerlokowego
2. Dolny nóż
3. Pokrętło wyboru szerokości cięcia
4. Autom atyczna nawlekarka górnej sczepiarki
5. Pokrętło ustawień dolnego noża
6. Dolna sczepiarka
7. órna sczepiarka
8. Schemat nawlekania
9. Szczelinowy system nawlekania sczepiarki
W
1. .Automatyczna nawlekarka sczepiarki
łańcuchowej
2. Pokrętło naprężenia nici sczepiarki łańcuchowej
3. Schemat nawlekania nici sczepiarki
łańcuchowej
A
1.Zestaw igieł 130/ 705H
2. ały śrubokręt
3. Pinceta
4. Konwerter górnej sczepiarki
5. Nawlekarka
6. Pędzelek/Wsuwarka igieł
7. Elektroniczny pedał kontrolny
8. Olejarka
9. Siatki
. Dolny nóż
11. Nakrętki szpulkowe
12. Torba na akcesoria
13. Porywa przeciwkurzowa
14. Duży śrubokręt
15. Płytka rozciągająca ściegu krytego/łańcuchowego
16. Stopka ściegu krytego
17. Zbiornik odpadów
18. Uchwyt szpulki

9
At t a c h i n g t h e f o o t c o n t r o l
Plug f oot c ontrol into the m ac hine soc k et (A) and then into m ain soc k et (B ). The f oot
c ontrol regulates the sewing speed. The sewing speed c an b e adj usted b y inc reas-
ing or dec reasing the pressure on the f oot c ontrol.
“ W ARNING ’ ’
This applianc e has a polariz ed plug (one b lade wider than the other).
To reduc e the risk of elec tric shoc k , this plug is intended to f it in a polariz ed m ain
soc k et only one way.
If the plug does not f it f ully in the polariz ed m ain soc k et, reverse the plug. If it still
does not f it, c ontac t a q ualif ied elec tric ian to install the proper polariz ed m ain soc k et.
D o not m odif y the plug in any way.(f or USA, Canada only)
* For M O-735 use only the f oot c ontrol m odel YC-482(USA,CANAD A),
YC-483N(220-240V )
Fussanlasseranschliessen
Fussanlasser-Kab el in Overloc k m asc hinenstec k dose stec k en (A) und ansc hliessend
den Netzst ecke r m it der Netzst eckd ose (B ) verb inden. D urch m ehr oder weniger
D ruc k auf die Trittf lä c he des Fussanlassers k ann die Nä hgesc hwindigk eit stuf enlos
verä ndert werden.
Ra c c o r d e m e n t d e l a p é d a l e
Introduire la f ic he de la pé dale dans la prise de la surj eteuse (A), puis relier la prise
sec teur (B ) au ré seau. Une pression plus ou m oins grande sur la surf ac e d’ appui de
la pé dale perm et de m odif ier progressivem ent la vitesse de la m ac hine.
Pr e p a r i n g t h e m a c h i n e / Us i n g t h e m a c h i n e
P
M a s c h i n e b e r e i t s t e l l e n / In b e t r i e b n a h m e
Pr é p a r a t i o n d e l a m a c h i n e / m i s e e n s e r v i c e
A
B
W a s t e c o l l e c t o r
Clip the waste c ollec tor into the opening on the looper c over. It c atc hes the c ut-of f
f ab ric as you sew, k eeping your work ing area neat and tidy.
Ab f a l l b e h ä l t e r
D en Ab f allb ehä lter in die Aussparung am G reif erdecke l einhä ngen. D er B ehä lter
f ä ngt den Stof f ab sch nitt nach dem Sch neiden auf . D er Arb eitsplatz b leib t saub er
und ü b ersic htlic h.
Ré c u p é r a t e u r d e c h u t e s
Suspendre le ré c upé rateur de c hutes dans l’ é videm ent du c ouverc le du b ouc leur.
L e ré c ipient ré c upè re les dé c hets aprè s la c oupe du tissu. L e poste de travail reste
propre et b ien ordonné .
D
Podłącz pedał do gniazdka wtykowego maszyny (A), a następnie do głównego
gniazdka. Pedał kontrolny reguluje prędkość szycia. Prędkość szycia może
dostosowywana przez zmniejszanie lub zwiększanie nacisku na pedał.
Z
Zakliszcz zbiornik odpadów w otworze pokrywy sczepiarki. W czasie szycia
wyłapuje on ścinki materiału, utrzymując teren pracy w czystości i porządku.

10
Th r e a d s t a n d
Push the support rod f irm ly into the soc k et on the b ac k of the m ac hine.
Raise the support rod (C) f ully, turning slightly until the position c atch es engage.
Position the thread guide (D ) on the thread stand so that the arrow is to the f ront.
Fa d e n f ü h r u n g
D en Fadenf ü hrungsstab b is z um Ansc hlag ausz iehen , drehen, b is er b ei den
entsprec henden Positionen einrastet (C). D ie Fadenf ü hrung (D ) auf den
Fadenf ü hrungsstab stec k en, so dass der Pf eil nac h vorne z eigt .
G u i d e - f i l
Sortir le support de guide-f il j usq u’ à la b uté e, le tourner j usq u’ à c e q u’ il s’enc liq uette
(C) dans les positions c orrespondantes. Introduire le guide-f il (D ) sur le support de
guide-f il de sorte q ue la f lè c he soit orienté e vers l’ avant.
Pr e p a r i n g t h e m a c h i n e / Us i n g t h e m a c h i n e
P
M a s c h i n e b e r e i t s t e l l e n / In b e t r i e b n a h m e
Pr é p a r a t i o n d e l a m a c h i n e / m i s e e n s e r v i c e
Pl a c i n g t h e s p o o l h o l d e r f o r t h e c h a i n t h r e a d
L if t the f oam pad (A), slide the guide tab s (C) of the spool holder (B ) into the guide of
the upper side of the spool holder f rom lef t to right into position (E ) and press until tab
(D ) c lic k s into the underside of rib . (F)
B e f e s t i g e n d e s S p u l e n h a l t e r s f ü r Ke t t e n f a d e n
D ie Sc haum stof f -Unterlage (A) anheb en. D ie Fü hrungslasc hen (C) des Spulenhalters
(B ) von vorne in die ob ere Fü hrung des f esten Spulenhalters einsc hieb en b is z ur
Position (E ).
D arauf ac hten, dass die L asc he (D ) hö rb ar unter der Rippe (F) einrastet.
Fi x e r l e s u p p o r t d e b o b i n e p r é v u p o u r l e f i l d e p o i n t c h a î n e t t e
Soulever le support en m ousse (A). E ngager la languette de guidage (C) du support
de b ob ine par l’avant dans le guide supé rieur du support de b ob ine f ix e j usq u’ à la
position (E ).
V eiller à c e q ue la languette (D ) s’ enc liq uette de f aç on audib le sous la nervure (F).
CD
S
Wepchnij drążek wspomagania mocno do otworu z tyłu maszyny.
Unieś drążek wspomagania (C ) całkowicie, obracając go delikatnie, aż się
zaczepi. Umieść prowadnicę nici (D) na stojaku niciowym tak, żeby strzałka
znajdowała się z przodu.
U
Unieś wkładkę piankową (A), wsuń wprowadzające uszka (C) uchwytu szpulki
() do prowadnicy górnej części uchwytu szpulki od lewej do prawej do pozycji
(E ) i naciskaj tak długo, aż uszko (D) zakliszczy się w spodzie żeberka ().

11
Th r e a d / c o n e s / s p o o l s
The anti-vib ration c one should b e used with the wider edge at the b ottom on the spool
holder pin when sewing with c ones.
Fa d e n s p u l e n a u f s e t z e n
Fü r norm ale Fadenk onen die V ib rationshem m er m it b reiter Seite nac h unten auf die
Spulenhalterstif te stec k en.
M i s e e n p l a c e d e s b o b i n e s d e f i l
L ors de l’ em ploi de c ô nes de f il norm aux , plac er les antivib reurs sur les b roc hes en
tournant le c ô té le plus large vers le b as.
Th r e a d n e t
If the threads slip and get twisted, c over the looper spools with the net supplied in the
ac c essory b ag.
Fa d e n n e t z
Fü r f eine Fä den, welc he leic ht von der Kone f allen, die Spulen m it den Netz en aus der
Z ub ehö rtasc he ü b erz iehen.
Ré s i l l e p o u r f i l
Pour les f ils f ins q ui tom b ent f ac ilem ent du c ô ne, rec ouvrir les b ob ines avec la ré sille
rangé e dans la poc hette d’ ac c essoires.
Ho u s e h o l d s p o o l s
Rem ove the anti-vib ration c ones. Plac e spools on spool holder pins and push the spool
c aps on with the rounded side downwards.
Ha u s h a l t s p u l e n
Fü r Fä den auf Haushaltspulen die V ib rationshem m er entf ernen und Fadenspulen
auf stec k en. Ansc hliessend die G arnab leitersc heib en m it gerundeter Aussenk ante nac h
unten auf die Spulenhalterstif te stec k en.
B o b i n e s f a m i l i a l e s
Pour les b ob ines f am iliales, enlever les antivib reurs, plac er les b ob ines de f il. E nsuite,
introduire les rondelles de m aintien sur les b roc hes avec l’ arrondi du b ord ex té rieur
tourné vers le b as.
L a r g e s p o o l s
If large industrial spools are used, position the anti-vib ration c one upside down on the
spool holder pin, i .e. with the wider edge at the top.
G r o s s e S p u l e n
W erden grosse Industriespulen verwendet, die V ib rationshem m er um gek ehrt, das heisst
m it b reiter Seite nac h ob en, auf die Spulenhalterstif te stec k en.
G r a n d e s b o b i n e s
Si vous vous servez de grandes b ob ines industrielles, installez les antivib reurs à l’ envers,
c ’ est-à -dire sur les b roc hes en tournant le c ô té le plus large vers le haut.
Pr e p a r i n g t h e m a c h i n e / Us i n g t h e m a c h i n e
P
M a s c h i n e b e r e i t s t e l l e n / In b e t r i e b n a h m e
Pr é p a r a t i o n d e l a m a c h i n e / m i s e e n s e r v i c e
N
Stożek antywibracyjny powinien być ustawiony z szerszym końcem przy dole bolca
uchwytu szpulki w czasie szycia ze stożkami.
D
Przy używaniu dużych szpulek przemysłowych należy ułożyć stożek antywibracyjny
odwrotnie na bolcu uchwytu szpulki (z szerszym końcem u szczytu).
S
Usuń stożki antywibracyjne. Umieść szpulki na bolcach uchwytów szpulek i
wciśnij na nie nakrętki szpulek zaokrąglonymi stronami w dół.
S
Jeśli nić ześlizguje się i plącze, przykryj szpulki sczepiarki siatką z torby z
akcesoriami.

W
DWyłącznik zasilania/światła jest wygodnie
gumieszczony po stonie pokrętła, z przodu
gniazdka wtykowego maszyny. 0 = wyłączone
1 = włączone, ze światłem
U
Wyłącz maszynę (pozycja wyłącznika "O")
1. Obracaj pokrętło w swoja stronę aż
do całkowitego podniesienia igieł.
2. Otwórz pokrywę sczepiarki.
Popchnij uchwyt górnego noża (E) w prawo.
Przekręć śrubę zgodnie z ruchem wskazówek
zegara (), aż nóż znajdzie się w pozycji jak na rysunku(G ).
12
Po w e r / l i g h t s w i t c h
The power/ light switc h is c onveniently plac ed
on the handwheel side of the m ac hine in f ront
of the soc k et.
O = Of f
I = On with light
Ha u p t - u n d L i c h t s c h a l t e r
D er Haupt- und L ic htsc halter ist ü b ersic htlic h
auf der Handradseite vor der
M asc hinenstec k dose platz iert.
O = aus
I = ein
Co m m u t a t e u r p r i n c i p a l e t
interrupteur de lum iè re.
L e c om m utateur princ ipal / interrupteur de
lum iè re est disposé visib lem ent du c ô te du vol-
ant devant la prise de la m ac hine.
O = arrê t
I = m arc he
Ra i s i n g t h e u p p e r k n i f e
S w i t c h t h e m a c h i n e o f f ( p o w e r s w i t c h ” O" )
• Turn the handwheel towards you until the
needles are f ully raised.
• Open the looper c over.
Press the upper k nif e holder (E ) to the right.
Turn the k nob c loc k wise (F) until the k nif e is in
the position illustrated (G ).
Ob e r m e s s e r h o c h s t e l l e n / s e n k e n
M a s c h i n e a u s s c h a l t e n , Ha u p t s c h a l t e r a u f
„ O“ s t e l l e n .
• D as Handrad vorwä rts drehen und Nadeln in
die hö c hste Stellung b ringen.
• G reif erdec k el ö f f nen.
D en ob eren M esserhalter (E ) ganz nac h rec hts
drü c k en und den D rehk nopf im Uhrz eigersinn
(F) drehen b is das M esser, wie illustriert,
einrastet (G ).
Re l e v e r e t a b a i s s e r l e c o u t e a u s u p é r i e u r
Co u p e r l e c i r c u i t d e l a m a c h i n e e n m e t t a n t
l e c o m m u t a t e u r p r i n c i p a l s u r „ O“ .
• Tourner le volant en avant et am ener les aigu-
illes à leur position la plus é levé e.
• Ouvrir le c ouverc le du b ouc leur.
Presser lesupport supé rieur du c outeau(E ) tout
à f ait à droite, puis tourner le b outon rotatif dans
le sens des aiguilles d’ une m ontre (F) j usq u’ à
c e q ue le c outeau s’ enc liq uette, c om m e le
m ontre l’ illustration (G ).
Us i n g t h e m a c h i n e / U
In b e t r i e b n a h m e / M i s e e n s e r v i c e

13
Tw o s t e p p r e s s e r f o o t l i f t e r w i t h
i n t e g r a t e d f r o n t f o o t l i f t
To raise the presser f oot, lif t the presser f oot
lever on the rear of the m ac hine, until it engages
(A). It c an b e raised again to the m ax im um
height and held in this position to provide m ore
spac e b etween presser f oot and stitc h plate (B ).
W hen the f oot is raised A and B , the f ront of the
f oot is autom atic ally lif ted.
No t e : W hen the presser f oot is raised, all the ten-
sions are released m ak ing it easier to thread the m a-
c hine.
Ch a n g i n g t h e p r e s s e r f o o t
• S w i t c h t h e m a c h i n e o f f ( p o w e r
s w i t c h ” O" )
• Raise the presser f oot.
• Turn handwheel towards you until needles
are f ully raised. M atc h the m atc hing up m ark s
on handwheel and side c over.
Press the c atc h (C) to release the presser f oot
f rom the c lam p. Raise the presser f oot shank
to the highest position (B ) and rem ove the
presser f oot to the lef t. To attac h the presser
f oot, plac e it under the shaf t. The groove in the
shaf t should line up ex ac tly with the presser
f oot pin (D ). L ower the shank and the presser
f oot will engage autom atic ally.
(E ) Standard f oot .
(F) Cover stitc h presser f oot.
Ad j u s t i n g t h e p r e s s e r f o o t ( G )
W hen m ak ing seam s on swim , gym wear or sim ilar
m aterial, this with the c overstitc h, shif t the lever to
the rear, presser f oot pressure on L .
For norm al use shif t the lever to the f ront side.
Z w e i s t u f e n Nä h f u s s l i f t e r h e b e l m i t
i n t e g r i e r t e m Nä h f u s s s p i t z e n - An h e b e r .
Um den Nä hf uss hoc hz ustellen, den
Nä hf usslif terheb el nac h ob en b ewegen, b is
er ansteht (A). W ird der Heb el ganz nac h ob en
gedrü c k t, vergrö ssert sic h der Ab stand
z wisc hen Stic hplatte und Nä hf uss (B ). Ist der
Nä hf ussob en (A+ B ), istauc h dieNä hf ussspitz e
angehob en.
Hi n w e i s : W enn der Nä hf uss angehob en ist sind alle
Fadenspannungen gelö st. D as E inf ä deln wird
dadurc h erleic htert.
L e v i e r d u p i e d - d e - b i c h e à d e u x
p o s i t i o n s a v e c r e l e v e u r i n t é g r é d e s
p o i n t e s d u p i e d - d e - b i c h e .
Pour relever le pied-de-b ic he, dé plac er le levier
du pied-de-b ic he vers le haut, j usq u’ à c e q u’ il
b ute (A). Si le levier est pressé tout à f ait en
haut, l’ é c art entre la plaq ue à aiguille et le pied-
de-b ic he (B ) est agrandi. Si le pied-de-b ic he
est en haut (A+ B ), la pointe du pied-de-b ic he
est aussi relevé e.
In d i c a t i o n : si le pied-de-b ic he est relevé , toutes les
tensions de f il sont lib é ré es. D e c ette m aniè re,
l’ enf ilage devient plus f ac ile.
Nä h f u s s a u s w e c h s e l n
• M a s c h i n e a u s s c h a l t e n , Ha u p t s c h a l t e r
a u f „ O“ s t e l l e n .
• Nä hf uss hoc hstellen.
• Handrad vorwä rts drehen und Nadeln in die
hö c hste Stellung b ringen. M ark ierungspf eile an
Handrad und Seitenab dec k ung neb eneinander.
Auslö seheb el (C) drü c k en. D er Nä hf uss lö st sic h
ausseinerHalterung.D enNä hf usslif terheb elganz
nac h ob en drü c k en (B ) und den Nä hf uss nac h
link s wegz iehen. Z um B ef estigen, den Nä hf uss
unter den Sc haf t legen. D ie Rille des Sc haf tes soll
daz u genau ü b er dem Stif t des Nä hf usses liegen
(D ). D en Sc haf t senk en, der Nä hf uss rastet ein.
(E ) Standart Nä hf uss
(F) Cover-Stic h Nä hf uss
Nä h f u s s e i n s t e l l e n ( G )
Z um Sä um e nä hen, m it Coverstic h, dies b ei M aterialien
wie B ade-, G ym nastik b ek leidung oder ä hnlic he, den
Heb el nac h hinten sc hieb en. Nä hf ussdruc k auf L stellen.
Fü r andere Arb eiten den Heb el nac h vorne sc hieb en,
Nä hf ussdruc k auf M .
Re m p l a c e m e n t d u p i e d - d e - b i c h e
• Co u p e r l e c i r c u i t d e l a m a c h i n e e n
m e t t a n t l e c o m m u t a t e u r p r i n c i p a l s u r „ O“ .
• Relever le pied-de-b ic he.
• Tourner le volant en avant et am ener les aigu-
illes à leur position la plus é levé e. Plac er, c ô te
à c ô te, les f lè c hes de repè re du volant et du
c apot laté ral.
Presser le levier de lib é ration (C). L e pied-de-
b ic he se lib è re de son support. Presser le levier
du pied-de-b ic he tout à f ait en haut (B ), puis
retirer le pied-de-b ic he par la gauc he.Pour f ix er
lepied-de-b ic he,leposer sousla tige.Pour c ela,
la rainure de la tige doit ê tre ex ac tem ent au-
dessusde la tigedu pied-de-b ic he (D ). Ab aisser
la tige, le pied-de-b ic he s’ enc liq uette.
(E ) Pied standard
(F) Pied pour point enveloppant
Ré g l a g e d u p i e d - d e - b i c h e ( G )
D é plac er le levier vers l’ arriè re pour la c outure
d’ ourlets avec le point enveloppant sur des tissus
utilisé s pour la c onf ec tion des m aillots de b ain,
survê tem ents de gym nastiq ue, etc . Positionner la
pression du pied sur L . Pour les autres travaux ,
dé plac er le levier vers l’avant.
Us i n g t h e m a c h i n e / U
In b e t r i e b n a h m e / M i s e e n s e r v i c e
D
.
W celu uniesienia stopki unieś jej drążek
znajdujący się z tyłu maszyny aż do jego
zaczepienia (A). ożna ponownie ją unieść
na maksymalną wysokość by zapewnić więcej
miejsca pomiędzy stopka a płytką ściegową ().
Podczas unoszenia stopki (A i ) jej przód
jest automatycznie podnoszony.
U:Kiedy stopka jest uniesiona,
wszystkie naprężenia zostają rozluźnione,
ułatwiając nawlekanie maszyny.
Z
Wyłącz maszynę (pozycja wyłącznika "O")
1. Unieś stopkę
2. Obracaj pokrętło w swoją stronę aż do
całkowitego uniesienia igieł.
Dopasuj do siebie znaki na pokrętle
bocznej pokrywie.
Naciśnij zatrzask (C) by zwolnić stopkę
z zacisku. Unies trzonek stopki do najwyższej
pozycji (B ) i wysuń stopkę w lewą stronę.
eby umocować stopkę, umieśc ją pod wałkiem.
łobek wałka powinien dokładnie pokryc się
z bolcem stopki (D). Zniż wałek, a stopka
zaczepi się automatycznie.
(E ) Standardowa stopka
(F) Stopka do ściegu krytego
Dopasowywanie stopki ()
Przy wykonywaniu szwów na strojach kąpielowych,
gimnastycznych lub podobnych materiałach,
przesuń drążek w tył, nastawiając nacisk stopki
na L. Dla normalnego użytku przesuń drążek
do przodu.

14
L o o p e r c o v e r
To open, press to the right with your thum b in the indent provided and tilt the c over
towards you. To c lose push it up and press lightly to the right.
The c over engages autom atic ally.
Saf ety switc h: The m ac hine does not run when the looper c over is opened.
G r e i f e r d e c k e l
Z um Ö f f nen den G reif erdec k el an der E inb uc htung m it dem D aum en nac h rec hts
sc hieb en und denD ec k el nac hvorne k ippen. Z um Sc hliessen den D ec k el hoc hk lappen
und leic ht nac h rec hts drü c k en b is er einrastet.
Sic herheitssc halter: D ie M asc hine nä ht b ei geö f f netem G reif erdec k el nic ht.
Co u v e r c l e d u b o u c l e u r
Pour ouvrir le c ouverc le du b ouc leur, pousser à droite, sur l’ é c hanc rure, avec le pouc e,
puis f aire b asc uler le c ouverc le vers l’avant. Pour ref erm er, relever le c ouverc le, puis
le presser lé gè rem ent à droite j usq u’ à c e q u’ il s’enc liq uette.
Com m utateur de sé cu rité : la m ach ine ne co ud pas si le co uvercl e du b oucl eur est
ouvert.
Cl o t h p l a t e
Op e n i n g a n d c l o s i n g t h e c l o t h p l a t e :
Opening: Push the c loth plate to the lef t.
Closing: Push the c loth plate to the right.
Saf ety switc h: The m ac hine does not run when the c loth plate is opened.
S t o f f a u f l a g e d e c k e l
Ö f f n e n u n d S c h l i e s s e n d e s S t o f f a u f l a g e d e c k e l s :
Ö f f nen: D en Stof f auf lagedec k el nac h link s sc hieb en.
Sc hliessen: D en Stof f auf lagedec k el nac h rec hts sc hieb en.
Sic herheitssc halter: D ie M asc hine nä ht b ei geö f f netem Stof f auf lagedec k el nic ht.
Pl a t e a u d e t r a v a i l
Ou v e r t u r e e t f e r m e t u r e d u p l a t e a u d e t r a v a i l :
Ouverture: dé plac er le plateau de travail à gauc he.
Ferm eture: dé plac er le plateau de travail à droite.
Com m utateur de sé c urité : la m ac hine ne c oud pas si le c ouverc le du plateau de
travail est ouvert.
Ha n d w h e e l
The handwheel turns f orward, i.e. in the sam e direct ion as on a household sewing
m ac hine.
Ha n d r a d
D as Handrad dreht sic h im G egenuhrz eigersinn, gleic h wie b ei einer
Haushaltnä hm asc hine.
V o l a n t
L e volant tourne dans le sens inverse des aiguilles d’ une m ontre, c om m e sur la m a-
c hine à c oudre f am iliale.
Us i n g t h e m a c h i n e / U
In b e t r i e b n a h m e / M i s e e n s e r v i c e
P
W celu otworzenia naciśnij kciukiem w prawo we wgłębieniu i przechyl osłonę
w swoja stronę. W celu zamknięcia popchnij ją w górę i lekko wciśnij w prawo.
Przycisk bezpieczeństwa aszyna nie pracuje, gdy pokrywa sczepiarki jest otwarta
P
O
Otwieranie Popchnij płytkę w lewo.
Zamykanie popchnij płytkę w prawo.
Przycisk bezpieczeństwa aszyna nie pracuje, gdy płytka materiałowa jest otwarta
P
Pokrętło obraca się w przód, tzn. w tym samym kierunku co w domowej maszynie

15
In s e r t i n g t h e n e e d l e s
Needles c an b e inserted q uic k ly and easily with the prac tic al needle inserter (A).
S w i t c h t h e m a c h i n e o f f ( Po w e r s w i t c h t o “ O” )
D i s c o n n e c t m a c h i n e f r o m e l e c t r i c i t y s u p p l y .
Turn handwheel towards you until needles are f ully raised. M atc h the m atc hing up
m ark s on handwheel and side c over.
L ower the presser f oot.
Using the sm all sc rewdriver, loosen the needle setsc rews and rem ove the needles
(B ).
Plac e the right-hand needle, f lat side towards the b ac k , into the hole of the needle
inserter and insert the needle as f ar as possib le into the needle c lam p. Tighten the
setscr ew lightly and then insert the lef t-hand needle in the sam e way and tighten
b oth setsc rews (C).
Na d e l n e i n s e t z e n
M it der Nadelf ü hrung im G rif f des Pinsels k ö nnen die Nadeln einf ac h und sc hnell
eingesetz t werden (A).
M a s c h i n e a u s s c h a l t e n , Ha u p t s c h a l t e r a u f „ O“ s t e l l e n .
D as Handrad vorwä rts drehen um Nadeln in die hö c hste Stellung z u b ringen.
M ark ierungspf eile an Handrad und Seitenab dec k ung neb eneinander.
Nä hf uss senk en.
M it dem k leinen Sc hraub enz ieher die Nadelb ef estigungssc hraub en lö sen. Nadeln
entf ernen (B ).
Je nac h Stic hwahl, rec hte oder link e Nadel einsetz en.
D ie Nadeln m it f lac her Seite nac h hinten in die Fü hrung am G rif f des Pinsels einsetz en
und die Nadeln in den Nadelhalter einf ü hren, b is sie ob en anstehen. D ie
Nadelb ef estigungssc hraub en anz iehen (C).
M e t t r e l e s a i g u i l l e s e n p l a c e
L e guide d’ aiguille situé dans le m anc hon du pinc eau perm et la m ise en plac e f ac ile
et rapide des aiguilles (A).
Co u p e r l e c i r c u i t d e l a m a c h i n e e n m e t t a n t l e c o m m u t a t e u r p r i n c i p a l s u r „ O“ .
Tourner le volant en avant et am ener les aiguilles à leur position la plus é levé e.
Plac er, c ô te à c ô te, les f lè c hes de repè re du volant et du c apot laté ral.
Ab aisser le pied-de-b ic he.
D esserrer la vis de f ix ation de l’ aiguille avec le petit tournevis. E nlever les aiguilles
(B ). Selon le point c hoisi, introduire l’aiguille à droite ou à gauc he.
Plac er les aiguilles avec le c ô té plat à l’ arriè re dans le guide situé sur le m anc hon du
pinc eau, puis introduire les aiguilles dans le porte-aiguille j usq u’ à c e q u’ elles b utent
en haut. Resserrer les vis de f ix ation des aiguilles (C).
Us i n g t h e m a c h i n e
U
In b e t r i e b n a h m e / Ei n f ä d e l n
M i s e e n s e r v i c e / e n f i l a g e
W
Igły mogą łatwo zostać włożone przy pomocy wsuwarki igieł (A)
Wyłącz maszynę (pozycja wyłącznika "O") i odłącz ja od źródła zasilania.
Obróć pokrętło w swoja stronę aż do całkowitego uniesienia igieł.
Dopasuj do siebie odpowiednie znaki na pokrętle i pokrywie bocznej.
Obniż stopkę.
Używając małego śrubokrętu poluzuj śruby igieł i usuń igły ().
Umieśc prawą igłę płaska strona do tyłu w otworze wsuwarki igieł i wsuń igłę
najdalej jak można do zacisku. Lekko przyciaśnij śrubę igły, wsuń lewą igłę w taki
sam sposób i dokręć obie śruby (C).

16
Ne e d l e a n d t h r e a d / I
Na d e l u n d Fa d e n / Ai g u i l l e e t f i l
Ne e d l e s
Needles m ust b e in perf ec t c ondition. Prob lem s c an oc c ur if needles:
A are b ent.
B are dam aged or b lunt.
C have hook ed points.
Na d e l n
D ie Nadeln m ü ssen einwandf rei sein. Nä hsc hwierigk eiten entstehen b ei:
A Krum m er Nadel.
B Stum pf er, b esc hä digter Nadel.
C Nadelspitz e m it Hä k c hen.
Ai g u i l l e
L esaiguilles doiventê treen b oné tat. D esdif f ic ulté s apparaî trontdansles c as suivants:
A Aiguille tordue.
B Aiguille é m oussé e ou endom m agé e.
C Pointe de l’ aiguille avec des b ardes.
Ne e d l e a n d t h r e a d
The needle siz e used depends on the thread. The needles should b e in ac c ordanc e
with thread used. W hen sewing, the thread is f ed through the long groove in the
needle. If the needle is too f ine, the thread does not f it into the groove and stitc hes
will b e sk ipped.
Use needles No. 70 - 90.
Na d e l u n d Fa d e n
D ie Nadelstä rk e hä ngt vom gewä hlten Faden ab , das heisst die Nadel m uss z um
Faden passen. D er Faden legt sic h b eim Nä hen in die lange Rille auf der V orderseite
der Nadel. Ist die Nadel z u f ein, f indet der Faden k einen Platz in der Rille und es
k ö nnen Fehlstic he entstehen.
V erwenden Sie Nadeln Nr. 70 - 90.
Ai g u i l l e e t f i l
L a grosseur de l’ aiguille dé pend du f il c hoisi. L ’ aiguille doit c onc order avec le f il.
L orsq ue l’ on piq ue, le f il se plac e dans la longue rainure de l’ aiguille. Si c ette derniè re
est trop f ine, le f il ne peut entrer dans la rainure, c e q ui em pê c he les points de se
f orm er c orrec tem ent.
E m ployer des aiguilles no. 70 - 90.
A
BC
I
Igły muszą być w idealnym stanie. ogą wystąpić problemy, jeśli igły
A. są wygięte
B . są uszkodzone lub stępione
C. mają haczykowate końce
I
ozmiar używanej igły zależy od nici. Igły powinny być dostosowane do
używanych nici. Przy szyciu nić jest przeciągana przez długi żłobek w igle
Jeśli igła jest zbyt cienka, nitka nie wpasowuje się w żłobek i ściegi przeskakują.
Używaj igieł nr .
* “ It is rec om m ended to use
JL x 2 needle, espec ially
when sewing thic k m aterials,
overlapped sec tion, etc ,
with overloc k m ac hine.”
* Zaleca się używanie
igieł JL x 2, zwłaszcza
przy szyciu grubych
materiałów, zakładek
itd. maszyną owerlokową.
* Il est rec om m andé
d’ utiliser l’ aiguille JL x 2, tout
partic uliè rem ent lors de la
c outure de tissus é pais, de
parties se c hevauc hant,
etc ., avec une surj eteuse.
* Z um nä hen sc hwerer
m aterialien eine nadel vorm
Type JL x 2 als link sseitige
nadel verwenden.

17
Ne e d l e a n d t h r e a d / I
Na d e l u n d Fa d e n / Ai g u i l l e e t f i l
Th r e a d / d e c o r a t i v e t h r e a d s
Sewing and spec ial overloc k threads are m anuf ac tured in a wide vari-
ety of types, weights and c om b ination of f ib res. It is worth investing in
good q uality threads f or perf ec t sewing results. D ec orative threads spe-
c iallym ade f oroverloc k ers (availab le onc ones)arealsob ec om ingwidely
availab le. W e rec om m end f ollowing the b asic guidelines when using
spec ial threads on your overloc k er:
- Purc hase threads on c ones or spools whic h are produc ed ex c lusively
f or overloc k ing.
- W hen using norm al spools, use the spool c aps (in ac c essory b ag).
- Only use dec orative threads in the loopers. The thread m ust m ove
easily and without resistanc e through the thread guides and looper eyes.
- The thic k er the thread, the longer the stitc h length (3-4).
- The thic k er the thread, the looser the tensions
- Sew slowly when using dec orative threads. Pull the thread c hain gen-
tly to the rear when starting to sew.
Always test sew dec orative threads b ef ore starting to sew your work .
Fa d e n , D e k o r f a d e n
Nä h- und Overloc k f ä den sind in einer V ielf alt von Stä rk en und Q ualitä ten
erhä ltlic h. Fü r ein perf ek tes Nä hresultat lohnt es sic h q ualitativ hoc hwertige
Nä hf ä den z u verwenden. Neb en den norm alen Nä hf ä den sind heute auc h
dek orative G arne in Overloc k auf m ac hung (auf Konen) erhä ltlic h.
B eac hten Sie f olgende G rundregeln f ü r den G eb rauc h von Spez ialf ä den:
G arne wä hlendie inoverloc k gerec hter Auf m ac hung,auf Spulenoder Konen
erhä ltlic h sind.
B eim G eb rauc h von norm alen Spulen die G arnab leitersc heib en (in der
Z ub ehö rtasc he enthalten) auf setz en.
D ek orativeG arnenurindenG reif ernverwenden.D ieG rö ssederG reif erö hre
istm assgeb end f ü rdiem ax im aleG arnstä rk e.D ieD ek orgarnem ü ssenohne
spü rb aren W iderstand eingef ä delt werden k ö nnen.
Je stä rk er der Faden, desto lä nger der Stic h (Stic hlä nge 3-4).
Je stä rk er der Faden, desto niedriger die Fadenspannung.
L angsam nä hen b eim G eb rauc h von D ek orgarnen. B eim Nä hb eginn die
Fadenk ette leic ht nac h hinten z iehen.
V or dem Arb eiten m it D ek orgarnen im m er eine Nä hprob e m ac hen.
Fi l s , f i l s d é c o r a t i f s
L es f ils à c oudre et les f ils pour surj eteuse sont disponib les dans de
nom b reuses q ualité s et é paisseurs. Pré f é rez touj ours des f ils à c oudre de
trè s b onne q ualité pour ob tenir du travail parf ait. E n plus des f ils à c oudre
c ourants,ontrouveé galem entdesf ilsdé c oratif spoursurj eteuse(sur c ô nes).
Priè red’ ob serverlesrè glesdeb asesuivanteslorsdel’ em ploidef ilsspé c iaux :
c hoisir des f ils dont la pré sentation sur b ob ines ou c ô nes c orrespond aux
surj eteuses.
Poser les disq ues de dé viation du f il q ui se trouvent dans la poc hette
d’ ac c essoires lorsq u’ on em ploie des b ob ines norm ales.
L esf ilsdé c oratif sserontutilisé suniq uem entdanslesb ouc leurs.L ’im portanc e
du c has des b ouc leurs dé term ine l’ é paisseur m ax im ale du f il. L ’ enf ilage des
f ils dé c oratif s doit s’ ef f ec tuer sans se heurter à une ré sistanc e.
Plus le f il est é pais, plus la longueur de point doit ê tre é levé e (longueur de
point 3-4m m )
Plus le f il est é pais, plus la tension de f il doit ê tre f aib le!
L ’ em ploi def ils dé c oratif s dem ande deré duire lavitesse dec outure. Touj ours
tirer la c haî nette de f il en arriè re avant de c om m enc er la c outure.
E f f ec tuer touj ours un essai avant de travailler avec les f ils dé c oratif s.
e l l e b a t t u g h ä N, - l e d a N, - n e d a Fe l b a tn o i t a c i l p p a , e l d e e n , d a e r h T
s u s s i t t es l i f , s e l l i u g i as e du a e l b a T
Faden
Allz wec k -Overloc k f aden
(Polyester)
Polyester-Nä hf aden
Nadel E insatz Anwendung
Nadel-und
G reif erf aden
70-90
Fü r alle Overloc k arb eiten
geeignet
Nur als G reif erf aden
geeignet
Polyester-
E ndlosf aden V ersä ub ern von
Sc hnittk anten
B ausc hgarn
Nur als G reif erf aden
geeignet
W eic he Nä hte in
M asc henware, Rollsä um e
80-90 Nadel-und
G reif erf aden
70-90Stic k - Stopf garne und
D ek orgarne
V ersä ub ern von
Sc hnittk anten, Rollsä um e
und Coverstic h
Anwendungen.
Nä hte in allen
M aterialien
Nur als
G reif erf aden
Fil
Filsurj et universel
(polyester)
Fil à c oudre en
polyester
Aiguille
D estination Applic ation
Fil d’ aiguille et f il
de b ouc leur
70-90 Convient pour tous les
travaux avec le point
de surj et et le point
enveloppant
Convient seulem ent
c om m e f il de b ouc leur
Fil invisib le en
polyester Surf ilage des b ords
Fil tex turé
Convient seulem ent
c om m e f il de b ouc leur
Coutures souples dans des
tissus à m ailles, ourlets roulé s
80-90 Fil d’ aiguille et f il
de b ouc leur
70-90Fil à b roder, f il à
repriser et f il
dé c oratif
Surf ilage des b ords,
ourlets roulé s et
dé c orations
Couture sur tous tissus
Fil d’ aiguille et f il
de b ouc leur
Thread
All purpose overloc k
thread120/ 2 (polyester)
Spun Polyester
Needles W here Applic ation
Needles and
looper threads
70-90 For all overloc k - and
c over stitc h work .
L oopers onlyPolyester-c ontinuous
f ilam ents Neatening edges
W oolly nylon L oopers only Sof t seam s in k nits,
rolled hem s.
80-90 Needles, and
looper threads
70-90E m b roidery/ darning
and dec orative
threads
Neatening edges,
rolledhem s and c over
stitc h applic ations.
Seam s in all f ab ric s.
L oopers only
N
Nici do szycia i specjalne owerlokowe są wytwarzane w wielu różnych
odmianach, szerokościach i z różnych włókien. Warto zainwestować
w wysokiej jakości nici dla dobrych rezultatów. Dekoracyjne nici
owerlokowe (dostępne na stożkach) równiez staja się dostępne.
Zalecamy następujące kroki przy używaniu specjalnych nici
- Kupuj nici na stożkach lub szpulkach do owerloków
- Przy normalnych szpulkach używaj nakrętek szpulkowych
z torby z akcesoriami
Używaj dekoracyjnych nici tylko w sczepiarkach. Nić musi łatwo
i bez oporu przesuwać się przez prowadnice i oczka sczepiarki
- Im grubsza nić, tym dłuższe ściegi ()
- Im grubsza nić, tym luźniejsze naprężenia
Przy niciach dekoracyjnych szyj wolno. Przy rozpoczęciu delikatnie
dociągnij łańcuch niciowy do tyłu.
Zawsze poprzedź pracę szyciem próbnym przy niciach dekoracyjnych.
T
Nici Igły dzie Zastosowanie
Uniwersalna owerlokowa
nić / (poliester) 70-90 igły i
sczepiarki wszystkie ściegi
kryte i owerlokowe
Ciągłe włókna
poliestrowe tylko
sczepiarki poprawianie
brzegów
Nylon wełniany tylko
sczepiarki
delikatne ściegi w
dzianinach, okrągłe
obrębianie
Przędziarski poliester 80-90 igły i
sczepiarki Szwy we wszystkich
materiałach
Nici do haftu/cerowania
i dekoracyjne 70-90 tylko
sczepiarki
poprawianie brzegów,
okrągłe obrębianie
aplikacje ze
ściegiem
krytym

18
Ad j u s t m e n t s a n d s e t t i n g s / D
Ei n s t e l l e n u n d B e d i e n e n / Ré g l a g e e t u t i l i s a t i o n
S t i t c h l e n g t h
It c an b e adj usted while sewing.
The stitc h length is inf initely variab le f rom
1-4m m . M ost overloc k work is done with
a b asic setting of 2.5m m .
S t i c h l ä n g e
D ie Stic hlä nge k ann stuf enlos und
wä hrenddes Nä hens eingestelltwerden.
D ie Stic hlä nge ist stuf enlos einstellb ar im
B ereic h von 1 und 4 m m . D ie m eisten
Overloc k arb eiten werden m it einer
Stic hlä nge von 2,5 m m genä ht.
L o n g u e u r d e p o i n t
L a longueur de point peut ê tre ré glé e
progressivem ent, m ê m e pendant la c ou-
ture. L a longueur de point est ré glab le
progressivem ent dans la z one c om prise
entre 1 et 4 m m . L a plupart des travaux
avec la surj eteuse sont c ousus avec une
longueur de point f ix é e à 2,5 m m .
Cu t t i n g w i d t h
S w i t c h t h e m a c h i n e o f f ( Po w e r s w i t c h
t o “ O” )
D i s c o n n e c t m a c h i n e f r o m e l e c t r i c i t y
s u p p l y .
• Raise the upper k nif e.
• Turn c utting width adjustm ent dial in
the desired direc tion.
• L ower upper k nif e.
1 = 4– 6 m m seam width
2 = 5– 7 m m seam width
3 = 6– 8 m m seam width
4 = 7– 9 m m seam width
5 = 8– 10 m m seam width
The position of the lower k nif e deter-
m ines the width of the seam .
Reduc e the c utting width if the edges of
f ine f ab ric c url up when b eing sewn (A).
Inc rease the c utting width if the loops
seem to b e too loose (B ).
M e s s e r p o s i t i o n
M a s c h i n e a u s s c h a l t e n ,
Ha u p t s c h a l t e r a u f „ O“ s t e l l e n .
• D as M esser hoc hstellen.
• M esserpositionswahlk nopf in die
gewü nsc hte Ric htung drehen.
• D as M esser senk en.
M e s s e r p o s i t i o n
1 = Nahtb reite von 4-6 m m
2 = Nahtb reite von 5-7 m m
3 = Nahtb reite von 6-8 m m
4 = Nahtb reite von 7-9 m m
5 = Nahtb reite von 8-10 m m
Reduz ieren Sie die Nahtb reite, wenn
sic h der Stof f b eim Nä hen einrollt.
D en M esserpositionswahlk nopf dab ei
gegen 1 drehen (A).
E rhö hen Sie die Nahtb reite wenn die
Fadenversc hlingung lose ersc heint.
D en M esserpositionswahlk nopf dab ei
gegen 5 drehen (B ).
Po s i t i o n d u c o u t e a u
Co u p e r l e c i r c u i t d e l a m a c h i n e e n
m e t t a n t l e c o m m u t a t e u r p r i n c i p a l s u r
„ O“ .
• Relever le c outeau.
• Tourner le sé lec teur de position du
c outeau dans la direc tion souhaité e.
• Ab aisser le c outeau.
Po s i t i o n d u c o u t e a u
1 = largeur de c outure 4-6 m m
2 = largeur de c outure 5-7 m m
3 = largeur de c outure 6-8 m m
4= largeur de c outure 7-9 m m
5= largeur de c outure 8-10 m m
Ré duire la largeur de c outure, si le tissu
s’ enroule pendant la c outure. Tourner
alors le sé lec teur de position du c outeau
vers 1 (A).
Augm enter la largeur de c outure, si le
nouage apparaî t lâ c he. Tourner alors le
sé lec teur de position du c outeau vers 5
(B ).
AB
D
oże być dostosowywana w trakcie
szycia. Nieskończona różnorodność
w zakresie mm.
Większość prac owerlokowych jest
wykonywana na podstawowej 2,5 m m .
S
Wyłącz maszynę (pozycja wyłącznika"O")
Odłącz maszyne od źródła zasilania.
- Unieś górny nóż
- Przekręć pokrętło wyboru szerokości
cięcia w pożądanym kierunku
- Zniż górny nóż
P :
1 = 4 - 6 m m szerokości szwu
2 = 5 - 7 m m szerokości szwu
3 = 6 - 8 m m szerokości szwu
4 = 7 - 9 m m szerokości szwu
5 = 8 - 10 m m szerokości szwu
Pozycja dolnego noża determinuje
szerokość szwu
Zmniejsz szerokość cięcia jeśli brzegi
cienkich materiałów zwijają się przy
szyciu (A). Zwiększ szerokość, jeśli
pętelki wydają się zbyt luźne (B ).

19
Ad j u s t m e n t s a n d s e t t i n g s / D
Ei n s t e l l e n u n d B e d i e n e n / Ré g l a g e e t u t i l i s a t i o n
D i f f e r e n t i a l f e e d
There are two f eed dogs one f ront (C) and one rear (D ). The two f eed dogs m ove indepen-
dently and the distanc e eac h f eed dog travels during one c om plete m ovem ent c an b e ad-
j usted. The dif f erential f eed prevents f luting or waving in k nitted or stretc h f ab ric s and m ove-
m ents b etween the layers of f ab ric .
It also ensures puc k er-f ree seam s in sm ooth f ab ric suc h as nylon or c losely woven f ab ric .
Pe r f e c t l y f l a t s e a m s i n k n i t s o r s t r e t c h f a b r i c s .
The distanc e travelled b y the f ront f eed dog should b e greater than that of the rear f eed dog.
The f ront f eed dog, theref ore, f eeds an am ount of f ab ric whic h the rear f eed dog c an tak e up
b ehind the needle without stretc hing the f ab ric . (E )
Pu c k e r - f r e e s e a m s i n n y l o n o r c l o s e l y w o v e n f a b r i c s .
The distanc e travelled b y the rear f eed dog should b e greater than that of the f ront f eed dog.
The f ront f eed dog, theref ore, holds the f ab ric b ac k so that the rear f eed dog c an tak e it up
b ehind the needle without any puc k ering. (F)
Ad j u s t i n g t h e d i f f e r e n t i a l f e e d
The dif f erential f eed c an b e adj usted b y sim ply turning the dif f erential f eed adj ustm ent dial in
the direc tion desired. Always m ak e a trial run. The dif f erential f eed is inf initely variab le and
c an b e adj usted while sewing.
D i f f e r e n t i a l t r a n s p o r t
D er Transporteur b esteht aus z wei Teilen, einem vorderen (C) und einem hinteren (D ).
Innerhalb einer vollstä ndigen Transporteurb ewegung k ö nnen die b eiden Transporteure
untersc hiedlic he Sc hub lä ngen hab en. D er D if f erentialtransport erm ö glic ht es Ihnen, ab solut
geradef allende und wellenf reie Nä hte in M asc henware z u arb eiten, ohne ein V ersc hieb en
der Stof f lagen. E b enf alls sorgt er daf ü r, dass sic h glatte Stof f e wie z . B . Nylon-Tric ots oder
f est gewob ene M aterialien b eim Nä hen nic ht z usam m enz iehen (E ).
W e l l e n f r e i e s V e r a r b e i t e n v o n Tr i c o t o d e r S t r i c k w a r e n
D ie Sc hub lä nge des vorderen Transporteurs m uss grö sser sein als derj enige des hinteren.
D er vordere Transporteur sc hieb t dann soviel M aterial z u, wie der hintere Transporteur gerade
hinter der Nadel wegtransportieren k ann.
Ke i n Z u s a m m e n z i e h e n d e r Na h t b e i f e s t g e w o b e n e n S t o f f e n o d e r Ny l o n - Tr i c o t s .
D ie Sc hub lä nge des hinteren Transporteurs m uss grö sser sein als j ene des vorderen. D er
vordere Transporteur hä lt dann soviel M aterial z urü c k , wie der hintere Transporteur gerade
hinter der Nadel wegtransportieren k ann (F)
Ei n s t e l l u n g D i f f e r e n t i a l t r a n s p o r t
D er D if f erentialtransport wird durc h drehen des D if f erentialtransport - W ahlk nopf es eingestellt.
M ac hen Sie im m er eine Nä hprob e. D er D if f erentialtransport k ann stuf enlos und wä hrend
des Nä hens eingestellt werden.
En t r a î n e m e n t d i f f é r e n t i e l
L a grif f e d’ entraî nem ent est c om posé e de deux parties, une partie avant (C) et une partie
arriè re (D ). L ors d’ un cycl e co m plet de la grif f e d’entraî nem ent, ce s deux grif f es peuvent
avoir des dé plac em ents de longueur dif f é rente. L ’ entraî nem ent dif f é rentiel vous perm et
d’ ef f ec tuer des c outures ab solum ent plates et sans ondulations dans des tissus à m ailles,
sans dé c alage des c ouc hes de tissu. Il perm et é galem ent q ue les tissus lisses c om m e le
nylon-les tric ots ou les m até riels ré sistants et tissé s ne ré tré c issent pas durant la c outure (E ).
Tr i c o t o u l a i n a g e s a n s o n d u l a t i o n s
L ’ avanc e de la grif f e avant doit ê tre plus grande q ue c elle de la grif f e arriè re. L a grif f e avant
dé plac e autant de m até riel q ue la grif f e arriè re est en m esure d’ entraî ner derriè re l’ aiguille.
Au c u n e c o u t u r e n e r é t r é c i t s u r d e s é t o f f e s t i s s é e s o u d e s t r i c o t s e n n y l o n
L ’ avanc e de la grif f e arriè re doit ê tre plus grande q ue c elle de la grif f e avant. L a grif f e avant
retient alors autant de m até riel q ue la grif f e arriè re est en m esure d’ entraî ner derriè re l’ aiguille (F).
Ré g l a g e d e l ’ e n t r a î n e m e n t d i f f é r e n t i e l
L ’ entraî nem ent dif f é rentiel se rè gle en tournant le sé lec teur de l’ entraî nem ent dif f é rentiel.
Priè re d’ ef f ect uer touj ours un essai de co uture. L ’ entraî nem ent dif f é rentiel peut se ré gler
progressivem ent m ê m e pendant la c outure.
T
Są dwa transportery przedni (C) i tylny (D). Oba poruszają się niezależnie, a odległość,
jaką przebywa każdy z transporterów w czasie jednego kompletnego ruchu może być
dostosowywana. Transporter różniczkowy zapobiega rowkowaniu lub falowaniu w
dzianinach i rozciągliwych materiałach oraz ruchom pomiędzy warstwami materiału.
Zapewnia również szwy wolne od fałdek w materiałach gładkich, jak nylon, czy gęsto tkanych.
I
Odległośc przebywana przez przedni transporter powinna być większa niż pokonana przez tylny.
Przedni transporter przesuwa zatem taką ilośc materiału, którą tylny może podjąć za igłą bez
rozciągania materiału (E ).
S
Odległość przebywana przez tylny transporter powinna być większa niż pokonana przez przedni.
Przedni transporter powstrzymuje więc materiał, tak że tylny może go podjąć za igłą bez
jakichkolwiek sfałdowań (F).
D
Transporter różniczkowy może byc dostosowywany przez obracanie jego pokrętła w
pożądanym kierunku. Zawsze wykonuj przebieg próbny. Transporter różniczkowy jest
nieskończenie różnorodny i może być dostosowywany w trakcie szycia.
Other manuals for MO-735
8
Table of contents
Other JUKI Sewing Machine manuals

JUKI
JUKI MF-7900 Series User manual

JUKI
JUKI LZH-1290 User manual

JUKI
JUKI MO-634DEV User manual

JUKI
JUKI LBH-1790 Series User manual

JUKI
JUKI HZL-UX8 User manual

JUKI
JUKI MO-6704D User manual

JUKI
JUKI MEB-3810 User manual

JUKI
JUKI HZL-80 series User manual

JUKI
JUKI LU-1565N User manual

JUKI
JUKI PLC-2700 Series User manual

JUKI
JUKI MO-104N User manual

JUKI
JUKI TL-98E User manual

JUKI
JUKI DDL-9000C-F Series User manual

JUKI
JUKI LZ-2290A Series User manual

JUKI
JUKI UT55 User manual

JUKI
JUKI HZL-27Z User manual

JUKI
JUKI DNU-1541 User manual

JUKI
JUKI HZL - 355Z Series User manual

JUKI
JUKI MB-372 User manual

JUKI
JUKI 7000 User manual