Jumper JPD-500E Instruction Manual

Pulse Oximeter JPD-500E(LED)
Issuing Date: April, 2020 Manual Version: 1.0
Instructions to User
Dear users, thank you very much for purchasing the Pulse Oximeter.
This Manual is written and compiled in accordance with the council directive
MDD 93/42/EEC for medical devices and harmonized standards. In case of
modifications and software upgrades, the information contained in this
document is subject to change without notice.
Please read the User Manual carefully before using this product.
WARNING:
■Uncomfortable or painful feeling may appear if using the device
ceaselessly, especially for the microcirculation barrier patient. It is
recommended that the sensor should not be applied to the same finger for
over 2 hours.
■The light (the infrared is invisible) emitted from the device is harmful to the
eyes, so the user and the maintenance man should not stare at the light.
■Enamel orAcrylic fingernail polish or other fingernail applications may
distort and/or produce inaccurate readings.
■Please refer to the correlative literature about the clinical restrictions and
caution.
■This device is not intended for treatment.
1 Safety
1.1 Instructions for Safe Operations
■Check the main unit and all accessories periodically to make sure that
there is no visible damage that may affect patient’s safety and monitoring
performance about cable and transducers. It is recommended that the device
should be inspected once a week at least. When there is obvious damage,
stop using the monitor.
■Necessary maintenance must be performed by qualified service
engineers ONLY. Users are not permitted to maintain it by themselves.
■The oximeter cannot be used together with devices not specified in User
Manual. Only the accessory that appointed or recommendatory by
manufacture can be used with this device.
■This product is calibrated before leaving factory.
1.2 Warning
■Explosive hazard---DO NOT use the oximeter in environment with
inflammable gas such as some ignitable anesthetic agents.
■DO NOT use the oximeter while the user is measured by MRI and CT.
■The person who is allergic to rubber can not use this device.
■The disposal of scrap instrument and its accessories and packing
(including battery, plastic bags, foams and paper boxes) should follow the
local laws and regulations.
■Please check the packing before use to make sure the device and
accessories are totally in accordance with the packing list, or else the device
may have the possibility of working abnormally.
1.3 Attentions
●Keep the oximeter away from dust, vibration, corrosive substances,
explosive materials, high temperature and moisture.
●If the oximeter gets wet, please stop operating it.
●When it is carried from cold environment to warm or humid environment,
please do not use it immediately.
●High temperature or high pressure steam disinfection of the oximeter is
not permitted. Refer to User Manual in the relative chapter for instructions of
cleaning and disinfection.
●Do not have the oximeter immerged in liquid. When it needs cleaning,
please wipe its surface with medical alcohol by soft material. Do not spray
any liquid on the device directly.
●Do not use the device on infant or neonatal patients.
●The product is suitable for children above four years old and
adults(Weight should be between 15kg to 110kg).

●The device may not work for all patients. If you are unable to achieve
stable readings, discontinue use.
●The update period of data is less than 5 seconds, which is changeable
according to different individual pulse rate.
●The instrument does not have low-voltage alarm function, it only shows
the low-voltage, please change the battery when the battery energy is used
out.
●Batteries must be removed if the device is going to be stored for more
than once month, or else batteries may leak.
1.4 Indication for use
The Fingertip Pulse Oximeter is a non-invasive device intended for the
spot-check of oxygen saturation of arterial hemoglobin (SpO2) and the pulse
rate of adult and pediatric patients in home and hospital environments
(including clinical use in internist/surgery, anesthesia, intensive care etc.).
This device is not intended for continuous monitoring.
2 Overview
The pulse oxygen saturation is the percentage of HbO2in the total Hb in the
blood, so-called the O2concentration in the blood. It is an important
bio-parameter for the respiration. For the purpose of measuring the SpO2
more easily and accurately, our company developed the Pulse Oximeter. At
the same time, the device can measure the pulse rate simultaneously.
The Pulse Oximeter features in small volume, low power consumption,
convenient operation and being portable. It is only necessary for patient to
put one of his fingers into a fingertip photoelectric sensor for diagnosis, and a
display screen will directly show measured valued of Hemoglobin Saturation.
2.1 Classification:
Class II a (MDD 93/42/EEC IX Rule 10)
Class II (U.S.FDA)
2.2 Feature
■Operation of the product is simple and convenient.
■The product is small in volume, light in weight (total weight is about 50g
including batteries) and convenient in carrying.
■Power consumption of the product is low .
■The product will automatically be powered off when no signal is in the
product within 16 seconds.
2.3 Major Applications and Scope of Application
The Pulse Oximeter can be used to measure human Hemoglobin Saturation
and pulse rate through finger, and indicate the pulse intensity by the
bar-display. The product is suitable for use in family, hospital (Ordinary
sickroom), Oxygen Bar, social medical organizations and also the measure of
saturation oxygen and pulse rate.
The product is not suitable for use in continuous supervision for patients.
2.4 Environment Requirements
Operation Temperature: 5℃-40℃
Storage Temperature: -10℃-50℃
Ambient Humidity: 15%-80% RH, no condensation in operation
10%-93% RH, no condensation in storage
Atmospheric Pressure: 70 kPa to 106 kPa, in operation
50kPa–106 kPa, in storage
3 Principle and Caution
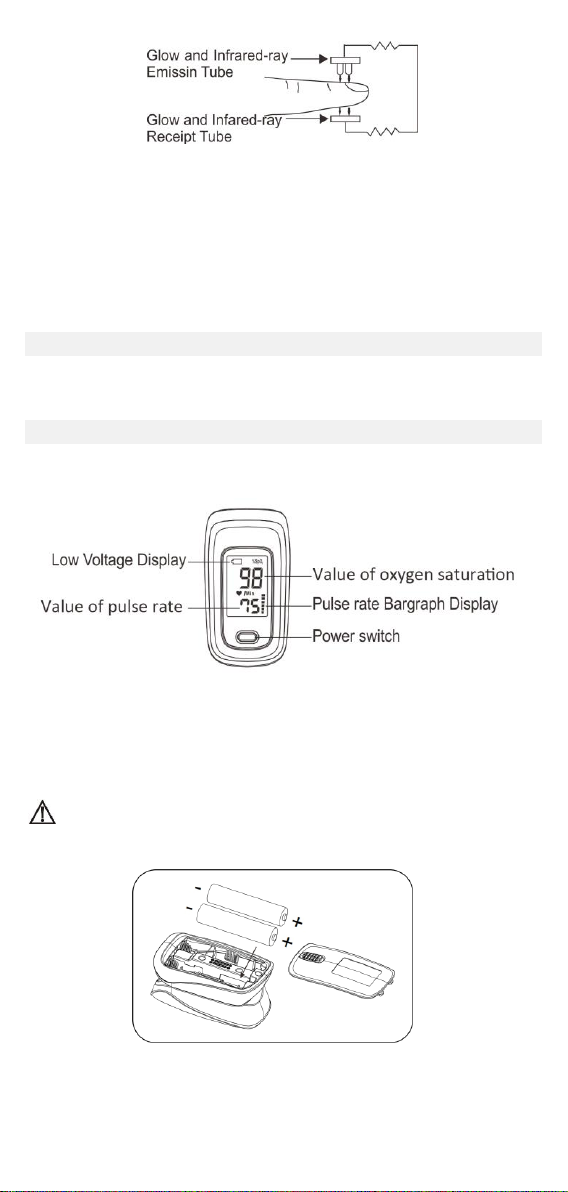
3.1 Principle of Measurement
Principle of the Oximeter is as follow: An experience formula of data process
is established taking use of Lambert Beer Law according to Spectrum
Absorption Characteristics of Reductive Hemoglobin (Hb) and
Oxyhemoglobin (HbO2) in glow & near-infrared zones. Operation principle of
the instrument is : Photoelectric Oxyhemoglobin inspection Technology is
adopted in accordance with Capacity Pulse Scanning & Recording
Technology, so that two beams of different wavelength of lights can be
focused onto human fingertip through perspective clamp finger-type sensor.
Then measured signal can be obtained by a photosensitive element,
information acquired through which will be show on screen through treatment
in electronic circuits and microprocessor.

Figure 1 Operating principle
3.2 Caution
1. The finger should be placed properly (see the attached illustration of
this manual, Figure 5), or else it may cause inaccurate measurement.
2. The SpO2sensor and photoelectric receiving tube should be arranged in
a way with the subject’s arteriole in a position there between.
3. Excessive ambient light may affect the measuring result. It includes
fluorescent lamp, dual ruby light, infrared heater, direct sunlight and etc.
4. Strenuous action of the subject or extreme electrosurgical interference
may also affect the accuracy.
4 Accessories
1.One hanging rope;
2.Storage bag;
2.Two AAA batteries;
3.One user’s manual;
5 Installation
5.1 View of the Front panel
Figure 2. Front View
5.2 Battery
Step 1. Refer to Figure 3. and insert the two AAAsize batteries properly in the
right direction.
Step 2. Replace the cover.
Please take care when you insert the batteries for the improper
insertion may damage the device.
Figure 3. Batteries Installation

Step 2. Put another end of the rope through the first one and then tighten it.
Figure 4. Mounting the hanging rope
6 Operating Guide
6.1 Insert the two batteries properly to the direction, and then replace the
cover.
6.2 Open the clip as shown in Figure 5.
Figure 5. Put finger in position
6.3 Let the patient’s finger put into the rubber cushions of the clip (make sure
the finger is in the right position ), and then clip the finger.
6.4 Press the switch button once on front panel.
6.5 Do not shake the finger and keep the patient at ease during the process.
Meanwhile, human body is not recommended in movement status.
6.6 Get the information directly from screen display.
6.7 In boot-strap state, press button, and the device is reset.
Fingernails and the luminescent tube should be the same side.
7 Repairing and Maintenance & cleaning and disinfection
■ Please change the batteries when the low-voltage display on the screen.
■ Please clean the surface of the device before using. Wipe the device with
medical alcohol first, and then let it dry in air or clean it by dry clean fabric.
■ Using the medical alcohol to disinfect the product after use, prevent from
cross infection for next time use.
■ Please take out the batteries if the oximeter is not use for a long time.
Warning: High-pressure sterilization cannot be used on the device.
Warning: Do not immerse the device in liquid.
Warning: It is recommended that the device should be kept in a dry
environment. Humidity may reduce the useful life of the device, or even
damage it.
8 Troubleshooting
Trouble
Possible Reason
Solution
The SpO2
and Pulse
Rate can not
be displayed
normally
1.The finger is not properly
positioned.
2.The patient’s SpO2is too
low to be detected.
1.Place the finger
properly and try again.
2.Try again; Go to a
hospital for a diagnosis
if you are sure the
device works all right.
The SpO2
and Pulse
Rate are not
displayed
stably
1.The finger is not placed
inside deep enough.
2.The finger is shaking or the
patient is moving.
1.Place the finger
properly and try again.
2.Let the patient keep
calm
The device
can not be
turned on
1.Low battery or no battery.
2.The batteries are not
inserted properly.
3.The malfunction of the
device.
1.Change batteries.
2.Reinstall batteries.
3.Please contact the
local service center.

The display is
off suddenly
1.The device will power off
automatically when there is
no signal within 16 seconds.
2.The batteries are almost
drained.
1.Normal.
2.Change batteries.
9 Key of Symbols
Symbol
Description
Type BF applied part
Caution: Please see this manual.
%SpO2
Symbol of oxygen saturation.
bpmPR
Symbol of pulse rate.
No SpO2 alarms.
Consult the instructions for use.
IP22
The degree of protection against harmful ingress of water
and particulate matter.
When end users abandon this product, they must send the
product to the collection place for recycling.
10 Technical Specification
Display Information
Display Mode
Display Format
LED display
The Pulse Oxygen
Saturation (SpO2)
Digital
Pulse Rate (PR)
Digital
Pulse Intensity (bar-graph)
Digital bar-graph display
SpO2 Parameter Specification
Measuring range
35%-100% (the resolution is 1%).
Accuracy
70%-100%;±2%, Below 70% unspecified.
Pulse Parameter Specification
Measuring range
25bpm-250bpm (the resolution is 1 bpm)
Accuracy
±2bpm
Pulse Intensity
Range
Continuous bar-graph display, the higher
display indicates the stronger pulse.
Alert conditions
SpO2
Less than 94%
PR
Less than 50bpm or more than 130bpm
Battery Requirement
2 X 1.5V (AAAsize) alkaline battery
Power Consumption
Smaller than 35 mA.
Battery Useful Life
Two batteries can work continually for 24 hours
Power off
The Oximeter can be powered off in case no finger is the Oximeter within
16 seconds.

Optical Sensor
Red light (wavelength is 660nm)
Infrared (wavelength is 905nm)
Dimensions and Weight
Dimensions
62 (L)X37 (W)X32(H) mm
Weight
About 50g (with the batteries)
Manufacturing date:see the label
11 Appendix: Electromagnetism Compatibility
Guidance and manufacture’s declaration – electromagnetic
emissions-for all EQUIPMENT and SYSTEMS
Warranty
Your product is warranted to be free of defects in materials and workmanship
for one year from the original purchase date.
The device was built to exacting standards and carefully inspected prior to
shipment. In the event of a defect covered by this warranty, we will at option,
repair or replace the device.
This warranty does not cover device failure due to owner misuse or
negligence, or normal wear and tear. If you have questions about your device,
or this warranty, please contact an authorized Jumper Medical provide.
After-sale service unit: Shenzhen Jumper Medical Equipment Co., Ltd.
Address: D Building, No. 71, Xintian Road, Fuyong Street, Baoan,
Shenzhen,Guangdong,China
Tel: +86-755-26696279
Fax: +86-755-26852025
mail:info@jumper-medical.com
Website: www.jumper-medical.com
Postal Code: 518103
DE
Überblick
Die Sauerstoffsättigung ist der Prozentsatz von Oxyhämoglobin (HbO2), der
mit Sauerstoff gegen alle kombinierbaren Hämoglobinen (Hb) kombiniert wird.
Es ist ein wichtiger physiologischer Parameter, der in dieAtmung und den
Kreislauf einbezogen ist. Mit diesem Instrument kann die Pulsfrequenz über
die Arterie gemessen werden.
Produktmerkmale
·Leicht, tragbar und einfach zu bedienen
·Lesbarer LED-Bildschirm
·Batterie-Unterspannungsanzeige
·Das Gerät wird 16 Sekunden später automatisch heruntergefahren, wenn
Guidance and manufacture’s declaration – electromagnetic emission
The JPD-500E is intended for use in the electromagnetic environment
specified below. The customer of the user of the JPD-500E should assure
that it is used in such and environment.
Emission
test
Compliance
Electromagnetic environment –
guidance
RF
emissions
CISPR 11
Group 1
The JPD-500E uses RF energy only for its
internal function. Therefore, its RF
emissions are very low and are not likely to
cause any interference in nearby electronic
equipment.
RF
emission
CISPR 11
Class B
The JPD-500E is suitable for use in all
establishments, including domestic
establishments and those directly
connected to the public low-voltage power
supply network that supplies buildings used
for domestic purposes.

kein Signal erkannt wird.
·Das Gerät ist mit zwei 1.5 V AAA-Trockenbatterien ausgestattet, die Energie
für einen Betrieb von mehr als 24 Stunden liefern können.
Ansicht der Frontplatte
1:Niederspannungsanzeige
2:Pulsfrequenz
3:Sauerstoffsättigung
4:Pulsfrequenz-Balkendiagramm
5:Stromschalter
Bedienerführung
Öffnen Sie den Clip wie inAbbildung gezeigt
1.Lassen Sie den Finger des Patienten in die Gummikissen des Clips
stecken (stellen Sie sicher, dass sich der Finger in der richtigen Position
befindet) und klemmen Sie dann den Finger.
2.Drücken Sie die Schaltertaste einmal auf der Vorderseite.
3.Schütteln Sie nicht den Finger und beruhigen Sie den Patienten während
des Vorgangs. In der Zwischenzeit wird der menschliche Körper im
Bewegungsstatus nicht empfohlen.
4.Holen Sie sich die Informationen direkt von der Bildschirmanzeige.
5.Drücken Sie im Boot-Strap-Zustand die Taste, und das Gerät wird
zurückgesetzt.
Fingernägel und Lumineszenzrohr sollten auf derselben Seite
liegen.
Fehlersymptome, Ursachen und Lösungen
Symptom
Möglice
Ursache
Solution
Das Oximeter
zeigt keine
Daten zur
Sauerstoffsä
ttigung und
Pulsfrequen z
an.
1.Der Finger befindet sich
nicht in der richtigen
Position.
2.Der Patient konzentriert
sich nicht gut auf die
Untersuchung
1.Bringen Sie den Finger
in die richtige Position.
2.Versuchen
Sie es
mehrere
Male. Wenn
Sie
sicher
sind, dass
das
Produkt
gut
funktioniert,empfehlen
Sie
dem
Patienten,rechtzeitig
medizinische
Hilfe in
Anspruch zu
nehmen.
Der
angezeigte
Wert der
Sauerstoffsä
ttigung oder
Pulsfrequen
z
schwankt.
1.Der Finger ist
nicht in
Position
eingeführt.
2.Der Finger
vibriert oder
der Körper
des Patienten
bewegt sich.
1.Setzen Sie
den Finger
erneut ein.
2.Stellen Sie
sicher, dass
sich der
Körper des
Patienten
nicht bewegt,
und bittenSie
den
Patienten,
ruhig zu
bleiben.
1
2
3
4
5

Das
Oximeter
kann nicht
eingeschalte
t
werden.
1.Die Battterien haben
keinen Strom oder sind
überhaupt nicht
installiert.
2.Die Batterien
sind falsch
eingesetzt.
3.Das Oximeter
ist
beschädigt.
1.Ersetzen Sie
die
Batterien.
2.Legen Sie
die Batterien
korrekt
gemäßder
Polaritätsanz
eige ein.
3.Wenden Sie
sich an das
Kundendiens
tpersonal
oder den
Hersteller.
Der
Bildschirm
ist
plötzlich
ausgeschalt
et.
Erkennt das
Oximeter
innerhalb von
16
Sekunden
kein Signal,
wird es
automatisch
ausgeschaltet
1.Das ist
normal.
2.Ersetzen Sie
die
Batterien.
FR
Vued'ensemble
La saturation en oxygène est le pourcentage d'oxyhémoglobine (HbO2)
associéàl'oxygène contre toutes les hémoglobines combinables (Hb). C'est
un paramètre physiologique important impliquédans la respiration et la
circulation. Cet instrument peut être utilisépour mesurer le pouls via l'artère.
Caractéristiques du Produit
·Poids léger, utilisation portable et opération simple.
·Écran LED lisible.
·Indication de basse tension de la batterie.
·L'appareil s'éteindra automatiquement 16 secondes plus tard si aucun
signal n'est détecté.
·L'appareil est équipéde deux piles sèches 1,5 VAAA, qui peuvent lui
fournir de l'énergie pour fonctionner plus de 24 heures.
vue du panneau avant
1.affichage basse tension
2.fréquence du pouls
3.Saturation d'oxygène
4.fréquence du pouls Bargraphe Affichage
5.interrupteur d'alimentation
Guide d'utilisation
Ouvrez le clip comme indiquédans la figure
1.Laissez le doigt du patient placédans les coussins en caoutchouc du clip
(assurez-vous que le doigt est dans la bonne position), puis clipsez le doigt.
2.Appuyez une fois sur le bouton de l'interrupteur sur le panneau avant.
3. Do not shake the finger and keep the patient at ease during the process.
Meanwhile, human body is not recommended in movement status.
4.Obtenez les informations directement àpartir de l'affichage àl'écran.
5.En état de démarrage, appuyez sur le bouton et l'appareil est réinitialisé.
1
2
3
4
5

Les ongles et le tube luminescent doivent être du même côté.
Dépannage
Difficulté
Raison possible
Solution
La SpO2 et la
fréquence du
pouls ne
peuvent pas
1.Le doigt n'est pas
correctement positionné.
2.La SpO2 du patient est
trop faible pour être détecté
e.
1.Placez le doigt
correctement et ré
essayez.
2.Réessayer; Allez à
l'hôpital pour un
diagnostic si vous êtes
sûr que l'appareil
fonctionne bien.
La SpO2 et la
fréquence du
pouls ne sont
pas affichées
de manière
stable
1.Le doigt n'est pas placé
assez profondément àl'int
érieur.
4.Le doigt tremble ou le
patient bouge.
1.Placez le doigt
correctement et ré
essayez.
2.Laissez le patient
garder son calme
L'appareil ne
peut pas être
allumé
1.batterie faible ou pas de
batterie.
2.Les piles ne sont pas insé
rées correctement.
3.Le dysfonctionnement de
l'appareil.
1.changez les piles.
2.Réinstallez les piles.
3.Veuillez contacter le
centre de service local.
L'écran s'éteint
soudainement
1.L'appareil s'éteint
automatiquement en
l'absence de signal dans
les 16 secondes.
2.Les batteries sont
presque épuisées.
1.Normal.
2.Changez les piles.
IT
Panoramica
La saturazione di ossigeno èla percentuale di ossiemoglobina (HbO2) che
ècombinata con l'ossigeno contro tutta l'emoglobina combinabile (Hb). Èun
parametro fisiologico importante coinvolto nella respirazione e nella
circolazione. Questo strumento puòessere utilizzato per misurare la
frequenza del polso tramite l'arteria.
Caratteristiche del prodotto
·Uso leggero, portatile e funzionamento semplice
·Schermo LED leggibile
·Indicatore di bassa tensione della batteria
·Il dispositivo si spegne automaticamente 16 secondi piùtardi quando non
viene rilevato alcun segnale.
·Il dispositivo èdotato di due batterie a secco AAA da 1,5 V, che possono
fornire energia per funzionare per piùdi 24 ore.
Vista del pannello frontale
1.schermo a basso voltaggio
2.Pulsazione
3.saturazione di ossigeno
4.Display grafico a barre pulsazione
5.interruttore
1
2
3
4
5

Guida operativa
Aprire la clip come mostrato in Figura
1.Lasciare il dito del paziente inserito nei cuscinetti di gomma della clip
(assicurarsi che il dito sia nella posizione corretta), quindi tagliare il dito.
2.Premere una volta il pulsante di commutazione sul pannello frontale.
3.Non agitare il dito e mantenere il paziente a proprio agio durante il
processo. Nel frattempo, il corpo umano non èraccomandato nello stato di
movimento.
4.Ottieni le informazioni direttamente dalla schermata.
5.In stato di avvio, premere il pulsante e il dispositivo viene ripristinato.
Le unghie e il tubo luminescente devono essere sullo stesso lato.
Risoluzione problemi
problema
Possibile motivo
Soluzione
SpO2 e
Pulsazione
non vengono
visualizzati
1.Il dito non èposizionato
adeguatamente.
2.La SpO2 del paziente è
troppo bassa per essere
rilevata.
1.Posizionare il dito
correttamente e
riprovare.
2.Riprova; Vai in
ospedale per una
diagnosi se sei sicuro
che il dispositivo
funzioni bene.
SpO2 e
frequenza del
polso non
sono
visualizzati
stabilmente
1.Il dito non èinserito
abbastanza in profondità.
2.Il dito trema o il paziente si
sta muovendo.
1.Posizionare il dito
correttamente e
riprovare.
2.Lascia che il paziente
mantenga la calma
Il dispositivo
non può
essere
acceso
1.Batteria scarica o nessuna
batteria.
2.Le batterie non sono
inserite correttamente.
3.Il malfunzionamento del
dispositivo.
1.Sostituire le batterie.
2.Reinstallare le
batterie.
3.Si prega di contattare
il centro di assistenza
locale.
Il display si
spegne
improvvisame
nte
1.Il dispositivo si spegne
automaticamente quando
non viene emesso alcun
segnale entro 16 secondi.
2.Le batterie sono quasi
scariche.
1.situazione normale
2.Sostituire le batterie.
ES
Visión General
La saturación de oxígeno es el porcentaje de oxihemoglobina (HbO2) que se
combina con oxígeno contra toda la hemoglobina combinable (Hb). Es un
importante parámetro fisiológico involucrado en la respiración y la circulación.
Este instrumento se puede utilizar para medir la frecuencia del pulso a través
de la arteria.
Características del producto
·Peso ligero, uso portátil y operación simple
·Pantalla LED legible
·Indication Indicación de bajo voltaje de la batería.

·El dispositivo se apagaráautomáticamente 16 segundos después cuando
no se detecte ninguna señal.
·El dispositivo estáequipado con dos baterías secas AAA de 1.5 V, que
pueden suministrar energía para que funcione más de 24 horas.
Vista del panel frontal
Guía de operación
Abra el clip como se muestra en la Figura
1. Introduzca el dedo del paciente entre los cojines de goma del clip
(asegúrese de que el dedo estéen la posición correcta).
2. Presione el botón de encendido una vez, situado en el panel frontal.
3. No agite el dedo y mantenga al paciente tranquilo durante el proceso.
Mientras se realiza la medición no se recomienda que el cuerpo humano
estéen estado de movimiento.
4. Obtenga la información directamente de la pantalla.
5. En estado de arranque, presione el botón de encendido y el dispositivo se
reiniciará.
Las uñas y el tubo luminiscente deben estar del mismo lado.
Solución de problemas
Problema
Posible razón
Solución
La SpO2y la
frecuencia del
pulso no se
muestra
normalmente
1. El dedo no estácolocado
correctamente.
2. El valor de la SpO2en el
paciente es demasiado baja
para ser detectado.
1.Coloque el dedo
correctamente y vuelva a
intentarlo.
2.Inténtelo de nuevo.
Vaya al hospital para un
diagnóstico, si está
seguro de que el
dispositivo funciona
correctamente.
La SpO2y la
frecuencia del
pulso no se
muestran de
forma estable
1. El dedo no se ha colocado
dentro del pulsioxímetro con
suficiente profundidad.
2.El dedo estásacudiéndose
o el paciente se está
moviendo.
1.Coloque el dedo
correctamente y vuelva a
intentarlo.
2.Deje que el paciente
mantenga la calma
El dispositivo
no se puede
encender
1.Batería baja o sin batería.
2.Las pilas no están
insertadas correctamente.
3.- Mal funcionamiento del
dispositivo.
1.Cambie las pilas
2.Reinstale las pilas
3.Póngase en contacto
con el servicio de
mantenimiento
La pantalla se
apaga de
repente
1.El dispositivo se apaga
automáticamente cuando no
hay señal en 16 segundos.
2.Las pilas están casi
agotadas.
1.Situación normal
2.Cambie las pilas

Wellkang Ltd
Suite B, 29 Harley Street, London W1G 9QR,UK
Shenzhen Jumper Medical Equipment Co., Ltd
Address: D Building, No. 71, Xintian Road, Fuyong Street,
Baoan,Shenzhen, Guangdong,China
E-mail: info@jumper-medical.com
Tel: +86-755-26692192,26696279
Web:www.jumper-medical.com
Table of contents
Other Jumper Medical Equipment manuals

Jumper
Jumper AngelSounds JPD-100S4 User manual

Jumper
Jumper AngelSounds JPD-100S9 User manual

Jumper
Jumper JPD-500G User manual

Jumper
Jumper FOX-200 Instruction Manual

Jumper
Jumper JPD-300E User manual

Jumper
Jumper JPD-100A User manual

Jumper
Jumper Pulse Oximeter User manual

Jumper
Jumper JPD-500F User manual

Jumper
Jumper JPD-ES200 User manual

Jumper
Jumper JPD-ES100 User manual