Juniper HarvestMaster GRAINGAGE H2 STATIONARY User manual

USER’S MANUAL

H2 Stationary GrainGage User’s Guide
2
H2 Stationary GrainGage User’s Guide
Copyright © 2021 HarvestMaster. All rights reserved. Information subject to change without notice.
Part Number: 30631-00
Trademarks
HarvestMaster, GrainGage, and Mirus are recognized trademarks of Juniper Systems, Inc. All other
trademarks are registered or recognized by their respective owners.
Disclaimer
Information is subject to change without notice.
Cautions
CAUTION: This symbol indicates that failure to follow directions could result in damage to equipment
or loss of information.
!
HarvestMaster Logan, Utah, USA
Phone: 435.753.1881
Email: agriculturesales@junipersys.com
www.harvestmaster.com
HarvestMaster Europe Wels, Austria
Phone: +43 7242219333
Email: office@harvestmaster.eu
www.harvestmaster.eu

H2 Stationary GrainGage User’s Guide
3
Contents
1 Introduction to the H2 Stationary GrainGage ........................................8
1.1 Set Up the Mesa 3 .......................................................................................8
1.1.1 Configure an Account on the Mesa 3 ..............................................................9
1.1.2 Turn Tablet Mode Off ..............................................................................9
1.1.3 Configure Power Settings ........................................................................10
1.1.4 Download and Install Mirus ......................................................................10
1.1.5 Set Up the Barcode Scanner ......................................................................11
1.1.6 Update Mirus ......................................................................................12
1.2 Set Up the GrainGage ..................................................................................12
1.2.1 Unpack the GrainGage ............................................................................13
1.2.2 Remove the Shipping Stops ......................................................................15
1.2.3 Install the Mesa 3 and Cradle .................................................................... 16
1.2.4 Connect the Battery ..............................................................................17
2 Mirus and H2 Stationary GrainGage Setup .........................................19
2.1 Start Mirus ..............................................................................................19
2.1.1 Load the H2 GrainGage Plugin ................................................................... 19
2.2 Setup Mirus Preferences ...............................................................................21
2.2.1 Open Setup .......................................................................................21
2.2.2 Set Preferred Units of Measure ...................................................................21
2.2.3 Set Preferred Language .........................................................................22
2.2.4 Set Preferred Backup Log Location .............................................................23
2.2.5 Clear Cached Settings ...........................................................................23
2.3 Setup the H2 Stationary GrainGage ...................................................................24
2.3.1 Open Setup ......................................................................................24
2.3.2 Configure Actuator ..............................................................................24
2.3.3 View GrainGage Info .............................................................................26
2.3.4 Configure Weight Sensors ......................................................................27
2.3.5 Configure Moisture Sensors .....................................................................29
2.3.6 Configure Level Detect Sensor ..................................................................30
2.3.7 Configure H2 Stationary GrainGage System Settings ...........................................30

H2 Stationary GrainGage User’s Guide
4
2.3.8 Reset the H2 Stationary GrainGage to Factory Settings ........................................ 31
2.3.9 Update H2 Stationary GrainGage Firmware .....................................................32
2.3.10 Create and Record Barcode Traits ..............................................................32
2.3.11 View Information About Mirus ..................................................................35
3 H2 Stationary GrainGage Diagnostics and Alerts ...................................37
3.1 Diagnostics Dialog Box.................................................................................37
3.1.1 Tare the GrainGage ...............................................................................38
3.1.2 Enter/Exit Glean Mode ...........................................................................39
3.1.3 Weight Diagnostics ..............................................................................39
3.1.4 Moisture Diagnostics.............................................................................40
3.1.5 Level Detect Diagnostics......................................................................... 41
3.1.6 Health Diagnostics ............................................................................... 41
3.1.7 Actuators Diagnostics ............................................................................ 41
3.2 Alerts...................................................................................................42
4 H2 Stationary GrainGage Calibration ...............................................45
4.1 Weigh Bucket Calibration..............................................................................45
4.1.1 Calibrate Weigh Bucket ..........................................................................45
4.1.2 Check Weigh Bucket Calibration ................................................................48
4.2 Moisture Curve Calibration ............................................................................49
4.2.1 Prepare Samples .................................................................................49
4.2.2 Moisture Calibration Overview ..................................................................50
4.2.3 Moisture Calibration .............................................................................50
4.2.4 Test and Tune a Moisture Curve .................................................................54
4.2.5 Manually Adjust a Moisture Curve ..............................................................57
4.2.6 Manual Calibration Using Excel .................................................................59

H2 Stationary GrainGage User’s Guide
5
5 Field Maps ........................................................................61
5.1 Create a Field Map. . . . . . . . . . . . . . . . . . . . . . . . . . . . . . . . . . . . . . . . . . . . . . . . . . . . . . . . . . . . . . . . . . . . . . . . . . . . . . . . . . . . . . 61
5.1.1 Create a Standard Plot ID Map.................................................................... 61
5.2 View a Map ............................................................................................64
5.3 Delete a Map...........................................................................................65
5.4 Copy a Map ............................................................................................66
5.5 Export Map Data.......................................................................................67
5.5.1 Export Data ......................................................................................67
6 Harvest Mode .....................................................................70
6.1 Options for Opening Harvest Mode. . . . . . . . . . . . . . . . . . . . . . . . . . . . . . . . . . . . . . . . . . . . . . . . . . . . . . . . . . . . . . . . . . . .70
6.2 Open Harvest Mode ..................................................................................70
6.3 Configure Harvest Screen Options ....................................................................74
6.3.1 Configure Cycle Settings.........................................................................75
6.3.2 Quad View .......................................................................................76
6.3.3 Diagnostics Screen ..............................................................................78
6.3.4 Navigation Screen ...............................................................................79
6.3.5 Observations Screen ............................................................................80
6.3.6 Graph View ...................................................................................... 81
6.3.7 List View .........................................................................................82
6.3.8 Configure Weight in Spatial Display.............................................................83
6.3.9 Configure Moisture in Spatial Display ...........................................................84
6.3.10 Configure Plot Size and Yield in Spatial Display ................................................84
6.4 Collect Harvest Data...................................................................................85
6.4.1 Harvest with Cycle Button .......................................................................85
7 Appendix A: Standard Grain Information ...........................................88
7.1 Standard Moisture and Test Weight .................................................................. 88

H2 Stationary GrainGage User’s Guide
6
8 Appendix B: Troubleshooting Mirus ................................................90
8.1 Error Logs ..............................................................................................90
8.1.1 Flag Errors ........................................................................................90
8.1.2 Find and Send Error Logs ........................................................................90
8.2 Enable Debug Streaming .............................................................................91
8.3 Common Errors........................................................................................91
8.3.1 Inaccurate Plot Weight........................................................................... 91
8.3.2 Can’t Connect to GrainGage ....................................................................92
8.3.3 Tare Warnings ...................................................................................92
8.4 Contact HarvestMaster................................................................................93
8.4.1 Instructional Content ............................................................................93
8.4.2 Contact a HarvestMaster Field Service Engineer ...............................................93
9 Appendix C: Limited Warranty .....................................................95
9.1 Software ................................................................................................95
9.2 Disclaimer of Warranties...............................................................................95
9.3 Updates or Modifications ..............................................................................95
9.4 Removal of Serial Number.............................................................................95
9.5 Extended Warranties ..................................................................................95

CHAPTER ONE
Introduction

H2 Stationary GrainGage User’s Guide
8Introduction to the H2 Stationary GrainGage
1 Introduction to the H2 Stationary GrainGage
The H2 Stationary is an affordable, entry-level option for acquiring accurate data measurements off-
combine. This simplified GrainGage is ideal for hand harvesters requiring a mobile option for measuring
grain weight and moisture.
This section explains how to set up the H2 Stationary GrainGage and the Mesa 3 Rugged Tablet that
operates it.
1.1 Set Up the Mesa 3
Each H2 Stationary GrainGage is operated by the Mirus Harvest Software running on a Mesa 3 Rugged
Handheld Tablet.

H2 Stationary GrainGage User’s Guide
9Introduction to the H2 Stationary GrainGage
1.1.1 Configure an Account on the Mesa 3
To set up the Mesa for the first time, turn it on and set up an account.
To set up with an offline account,
1. Select “Set up for an organization.”
2. Tap Next.
3. Tap Domain join instead in the lower-left corner of the screen.
4. On the “Who’s going to use this PC?” screen, enter a username.
5. You will be prompted to “Create a super memorable password.”
6. If you do not want a password for your unit, leave the field blank and click Next.
After you have set up your account, connect your device to Wi-Fi and restart it so Windows will fully
activate.
1.1.2 Turn Tablet Mode Off
On the Mesa 3,
1. Open the notification area on your Mesa 3.
2. Expand it if necessary.
3. Tap Tablet Mode to turn it from blue to gray.
Notification area
Expand
Tablet Mode

H2 Stationary GrainGage User’s Guide
10Introduction to the H2 Stationary GrainGage
1.1.3 Configure Power Settings
On the Mesa 3,
1. Go to Settings > Power & sleep.
2. Select Never under “When plugged in, turn off after.”
3. Select Never under “When plugged in, PC goes to
sleep after.”
1.1.4 Download and Install Mirus
After you have purchased a license for Mirus, using the Mesa 3,
1. Go to http://www.harvestmaster.com/support/mirus/downloads.

H2 Stationary GrainGage User’s Guide
11Introduction to the H2 Stationary GrainGage
2. Tap the down arrow for Mirus Harvest Software.
3. Select and download the most recent Mirus release.
4. Open the file and follow the installation instructions.
5. Go to http://www.harvestmaster.com/activate and fill out the form.
6. HarvestMaster will send the unlock code via email.
7. Return to the Mirus activation screen and input the unlock code.
1.1.5 Set Up the Barcode Scanner
On the Mesa 3,
1. Open Barcode Connector.
2. On the Home screen under Startup, verify the
following are checked:
•Start up Barcode Connector on bootup
•Start Barcode Connector minimized
3. Tap the Menu icon in the top left corner.
4. Select User.
5. Verify P2 is selected under “Select Scan Button.”
The barcodes can now be scanned when P2 is pressed on
the Mesa 3.
6. Minimize Barcode Connect.
Note: Barcode Connector should be open and running in
the background on each Mesa 3. It can be minimized.
H2 Stationary GrainGage User’s Guide
12Introduction to the H2 Stationary GrainGage
1.1.6 Update Mirus
Mirus is updated about once a year. Check online or with a HarvestMaster Field Service Engineer to ensure
you have the latest version before harvest season.
To update to the latest Mirus version, do the following:
1. Go to http://www.harvestmaster.com/support/mirus/downloads.
2. Tap the down arrow for the Mirus Harvest Software.
3. Check for a newer version of Mirus.
4. If there is a newer version, download it.
5. Follow the installation instructions.
1.2 Set Up the GrainGage
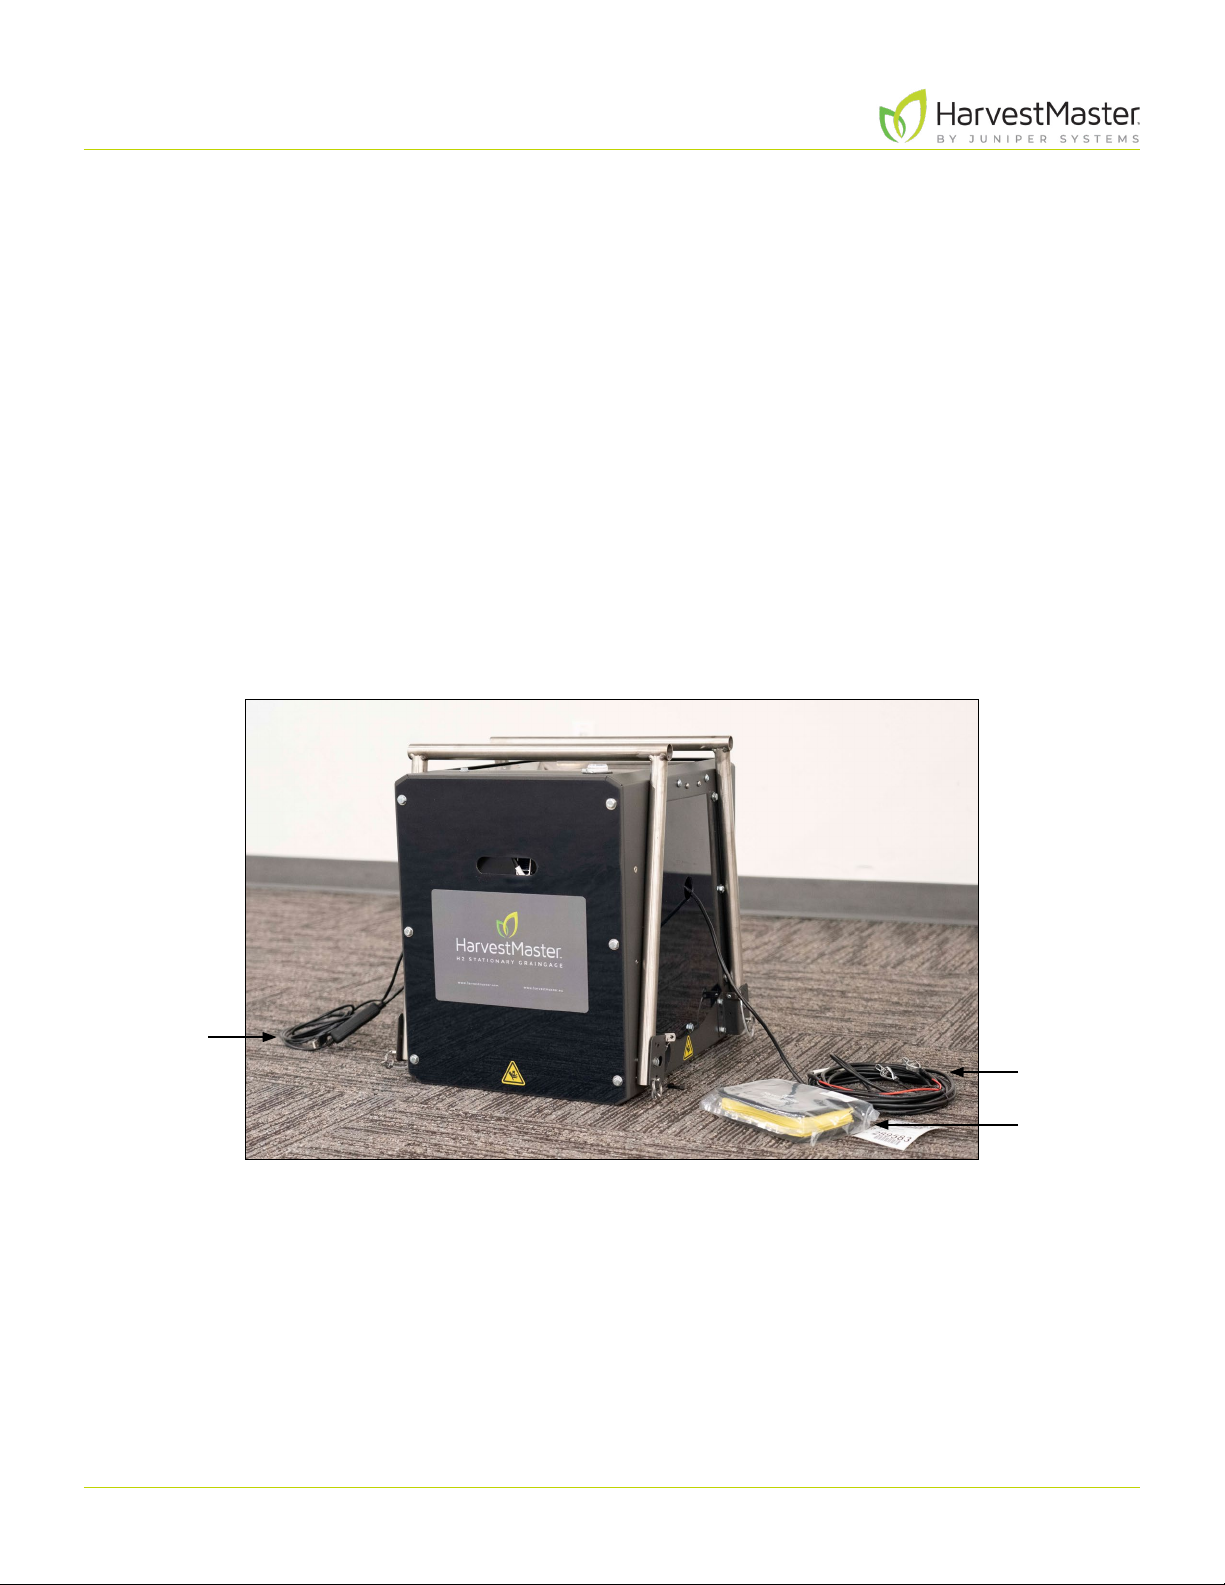
The H2 Stationary GrainGage comes fully assembled. Included in the assembly is a cable for connecting the
GrainGage to a 12 V battery as well as cables for connecting to and powering a Mesa 3 Rugged Tablet. It
also ships with a toolkit for on-site maintenance of the GrainGage.
Mesa 3 USB
and power
cables Battery
cable
Toolkit

H2 Stationary GrainGage User’s Guide
13Introduction to the H2 Stationary GrainGage
1.2.1 Unpack the GrainGage
1. Use the folded legs of the GrainGage to lift it out of the
box.
2. Adjust the leg position by removing the leg pins and
rotating the legs down.
3. Align the pinhole in each leg with a cycle position hole
in the GrainGage.
4. Insert the leg pin for each leg.
5. Use the bubble level on top of the GrainGage to verify
the GrainGage is level and stable.
Leg pin
Cycle position holes
Legs
Bubble Level

H2 Stationary GrainGage User’s Guide
14Introduction to the H2 Stationary GrainGage
The H2 Stationary has two cycle positions:
Tall Cycle Position (34 in.)
Short Cycle Position (27 in.)

H2 Stationary GrainGage User’s Guide
15Introduction to the H2 Stationary GrainGage
With the legs folded, the H2 Stationary GrainGage is in the
carry or storage position.
1.2.2 Remove the Shipping Stops
The H2 Stationary GrainGage has two shipping stops on each lateral edge of the weigh bucket. The
shipping stops keep the weigh bucket stable during long transport. They are not necessary for normal
transport and must be removed in order for the weigh bucket to function.
1. Remove all four shipping stops.
Shipping Stops

H2 Stationary GrainGage User’s Guide
16Introduction to the H2 Stationary GrainGage
1.2.3 Install the Mesa 3 and Cradle
The Mesa 3 can be mounted on either side of the H2 Stationary GrainGage, but it is recommended that you
mount it on the side with the USB and power cable.
1. Remove the cradle mount bolts on one side of the
GrainGage. Set aside.
2. Attach the Mesa 3 cradle using the mount bolts.
3. Place the Mesa 3 in the cradle.
4. The Mesa 3 power cable and USB cable extend from a
hole in one side of the GrainGage. Plug them into the
Mesa 3.
Note: Remove the Mesa 3 during transport.
Cradle Mount Bolts

H2 Stationary GrainGage User’s Guide
17Introduction to the H2 Stationary GrainGage
1.2.4 Connect the Battery
1. Connect the leads on the battery cable to the
appropriate terminals on a 12 V battery:
Red = Positive
Black = Negative
Note: Mirus warns the user when the battery or power
source drops below 11 V.
CHAPTER TWO
Mirus and H2 Stationary
GrainGage Setup
H2 Stationary GrainGage User’s Guide
19Mirus and H2 Stationary GrainGage Setup
2 Mirus and H2 Stationary GrainGage Setup
2.1 Start Mirus
Double tap the Mirus icon on your Windows desktop.
Mirus opens the Home screen.
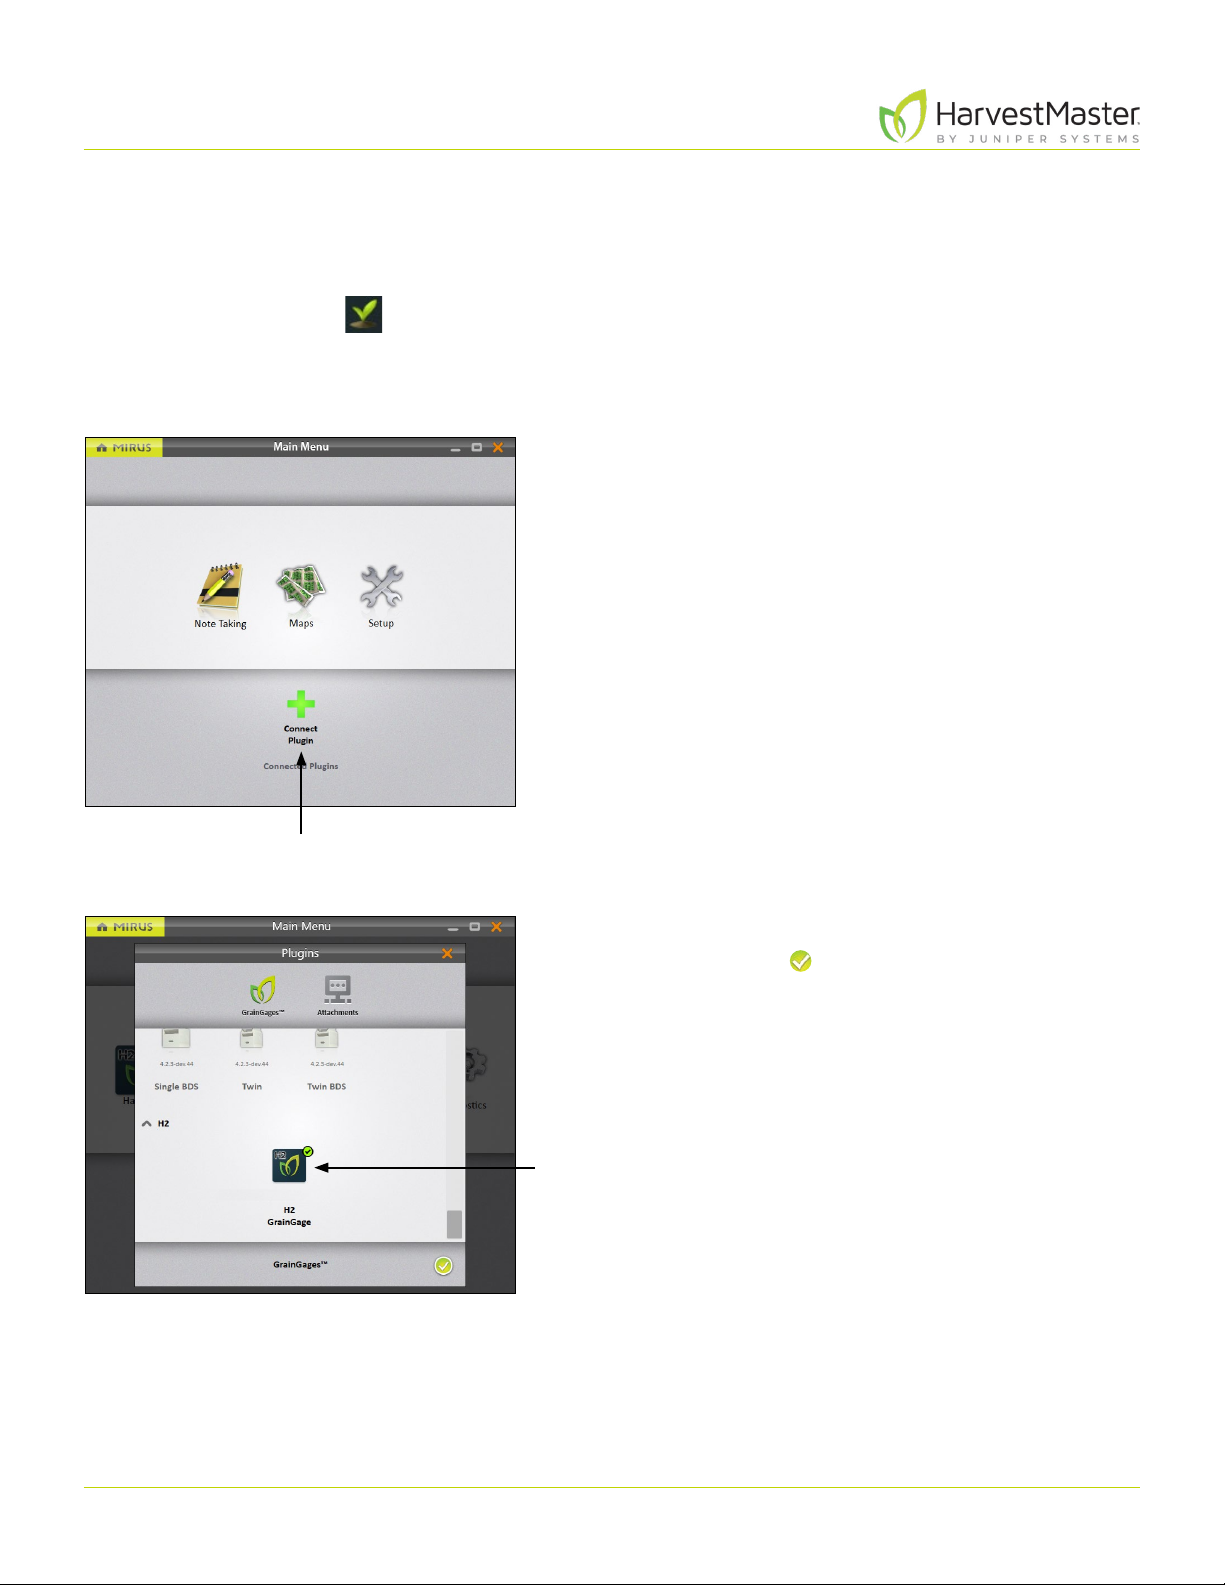
2.1.1 Load the H2 GrainGage Plugin
On the Mirus Home screen,
1. Tap Connect Plugin.
2. Tap H2 GrainGage.
3. Tap the check icon .
Note: Mirus for H2 GrainGages doesn’t display the specific
type of GrainGage for you to select. The software can
detect which GrainGage is connected.
Connect
Plugin
H2 GrainGage

H2 Stationary GrainGage User’s Guide
20Mirus and H2 Stationary GrainGage Setup
If Mirus is unable to detect the H2 GrainGage, the software
may display a device connection error.
•Check the GrainGage power source and cables.
Or
•Select the Use Emulator option to proceed without
connecting the H2 GrainGage. Emulator Mode is
not recommended for setting up the H2 Stationary
GrainGage.
After adding the H2 GrainGage plugin, Mirus displays an
icon for the H2 GrainGage on the Main Menu screen.
If you upgraded Mirus to a new version before connecting
to the GrainGage, Mirus might display a Changed Settings
Summary warning. You will be prompted to Use Local
Settings or Use GrainGage Settings.
•Local settings use the current settings on the tablet.
•GrainGage settings use the old settings saved to the
GrainGage from the previous Mirus version.
H2 GrainGage
Table of contents
Other Juniper Farm Equipment manuals


Popular Farm Equipment manuals by other brands


Guide Gear
Guide Gear 702141 quick start guide

Maschio
Maschio GASPARDO COMPAGNA 1500 Use and maintenance

360 Yield
360 Yield 360 Y-DROP JOHN DEERE 4930 instruction manual

LANDY
LANDY S-BH380 Operator's manual

FarmTek
FarmTek Growers supply 115050 quick start guide

Tufline
Tufline LO40 Series Operator's manual