IAE CORN BINS Instruction Manual

CORN BINS
Installaon & Maintenance Manual
1001739 | v3
hps://iae.co.uk/
Technical Document

2
Before reading, study the illustraons on this page and familiarise yourself with all the parts of the product
i
Note: All corn bin components are
supplied loose in flat pack form, including
fings kits (bagged) enclosed securely
beneath the lid - for details of
components contained within the fings
kits and full parts descripons see page 3

3
Contents Of Fing Kit
No. 1002142
Contents Of Fing Kit
No. 1002183
1x (1200L), or 2x (1600L) PARTITION(S)
1x FRONT PANEL
1x RH SIDEPANEL
1x LID ASSEMBLY
1x BACK PANEL
1x BASE
1x LH SIDE PANEL
1.3
1.1
1.2
1.4
1.5
1.6
1.7
PARTS DESCRIPTION/SCOPE OF INSTALLATION
18x M5 NYLOC NUT
18x M5 WASHER
44x M6 SPRING WASHER
44x M6X10 SCOKET BUTTON HEAD SCREW
18x M5X10 SETSCREW
16x 4.8 PAN HEAD SELF TAPPING SCREW
2x SPRING CLAW LATCH
2.3
2.1
2.2
2.4
2.5
2.6
2.7
2x LID STAY BRACKET
3x 2in BUTT HINGE
2x LID STAY
1x LID HANDLE
3.3
3.1
3.2
3.4

4
INTRODUCTION ....................................................................... Page 5
UNPACKING PARTS .................................................................. Page 6
PREP FOR PARTITIONS ............................................................ Page 7
HOW TO INSTALL ..................................................................... Page 8
RECOMMENDED MAINTENANCE ............................................ Page 14

5
INTENDED USE
The IAE plain corn bin is manufactured from pre-galvanised sheet, ideal for indoor storage of
corn or other animal feed. Not waterght, but will keep feed free from rodents and other
contaminants.
TECHNICAL DATA
Item Number: 1002137 | 1002140 Weight: 45Kg | 60Kg
Dimensions: 1200mm (630 litres) | 1600mm (840 litres)
SAFETY INFORMATION
PLEASE TAKE NOTE OF THE FOLLOWING SAFETY PRECAUTIONS BEFORE USE. ANY HARM OR
INJURY WHICH OCCURS FROM THE LACK OF COMPLIANCE WITH THESE HEALTH AND
SAFETY MEASURES WILL BE THE RESPONSIBILITY OF THE OPERATOR.
¨ IMPORTANT! Read these instrucons carefully before use and keep them for future
reference.
¨ Situate this product on a level, solid surface.
¨ CAUTION! When handling heavy equipment, some stages of installaon may require at
least two people.
¨ DO NOT lean on or exert undue pressure on the product.
¨ CAUTION! Check posture when liing/manoeuvring the equipment or associated parts.
¨ ALWAYS Check the product for damage before each use.
If you have any quesons or comments regarding the product, we will be glad to hear them
either through our website www.iae.co.uk or by contacng your local IAE dealership.
LIST OF SYMBOLS USED
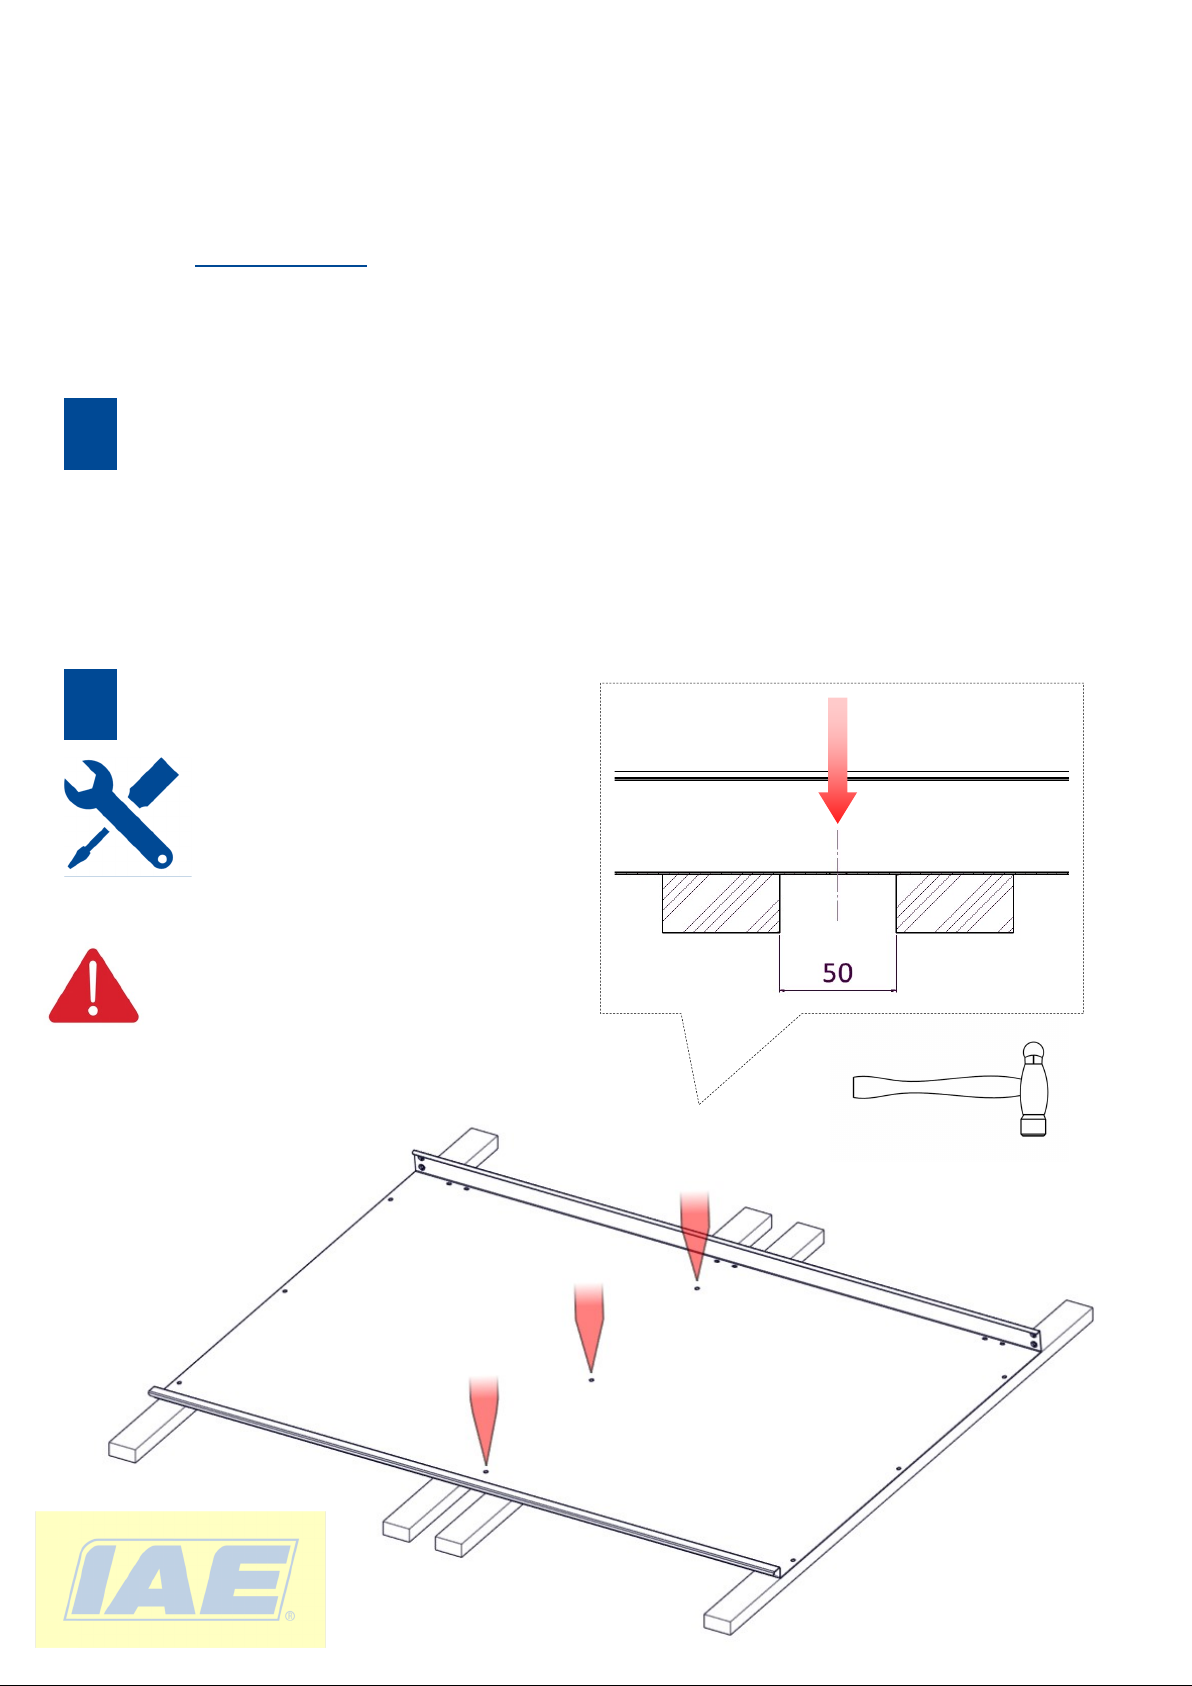
MAY REQUIRE HAMMER
TWO PERSON LIFT WARNING
TOOLS REQUIRED

6
UNPACKING PARTS
Unpack all corn bin
parts supplied shrink-
wrapped in a flat pack
form.
Note: Timber baens
are supplied posioned
in the space on either
side between the corn
bin lid and the edges of
the corn bin back serve
no purpose other than
to protect during
transportaon and
therefore can be
discarded once
unpacked.
Exploded view displays order of corn bin parts
comprised in flat pack.
Note: Fings kits will be bagged and situated
beneath the corn bin lid.
FLAT PACK FORM
PARTS EXPLODED

7
PREP FOR PARTITIONS
Parons are supplied to divide the internal body into 2 or 3 secons, dependent on the length of the bin
and user preference. The FRONT, BASE and BACK parts feature hole locators along the width of the sheet
metal which MAY NEED TO BE punched out to allow for fastening the parons with self tapping screws.
PUNCHING OUT GUIDE (if required)
Lay the sheet metal on top of supports (user to source separately, dimensions not specified)
· x2 supports spaced approximately 50mm apart with the hole locators directly over the centre
· x2 addional supports placed at each end for stability
Punch out holes in the steel metal
Ensure holes are tapped out leaving a nice
clean finish for inserng M6 buon head
screws
1.
4.8mm centre punch
hammer
Protecve gloves
2.

8
INSTALL
1.
Ø8mm socket wrench/open end spanner
Ø10mm socket wrench
Start by offering the
back up to the base and
insert M6 x 10 socket
buon head screws
into pre-punched fixing
holes at each corner to
secure.
PRE-PUNCHED THREADED HOLES:
The feature of thread form tool
used in the manufacturing process
on some sheet metal corn bin
parts ensures that bolts are
secured at inseron - eliminang
the need for nuts.
2.
Next, present the right hand side
to the base and back. To ensure
all fixing holes are aligned, insert
4No. M6 x 10 socket buon head
screws to secure. This will add
support to rear panel whilst
adding the remaining socket
buon head screws.

9
Offer le hand side panel to the unit
in the same way as the right hand
panel. Fit the remaining M6 x 10
socket buon head screws to secure
side panels and rear panel.
3.
4.
Fit the front by inserng M6 x 10
socket buon head screw into
corresponding holes in the base, RH
and LH sides to secure.

10
5.
Fit the hinges connecng the lid
and the back together by inserng
12no. (4no. per hinge) M5 x 10
setscrews, nyloc nuts and washers
through the relave fixings holes.
Fit hinge to lid before fing to
back panel.
Fully ghten the M5 nyloc nuts
with a spanner from finger ght.

11
6.
A
B
C
A - Fit the stay plate to the L-shaped bracket by inserng M5
x 10 setscrew and nyloc nut, ensure the lid stay pair are
handed accordingly. Fully ghten the M5 nyloc nuts
carefully with a spanner from finger ght. DO NOT OVER
TIGHTEN
B - Next fasten the lid stays to the lid. To do so, slide the
angled end of the stay plate into the longest slot in the top
folded edge of each side panel, then offer the L-shaped
bracket up to the pre-punched fixing holes in the lid and
insert 4no. M6 x 10 socket buon head screws (2no. per
bracket) to secure lid.
C - Finally, use 2no. M6 x 10 socket buon head screws to fit
the handle to lid.
Note: Some users may prefer to operate the lid with either
one or two lid stays. This is enrely down to user
preference, there is no detriment to the product if only
using one.

12
7.
Fit the spring claw latches to the front using 4no. M5 x 10 setscrews, nyloc nuts and washers.

13
8. PARTITIONS ARE SUPPLIED AS AN OPTIONAL
COMPONENT TO ALLOW USER TO DIVIDE THE
BODY INTO 2 SECTIONS (UP TO 3 SECTIONS IN
1600mm CORN BIN) AS REQUIRED.
9.
Close and lock the lid down using the spring claw
latches to complete assembly.
Fit parons; carefully lower the paron inside
corn bin and ensure locator holes are aligned with
the thread loop integrated in the paron and
then insert M5 x 32mm pan head self tapping
screws to secure.

14
RECOMMENDED MAINTENANCE
REGULAR MAINTENANCE CHECKS TO THE PRODUCT WILL GIVE EARLYING WARNING OF
ANY PROBLEMS, SUCH AS DAMAGE, CORROSION OR MISSING PARTS AND WILL ENSURE
YOUR PRODUCTS LONGEVITY AND DURABILITY.
¨ General inspecon of the enre product.
¨ Check all fasteners sets are ght. Ensure all parts are in place before each use.
Spare spring washers are supplied to be fied only if the setscrews start to become loose.
¨ Any damage to steelwork (causing exposure of bare metal) should be made good by
rubbing down and applying x1 coat of galvanizing coang and x1 of oil based paint.
¨ Lubricate all moving parts, in parcular the lid stays.
¨ Simply cleaning down aer each use will increase the working life due to the highly
corrosive effect of some feeds. Check regularly and treat if required.

15
MANUFACTURER
IAE
Mossfield Road
Adderley Green
Stoke-on-Trent
England
ST3 5BW
.
T: +44 (0)1782 339320
F: +44 (0)1782 339321
Company Reg number: 01448116 Company VAT number: 319060967
1001739 | v3
Table of contents
Other IAE Farm Equipment manuals
Popular Farm Equipment manuals by other brands

Amazone
Amazone Ceus 3000-TX Original operating manual

Headsight
Headsight CONVERSION AGCO GLEANER S9X Installation & operation manual

Frontier
Frontier DH3499 operating manual

Raven
Raven CR7 quick start guide

McHale
McHale Issue 5 Operator's instruction manual

KK farming
KK farming AeroBoxClassic Installation and Operating Instrucitons