CAUTION: To meet safety and electromagnec interference (EMI) requirements and to ensure proper
operaon, you must connect QFX10016 switches to earth ground before you connect them to power.
For installaons that require a separate grounding conductor to the chassis, use the protecve earthing
terminal on the switch chassis to connect to earth ground. For instrucons on connecng a QFX10016
switch to ground using a separate grounding conductor, see "Ground the Chassis" on page 13.
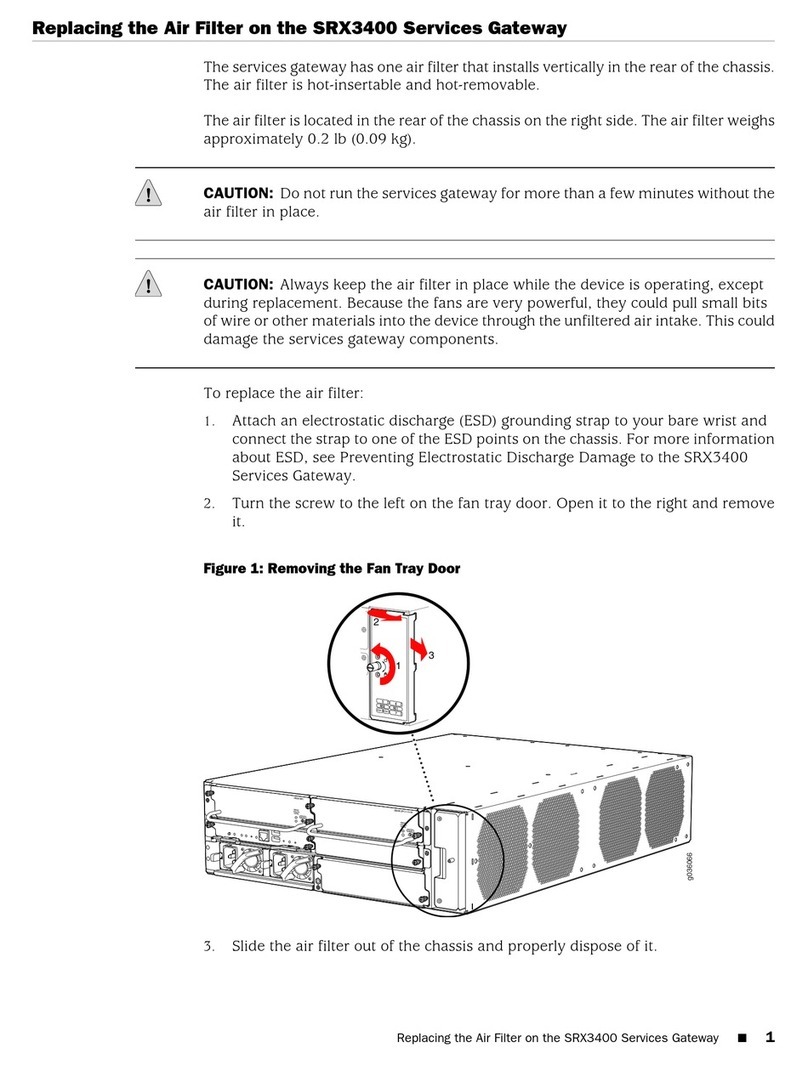
To install a DC power supply in a QFX10016:
1. Aach the electrostac discharge (ESD) grounding strap to your bare wrist, and connect the strap to the ESD point
on the chassis. There is an ESD point located next to the protecve earthing terminal and below PSU 9 on the rear
panel .
2. Taking care not to touch power supply components, pins, leads, or solder connecons, remove the power supply
from its bag.
3. Peel back and remove the protecve plasc wrap that covers all four sides of the power supply.
4. Ensure the power switch is set to the standby (O) posion. This switch turns o the output voltage; it does not
interrupt DC.
5. Remove the plasc cable cover from the DC power input terminals by using the Phillips (+) screwdriver, number 2,
to loosen the screws.
6. Remove the nuts from each DC power input terminal, using the 13/32 in. (10 mm) nut driver or socket wrench to
loosen the nuts.
7. Ensure that the power source circuit breaker is open so that the voltage across the DC power source cable leads is
0 (zero) V and that the cable leads do not become acve while you are connecng DC power.
8. Verify that the DC power cables are correctly labeled before making connecons to the power supply. In a typical
power distribuon scheme where the return is connected to chassis ground at the baery plant, you can use a
mulmeter to verify the resistance of the –48V and RTN DC cables to chassis ground:
• The cable with very high resistance (indicang an open circuit) to chassis ground is negave (–) and will be
installed on the –48V (input) DC power input terminal.
The cable with very low resistance (indicang a closed circuit) to chassis ground is posive (+) and will be
installed on the RTN (return) DC power input terminal.
CAUTION: You must ensure that power connecons maintain the proper polarity. The power
source cables might be labeled (+) and (–) to indicate their polarity. There is no standard color
coding for DC power cables.
9. Install each power cable lug on the DC power input terminal, securing it with the nut.
10. Apply between 24 in.-lb (2.7 Nm) and 25 in.-lb (2.8 Nm) of torque to each nut. (Use the 13/32 in. [10 mm] nut
driver or socket wrench.)
• Secure each posive (+) DC source power cable lug to the RTN (return) DC power input terminal.
• Secure each negave (–) DC source power cable lug to the –48V (input) DC power input terminal.
17