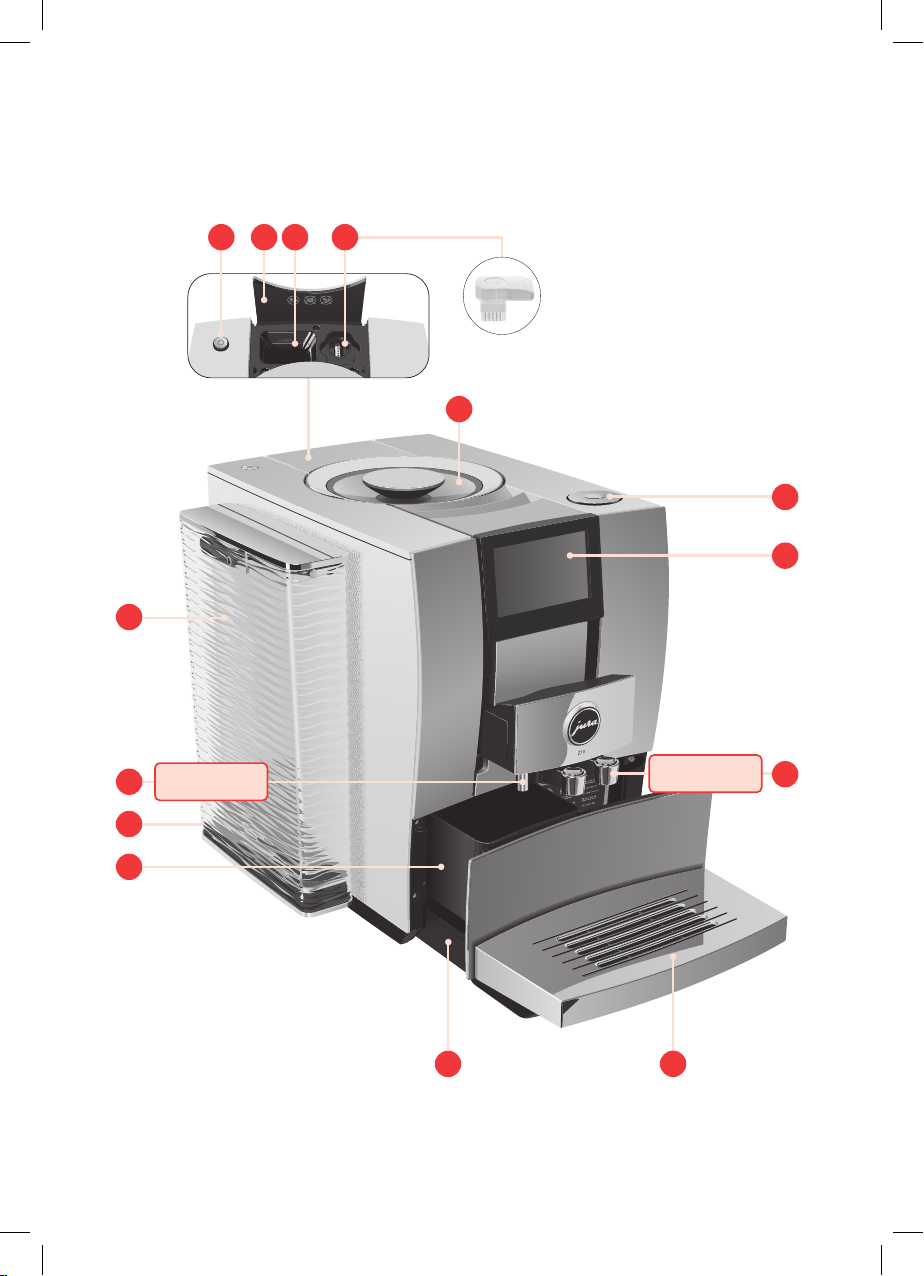
Jura Z10 User manual

Z10 (NAA)
Instructions for Use
For your safety: read and understand manual before use.
Figure: Your machine may look
different than the one shown.

2
Table of contents
Your Z10
1 IMPORTANT SAFEGUARDS ........................................................................................
2 Control elements ....................................................................................................
3 Preparing and using for the first time ......................................................................
Operation with touchscreen display and Rotary Switch ..................................................
Setting up the machine ..........................................................................................
Filling the bean container ........................................................................................
Determining the water hardness ...............................................................................
First-time use .......................................................................................................
Managing your Z – the JURA Cockpit ......................................................................
Connecting milk ....................................................................................................
Connecting the Cool Control milk cooler wirelessly .......................................................
Establishing a WiFi connection .................................................................................
4 Preparation .........................................................................................................
Aroma Selection ....................................................................................................
Preparation with preselection (Specialty Selection) .......................................................
Cold Brew ............................................................................................................
Espresso and coffee ...............................................................................................
Latte macchiato, cappuccino and other specialty coffees with milk ...................................
Milk and milk foam ................................................................................................
Espresso doppio ....................................................................................................
Caffè Barista and Americano ...................................................................................
Jug of coffee .........................................................................................................
Ground coffee .......................................................................................................
Hot water ............................................................................................................
Adjusting the product settings .................................................................................
5 Daily operation ....................................................................................................
Switching the machine on and off .............................................................................
Filling the water tank ..............................................................................................
Maintenance actions ..............................................................................................
6 Machine settings ..................................................................................................

3
Table of contents
7 Maintenance ........................................................................................................
Rinsing the machine ..............................................................................................
Automatic milk system rinsing .................................................................................
Cleaning the milk system ........................................................................................
Dismantling and rinsing the dual spout ......................................................................
Inserting/changing the filter .....................................................................................
Cleaning the machine ............................................................................................
Descaling the machine ..........................................................................................
Descaling the water tank .........................................................................................
Cleaning the bean container ....................................................................................
8 Display messages .................................................................................................
9 Troubleshooting ...................................................................................................
10 Transport and environmentally friendly disposal ........................................................
Transport/ Emptying the system ..............................................................................
Disposal ..............................................................................................................
11 Technical data .......................................................................................................
12 Index ..................................................................................................................
13 JURA contact details/ Legal information ...................................................................

1 IMPORTANT SAFEGUARDS
4
1 IMPORTANT SAFEGUARDS
Failure to observe the instructions for use may result in serious
injuries or damage to property. Safety information is therefore
indicated as follows:
JThis is the safety alert symbol. lt is used to
alert you to potential personal injury hazards.
Obey all safety messages that follow this
symbol to avoid possible injury or death.
DANGER indicates a hazardous situation which,
if not avoided, will result in death or serious
injury.
WARNING indicates a hazardous situation
which, if not avoided, could result in death or
serious injury.
JCAUTION CAUTION, used with the safety alert symbol,
indicates a hazardous situation which, if not
avoided, could result in minor or moderate
injury.
NOTICE NOTICE is used to address practices not related
to personal injury.
When using electrical appliances, basic safety precautions shall
always be followed, to reduce the risk of fire, electric shock, and/or
injury to persons, including the following:
ZRead all instructions.
ZDo not touch hot surfaces. Use handles or knobs.
ZTo protect against fire, electric shock and injury to persons, do
not immerse power cord, plugs, or body of machine in water
or other liquid.
ZClose supervision is necessary when any appliance is used by
or near children.
ZUnplug from outlet when not in use and before cleaning.
Allow to cool before putting on or taking off parts, and before
cleaning the appliance.
ZDo not operate any appliance with a damaged cord or plug or
after the appliance malfunctions, or has been damaged in any
manner. Return appliance to the nearest authorized service
facility for examination, repair or adjustment.
Comply with the
instructions for use
J DANGER
J WARNING
Follow the basic safety
precautions

1 IMPORTANT SAFEGUARDS
5
SAVE THESE INSTRUCTIONS. Pass them on to any subsequent user.
The appliance is designed and intended for household use only. It
shall only be used for coffee preparation and to heat milk and water,
according to these instructions. Use for any other purpose will be
deemed improper. JURA Elektroapparate AG cannot accept any
responsibility for the consequences of improper use.
People, including children, who
Zdo not have the physical, sensory or mental capabilities to use
the appliance safely or
Zare inexperienced or lack knowledge in how to use the
appliance safely
must be supervised by a responsible person when using it, or must
be instructed in how to use it correctly.
ZA short power-supply cord is to be provided to reduce risks
resulting from becoming entangled in or tripping over a
longer cord.
ZThe cord shall be arranged so that it will not drape over the
counter top or table top where it can be pulled on by children
or tripped over.
ZThis appliance has a 3-pin grounded plug.
ZDo not modify the plug in any way.
Intended use
Special power cord set
instructions
ZThe use of an accessory attachment not recommended by the
appliance manufacturer may result in fire, electric shock, or
injury to persons.
ZDo not use outdoors.
ZDo not let the cord hang over the edge of a table or counter,
or touch hot surfaces.
ZDo not place on or near a hot gas or electric burner, or in a
heated oven.
ZTo disconnect, turn any control to ‘OFF’ then remove plug
from wall outlet.
ZDo not use appliance for other than intended use.
ZUse extreme caution when dispensing hot steam, hot water
or hot coffee.

1 IMPORTANT SAFEGUARDS
6
Extension cords are available an may be used if care is exercised in
their use.
If the user chooses to use an extension cord,
Zthe marked electrical rating of the extension cord should be
at least as great as the electrical rating of the appliance, and
Zif the appliance is of the grounded type, the extension cord
should be a grounding type 3-wire cord, and
Zthe longer cord should be arranged so that it will not drape
over the counter top or tabletop where it can be pulled on by
children or tripped over.
To reduce the risk of fire or electric shock, DO NOT remove any
service covers. DO NOT modify the appliance in any way that is not
described in these instructions. NO user serviceable parts included.
Repair MUST be done by authorized personnel only.
In the event of signs of damage, for example if there is a smell of
burning, unplug the machine immediately from outlet and contact
JURA customer service.
This appliance is for household use. Any servicing other than
cleaning and user maintenance shall be performed by an authorized
service representative:
ZDo not immerse base in water or try to disassemble.
ZDo not put the appliance or any individual parts in the
dishwasher.
ZCheck voltage to be sure that the voltage indicated on the
name plate complies with your voltage. The name plate is
located on the underside of the appliance.
ZNever use warm or hot water to fill the water container. Use
cold water only.
ZKeep your hands and the cord away from hot parts of the
appliance during operation.
There is a risk of scalds or burns on the spouts and the cappuccino
frother / nozzle.
ZKeep children away.
ZDo not touch any hot parts. Use the handles or knobs
provided.
ZEnsure that the cappuccino frother / nozzle is correctly fitted
and clean. If incorrectly fitted or if they become blocked, the
cappuccino frother or its parts might come off.
J WARNING
JCAUTION

1 IMPORTANT SAFEGUARDS
7
ZNever clean with scouring powders or hard implements.
ZEnsure that the ventilation slots are not covered.
ZNever pull out the drip tray during the brewing process. Only
pull the drip tray when the display instructs you or when the
appliance is ready for use.
ZNever fill instant coffee, chocolate mix etc. into the bean
container or ground coffee funnel (filler funnel for ground
coffee). It will damage the functioning of the brewing
chamber.
ZNever fill sugar coated coffee beans into the bean container.
In case of doubt, call your dealer.
ZNever fill anything other than coffee beans into the bean
container (no chocolate, no rice, no nuts, no spices, nothing
other than roasted coffee beans).
ZNever fill frozen beans into the bean container. If you store
beans in the freezer, let them thaw 3 to 4 hours before filling
them into the bean container.
ZNever fill anything but fresh, cold and clean water into the
water tank, except when decalcifying.
ZNever use mineral or carbonated water. You can use tap water,
bottled water, spring water and reverse osmosis water.
ZNever do anything with the machine which is not described in
these instructions. In case of doubt, call your dealer.
NOTICE
NEVER DO
(or you will void your
warranty protection):

2 Control elements
8
2 Control elements
11
12
14
8
6
7
1234
5
9
10
13 J HOT
J HOT
Figure: Your machine may look
different than the one shown.

2 Control elements
9
qOn/Off button Q
wCover for powder chute for ground coffee
ePowder chute for ground coffee
rService socket with JURA WiFi Connect
(under cover)
tBean container with aroma preservation
cover
zRotary Switch
uTouchscreen display
iHeight- and width-adjustable dual spout
oCup platform
pDrip tray
aCoffee grounds container
sPower cord
dHot-water spout
fWater tank
gContainer for milk system cleaning
hMeasuring spoon for ground coffee
jFilter casing
6
hg j

3 Preparing and using for the first time
10
3 Preparing and using for the first time
You can operate your Z in two ways:
UYour Z has a touchscreen display. Tap or swipe the display to
trigger an action.
UUse the Rotary Switch, which can be turned or pressed.
When setting up your Z, please note the following:
UChoose a spot for your Z which protects the machine against
overheating. Ensure that the ventilation slots are not covered.
UPlace the Z on a horizontal surface that is not sensitive to
water.
The bean container has an aroma preservation cover. This will ensure
that your coffee beans retain their aroma for longer.
Coffee beans which have been treated with additives (e.g. sugar),
ground coffee or freeze-dried coffee will damage the grinder.
T Only use roasted, untreated coffee beans to fill the bean
container.
T Remove the aroma preservation cover.
T Remove any dirt or foreign objects from inside the bean
container.
T Fill the bean container with coffee beans and close the aroma
preservation cover.
Operation with touchscreen
display and Rotary Switch
s
Setting up the machine
Filling the bean container
NOTICE

3 Preparing and using for the first time
11
When you use the machine for the first time, you must set the water
hardness. If you do not know the hardness of your water, you can
find this out first. Use the Aquadur® test strips supplied with the
machine.
T Hold the test strip under flowing water for one second. Shake
off the water.
T Wait for about minute.
T You will then be able to read the degree of water hardness from
the discoloration of the Aquadur® test strip and the description
on the packaging.
Level Display German
Degree (°dH)
Degrees of general
hardness (°dGH)
Parts per
million (ppm)
Indicator Strip number
of ‘reddish’fields
Not active – – – –
Very soft water < < < . None
Soft water > > >
Hard water > . > . >
Very hard water > > >
If the machine is operated with a defective power cord, there is a
danger of potentially fatal electric shock.
T Never use a machine which is damaged.
T Never use a machine which has a defective power cord.
Milk, sparkling mineral water or other liquids can damage the
water tank or the machine.
T Only fill the water tank with fresh, cold water.
EThe water volume is given as standard in ‘oz’. You can
change this setting to ‘ml’ in programming mode (see
Chapter ‘Machine settings’).
Precondition:The bean container has been filled.
Determining the water
hardness
First-time use
J WARNING
NOTICE

3 Preparing and using for the first time
12
T Insert the power plug into a power socket.
T Press the On/Off button Qto switch the Z on.
‘Choose language’
ETo display more languages, touch 9or 0until the desired
language comes into focus (e.g. ‘English’).
T Touch ‘Save’.
‘Saved’ appears briefly on the display.
‘Water hardness’
EIf you do not know the hardness of your water, you must
find this out first (see chapter ‘Preparing and using for the
first time – Determining the water hardness’).
T Touch 9or 0to change the water hardness setting.
T Touch ‘Save’.
‘Saved’ appears briefly on the display.
‘Insert filter’
T Place a receptacle under the hot-water spout and dual spout.
T Remove the water tank and rinse it with cold water.
T Open the filter casing.
T Insert the CLEARYL Smart filter cartridge.
T Close the filter casing.
T Insert the filter casing into the water tank.
q
w

3 Preparing and using for the first time
13
T Turn the filter casing clockwise until it audibly clicks into place.
T Fill the water tank with fresh, cold water and reinsert the tank.
EThe machine automatically detects that you have just
inserted the filter cartridge.
‘Saved’
‘Filter is being rinsed’
‘System is filling’
‘Empty drip tray’
T Empty the drip tray and put it back into the machine.
‘Connect accessory?’
T Scan the QR code with your mobile device to establish a
connection.
T Place a receptacle under the dual spout.
‘Machine is rinsing’
The start screen is displayed. Your Z is ready for use.
You can manage your Z with the JURA Cockpit. Press the Rotary
Switch to open the JURA Cockpit.
Symbol Meaning
c ‘Maintenance’ section (blue)
f‘Machine setting’ section (green)
h‘Smart mode’ active
4 (white) Your Z is connected with the network
and/or Cool Control via JURA WiFi Connect.
4 (red) No connection to the WiFi network
$ Filter mode
c
4$
Managing your Z10 – the
JURA Cockpit

3 Preparing and using for the first time
14
Your Z creates fine, creamy, feather-light milk foam with a perfect
consistency. The most important requirement for frothing milk is a
milk temperature of – °F (– °C). We would therefore
recommend using a milk cooler or a milk container.
T Connect the milk pipe to the dual spout.
T Connect the other end of the milk pipe to a milk container or a
milk cooler.
Your Z can be connected with your Cool Control milk cooler.
Precondition:The JURA WiFi Connect is inserted into the service
socket of your Z.
T Press the Rotary Switch.
T Touch the ‘Machine setting’ fsymbol.
T Touch ‘/’ to go to the next page.
T Touch ‘Connect accessory’.
T Touch ‘Connect’.
‘Saved’
Your Z can be connected with your JURA app (J.O.E.®).
Precondition:J.O.E.®is installed on your mobile end device and
you have logged into your home network. The JURA WiFi Connect
is inserted into the service socket of your Z.
T Press the Rotary Switch.
T Touch the ‘Machine setting’ fsymbol.
T Touch ‘Wi-Fi connection’.
T Touch ‘Connect’.
T Add a new network in your JURA app (J.O.E.®) and follow the
instructions.
Connecting milk
Connecting the Cool Control
milk cooler wirelessly
Establishing a WiFi
connection

4 Preparation
15
4 Preparation
Hot coffee, hot steam and hot water can cause scalding. Scalding
is a serious burn.
T Use extreme care when handling hot liquid or steam.
T Allow liquid to cool down before drinking.
T In the event of scalding, rinse affected area with cold water and
seek medical attention.
T Keep children AWAY.
Basic information about preparing drinks:
Aim What to do
Change the coffee
strength of a single
product
During the grinding operation,
move your finger across the display
or turn the Rotary Switch
Change the amount for a
single product
During preparation, move your
finger across the display or turn the
Rotary Switch
Change the consistency of
grind, coffee strength,
quantity and temperature
for any given product
Tap and hold a product for around
seconds and configure the
settings under ‘Product settings’
Display more products Turn the Rotary Switch to access
the product selector view or move
your finger across the display
Stop preparation Touch ‘Cancel’ or press the Rotary
Switch
Place a product on the
start screen as a favorite
Tap and hold a product for around
seconds and place another
product under ‘Replace product’
EIf no actions are performed on the machine for minutes,
your Z will switch to standby mode. Touch the display or
press or turn the Rotary Switch to take it out of standby mode.
EThe water volume is given as standard in ‘oz’. You can
change this setting to ‘ml’ in programming mode (see
Chapter ‘Machine settings’).
ECoffee tastes best served hot. A cold porcelain cup cools the
beverage – and impairs the taste. We therefore recommend
prewarming the cups. You can purchase a JURA cup warmer
from your specialized dealer.
J WARNING

4 Preparation
16
You can use Aroma Selection on your Z to change the consistency
of grind and coffee strength of any product:
Example:Espresso with higher coffee strength
T Place a cup under the dual spout.
T Touch the ‘Aroma Selection’ symbol (bottom right).
T Touch ‘Espresso’.
T Touch sto increase the coffee strength.
T Touch ‘Start’.
The preset amount of water for coffee flows into the cup.
Touch ‘ZZZ Z’to initiate the Specialty Selection and activate the
desired preselection for your next product:
Specialty Selection Meaning
Cold Brew d
(espresso, coffee,
caffè Barista,
Americano)
The product is prepared as a cold
beverage.
Extra Shot s(all
specialty coffees)
The product is prepared with two
brewing operations, each with half the
amount of water – for a specialty coffee
with a particularly intense taste.
Double product eThe product is prepared x in succession
( strokes).
Ground coffee £The product is prepared with ground
coffee.
EThe Specialty Selection closes after seconds.
EIf you press your preselection briefly, the next product will
be prepared according to your preselection.
EIf you press and hold your preselection (for seconds), the
preselection will be active until you switch off your Z.
Aroma Selection
s
Preparation with
preselection (Specialty
Selection)

4 Preparation
17
The ‘Cold Brew’ preselection is used to prepare a cold specialty coffee.
Example:Coffee with ‘Cold Brew’ preselection
T Fill the water tank with cold water.
EYou can influence the brewing result: The colder the water in
the water tank, the colder the brewed beverage will be.
T Place a cup under the dual spout.
T Add ice cubes to the cup according to your own preferences.
T Touch ‘ZZZZ’to initiate the Specialty Selection.
EThe Specialty Selection closes after seconds.
T Touch dto activate the ‘Cold Brew’ preselection.
T Touch ‘Coffee’.
The preset amount of water for coffee flows into the cup.
Example:Coffee
T Place a cup under the dual spout.
T Touch ‘Coffee’.
The preset amount of water for coffee flows into the cup.
Your Z prepares the following specialty coffees with milk at the
touch of a button:
UCortado
ULatte macchiato
UMacchiato
UFlat White
UCappuccino
UCaffe latte
Example:Latte macchiato
Precondition:Milk is connected to the dual spout.
T Place a glass under the dual spout.
T Touch ‘Latte macchiato’.
The preset amounts of milk and milk foam flow into the glass.
EThere is a short interval while the hot milk separates from
the milk foam. This allows the typical layers of a latte
macchiato to form.
Cold Brew
Espresso and coffee
Latte macchiato, cappuccino
and other specialty coffees
with milk

4 Preparation
18
The preset amount of water for espresso flows into the glass.
E minutes after preparation, the milk system is
automatically rinsed. Therefore, always place a receptacle
under the dual spout after preparing milk.
To ensure that the milk system in the dual spout always works
properly, you must clean it daily (see chapter ‘Maintenance –
Cleaning the milk system’).
Your Z prepares hot milk and milk foam.
E8 minutes after milk preparation, the milk system is
automatically rinsed. Therefore, always place a receptacle
under the dual spout after preparing milk.
‘Doppio’ is Italian for ‘double’. When you select Espresso doppio,
two espressi are prepared one after the other. The result is an extra
full-bodied and aromatic specialty coffee.
For the ‘caffè Barista’ and ‘Americano’, the Z blends the coffee with
hot water using a special preparation method. This results in a
full-bodied specialty coffee which is particularly easy to digest. You
can change the amount of this additional water (see chapter
‘Preparation – Adjusting the product settings’).
Relive the good old days – a ‘jug of coffee’, traditionally made from
porcelain, is perfect when you want to slow things down and catch
up with friends or family. The ‘jug of coffee’ function provides a large
portion of black coffee which is generally served at breakfast or to
accompany a piece of cake. Fill the jug with – strokes of black
coffee.
You can choose to use a second coffee variety, for example
decaffeinated coffee, with the filter funnel for ground coffee.
UNever add more than two level measuring spoons of ground
coffee.
UUse ground coffee which is not ground too finely. Very fine
coffee can block up the system so that the coffee only comes
out in drips.
UIf you did not fill the machine with a sufficient amount of
ground coffee, ‘Not enough ground coffee’ is displayed and the
Z stops the operation.
Milk and milk foam
Espresso doppio
Caffè Barista and Americano
Jug of coffee
Ground coffee

4 Preparation
19
UThe desired specialty coffee must be prepared within
approximately one minute after filling with the ground coffee.
Otherwise the Z stops the operation and is once more ready
for use.
All specialty coffees with ground coffee are always prepared
following the same model.
Example:Proceed as follows to prepare one espresso using ground
coffee.
T Place an espresso cup under the dual spout.
T Touch ‘ZZZZ’to initiate the Specialty Selection.
T Touch £.
T Touch ‘Espresso’.
‘Please add ground coffee’
T Open the powder chute cover.
T Place one level measuring spoon of ground coffee into the filler
funnel.
T Close the cover of the powder chute.
T Touch ‘Next’.
T Touch ‘Espresso’.
The preset amount of water for espresso flows into the cup.
The Z allows you to prepare different variants of hot water:
U‘Hot water’
U‘Hot water for green tea’
There is a danger of scalding from hot water splashes.
T Avoid direct contact with the skin.
Example:Hot water
T Place a cup under the dual spout.
T Touch ‘Hot water’.
The preset amount of water flows into the cup.
Hot water
JCAUTION

4 Preparation
20
Touch a product for approximately 2 seconds to access the settings:
U‘Product settings’: Specify individual settings such as coffee
strength, amount of water, etc.
U‘Initials’: Change the name of the product.
U‘Permanent preselection’: Specify a permanent preselection
(Specialty Selection).
U‘Replace product’: Replace the products on the start screen
with your favorites.
The settings always follow the same model.
Example:Proceed as follows to change the coffee strength for one
coffee.
T Touch ‘Coffee’ for approximately 2 seconds.
T Touch ‘Product settings’.
EDepending on the selected product, there will be different
settings available which are represented by symbols on your
display.
T Touch the _symbol.
The _symbol appears in white.
T Turn the Rotary Switch to change the setting.
T Touch ‘Save’.
T Touch ‘Back’ to return to the start screen.
Adjusting the product
settings
Table of contents
Other Jura Coffee Maker manuals

Jura
Jura IMPRESSA F7 User manual

Jura
Jura Impressa S guide User manual

Jura
Jura GIGA X3C User manual

Jura
Jura Z6 User manual

Jura
Jura IMPRESSA XJ9 Professional User manual

Jura
Jura impressa IMPRESSA F90/F9 User manual

Jura
Jura J8 User manual

Jura
Jura IMPRESSA S9 One Touch User manual

Jura
Jura A9 User manual

Jura
Jura J8 User manual

Jura
Jura ENA 4 User manual

Jura
Jura ENA 3 Operator's manual

Jura
Jura IMPRESSA XJ5 Professional User manual

Jura
Jura GIGA X3C Configuration guide

Jura
Jura IMPRESSA C50 User manual

Jura
Jura IMPRESSA XJ9 Professional Configuration guide

Jura
Jura IMPRESSA E25 User manual

Jura
Jura E8 User manual

Jura
Jura GIGA X8 Professional Guide

Jura
Jura IMPRESSA C5 User manual