JVC KD-ADV7490 User manual

ENGLISHESPAÑOLFRANÇAIS
For canceling the display demonstration, see page 7.
Para cancelar la demostración en pantalla, consulte la página 7.
Pour annuler la démonstration des affichages, référez-vous à la page 7.
For installation and connections, refer to the separate manual.
Para la instalación y las cone iones, refiérase al manual separado.
Pour l’installation et les raccordements, se référer au manuel séparé.
INSTRUCTIONS
MANUAL DE INSTRUCCIONES
MANUEL D’INSTRUCTIONS
GET0531-001A
[J]
For customer Use:
Enter below the Model
No. and Serial No. which
are located on the top or
bottom of the cabinet. Retain
this information for future
reference.
Model No.
Serial No.
DVD/CD RECEIVER KD-ADV7490/KD-DV7400
RECEPTOR CON DVD/CD KD-ADV7490/KD-DV7400
RÉCEPTEUR DVD/CD KD-ADV7490/KD-DV7400
Cover_KD-ADV7490[J]f.indd 1Cover_KD-ADV7490[J]f.indd 1 1/21/08 3:09:49 PM1/21/08 3:09:49 PM

ENGLISH
2
Thank you for purchasing a JVC product.
Please read all instructions carefully before operation, to ensure your complete understanding and to obtain the best
possible performance from the unit.
INFORMATION (For U.S.A.)
This equipment has been tested and found to comply with the limits for a Class B digital de ice, pursuant to Part
15 of the FCC Rules. These limits are designed to pro ide reasonable protection against harmful interference in
a residential installation. This equipment generates, uses, and can radiate radio frequency energy and, if not
installed and used in accordance with the instructions, may cause harmful interference to radio communications.
Howe er, there is no guarantee that interference will not occur in a particular installation. If this equipment does
cause harmful interference to radio or tele ision reception, which can be determined by turning the equipment
off and on, the user is encouraged to try to correct the interference by one or more of the following measures:
– Reorient or relocate the recei ing antenna.
– Increase the separation between the equipment and recei er.
– Connect the equipment into an outlet on a circuit different from that to which the recei er is connected.
– Consult the dealer or an experienced radio/TV technician for help.
Caution:
Changes or modifications not appro ed by JVC could oid the user’s authority to operate the equipment.
IMPORTANT FOR LASER PRODUCTS
1. CLASS 1 LASER PRODUCT
2. CAUTION: Do not open the top co er. There are no user ser iceable parts inside the unit; lea e all ser icing to
qualified ser ice personnel.
3. CAUTION: (For U.S.A.) Visible and/or in isible class II laser radiation when open. Do not stare into beam.
(For Canada) Visible and/or in isible class 1M laser radiation when open. Do not iew directly with
optical instruments.
4. REPRODUCTION OF LABEL: CAUTION LABEL, PLACED OUTSIDE THE UNIT.
[European Union only]
EN02-09_KD-ADV7490[J]f.indd 2EN02-09_KD-ADV7490[J]f.indd 2 1/21/08 2:46:01 PM1/21/08 2:46:01 PM

ENGLISH
3
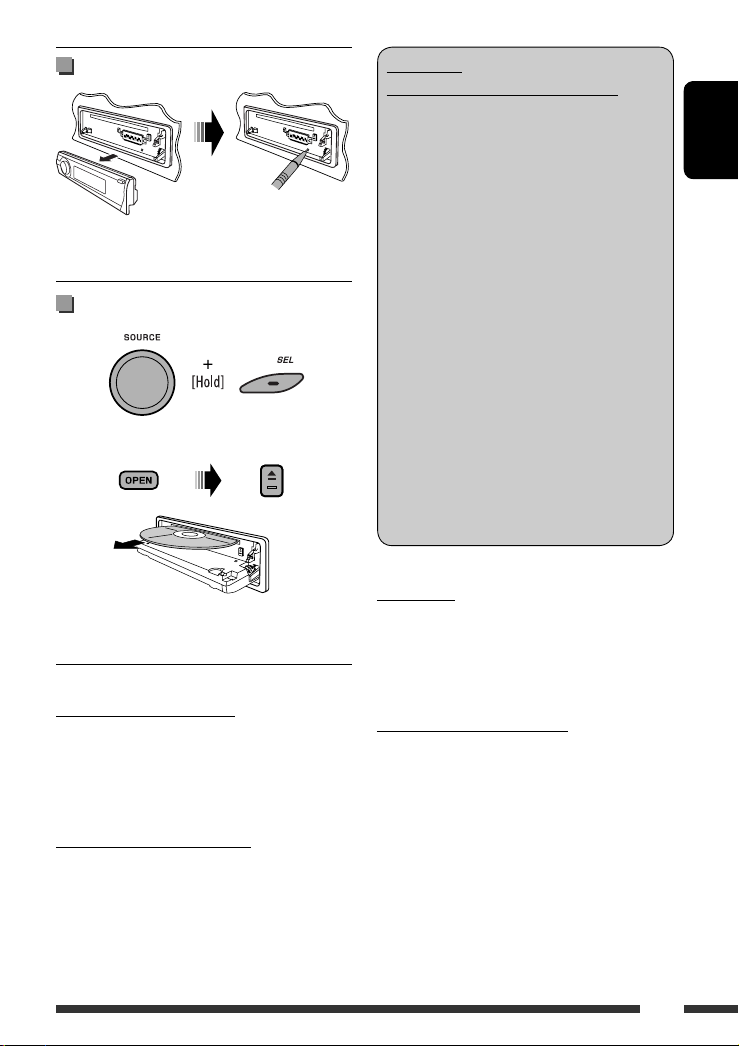
How to reset our unit
• Your preset adjustments will also be erased (except the
registered Bluetooth device, see pages 26 and 27).
How to forcibl eject a disc
“Please Eject” appears on the display.
• Be care ul not to drop the disc when it ejects.
• I this does not work, reset your unit.
Caution on volume setting:
Digital de ices (CD/USB) produce ery little noise
compared with other sources. Lower the olume before
playing these digital sources to a oid damaging the
speakers by sudden increase of the output le el.
Caution for DualDisc pla back
The Non-DVD side of a “DualDisc” does not comply with
the “Compact Disc Digital Audio” standard. Therefore,
the use of Non-DVD side of a DualDisc on this product
may not be recommended.
WARNINGS:
(To prevent accidents and damage)
• DO NOT install an unit or wire an cable in
a location where;
– it ma obstruct the steering wheel and
gearshift lever operations.
– it ma obstruct the operation of safet
devices such as air bags.
– it ma obstruct visibilit .
• DO NOT operate the unit while driving.
• If ou need to operate the unit while
driving, be sure to look around carefull .
• The driver must not watch the monitor
while driving.
If the parking brake is not engaged,
“DRIVER MUST NOT WATCH THE MONITOR
WHILE DRIVING.” appears on the monitor,
and no pla back picture will be shown.
– This warning appears onl when the
parking brake lead is connected to the
parking brake s stem built in the car
(refer to the Installation/Connection
Manual).
For safet ...
• Do not raise the olume le el too much, as this will
block outside sounds, making dri ing dangerous.
• Stop the car before performing any complicated
operations.
Temperature inside the car...
If you ha e parked the car for a long time in hot or cold
weather, wait until the temperature in the car becomes
normal before operating the unit.
EN02-09_KD-ADV7490[J]f.indd 3EN02-09_KD-ADV7490[J]f.indd 3 1/21/08 2:46:03 PM1/21/08 2:46:03 PM

ENGLISH
4
Detaching the control panel
Attaching the control panel
Opening and closing the control
panel
A oid touching the connectors.
How to use the M MODE and SEL
buttons
If you use M MODE or SEL (select), the display and some
controls (such as the number buttons,
4 /¢ buttons, 5/∞ buttons, and the
control dial) enter the corresponding control mode.
Ex.: When you press number button 1 after pressing
M MODE, to operate the FM tuner.
To use these controls for original functions, press
M MODE again.
• Howe er, pressing SEL makes the unit enters a
different mode.
• Waiting for about 15 seconds (or 30 seconds for
Bluetooth sources) without pressing any of these
buttons will automatically cancels the control.
Caution:
If the temperature inside the car is below 0°C (32°F),
the mo ement of animation and text scroll will be
halted on the display to pre ent the display from being
blurred. appears on the display.
When the temperature increases, and the operating
temperature is resumed, these functions will start
working again.
Indication language:
In this manual, English indications are used
for purposes of explanation. You can select
the indication language on the monitor on the
“LANGUAGE” setting (see page 49).
Open...
Close...
EN02-09_KD-ADV7490[J]f.indd 4EN02-09_KD-ADV7490[J]f.indd 4 1/21/08 2:46:04 PM1/21/08 2:46:04 PM

ENGLISH
5
CONTENTS
INTRODUCTIONS
Playable disc type ........................................................................................................................... 6
Preparation ..................................................................................................................................... 7
OPERATIONS
Basic operations .............................................................................................................................. 8
• Using the control panel ............................................................................................................................ 8
• Using the remote controller (RM-RK252) ................................................................................................. 9
Listening to the radio ...................................................................................................................... 12
Disc operations ................................................................................................................................ 14
• Operations using the control panel .......................................................................................................... 15
• Operations using the remote controller (RM-RK252) ............................................................................... 18
Listening to the USB de ice ............................................................................................................. 24
Dual Zone operations ...................................................................................................................... 25
EXTERNAL DEVICES
Listening to the Bluetooth® de ices ................................................................................................ 26
• Using the Bluetooth cellular phone ......................................................................................................... 28
• Using the Bluetooth audio player ............................................................................................................ 30
Listening to the HD Radio ™ Broadcast ............................................................................................ 31
Listening to the CD changer ............................................................................................................ 32
Listening to the satellite radio ........................................................................................................ 33
Listening to the iPod ....................................................................................................................... 36
Listening to the other external components ................................................................................... 40
SETTINGS
Selecting a preset sound mode ....................................................................................................... 42
General settings — PSM ................................................................................................................ 44
Disc setup menu .............................................................................................................................. 49
Bluetooth settings .......................................................................................................................... 51
Title assignment ............................................................................................................................. 52
REFERENCES
Maintenance ................................................................................................................................... 53
More about this unit ....................................................................................................................... 54
Troubleshooting .............................................................................................................................. 62
Specifications .................................................................................................................................. 68
EN02-09_KD-ADV7490[J]f.indd 5EN02-09_KD-ADV7490[J]f.indd 5 1/21/08 2:46:05 PM1/21/08 2:46:05 PM

ENGLISH
6
Disc t pe Recording format, file t pe, etc Pla able
DVD DVD Video (Region Code: 1) *1
DVD Audio
DVD-ROM
DVD Recordable/Rewritable
(DVD-R/-RW *2, +R/+RW *3)
• DVD Video: UDF bridge
• DVD-VR
• Di X/MPEG-1/MPEG-2/MP3/
WMA/WAV: ISO 9660 le el 1,
le el 2, Romeo, Joliet
DVD Video
DVD-VR
Di X/MPEG1/MPEG2
MP3/WMA/WAV
AAC
JPEG/MPEG4
DVD+VR
DVD-RAM
Dual Disc DVD side
Non-DVD side
CD/VCD Audio CD/CD Text (CD-DA)/DTS-CD *4
VCD (Video CD)
SVCD (Super Video CD)
CD-ROM
CD-I (CD-I Ready)
CD Recordable/Rewritable
(CD-R/-RW)
• ISO 9660 le el 1, le el 2, Romeo,
Joliet
CD-DA
Di X/MPEG1/MPEG2
MP3/WMA/WAV
AAC
JPEG/MPEG4
*1 I you insert a DVD Video disc o an incorrect Region Code, “REGION CODE ERROR” appears on the monitor.
*2 DVD-R recorded in multi-border ormat is also playable (except or dual layer discs). DVD-RW dual layer discs are not
playable.
*3 It is possible to play back inalized +R/+RW (Video ormat only) discs. +RW double layer discs are not playable.
*4 To reproduce DTS sound, use the DIGITAL OUT terminal (see also pages 50 and 60).
Playable disc type
EN02-09_KD-ADV7490[J]f.indd 6EN02-09_KD-ADV7490[J]f.indd 6 1/21/08 2:46:05 PM1/21/08 2:46:05 PM

ENGLISH
7INTRODUCTIONS
Preparation
Cancel the displa demonstration and set the clock
• See also pages 44 and 45.
1Turn on the power.
2Enter the PSM settings.
3Cancel the displa demonstrations
Select “Demo,” then “Off.”
Set the clock
Select “Clock Hr” (hour), then adjust the hour.
Select “Clock Min” (minute), then adjust the minute.
Select “24H/12H,” then “24Hours” or “12Hours.”
4Finish the procedure.
Changing the displa information and pattern
When the power is turned off: Check the current clock time
Ex.: When tuner is selected as the source
Source operation display
• If a station has been assigned a title, station
title appears after about 5 seconds.
• To assign a title to a station, see page 52.
Audio le el meter display
(see “Le elMeter” on page 44)
EN02-09_KD-ADV7490[J]f.indd 7EN02-09_KD-ADV7490[J]f.indd 7 1/21/08 2:46:06 PM1/21/08 2:46:06 PM

ENGLISH
8
Basic operations
Using the control panel
TUNER *2/HD RADIO *3 = SIRIUS *3/XM *3
= DISC *3 = USB *3 (or USB-i od) *3 =
CD-CH *3/i od *3 (or EXT IN) = BT- HONE *3
= BT-AUDIO *3 = LINE IN = AV IN =
(back to the beginning)
p • Select/adjust the sound mode.
• Enter the PSM settings [Hold].
q • TUNER/SIRIUS/XM/HD RADIO: Select reset
station/channel.
• DISC/USB/CD-CH:
Select cha ter/title/
rogram/folder/track/disc (for CD changer).
• BT- HONE: Dial reset hone number *4.
w • Enter functions mode.
• BT- HONE: Activate Voice Dialing [Hold].
e Change the dis lay information and attern.
r • TUNER/HD RADIO/SIRIUS/XM: Select the
bands.
• DISC/USB/USB-i od: Start/ ause layback.
• BT-AUDIO: Start/ ause layback.
*1 Holding SOURCE will enter the Bluetooth menu if a
Bluetooth phone is connected.
*2 When the HD Radio tuner bo is connected, the
built-in tuner of this unit will be disable. To listen
to the HD Radio broadcast, refer to “Listening to the
radio” on page 12. For more features, see page 31.
*3 You cannot select these sources if they are not ready
or not connected.
*4 For storing preset phone number, see page 30.
1 • TUNER: Select reset station.
• HD RADIO: Select channel.
• SIRIUS/XM: Select category.
• DISC/USB/CD-CH: Select title/ rogram/
laylist/folder.
• USB-i od: Enter the main menu [Hold].
• i od: Enter the main menu/Pause layback/
Confirm selection.
• BT- HONE/BT-AUDIO: Select a registered
device.
2 • Turn on the ower.
• Turn off the ower [Hold].
• Attenuate the sound (if the ower is on).
3 Dis lay window
4 USB (Universal Serial Bus) in ut jack
5 Select the sound mode
6 Fli down the control anel.
• To eject the disc, fli down the control anel
then ress 0 on the unit.
7 AV-IN (video) in ut jack
8 • TUNER/HD RADIO/SIRIUS/XM: Search for
station/channel.
• DISC/USB/USB-i od/CD-CH/i od: Select
cha ter/track.
• BT-AUDIO: Reverse ski /forward ski .
9 • Volume control [Turn].
• Select the source [Press] *1.
EN02-09_KD-ADV7490[J]f.indd 8EN02-09_KD-ADV7490[J]f.indd 8 1/31/08 9:59:11 AM1/31/08 9:59:11 AM

ENGLISH
9OPERATIONS
Continued on the next page
Installing the batter
Insert the batteries into the remote controller by
matching the polarity (+ and –) correctly.
Caution:
Battery shall not be exposed to excessi e heat such as
sunshine, fire, or the like.
If the effectiveness of the remote controller
decreases, replace both batteries.
Before using the remote controller:
• Aim the remote controller directly at the remote
sensor on the unit.
• DO NOT expose the remote sensor to bright light
(direct sunlight or artificial lighting).
KD-ADV7490 is equipped with the steering wheel
remote control function.
• See the Installation/Connection Manual (separate
olume) for connection.
Using the remote controller (RM-RK252)
R03/LR03/AAA
Remote sensor
IMPORTANT:
If Dual Zone is acti ated (see page 25), the remote
controller only functions for operating the DVD/CD
player.
1*1 button
• Turns the power on if pressed briefly or
attenuates the sound when the power is on.
• Turns the power off if pressed and held.
EN02-09_KD-ADV7490[J]f.indd 9EN02-09_KD-ADV7490[J]f.indd 9 1/21/08 2:46:07 PM1/21/08 2:46:07 PM

ENGLISH
10
2 5/∞ buttons
• TUNER: Selects the preset stations.
• HD RADIO: Selects the multicast channel.
• SIRIUS/XM: Selects the categories.
• DISC:
– DVD-Video: Selects the title.
– DVD-VR: Selects the program/playlist.
– DivX/M EG Video/M 3/WMA/WAV: Selects
the folders if included.
• USB:
– DivX/M EG Video/M 3/WMA/WAV: Selects
the folders if included.
• CD-CH: Selects the folders if included.
• IPOD:
–
5 : Enters the main menu (then 5 / ∞ /
4 / ¢ work as menu
selecting buttons.)
5 : Returns to the previous menu.
∞ : Confirms the selection.
– ∞ : auses or resumes playback.
4 / ¢ buttons
• TUNER/HD RADIO:
– Searches for stations automatically if pressed
briefly.
– Searches for stations manually if pressed and
held.
• SIRIUS/XM:
– Changes the channels if pressed briefly.
– Changes the channels rapidly if pressed and
held.
• DISC/USB/USB-iPod/CD-CH:
– Reverse skip/forward skip if pressed briefly.
– Reverse search/forward search if pressed and
held.
• BT-AUDIO: Reverse skip/forward skip if pressed
briefly.
• IPOD:
– Reverse skip/forward skip if pressed briefly.
– Reverse search/forward search if pressed and
held.
In menu selecting mode:
– Selects an item if pressed briefly. (Then, press
∞ to confirm the selection.)
– Skips 10 items at a time if pressed and held.
3 VOL (volume) + / – buttons
• Adjusts the volume level.
nd VOL (volume) buttons
• Adjust the volume level through the 2nd AUDIO
OUT plug when pressed with SHIFT button (see
page 25).
4 * 2 ASPECT button
• Not applicable for this unit.
5*1 PHONE button
• Answer incoming calls.
• Enters “Redial” menu when a Bluetooth phone
is connected [Hold].
6 * 2 SETUP button
• Enters disc setup menu (during stop).
7 * 2 TOP M (menu) button
• DVD-Video/DivX: Shows the disc menu.
• DVD-VR: Shows the Original rogram screen.
• VCD: Resumes BC playback.
• USB-iPod: Enters the search mode menu (see
page 38).
8 * 2 OSD (on-screen display) button
• Shows the on-screen bar.
9 SHIFT button
• Functions with other buttons.
p DISP (display) button
• Changes the display information.
q 1 / ¡ buttons
• DVD-Video: Slow motion playback (during
pause).
• DVD-VR/VCD: Forward slow motion playback
(during pause).
• DISC/USB/USB-iPod: Reverse search/forward
search.
w*1 SOURCE button
• Selects the source.
EN10-17_KD-ADV7490[J]f.indd 10EN10-17_KD-ADV7490[J]f.indd 10 1/31/08 5:42:33 PM1/31/08 5:42:33 PM

ENGLISH
11OPERATIONS
e 3 (play) / 8 (pause) button
• DISC/USB/USB-iPod/BT-AUDIO: Starts/pauses
playback.
r (end call) button
• Ends the call.
BAND / 7 (stop) buttons
• TUNER/SIRIUS/XM/HD RADIO: Selects the
bands.
• DISC/USB/USB-iPod/BT-AUDIO: Stops
playback.
t * 2 RETURN button
• VCD: Returns to the BC menu.
• USB-iPod: Returns to Control Screen.
y * 2 MENU button
• DVD-Video/DivX: Shows the disc menu.
• DVD-VR: Shows the laylist screen.
• VCD: Resumes BC playback.
• USB-iPod: Enters the search mode menu (see
page 38).
u * 2 % / fi buttons
• DVD-Video: Makes selection/settings.
• CD-CH: Changes discs in the magazine.
@ / # buttons
• DVD-Video: Makes selection/settings.
• DivX/M EG Video: Skips back or forward by
about five minutes.
ENT (enter) button
• Confirms selection.
i * 2 DUAL button
• Activates or deactivates Dual Zone.
o SURROUND button
• Not applicable for this unit.
DIRECT button
• DISC/USB: Enters direct search mode for
chapter/title/program/playlist/folder/track
when pressed with SHIFT button (see page 18
for details).
CLR (clear) button
• DISC/USB: Erases the misentry when pressed
with SHIFT button.
*1 When Dual Zone is activated, these buttons cannot be
used.
*2 Functions as number buttons/* (asterisk)/# (hash)
when pressed with HIFT button.
– TUNER/HD RADIO/ IRIU /XM: elects the preset
stations/channels (1 – 6).
– DI C: Enters chapter/title/program/playlist/folder/
track number after entering search mode by
pressing HIFT and DIRECT (see page 18 for details).
EN10-17_KD-ADV7490[J]f.indd 11EN10-17_KD-ADV7490[J]f.indd 11 1/31/08 10:00:25 AM1/31/08 10:00:25 AM

ENGLISH
12
FM station automatic presetting
— SSM (Strong-station Sequential
Memory)
You can preset up to six stations for each band.
1 While listening to a station...
2
3
Local FM stations with the strongest signals are
searched and stored automatically in the selected
FM band.
• If an HD Radio tuner box is connected, you
can also search and store the AM station
automatically.
When an FM stereo broadcast is
hard to receive
1
2
Reception improves, but stereo effect will be lost.
• lights up on the display.
3 Exit from the setting.
Listening to the radio
1Select “TUNER.”
2Select the bands.
3Search for a station to listen—Auto Search.
Manual Search: Hold either one of the buttons until “M” lights up on the display, then
press it repeatedly.
• When receiving an FM stereo broadcast with sufficient signal strength, lights up
on the display.
EN10-17_KD-ADV7490[J]f.indd 12EN10-17_KD-ADV7490[J]f.indd 12 1/21/08 2:47:06 PM1/21/08 2:47:06 PM

ENGLISH
13OPERATIONS
Manual presetting
Ex.: Storing FM station of 92.5 MHz into preset number
4 of the FM1 band.
Using the number buttons
1
2
3
Using the Preset Station list
When is shown on the display, you can
move back to the previous screen by pressing number
button 3.
1 Follow steps 1 and 2 of “Using the number
buttons” above.
By holding 5 / ∞, the Preset Station List will
also appear (go to step 4).
2
3 isplay the Preset Station List.
4 Select the preset number you want to store
into.
You can move to the lists of the other FM bands
by pressing number button 5 ( ) or
6 ( ) repeatedly.
5 Store the station.
Listening to the preset station on
the Preset Station List
1 isplay the Preset Station List, then select
the preset station you want to listen to.
2 Change to the selected station.
Preset number flashes for a while.
EN10-17_KD-ADV7490[J]f.indd 13EN10-17_KD-ADV7490[J]f.indd 13 2/1/08 11:44:15 AM2/1/08 11:44:15 AM

ENGLISH
14
To stop play and eject the disc
• ress SOURCE to listen to another playback source.
Prohibiting disc ejection
To cancel the prohibition, repeat the same
procedure.
Disc operations
Before performing any operations...
Turn on the monitor to watch the playback picture. If you turn on the monitor, you can also control playback of other
discs by referring to the monitor screen. (See pages 20 – 23.)
The disc type is automatically detected, and playback starts automatically (for DVD: automatic start depends on its
internal program).
If the current disc does not have any disc menu, all tracks will be played repeatedly until you change the source or
eject the disc.
If “ ” appears on the monitor when pressing a button, the unit cannot accept the operation you have tried to
do.
• In some cases, without showing “ ,” operations will not be accepted.
1Open the control panel.
Make sure to detach the USB device before opening the control
panel, as it might block the opening mechanism.
• To detach the USB device, see page 24.
2
Insert the disc.
layback starts automatically.
3Start playback if necessary.
EN10-17_KD-ADV7490[J]f.indd 14EN10-17_KD-ADV7490[J]f.indd 14 1/21/08 2:47:08 PM1/21/08 2:47:08 PM

ENGLISH
15OPERATIONS
Operations using the control panel
ressing (or holding) the following buttons allows you to...
Disc type
(Number buttons) *3
[ ress] Select chapter
[Hold] Reverse/fast-forward
chapter *1
Select title During stop: Locate title
During play/pause: Locate
chapter
[ ress] Select chapter
[Hold] Reverse/fast-forward
chapter *1
Select program number/
playlist number
During stop: Locate program
During play/pause: Locate
chapter
[ ress] Select track
[Hold] Reverse/fast-forward track *2
Select folder Locate particular folder directly
[ ress] Select track
[Hold] Reverse/fast-forward track *1—Locate particular track directly
( BC not in use)
[ ress] Select track
[Hold] Reverse/fast-forward track *1
Select folder Locate particular folder directly
[ ress] Select track
[Hold] Reverse/fast-forward track *1—Locate particular track directly
*1 earch speed:
*2 earch speed:
*3 Press to select number 1 to 6; hold to select number 7 to 12.
Continued on the next page
EN10-17_KD-ADV7490[J]f.indd 15EN10-17_KD-ADV7490[J]f.indd 15 1/21/08 2:47:09 PM1/21/08 2:47:09 PM

ENGLISH
16
After pressing M MODE, press the following buttons to...
Disc type
Skip 10 chapters (during
play or pause)
Repeat Chapter:
Repeat current chapter
Repeat Title:
Repeat current title
—
Skip 10 chapters (during
play or pause)
Repeat Chapter:
Repeat current chapter
Repeat Program:
Repeat current program (not
available for laylist layback)
—
Skip 10 tracks (within the
same folder)
Repeat Track:
Repeat current track
Repeat Folder:
Repeat current folder
Random Folder:
Randomly play all tracks of
current folder, then tracks of
next folders
Random All:
Randomly play all tracks
Skip 10 tracks ( BC not in
use)
Repeat Track:
Repeat current track ( BC not in
use)
Random All:
Randomly play all tracks ( BC
not in use)
Skip 10 tracks (within the
same folder)
Repeat Track:
Repeat current track
Repeat Folder:
Repeat current folder
Random Folder:
Randomly play all tracks of
current folder, then tracks of
next folders
Random All:
Randomly play all tracks
Skip 10 tracks Repeat Track:
Repeat current track
Random All:
Randomly play all tracks
• You can also cancel the playback mode by selecting “Off” or press number button 4 ( ).
EN10-17_KD-ADV7490[J]f.indd 16EN10-17_KD-ADV7490[J]f.indd 16 1/21/08 2:47:09 PM1/21/08 2:47:09 PM

ENGLISH
17OPERATIONS
5 Change to the selected item.
A If File List is selected
The list disappears and playback
starts.
B If Folder List is selected
• If the current folder is selected, File List
appears, then repeat steps 4 and 5 A to
start playback.
• If another folder is selected, playback starts
from the 1st file of the selected folder.
Ex.: When “File” is selected in step 3
Selecting a folder/track on the list
(only for MP3/WMA/WAV file)
• When is shown on the display, you can
move back to the previous screen by pressing number
button 3.
1
2 Select “LIST.”
3 Select the list type.
4 Select an item.
• You can move to the other lists by pressing
number button 5 ( ) or 6 ( )
repeatedly.
EN10-17_KD-ADV7490[J]f.indd 17EN10-17_KD-ADV7490[J]f.indd 17 1/21/08 2:47:10 PM1/21/08 2:47:10 PM

ENGLISH
18
To search for chapter/title/program/playlist/folder/track directly (DVD/DivX/MPEG Video/VCD/
MP3/ MA/ AV/CD)
1 While holding SHIFT, press DIRECT repeatedly to select the desired search mode.
DVD-Video VCD
DVD-VR CD
DivX/MPEG Video
MP3/WMA/WAV
2 While holding SHIFT, press the number buttons (0 – 9) to enter the desired number.
3 Press ENT (enter) to confirm.
Button /
Stop play Stop play
Start play/Pause (if pressed during play) Start play/Pause (if pressed during play)
• Reverse/forward chapter search *1 (No
sound can be heard.)
• Slow motion *2 during pause (No sound can
be heard.)
* DVD-VR: Reverse slow motion does not work.
Reverse/forward track search *4 (No sound can
be heard.)
[Press] Select chapter (during play or pause)
[Hold] Reverse/fast-forward chapter search *3
[Press] Select track (during play or pause)
[Hold] Reverse/fast-forward track search *5
(No sound can be heard.)
• DVD-Video Select title (during play or
pause)
• DVD-VR Select program/playlist (during
play or pause)
Select folder
—
• Skip back or forward the scenes by about
five minutes
• Select chapter
Operations using the remote controller (RM-RK252)
Disc
EN18-25_KD-ADV7490[J]f.indd 18EN18-25_KD-ADV7490[J]f.indd 18 1/21/08 2:54:50 PM1/21/08 2:54:50 PM

ENGLISH
19OPERATIONS
Stop play Stop play Stop play
Start play/Pause (if pressed during
play)
Start play/Pause (if pressed during
play)
Start play/Pause (if pressed during
play)
Reverse/forward track search *1
• Forward slow motion *2 during
pause. (No sound can be heard.)
* Reverse slow motion does not work.
Reverse/forward track search *1Reverse/forward track search *1
[Press] Select track (during play or
pause)
[Hold] Reverse/fast-forward track
search *3 (No sound can be
heard.)
[Press] Select track (during play or
pause)
[Hold] Reverse/fast-forward track
search *3
[Press] Select track (during play or
pause)
[Hold] Reverse/fast-forward track
search *3
—
Select folder
—
———
Continued on the next page
• For DivX/MPEG Video/MP3/WMA/WAV, track is searched within the same folder.
• To erase a misentry, press CLR (clear) while holding SHIFT.
• To return to the previous screen, press RETURN.
*1 Search speed:
*2 Slow motion speed:
*3 Search speed:
*4 Search speed:
*5 Search speed:
EN18-25_KD-ADV7490[J]f.indd 19EN18-25_KD-ADV7490[J]f.indd 19 1/21/08 2:54:52 PM1/21/08 2:54:52 PM

ENGLISH
20
Operations using the
on-screen bar
(DVD/DVD-VR/DivX/MPEG Video/VCD)
These operations are possible on the monitor using the
remote controller.
1 Show the on-screen bar (see page 21).
2 Select an item.
3 Make a selection.
If pop-up menu appears...
• To cancel pop-up menu, press RETURN.
• For entering time/numbers, see the following.
Entering time/numbers
Press % / fi to change the number, then press @ / # to
move to the next entry.
• Each time you press % / fi, the number increases/
decreases by one value.
• After entering the numbers, press ENT (enter).
• It is not required to enter the zero and tailing zeros
(the last two digits in the example below).
Ex. Time search
DVD: _ _ _ _ _ (Ex. 1 02 00)
Press % once, then # twice to go to the third entry, %
twice, then press ENT (enter).
To remove the on-screen bar
(twice)
Using menu driven features... (DVD-Video/
DVD-VR)
1 Press TOP M/MENU to enter the menu screen.
2 Press % / fi / @ * / # * to select an item you want
to start play.
3 Press ENT (enter) to confirm.
* Not applicable or DVD-VR.
Canceling the PBC playback... (VCD)
1 During stop, press DIRECT while holding SHIFT.
2 Hold SHIFT, then press the number buttons (0 – 9)
to enter the desired number.
3 Press ENT (enter) to confirm.
• To resume PBC, press TOP M/MENU.
EN18-25_KD-ADV7490[J]f.indd 20EN18-25_KD-ADV7490[J]f.indd 20 1/21/08 2:54:53 PM1/21/08 2:54:53 PM
This manual suits for next models
1
Table of contents
Languages:
Other JVC Car Receiver manuals

JVC
JVC KD-S895 User manual

JVC
JVC KD-ADV8490 User manual

JVC
JVC GET0163-001A User manual

JVC
JVC KD-T706BT User manual

JVC
JVC KD-AVX1 Guide

JVC
JVC KD-S52 User manual

JVC
JVC KD-R701 Guide

JVC
JVC KW-ADV792 - Arsenal 2-DIN 7" TouchScreen DVD/MP3/CD... Guide

JVC
JVC KD-S711RE User manual

JVC
JVC KD-X50BT User manual
Popular Car Receiver manuals by other brands

Alpine
Alpine TDA-7572R owner's manual

Aurora Design
Aurora Design AAC/MP3 User's operation manual

Blaupunkt
Blaupunkt Monte Carlo MP28 Operating and installation instructions

Clarion
Clarion VZ509 Owner's manual & installation manual

Kenwood
Kenwood KDC-BT530U instruction manual

Panasonic
Panasonic CQDVR592U - AUTO RADIO/CD/DVD PL operating instructions