JVC KD-LH1000 User manual

CD RECEIVER KD-LH1000
ENGLISH
INSTRUCTIONS
§”·π–π”
LVT0856-001B
[U]
KD-LH1000
For installation and connections, refer to the separate manual.
°√ÿ≥“¥Ÿ§Ÿà¡◊Õ∑’Ë·¬°µà“ßÀ“° „π°“√µ‘¥µ—Èß·≈–°“√‡™◊ËÕ¡µàÕ
∂“¥„à´’¥’KD-LH1000
This unit is equipped with the display demonstration. To cancel it, see page 9.
‡§√◊ËÕßπ’ȉ¥√—∫°“√µ‘¥µ—Èß°“√“∏‘µ¿“æª√–°Õ∫ À“°µÕß°“√¬°‡≈‘° ‚ª√¥¥Ÿ Àπ“ 9
1000
D
SOUND
VOL VOL
SOURCE
RF
U
D
KD-LH1000
Detachable
‰∑¬
CoverKD-LH1000.pm6 15/3/02, 5:46 PM2

2
ENGLISH
IMPORTANT FOR LASER PRODUCTS
Precautions:
1. CLASS 1 LASER PRODUCT
2. CAUTION: Invisible laser radiation when open and interlock failed or defeated. Avoid direct
exposure to beam.
3. CAUTION: Do not open the top cover. There are no user-serviceable parts inside. Leave all
servicing to qualified service personnel.
4. CAUTION: This CD player uses invisible laser radiation, however, is equipped with safety switches
to prevent radiation emission when unloading CDs. It is dangerous to defeat the safety switches.
5. CAUTION: Use of controls, adjustments or performance of procedures other than those specified
herein may result in hazardous radiation exposure.
BEFORE USE
*
For safety....
• Do not raise the volume level too much, as this will
block outside sounds, making driving dangerous.
• Stop the car before performing any complicated
operations.
*
Temperature inside the car....
If you have parked the car for a long time in hot or
cold weather, wait until the temperature in the car
becomes normal before operating the unit.
How to reset your unit
After detaching the control panel, press the reset
button on the panel holder using a ball-point pen
or similar tool.
This will reset the built-in microcomputer.
Note:
Your preset adjustments—such as preset channels or
sound adjustments—will also be erased.
Caution:
If the temperature inside the car is below 0˚ C, the movement of source animation and text scroll will be
halted on the display to prevent the display from being blurred. When the temperature increases, and the
operating temperature is resumed, these functions will be start working again.
EN02-06LH1000[U]f.pm5 3/19/02, 11:302

3
ENGLISH
CONTENTS
Thank you for purchasing a JVC product. Please read all instructions carefully before operation,
to ensure your complete understanding and to obtain the best possible performance from the unit.
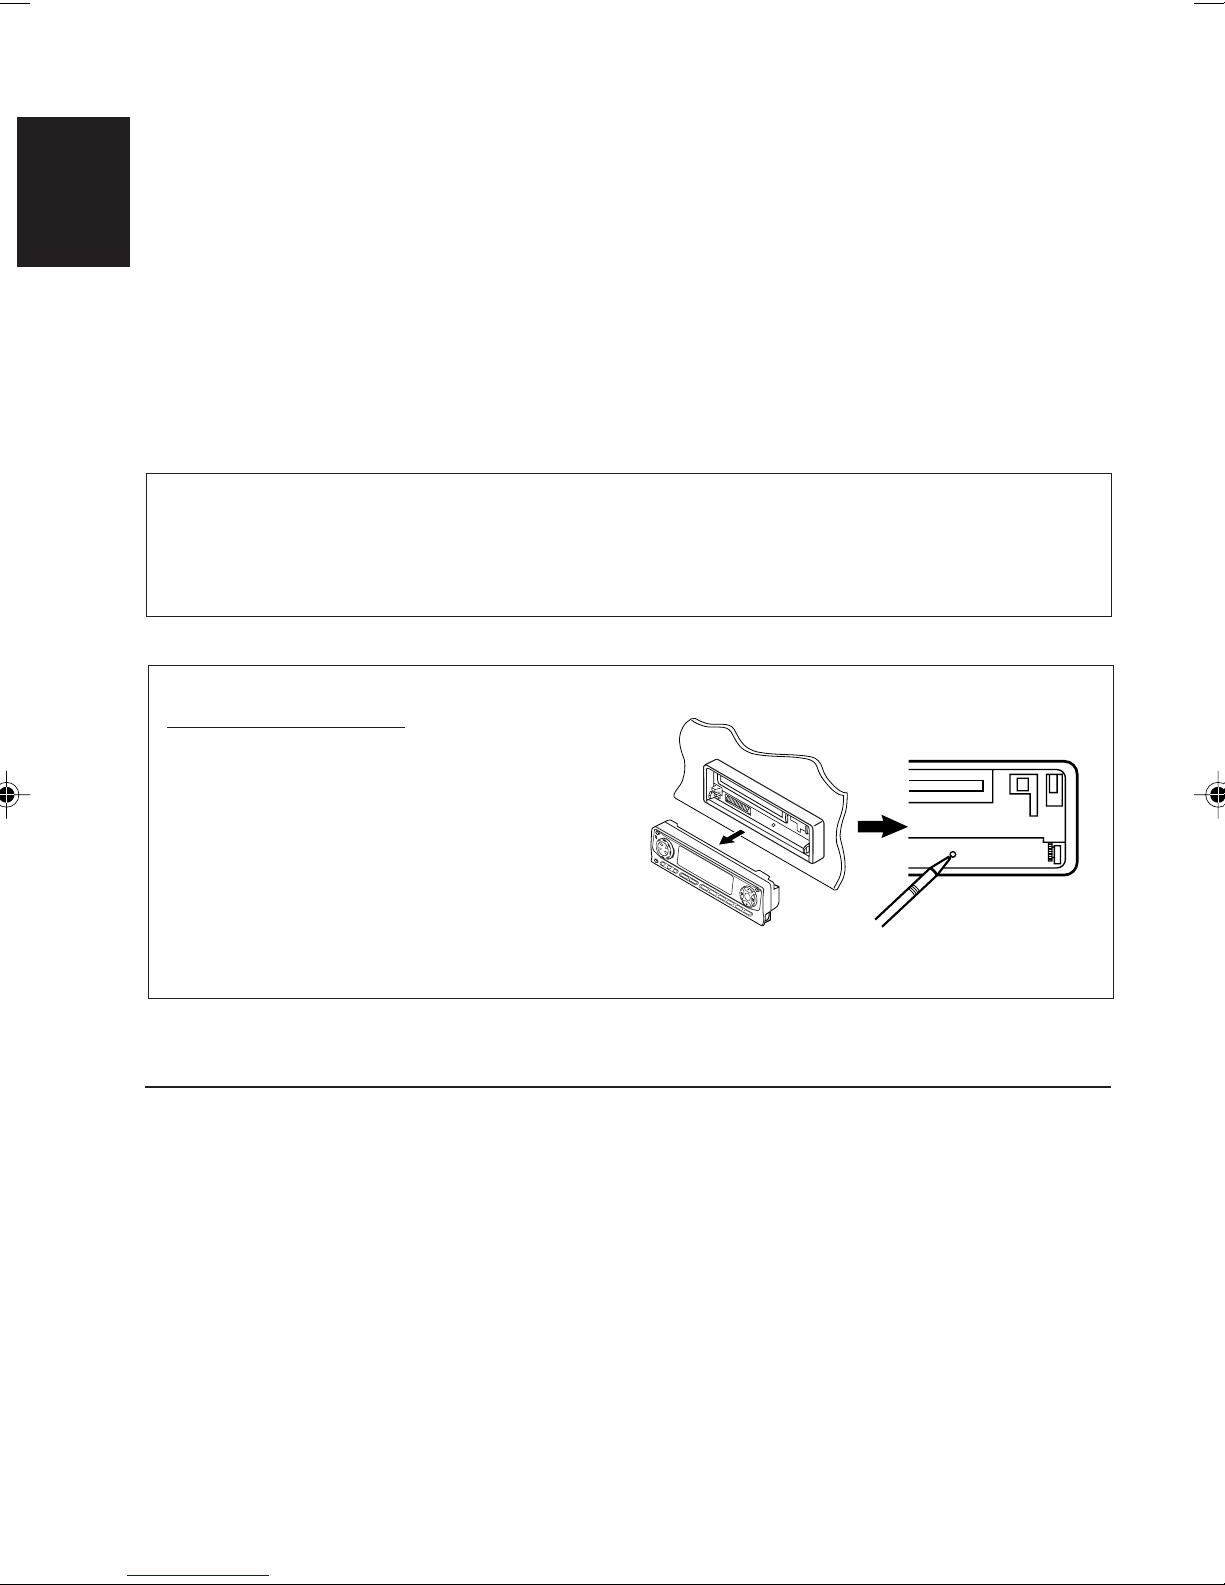
How to reset your unit ............................... 2
How to use the MODE (M) button ............ 3
LOCATION OF THE BUTTONS ............ 4
Control panel ........................................... 4
Remote controller .................................... 5
Preparing the remote controller ................. 6
BASIC OPERATIONS ...................... 7
Turning on the power ................................ 7
Changing the display pattern .................... 8
Canceling the display demonstration ....... 9
RADIO OPERATIONS ...................... 10
Listening to the radio ................................ 10
Storing stations in memory ....................... 12
Tuning in to a preset station ..................... 13
Changing the display pattern .................... 14
CD OPERATIONS .......................... 15
Playing a CD ............................................ 15
Locating a track or a particular portion
on a CD ................................................. 16
Selecting CD playback modes .................. 16
Prohibiting CD ejection ............................. 17
Changing the display pattern .................... 18
SOUND ADJUSTMENTS .................. 19
Adjusting the sound ................................. 19
Selecting preset sound modes
(iEQ: i-equalizer) ................................... 20
Storing your own sound adjustments ....... 20
Activating the level meter .......................... 22
OTHER MAIN FUNCTIONS ............... 23
Changing the general settings (PSM) ...... 23
Changing the display color ....................... 26
Assigning names to the sources .............. 28
Detaching the control panel ...................... 29
CD CHANGER OPERATIONS ............. 30
Playing CDs ............................................. 30
Locating a track or a particular portion
on a CD ................................................. 31
Selecting a disc ....................................... 31
Selecting CD playback modes .................. 32
EXTERNAL COMPONENT OPERATIONS ... 34
Playing an external component ................ 34
TROUBLESHOOTING...................... 35
MAINTENANCE ............................ 36
Handling CDs .......................................... 36
SPECIFICATIONS .......................... 37
How to use the MODE (M) button:
If you press MODE (M), the unit goes into functions mode and the number buttons work as different
function buttons.
To use these buttons as number buttons again after pressing MODE (M), wait for 5 seconds
without pressing any number button until the functions mode is cleared.
• Pressing MODE (M) again also clears the functions mode.
EN02-06LH1000[U]f.pm5 3/19/02, 11:303

4
ENGLISH
LOCATION OF THE BUTTONS
Control panel
1 2 3 4 6 9
p
8
5 7
E
EQ
u
ytrewq i o
1000
D
;
1(standby/on/attenuator) button
2SEL (select) button
3Control dial
4Display window
5Number buttons
64/¢buttons
75(up) button
80(eject) button
9∞(down) button
p(control panel release) button
qEQ (E) (equalizer) button
wDISP (D) (display) button
•Also functions as SSM buttons when pressed
together with MODE (M) button.
eMODE (M) button
•Also functions as SSM buttons when pressed
together with DISP (D) (display) button.
rFM/AM button
tCD/CD-CH button
yMO (monaural) button
uINT (intro) button
iRPT (repeat) button
oRND (random) button
;Remote sensor
EN02-06LH1000[U]f.pm5 3/19/02, 11:304

5
ENGLISH
Remote controller
1•Turns on the unit if pressed when the unit is
turned off.
•Turns off the unit if pressed and held for a
few seconds.
•Drops the volume level in a moment if
pressed briefly.
Press again to resume the volume.
2•Selects the band while listening to the radio.
Each time you press the button, the band
changes.
•Skips to the next disc while listening to the
CD changer.
Each time you press the button, the disc
number increases, and the selected disc
starts playing.
SOUND
VOL VOL
SOURCE
RF
U
D
ATT
1
2
3
5
6
7
4
3•Selects the preset stations while listening to
the radio.
Each time you press the button, the preset
station number increases, and the selected
station is tuned in.
•Skips to the previous disc while listening to
the CD changer.
Each time you press the button, the disc
number decreases, and the selected disc
starts playing.
4Functions the same as the control dial on the
main unit.
Note:
These buttons do not function for the preferred
setting mode adjustment.
5Selects the sound (iEQ) mode.
Each time you press the button, the sound
(iEQ) mode changes.
6Selects the source.
Each time you press the button, the source
changes.
7•Searches stations while listening to the
radio.
•Fast-forwards or reverses the track if
pressed and held while listening to a disc.
•Skips to the beginning of the next track or
goes back to the beginning of the current (or
previous) tracks if pressed briefly while
listening to a disc.
EN02-06LH1000[U]f.pm5 3/19/02, 11:305

6
ENGLISH
Preparing the remote controller
Before using the remote controller:
•Aim the remote controller directly at the remote
sensor on the main unit. Make sure there is no
obstacle in between.
•Do not expose the remote sensor to strong light
(direct sunlight or artificial lighting).
Installing the battery
When the controllable range or effectiveness of the
remote controller decreases, replace the battery.
1. Remove the battery holder.
1) Push out the battery holder in the direction
indicated by the arrow using a ball-point
pen or a similar tool.
2) Remove the battery holder.
2. Place the battery.
Slide the battery into the holder with the + side
facing upwards so that the battery is fixed in
the holder.
3. Return the battery holder.
Insert again the battery holder pushing it until
you hear a clicking sound.
1000
D
(back side)
Lithium coin battery
(product number:
CR2025)
(back side)
Remote sensor
WARNING:
•Store the battery in a place where children cannot
reach.
If a child accidentally swallows the battery,
consult a doctor immediately.
•Do not recharge, short, disassemble or heat the
battery or dispose of it in a fire.
Doing any of these things may cause the battery
to give off heat, crack or start a fire.
•Do not leave the battery with other metallic
materials.
Doing this may cause the battery to give off heat,
crack or start a fire.
•When throwing away or saving the battery, wrap
it in tape and insulate; otherwise, the battery may
start to give off heat, crack or start a fire.
•Do not poke the battery with tweezers or similar
tools.
Doing this may cause the battery to give off heat,
crack or start a fire.
CAUTION:
DO NOT leave the remote controller in a place
(such as dashboards) exposed to direct sunlight
for a long time. Otherwise, it may be damaged.
EN02-06LH1000[U]f.pm5 3/19/02, 11:306

7
ENGLISH
BASIC OPERATIONS
Turning on the power
1
Turn on the power.
Note on One-Touch Operation:
When you select a source in step 2 below, the
power automatically comes on. You do not have
to press this button to turn on the power.
2
Select the source.
To operate the tuner (FM or AM),
see pages 10 –14.
To play a CD,
see pages 15 –18.
To operate the CD changer,
see pages 30 –33.
To operate the external component
(Line In), see page 34.
CAUTION on Volume Setting:
Discs produce very little noise compared with
other sources. If the volume level is adjusted for
the tuner, for example, the speakers may be
damaged by the sudden increase in the output
level. Therefore, lower the volume before playing a
disc and adjust it as required during playback.
To increase the volume.
To decrease the volume.
3
Adjust the volume.
4
Adjust the sound as you want.
(See pages 19 – 22.)
Volume level appears
13
1000
D
2
EN07-09LH1000[U]f.pm5 3/19/02, 11:307

8
ENGLISH
To drop the volume in a moment
Press briefly while listening to any
source. “ATT”starts flashing on the display, and
the volume level will drop in a moment.
To resume the previous volume level, press the
button briefly again.
•If you turn the control dial, you can also restore
the sound.
To turn off the power
Press for more than one second.
•If you turn off the power while listening to a
disc, CD play will start from where playback
has been stopped previously, next time you turn
on the power.
Note:
When you use this unit for the first time, set the built-in
clock correctly, see page 23.
Changing the display pattern
You can change the display pattern.
The number of the selectable display patterns
varies according to the playback sources.
However, the unit basically provides three main
display patterns for each source, and once one of
these three patterns is selected, the same
pattern is used for all the sources.
Press DISP (D).
Each time you press the button,
the display patterns change as
follows.
*Small animation displays are used for showing
not only the source’s main information
(illustrated on this page as examples), but also
showing some other information. For details, see
each related section.
Large animation
display
Small animation
displays*
Clock time
display
In this manual, the illustrations of the display are
mainly of the large animation display (initial
setting). If you have changed the display patterns
or some PSM items, the actual displays you see
will be different.
Note:
While playing a source, you can also show the level
meter on the display. For details, see “Activating the
level meter”on page 22.
EX.: When playing a CD
EN07-09LH1000[U]f.pm5 3/19/02, 11:308

9
ENGLISH
Canceling the display
demonstration
When shipped from the factory, display
demonstration (MovieDemo) has been activated,
and starts automatically when no operations are
done for about 20 seconds.
•It is recommended to cancel the demonstration
before you use the unit for the first time.
To cancel the display demonstration, follow
the procedure below:
1
Press and hold SEL
(select) for more than 2
seconds so that “Movie
Demo”appears on the
display.
(PSM: see page 24.)
2
Select “Off.”
3
Press SEL (select) to
finish the setting.
To activate the display demonstration, repeat
the same procedure and select “Interval”or “All
Time”in step 2.
•For more details, see “To set the movie demo—
MovieDemo”on page 25.
EN07-09LH1000[U]f.pm5 3/19/02, 11:309

10
ENGLISH
RADIO OPERATIONS
1000
D
2
Start searching a station.
When a station is received, searching stops.
To stop searching before a station is received,
press the same button you have pressed for
searching.
Press ¢to
search stations of
higher frequencies.
Listening to the radio
You can use either automatic searching or manual
searching to tune in to a particular station.
Searching a station automatically:
Auto search
1
Select the band (FM1 –3, AM).
Note:
This receiver has three FM bands (FM1, FM2,
FM3). You can use any one of them to listen to an
FM broadcast.
Last received station of the selected band is
tuned in.
Press 4to
search stations of
lower frequencies.
Ex.: When the band is FM
FM1 FM2 FM3 AM
EN10-14LH1000[U]f.pm5 3/19/02, 11:3010

11
ENGLISH
When an FM stereo broadcast is hard to
receive:
1Press MODE (M) to enter the
functions mode while listening to
an FM stereo broadcast.
“Mode”appears on the display.
2Press MO (monaural), while
“Mode”is still on the display, so
that the MO indicator is
highlighted on the display.
Each time you press MO, “Mono
On”and “Mono Off”alternately
appears.
Searching a station manually:
Manual search
1
Select the band (FM1 –3, AM).
Note:
This receiver has three FM bands (FM1, FM2,
FM3). You can use any one of them to listen to an
FM broadcast.
2
Press and hold ¢or 4until
“Manual Search”starts flashing on the
display.
3
Tune in to a station you want while
“Manual Search”is flashing.
•If you release your finger from the button,
the manual mode will automatically turn off
after 5 seconds.
•If you hold down the button, the frequency
keeps changing (in 50 kHz intervals for FM
and 9 kHz intervals for AM) until you release
the button.
FM1 FM2 FM3 AM
Press ¢to
tune in to stations
of higher
frequencies.
Press 4to
tune in to stations
of lower
frequencies.
“STEREO”is lit when receiving an FM broadcast in
stereo.
MO indicator
MONO indicator
When the MONO indicator is lit on the
display, the sound you hear becomes
monaural but the reception will be improved.
If the sound quality decreases and the
stereo effect is lost while listening to an
FM station
In some areas, adjacent stations may
interfere with each other. If this interference
occurs, this unit can automatically reduce this
interference noise (the initial setting when
shipped from the factory). However, in this
case, the sound quality will be degraded and
the stereo effect will be also lost.
If you do not want to degrade the sound
quality and to lose the stereo effect, rather
than to eliminate the interference noise, see
“To change the FM tuner selectivity —IF
Filter”on page 25.
EN10-14LH1000[U]f.pm5 3/19/02, 11:3111

12
ENGLISH
Manual preset
You can preset up to 6 stations in each band (FM1,
FM2, FM3 and AM) manually.
Ex.: Storing an FM station of 88.3 MHz into the
preset number 1 of the FM1 band.
1
Select the band (FM1 –3, AM) you
want to store stations into (in this
example, FM1).
Each time you press the
button, the band changes
as follows:
2
Tune in to a station (in this example,
of 88.3 MHz).
3
Press and hold the number button (in
this example, 1) for more than 2
seconds.
FM1 FM2 FM3 AM
Storing stations in memory
You can use one of the following two methods to
store broadcasting stations in memory.
•Automatic preset of FM stations: SSM (Strong-
station Sequential Memory)
•Manual preset of both FM and AM stations
FM station automatic preset: SSM
You can preset 6 local FM stations in each FM band
(FM1, FM2 and FM3).
1
Select the FM band (FM1 –3) you want
to store FM stations into.
Each time you press the
button, the band changes
as follows:
2
Press and hold both buttons for more
than 2 seconds.
Local FM stations with the strongest signals are
searched and stored automatically in the band
number you have selected (FM1, FM2 or FM3).
These stations are preset in the number buttons —
No.1 (lowest frequency) to No.6 (highest frequency).
When automatic preset is over, the station stored
in number button 1 will be automatically tuned in.
FM1 FM2 FM3 AM
Press ¢to
tune in to stations
of higher
frequencies.
Press 4to
tune in to stations
of lower
frequencies.
“–SSM–” appears, then disappears when
automatic preset is over.
The display pattern automatically changes to the
small animation display and the preset number
flashes (then the previous display pattern resumes).
EN10-14LH1000[U]f.pm5 3/19/02, 11:3112

13
ENGLISH
4
Repeat the above procedure to store
other stations into other preset
numbers.
Note:
A previously preset station is erased when a new station
is stored in the same preset number.
Tuning in to a preset station
You can easily tune in to a preset station.
Remember that you must store stations first. If you
have not stored them yet, see “Storing stations in
memory”on page 12.
Selecting a preset station directly
1
Select the band (FM1 –3, AM).
2
Select the number (1 –6) for the preset
station you want.
Note:
You can also use the 5(up) or ∞(down) buttons
on the unit to select the next or previous preset
stations. Each time you press the 5(up) or ∞
(down) buttons, the next or previous preset
station is tuned in.
FM1 FM2 FM3 AM
Selecting a preset station using the
preset station list
If you forget what stations are stored in what
preset numbers, you can check the preset station
list, then select your desired station on the list.
1
Select the band (FM1 –3, AM).
2
Press and hold 5(up) or ∞(down) until
the preset station list for the current
band (FM1, FM2, FM3, or AM) appears
on the display.
Notes:
•If one of FM band preset station lists (FM1,
FM2, or FM3) is shown on the display, you can
show the other lists by pressing 5or ∞.
•If a name has been assigned to a station (see page 28),
it will be shown instead of the station frequency.
3
Select the number (1 –6) for the preset
station you want.
FM1 FM2 FM3 AM
EN10-14LH1000[U]f.pm5 3/19/02, 11:3113

14
ENGLISH
Changing the display pattern
By pressing DISP (D), you can change the
information shown on the display.
Each time you press the button, the
display patterns change as follows:
•When receiving an AM or FM station
Small animation display
Large animation display
Clock time display
If a name has been
assigned to a station it
will be shown instead
of “NO NAME.”
EN10-14LH1000[U]f.pm5 3/19/02, 11:3114

15
ENGLISH
CD OPERATIONS
1000
D
Notes:
•When a disc is already in the loading slot, selecting
“CD”as the source starts CD play.
•When a disc is inserted upside down, the disc
automatically ejects (if the control panel is open). If
the control panel is closed, “Please Eject”appears.
•If you change the source, CD play also stops
(without ejecting the disc).
Next time you select “CD”as the source, CD play
starts from where playback has been stopped
previously.
To stop play and eject the disc
Press 0.
CD play stops, the control panel opens, then the
disc automatically ejects from the loading slot.
If you change the source, the CD play also stops
(without ejecting the disc this time).
Notes:
•If the ejected disc is not removed for about 15
seconds, the disc is automatically inserted again
into the loading slot to protect it from dust.
(CD play will not start this time.)
•You can eject the disc even when the unit is turned
off.
Playing a CD
1
Open the control panel.
2
Insert a disc into the loading slot.
The unit turns on,
draws a disc and
starts playback
automatically.
3
Close the control panel by hand.
The opening
display then source
name display
appears first....
All tracks will be played repeatedly until you
stop playback.
Current track
Elapsed playing time
Total track number/total playing time
EN15-18LH1000[U]f.pm5 3/19/02, 11:3115

16
ENGLISH
Locating a track or a particular
portion on a CD
To fast-forward or reverse the track
To go to the next or previous tracks
Press and hold ¢,
while playing a disc, to
fast-forward the track.
Press and hold 4,
while playing a disc, to
reverse the track.
Press ¢briefly,
while playing a disc, to
go ahead to the
beginning of the next
track.
Each time you press the
button consecutively,
the beginning of the
next tracks is located
and played back.
To go to a particular track directly
Press the number button corresponding to the
track number to start its playback.
•To select a track number from 1 –6:
Press 1 (7) –6 (12) briefly.
•To select a track number from 7 –12:
Press and hold 1 (7) –6 (12) for more than 1
second.
Selecting CD playback modes
To play back tracks at random (Random Play)
You can play back all tracks on the disc at random.
1Press MODE (M) to enter the
functions mode while playing a
disc.
“Mode”appears on the display.
2Press RND (random), while
“Mode”is still on the display, so
that the RND indicator is
highlighted on the display.
Each time you press RND,
“Random On”or “Random Off”
alternately appears.
When Random Play is turned on, the RANDOM
indicator lights up on the display and a track
randomly selected starts playing.
Press 4briefly,
while playing a disc, to
go back to the beginning
of the current track.
Each time you press the
button consecutively, the
beginning of the previous
tracks is located and
played back.
RND indicator is highlighted
when “Random On”is
selected.
RANDOM indicator
EN15-18LH1000[U]f.pm5 3/19/02, 11:3116

17
ENGLISH
To play back tracks repeatedly (Repeat Play)
You can play back the current track repeatedly.
1Press MODE (M) to enter the
functions mode while playing a
disc.
“Mode”appears on the display.
2Press RPT (repeat), while
“Mode”is still on the display, so
that the RPT indicator is
highlighted on the display.
Each time you press RPT,
“Repeat On”or “Repeat Off”
alternately appears.
When Repeat Play is turned on, the REPEAT
indicator lights up on the display.
REPEAT indicator RPT indicator is highlighted
when “Repeat On”is
selected.
To play back only intros (Intro Scan)
You can play back the first 15 seconds of each
track sequentially.
1Press MODE (M) to enter the
functions mode while playing a
disc.
“Mode”appears on the display.
2Press INT (intro), while “Mode”
is still on the display, so that the
INT indicator is highlighted on
the display.
Each time you press INT, “Intro
On”or “Intro Off”alternately
appears.
When Intro Scan is turned on, the INTRO
indicator lights up on the display.
Prohibiting CD ejection
You can prohibit CD ejection and can lock a disc
in the loading slot.
While pressing CD/CD-CH, press and
hold for more than 2 seconds.
“No Eject”flashes on the display for about 5
seconds, and the disc is locked and cannot be
ejected.
To cancel the prohibition and unlock the disc,
press again for more than 2 seconds,
while pressing CD/CD-CH.
“Eject OK”flashes on the display for about 5
seconds, and the disc is unlocked.
INTRO indicator INT indicator is highlighted
when “Intro On”is selected.
EN15-18LH1000[U]f.pm5 3/19/02, 11:3117

18
ENGLISH
Notes:
•When the disc title/performer is shown, the DISC indicator lights up. When the track title is shown, the TR
indicator lights up.
•If the information cannot be shown at a time, it will scroll on the display.
Some characters or symbols will not be shown (will be blanked or substituted) on the display.
•If no name or assigned to the audio CD, “NO NAME”will appear.
To assign a name to a conventional CD, see page 28.
•If no disc title/performer or no track title is recorded for the CD Text, “NO NAME”will appear.
Changing the display pattern
By pressing DISP (D), you can change the
information shown on the display.
Each time you press the button, the
display patterns change as follows:
iEQ mode
(see page 20) Small animation display 2
Small animation display 1
Large animation display
Small animation display 3
Small animation display 4
Clock time display
Clock time
EN15-18LH1000[U]f.pm5 3/19/02, 11:3118

19
ENGLISH
SOUND ADJUSTMENTS
2
Adjust the level.
While adjusting fader and balance
—Fad, Bal:
You can make these two adjustments at the
same time, by referring to the indication on
the display.
•Press 5or ∞to adjust the fader.
•Press ¢or 4to adjust the
balance.
While adjusting subwoofer output
—Sub Out:
You can also set an appropriate cut off
frequency level according to the subwoofer
connected:
•Press ¢or 4to select “Low,”
“Mid,”or “High.”
Low: Frequencies higher than 50 Hz are
cut off to the subwoofer.
Mid: Frequencies higher than 80 Hz are
cut off to the subwoofer.
High: Frequencies higher than 115 Hz are
cut off to the subwoofer.
To increase the level.
To decrease the level.
Adjusting the sound
You can adjust the sound characteristics to your
preference.
1
Select the item you want to adjust.
Each time you press the
button, the adjustable items
change as follows:
Indication To do: Range
Fad*1Adjust the front R06 (Rear only)
and rear speaker |
balance. F06 (Front only)
Bal Adjust the left L06 (Left only)
and right speaker |
balance. R06 (Right only)
S. Bass*2Adjust the bass. 00 (min.)
|
08 (max.)
Sub Out*3Adjust the 00 (min.)
subwoofer output |
level and cut off 12 (max.)
frequency level. Low/Mid/High
Vol Adj*4Adjust and store –12 (min.)
the input level |
of each source. +12 (max.)
*1If you are using a two-speaker system, set the fader
level to “00.”
*2The richness and fullness of the bass sound is
clearly maintained regardless of how low you set
the volume.
*3This takes effect only when a subwoofer is
connected.
*4By adjusting the input level to match it to the FM
sound level, you will not need to adjust the volume
level each time you change the source. This
adjustment is memorized for each source except
FM.
Vol Adj
(Volume Adjustment)
S.Bass
(Super Bass)
Fad
(Fader)
Sub Out
(Subwoofer Output)
Bal
(Balance)
(Canceled)
EN19-22LH1000[U]f.pm5 3/19/02, 11:3119

20
ENGLISH
Selecting preset sound modes
(iEQ: i-equalizer)
You can select a preset sound mode suitable to
the music genre.
•There is a time limit in doing the following
procedure. If the setting is canceled before you
finish, start from step 1 again.
1
Press EQ (equalizer).
The last selected sound mode is
called up.
2
Select the sound mode you want.
As you turn the control
dial, the sound modes
change as follows:
Flat OHard Rock OR&B*OPop O
Jazz ODance Music OCountry O
Reggae OClassic OUser 1 OUser 2 O
User 3 O(back to the beginning)
*Rhythm and Blues
To cancel the sound mode, select “Flat”in step
2.
Note:
For details about the preset settings of each sound
mode, see page 22.
Ex.: If you have selected “Flat”previously
Storing your own sound
adjustments
You can adjust the sound modes to your preference
and store your own adjustments in memory
(User 1, User 2 and User 3).
•There is a time limit in doing the following
procedure. If the setting is canceled before you
finish, start from step 1 again.
1
Press EQ (equalizer).
2
Select the sound mode you want to
adjust.
3
Enter the sound adjustment mode.
The following sound mode
adjustment screen appears
on the display.
Ex.: If you have selected “R & B”
EN19-22LH1000[U]f.pm5 3/19/02, 11:3120
Other manuals for KD-LH1000
3
Table of contents
Other JVC Car Receiver manuals
Popular Car Receiver manuals by other brands

Alpine
Alpine TDA-7572R owner's manual

Aurora Design
Aurora Design AAC/MP3 User's operation manual

Blaupunkt
Blaupunkt Monte Carlo MP28 Operating and installation instructions

Clarion
Clarion VZ509 Owner's manual & installation manual

Kenwood
Kenwood KDC-BT530U instruction manual

Panasonic
Panasonic CQDVR592U - AUTO RADIO/CD/DVD PL operating instructions