JVC KW-V66BT User manual

2
Contents
Before Use 4
Precautions................................................................... 4
How to read this manual ......................................... 5
Basic Operations 6
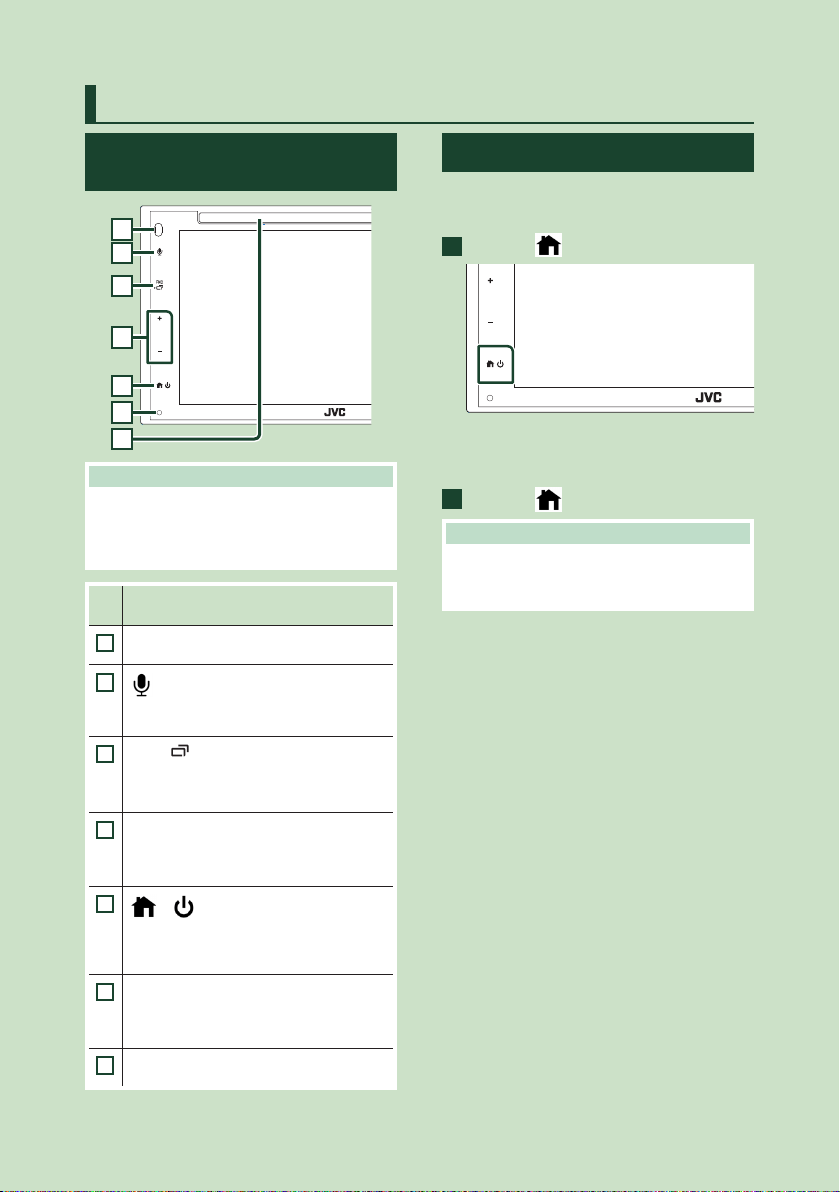
Functions of the Buttons on the Front Panel ... 6
Turning on the Unit ................................................... 6
Getting Started............................................................ 7
Adjusting the volume............................................... 8
Touch screen operations ......................................... 8
HOME screen descriptions...................................... 9
Source selection screen descriptions.................. 9
Source control screen descriptions ...................11
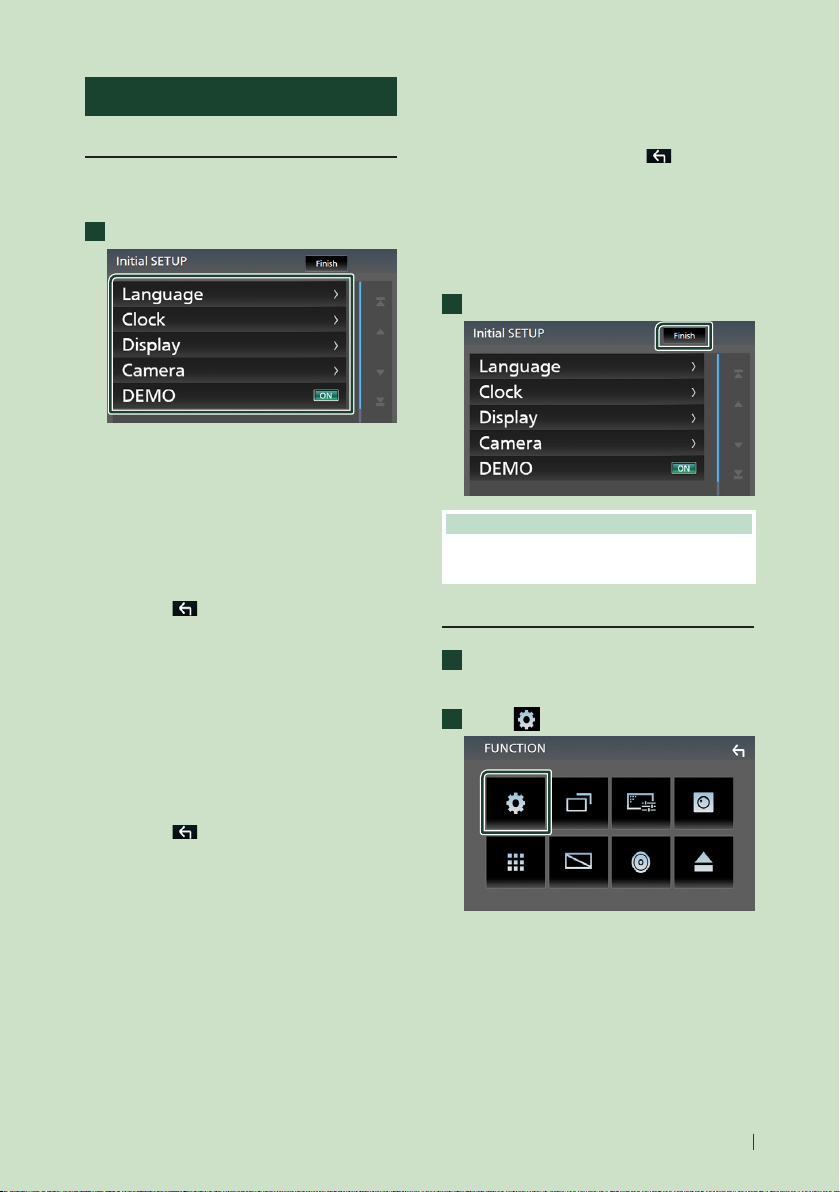
FUNCTION screen.....................................................12
List screen ...................................................................12
Disc 13
Playing a disc .............................................................13
DVD/VCD Basic Operation ....................................13
Search Operation......................................................15
Music CD/Disc media Basic Operation .............15
DVD Disc Menu Operation....................................16
DVD Setup...................................................................17
APPS 19
Apple CarPlay Operation.......................................19
Android Auto Operation........................................20
USB Mirroring Operation.......................................21
USB 22
Connecting a USB device ......................................22
USB Basic Operation................................................22
Search Operation......................................................24
Tuner 25
Tuner Basic Operation ............................................25
Memory Operation ..................................................26
Selecting Operation ................................................26
Traffic Information ...................................................27
Tuner Setup................................................................27
SiriusXM® 28
SiriusXM® Basic Operation ....................................28
Storing Channels in Preset Memory..................29
Preset select ...............................................................29
Direct search ..............................................................30
Category/Channel search......................................30
Replay...........................................................................31
SiriusXM Setup ..........................................................31
Bluetooth Control 34
Information for using Bluetooth® devices.......34
Register from the Bluetooth device...................35
Bluetooth Setup........................................................35
Playing Bluetooth Audio Device.........................36
Using Hands-Free Unit............................................38
Other External Components 42
View Camera ..............................................................42
External audio/video players—AV-IN ...............43
Setting Up 44
Monitor Screen Setup.............................................44
System Setup.............................................................44
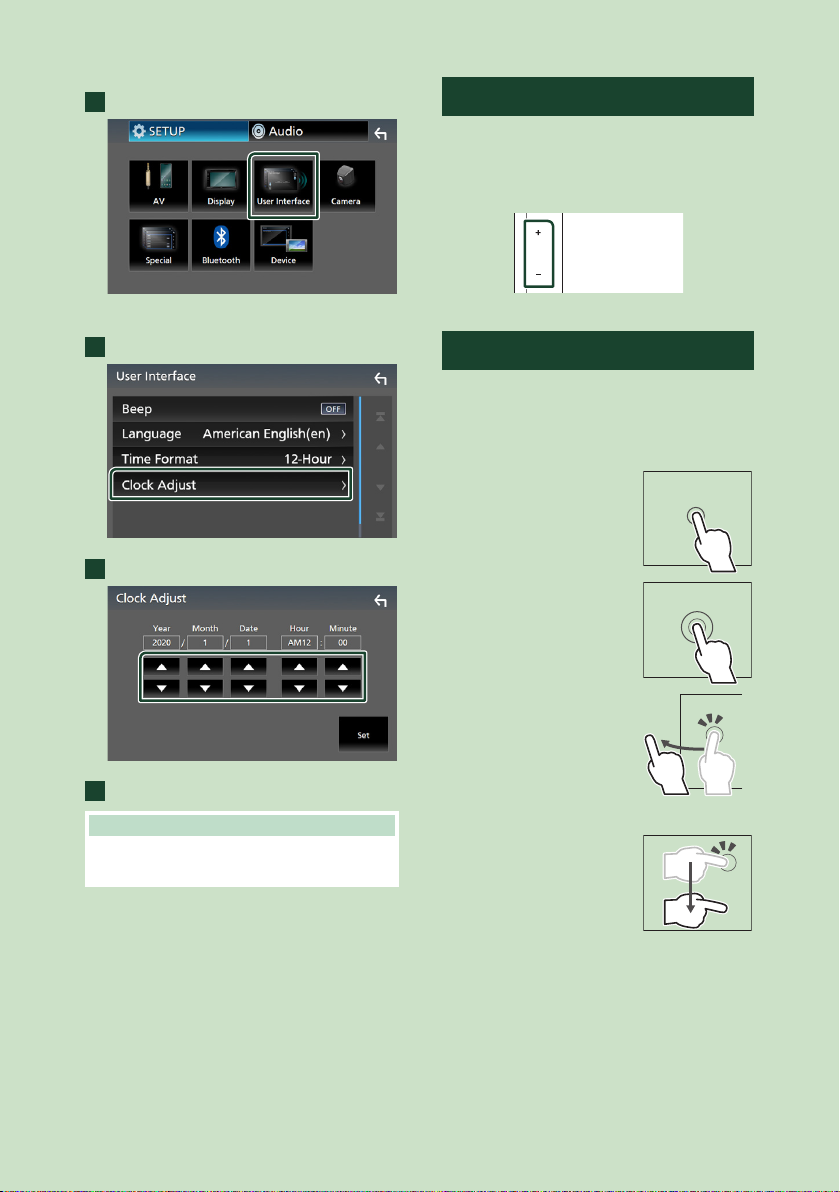
User Interface Setup................................................45
Special Setup .............................................................45
Display Setup.............................................................46
AV Setup ......................................................................47
!B5H-0357-03_JVC_KWV_K_En.indb 2 2020/07/09 8:19

3English
Controlling Audio 48
Speaker/ X’over setup.............................................48
Controlling General Audio....................................49
Equalizer Control......................................................50
Volume Offset............................................................51
Sound Effect...............................................................51
Listening Position/ DTA..........................................52
Remote control 53
Functions of the Remote control Buttons.......53
Connection/Installation 54
Before Installation....................................................54
Installing the unit .....................................................55
Troubleshooting 59
Problems and Solutions.........................................59
Error Messages ..........................................................59
Appendix 61
Playable Media and Files........................................61
Region Codes in the World ...................................63
DVD Language Codes.............................................64
Specifications.............................................................65
About this Unit..........................................................67
!B5H-0357-03_JVC_KWV_K_En.indb 3 2020/07/09 8:19

Before Use
4
Before Use
Precautions
#WARNINGS
Ñ To prevent injury or re, take
the following precautions:
• To prevent a short circuit, never put or leave
any metallic objects (such as coins or metal
tools) inside the unit.
• Do not watch or fix your eyes on the unit’s
display when you are driving for any extended
period.
• If you experience problems during installation,
consult your JVC dealer.
Ñ Precautions on using this unit
• When you purchase optional accessories,
check with your JVC dealer to make sure that
they work with your model and in your area.
• You can select language to display menus,
audio file tags, etc. See User Interface Setup
(P.45).
• The Radio Data System or Radio Broadcast
Data System feature won’t work where the
service is not supported by any broadcasting
station.
Ñ Protecting the monitor
• To protect the monitor from damage, do not
operate the monitor using a ball point pen or
similar tool with the sharp tip.
Ñ Cleaning the unit
• If the faceplate of this unit is stained, wipe it
with a dry soft cloth such as a silicon cloth.
If the faceplate is stained badly, wipe the
stain off with a cloth moistened with neutral
cleaner, then wipe it again with a clean soft
dry cloth.
NOTE
• Applying spray cleaner directly to the unit may
affect its mechanical parts. Wiping the faceplate
with a hard cloth or using a volatile liquid such
as thinner or alcohol may scratch the surface or
erase screened print.
Ñ How To Reset Your Unit
• If the unit or the connected unit fails to
operate properly, reset the unit. Press the
<Reset> button. The unit returns to factory
settings.
Reset button
NOTE
• Disconnect the USB device before pressing the
<Reset> button. Pressing the <Reset> button
with the USB device connected can damage
the data stored in the USB device. For how to
disconnect the USB device, see Disconnect the
USB device (P.22).
• When the unit is turned on after resetting, the
Initial SETUP screen appears. See Initial setup
(P.7).
Ñ Lens fogging
• When you turn on the car heater in cold
weather, dew may form on the lens in the
disc player of the unit due to condensation.
This condensation on the lens (also called
lens fogging) may not allow discs to play. In
such a situation, remove the disc and wait for
the dew to evaporate. If the unit still does not
operate normally after a while, consult your
JVC dealer.
!B5H-0357-03_JVC_KWV_K_En.indb 4 2020/07/09 8:19

Before Use
5English
Ñ Precautions on handling discs
• Do not touch the recording surface of the disc.
• Do not stick tape etc. on the disc, or use a disc
with tape stuck on it.
• Do not use disc type accessories.
• Clean the disc from the center toward the
outside rim.
• When removing a disc from this unit, pull it
out horizontally.
• If the disc center hole or outside rim has burrs,
use the disc only after removing the burrs with
a ballpoint pen etc.
• Discs that are not round cannot be used.
• 8-cm (3 inch) discs cannot be used.
• Discs with coloring on the recording surface
or discs that are dirty cannot be used.
• This unit can only play the following types of
CDs.
• This unit may not correctly play discs which do
not have the mark.
• You cannot play a disc that has not been
finalized. (For the finalization process, see
your writing software and your recorder's
instruction manual.)
Ñ Caution for Smartphone Users
• Simultaneously running multiple applications
on your smartphone while screen sharing
places heavy demand on the microprocessor
of the phone, potentially affecting
communication and performance.
• For best results while pairing with your JVC
receiver, please be sure to close any unused
applications.
How to read this manual
• The screens and panels shown in this
manual are examples used to provide clear
explanations of the operations.
For this reason, they may be different from the
actual screens or panels used, or some display
patterns may be different.
• Indication language: English indications
are used for the purpose of explanation. You
can select the indication language from the
[SETUP]menu. See User Interface Setup
(P.45).
!B5H-0357-03_JVC_KWV_K_En.indb 5 2020/07/09 8:19

Basic Operations
6
Basic Operations
Functions of the Buttons on
the Front Panel
1
2
3
4
5
6
7
NOTE
• The panels shown in this guide are examples
used to provide clear explanations of the
operations. For this reason, they may be different
from the actual panels.
Name
• Motion
1
Remote Sensor
• Receives the remote control signal.
2
[ ]
• Displays the Voice Recognition screen
(P.39).
3
[FNC]/ [ ]
• Displays the FUNCTION screen.
• Pressing for 1 second displays the APP
(Apple CarPlay/ Android Auto) screen.
4
[+], [−](Volume)
• Adjusts volume.
The volume will go up until 15 when you
keep pressing +.
5
[ ] / [ ]
• Displays the HOME screen (P.9).
• Pressing for 1 second turns the power off.
• When the power off, turns the power on.
6
Reset
• If the unit or the connected unit fails to
operate properly, the unit returns to initial
settings when this button is pressed.
7
Disc insert slot
• A slot to insert a disc media. (P.13)
Turning on the Unit
The method of turning on is different
depending on the model.
1
Press the [ ] button.
The unit is turned on.
●To turn off the unit:
1
Press the [ ] button for 1 second.
NOTE
• If it is your first time turning the unit on after
installation, it will be necessary to perform Initial
setup (P.7).
!B5H-0357-03_JVC_KWV_K_En.indb 6 2020/07/09 8:19

Basic Operations
7English
Getting Started
Initial setup
Perform this setup when you use this unit first
time.
1
Set each item as follows.
■[Language]
Select the language used for the control
screen and setting items. Default is
“[American English(en)]”.
1Touch [Language].
2Touch [Language Select].
3Select the desired language.
4Touch [
].
■[Clock]
Adjusts clock.
For detailed operation, see Calendar/clock
settings (P.7).
■[Display]
Set the image on the screen.
1Touch [Display].
2Touch [Background].
3Select the image.
4Touch [
].
For detailed operation, see Display Setup
(P.46).
■[Camera]
Set the parameters for the camera.
1Touch [Camera].
2Set each item and touch [
].
For detailed operation, see Camera Setup
(P.42).
■[DEMO]
Set the demonstration mode. Default is “ON”.
1Touch [DEMO]and set [ON]or [OFF].
2
Touch [Finish].
NOTE
• These settings can be set from the SETUP menu.
See Setting Up (P.44).
Calendar/clock settings
1
Press the [FNC]button.
FUNCTION screen appears.
2
Touch [ ].
SETUP Menu screen appears.
!B5H-0357-03_JVC_KWV_K_En.indb 7 2020/07/09 8:19

Basic Operations
8
3
Touch [User Interface].
User Interface screen appears.
4
Touch [Clock Adjust].
5
Adjust the date, then adjust the time.
6
Touch [Set].
NOTE
• Deactivate [RDS CT]before adjusting the clock.
See Tuner Setup (P.27).
Adjusting the volume
To adjust the volume (0 to 40),
Press [+]to increase, and press [−]to decrease.
Holding [+]increases the volume continuously
to level 15.
Touch screen operations
To perform operations on the screen, you need
to touch, touch and hold, flick or swipe to select
an item, display setting menu screen or to
change the page, etc.
●Touch
Touch the screen gently to
select an item on the screen.
●Touch and hold
Touch the screen and keep
your finger in place until the
display changes or a message
is displayed.
●Flick
Slide your finger quickly to
the left or right on the screen
to change the page.
You can scroll the list screen
by flicking the screen up/
down.
●Swipe
Slide your finger up or down
on the screen to scroll the
screen.
!B5H-0357-03_JVC_KWV_K_En.indb 8 2020/07/09 8:19

Basic Operations
9English
Gesture Touch Control:
You can also control playback by moving your
finger on the touch panel as follows (for some
sources, the gesture control is not available).
• Sliding the finger towards up/down:
- Functions same as pressing [
]/ [ ]
(Media) in the USB Control screen.
- For the Tuner, tuner preset broadcast stations
are switched.
• Sliding the finger towards left/right: Functions
same as pressing [E]/ [F].
• Moving your finger clockwise or counter-
clockwise: increases/decreases the volume.
HOME screen descriptions
Most functions can be performed from the
HOME screen.
41 5 6
1 2 3 1
1
• Short-cut playback source icons. (P.10)
2
• Current source information.
• Touch to display the control screen of current
source.
3
• Widget
4
• Displays the source selection screen. (P.10)
5
• Displays the SETUP Menu screen. (P.44)
6
• Displays the Hands Free screen. (P.38)
• When connecting as Apple CarPlay or
Android Auto, it works as a phone provided
in Apple CarPlay or Android Auto.
Display the HOME screen
1
Press the [ ] button.
HOME screen appears.
Source selection screen
descriptions
You can display all playback sources and options
on the source selection screen.
2 3
1
1
• Changes the playback source.
For playback sources, see Select the
playback source (P.10).
2
• Returns to previous screen.
3
• Displays the SETUP Menu screen. (P.44)
!B5H-0357-03_JVC_KWV_K_En.indb 9 2020/07/09 8:19

Basic Operations
10
Select the playback source
1
Touch [ ] on the HOME screen.
From the screen, you can select the
following sources and functions.
• Switches to the Apple CarPlay screen from
the connected iPhone. (P.19)
• Switches to the Android Auto screen from
the connected Android smartphone.
(P.20)
It is necessary to connect Android
smartphone compatible with
Android Auto and to set [Mode]to
[Android Auto]. (P.21)
• Switches to the USB Mirroring screen
from the connected Android smartphone.
(P.21)
It is necessary to connect Android
smartphone with “Mirroring OA for JVC”
application installed and to set [Mode]to
[Mirroring for Android™]. (P.21)
• Displays the Hands Free screen. (P.38)
When neither Apple CarPlay, Android
Auto, nor a Bluetooth Hands-Free phone
is connected, displays "[Disconnected]"
message in the TEL screen.
When connecting as Apple CarPlay
or Android Auto, it works as a phone
provided in Apple CarPlay or Android
Auto.
• Switches to the Radio broadcast. (P.25)
• Plays a Bluetooth audio player. (P.34)
• Plays a disc. (P.13)
• Plays files on a USB device. (P.22)
• Switches to an external component
connected to the AV-IN input terminal.
(P.43)
• Switches to the SiriusXM® satellite radio
broadcast. (P.28)
• Turns off the AV source. (P.10)
To select the playback source on the
HOME screen
The 3 items displayed on the source selection
screen as the large icons are shown on the
HOME screen.
You can change items displayed on this area
by customizing the source selection screen.
(P.11)
To turn o the AV source
1
Touch [ ] on the HOME screen.
2
Touch [AV Off].
!B5H-0357-03_JVC_KWV_K_En.indb 10 2020/07/09 8:19

Basic Operations
11English
Customize Short-cut buttons on
HOME screen
You can arrange the position of the source icons
as you like.
1
Touch [ ] on the HOME screen.
2
Touch and hold the icon which you want
to move to go into the customizing
mode.
3
Drag it where you want to move.
Source control screen
descriptions
There are some functions which can be
operated from most screens.
Indicators
1
234
Sub menu
1
[ ]/[ ]
Connected Bluetooth device information.
2
All sources icon
Displays all sources.
3
Secondary screen
• [
]/[ ] : The Secondary screen changes every
time you touch it. You can also change the
Secondary screen by flicking left or right on
the screen.
• Indicators: Displays the current source
condition and so on.
– [MUTE]: The mute function is active.
– [LOUD]: The loudness control function is on.
• Sub menu
– [ ] : Operation when the icon is touched:
The first touch darkens the screen, the second
touch darkens the screen further, and the third
touch restores the screen to its original brightness.
– [
]: Displays the Graphic Equalizer screen.
(P.50)
– [
]: Displays the APP (Apple CarPlay/ Android
Auto) screen (P.19).
4
[Û]
Touch to display the Hands Free screen.
(P.38)
When connecting as Apple CarPlay or Android
Auto, it works as a phone provided in Apple
CarPlay or Android Auto.
!B5H-0357-03_JVC_KWV_K_En.indb 11 2020/07/09 8:19

Basic Operations
12
FUNCTION screen
1
Press the [FNC]button.
FUNCTION screen appears.
2
Touch to display the FUNCTION screen.
The contents of the menu are as follows.
• Displays the SETUP Menu screen. (P.44)
• Displays the APP (Apple CarPlay/ Android
Auto) screen. (P.19)
• Displays the Screen Adjust screen.
(P.44)
• Displays the view camera. (P.42)
• Displays the source selection screen.
(P.10)
• Turns the display off. (P.12)
• Displays the Audio screen. (P.48)
• Touch to eject the disc. (P.13)
• Touch for 2 seconds to forcibly eject
the disc and then touch [Ye s ]after the
message is displayed.
• Close the FUNCTION screen.
Turn o the screen
1
Select [ ] on the FUNCTION screen.
●To turn on the screen
1
Touch the display.
List screen
There are some common function keys in the
list screens of most sources.
61 2
3 4 5
1
Displays list type selection window.
2
Displays music/movie file list.
3
Text scroll
Scrolls the displayed text.
4
etc.
Keys with various functions are displayed here.
• [
]: Plays all tracks in the folder containing
the current track.
• [
][ ] : Moves to the upper hierarchy.
5
[ ] / [ ] / [ ] / [ ] Page scroll
You can change the page to display more items
by pressing [
]/[ ].
• [
]/[ ] : Displays the top or bottom page.
6
Return
Returns to previous screen.
NOTE
• Buttons which cannot be activated from the list
screen are not displayed.
!B5H-0357-03_JVC_KWV_K_En.indb 12 2020/07/09 8:19

Disc
13English
Disc
Playing a disc
Ñ Insert a disc
1 Insert the disc into the slot.
The unit loads the disc and playback
starts.
Ñ Eject a disc
1 Press the [FNC]button.
FUNCTION screen appears.
2 Touch [ ].
When removing a disc, pull it horizontally.
NOTE
• To forcibly eject the disc, touch and hold [G]for 2
seconds and then touch [Yes]after the message
is displayed.
DVD/VCD Basic Operation
Most functions can be controlled from the
source control screen and playback screen.
NOTE
• The screen shot below is for DVD. It may be
different from the one for VCD.
1 When the operation buttons are not
displayed on the screen, touch
7
area.
Control screen
4 5
31 2
Video screen
6
7 8
1
Function panel
Touch the left side of the screen to display the
function panel. Touch again to close the panel.
For details on the keys, see Function panel
(P.15).
!B5H-0357-03_JVC_KWV_K_En.indb 13 2020/07/09 8:19

Disc
14
2
Play mode indicator/Playing time
• D, B, I, etc.: Current play mode indicator
Meanings of the icons are as follows: D(play),
B(fast forward), A(fast backward),
I(stop), R(resume stop), H(pause), (slow
playback), (slow reverse playback).
3
Information display area
Displays the following information.
• [Hide]: Hides the control screen.
• [
]: Repeats the current content. Each time
you touch the key, repeat modes are switched
in the following sequence;
[DVD]: Title repeat ([
]), Chapter repeat
([
]), Repeat off ([ ])
[VCD](PBC On): Does not repeat
[VCD](PBC Off): Track repeat ([
]), Repeat off
([
])
• [Title #], [Chapter #]: DVD title and chapter
number
• [Track #]/[Scene #]:VCD track or scene
number. Scene # is displayed only when
Playback control (PBC) is on.
• [Linear PCM], etc.: Audio format
• [OFF/Zoom2 – 4](DVD)/[Zoom2](VCD):
Displays the zoom ratio.
This function can be used from the remote
control. (P.53)
4
Operation keys
• [E][F]: Searches for the previous/next
content.
Touch and hold to fast-forward or fast-
backward the disc.
• [D/H]: Plays or pauses.
• [
]: Touch to mute or not to mute.
5
Indicator Items
• [IN]: Disc insertion status.
White: A Disc is inside the unit.
Orange: Disc player failure.
VCD
• [1chLL/2chLL]: Identifies the left audio output
of channel 1 or 2.
• [1chLR/2chLR]: Identifies the monaural audio
output of channel 1 or 2.
• [1chRR/2chRR]: Identifies the right audio
output of channel 1 or 2.
• [1chST/2chST]: Identifies the stereo audio
output of channel 1 or 2.
• [LL]: Identifies the left audio output.
• [LR]: Identifies the monaural audio output.
• [RR]: Identifies the right audio output.
• [ST]: Identifies the stereo audio output.
• [PBC]: The PBC function is on.
• [VER1]: The VCD version is 1.
• [VER2]: The VCD version is 2.
6
Searching area
Touch to search for the next/previous content.
7
Key display area
Touch to display the control screen.
8
[MENU CTRL](DVD only)
Touch to display the DVD-VIDEO disc menu
control screen. See DVD Disc Menu Operation
(P.16).
NOTE
• The control screen disappears when no
operation is done for 5 seconds.
!B5H-0357-03_JVC_KWV_K_En.indb 14 2020/07/09 8:19

Disc
15English
Ñ Function panel
1 Touch on the left side of the screen.
DVD VCD
The functions of each key are as follows.
[
][ ] : Fast-forwards or fast-backward
the disc. Each time you touch the key, the
speed changes.
[
][ ] (DVD only): Plays in slow motion
forward or backward.
[I]: Stops playback. Touching twice will play
the disc from the beginning when you
play it next time.
[SETUP](DVD only): Touch to display the
DVD SETUP screen.
[MENU CTRL](DVD only): Touch to display
the DVD-VIDEO disc menu control screen.
See DVD Disc Menu Operation (P.16).
[PBC](VCD only): Touch to turn Playback
control (PBC) on or off.
[Audio](VCD only): Touch to change audio
output channels.
Music CD/Disc media Basic
Operation
Most functions can be controlled from the
source control screen and playback screen.
NOTE
• In this manual, “Music CD” means a general CD
which includes music tracks.
“Disc media” means a CD/DVD disc which
includes audio or video files.
• The screen shot below is for disc media. It may
be different from the one for CD.
Control screen
4 5
21 3
Open the drawer
5
6
1
Play mode indicator/Playing time
• [D[, [B], etc.: Current play mode indicator
Meanings of the icons are as follows:
[D](play), [B](fast forward), [A](fast
backward), [H](pause).
!B5H-0357-03_JVC_KWV_K_En.indb 15 2020/07/09 8:19

Disc
16
2
[ ]/[ ]
• [
]: Repeats the current track. Each time
you touch the key, repeat mode switches in
the following sequence;
Track/File repeat ([
]), Repeat all ([ ])
• [
]: Randomly plays all tracks in current disc.
Each time you touch the key, random mode
switches in the following sequence;
Track random ([
]) (Music CD only), Random
off ([
])
3
Track information
• Displays the information of the current track/
file.
4
Operation keys
• [E][F]: Searches for the previous/next
content.
Touch and hold to fast-forward or fast-
backward the disc.
• [DH]: Plays or pauses.
• [
]: Touch to mute or not to mute.
5
Content list
Touch the right side of the screen to display the
Content list. Touch again to close the list.
Displays the playing list. When you touch a
track/song title on the list, playback will start.
6
Indicator Items
• [IN]: Disc insertion status.
White: A Disc is inside the unit.
Orange: Disc player failure.
Video screen
8
77
7
File search area (Video file only)
Touch to search for the next/previous file.
8Key display area (Video file only)
Touch to display the control screen.
DVD Disc Menu Operation
You can set up some functions using the DVD-
VIDEO disc menu.
1 Touch the framed area during playback.
Menu Control screen appears.
2 Perform your desired operation as
follows.
■To display the top menu
Touch [TopMenu].*
■To display the menu
Touch [Menu].*
■To display the previous menu
Touch [Return].*
■To enter selected item
Touch [Enter].
■To enable direct operation
Touch [Highlight]to enter the highlight
control mode (P.17).
■To move the cursor
Touch [R], [S], [C], [D].
■To switch among subtitle languages
Touch [Subtitle]. Each time you touch this
key, subtitle languages are switched.
■To switch among audio languages
Touch [Audio]. Each time you touch this key,
audio languages are switched.
!B5H-0357-03_JVC_KWV_K_En.indb 16 2020/07/09 8:19

Disc
17English
■To switch among picture angles
Touch [Angle]. Each time you touch this key,
picture angles are switched.
* These keys may not function depending on
the disc.
Ñ Highlight control
Highlight control lets you control the DVD
menu by touching the menu key directly on the
screen.
1 Touch [Highlight]on the Menu Control
screen.
2 Touch your desired item on the screen.
NOTE
• The highlight control function is cancelled
automatically if you do not operate for a
predetermined period of time.
DVD Setup
You can set up the DVD playback functions.
1 Touch the framed area during playback.
2 Touch []on the left side of the screen.
Touch [SETUP].
DVD SETUP screen appears.
3 Set each function as follows.
■[Menu Language]/[Subtitle Language]/
[Audio Language]
See Language setup (P.18).
■[Dynamic Range Control]
Sets the dynamic range.
[Wide]: The dynamic range is wide.
[Normal]: The dynamic range is normal.
[Dialog](Default): Makes the total sound
volume larger than the volumes in other
modes. This is effective only when the
Dolby Digital software is in use.
!B5H-0357-03_JVC_KWV_K_En.indb 17 2020/07/09 8:19

Disc
18
■[Screen Ratio]
Sets the screen display mode.
[16:9 ](Default): Displays wide pictures.
[4:3LB]: Displays wide pictures in the Letter
Box format (having black stripes at the top
and bottom of screen).
[4:3PS]: Displays wide pictures in the Pan &
Scan format (showing pictures cut at the
right and left ends).
Ñ Language setup
This setting is for the languages used for the
menu, subtitle, and voice.
1 Touch the desired item;
[Menu Language], [Subtitle Language],
[Audio Language].
Language Set screen appears.
2 Select a language.
For language codes, refer to DVD
Language Codes (P.64).
Touch Close to set the entered language
and return to the DVD SETUP screen.
NOTE
• To set the DVD’s original language as the audio
language, touch [Original].
!B5H-0357-03_JVC_KWV_K_En.indb 18 2020/07/09 8:19

APPS
19English
APPS
Apple CarPlay Operation
Apple CarPlay is a smarter, safer way to use your
iPhone in the car. Apple CarPlay takes the things
you want to do with iPhone while driving and
displays them on the screen of the product. You
can get directions, make calls, send and receive
messages, and listen to the music from iPhone
while driving. You can also use Siri voice control
to make it easier to operate iPhone.
For details about Apple CarPlay, visit
https://www.apple.com/ios/carplay/.
Compatible iPhone devices
You can use Apple CarPlay with the following
iPhone models.
• iPhone 11 Pro Max
• iPhone 11 Pro
• iPhone 11
• iPhone XR
• iPhone XSMax
• iPhone XS
• iPhone X
• iPhone 8 Plus
• iPhone 8
• iPhone 7 Plus
• iPhone 7
• iPhone SE
• iPhone 6s Plus
• iPhone 6s
• iPhone 6 Plus
• iPhone 6
• iPhone 5s
• iPhone 5c
• iPhone 5
Ñ Preparation
1 Connect iPhone using KS-U62 via USB
terminal. (P.58)
When iPhone compatible with Apple
CarPlay is connected to the USB terminal,
the Bluetooth smartphone currently
connected is disconnected.
2 Unlock your iPhone.
Ñ Operation buttons and
available Apps on the home
screen of Apple CarPlay
You can use the Apps of the connected iPhone.
The items displayed and the language used on
the screen differ among the connected devices.
To enter Apple CarPlay mode, touch
[Apple CarPlay]icon in the source selection
screen. (P.10)
3
1
2
1
[ ]
• Displays the home screen of Apple CarPlay.
• Touch and hold to activates Siri.
2
Application buttons
Starts the application.
3
[HOME]
Exits the Apple CarPlay screen and displays the
Home screen.
To exit the Apple CarPlay screen
1 Press the [ ] button.
Ñ Use Siri
You can activate Siri.
1 Press the [ ] button.
2 Talk to Siri.
Ñ Switch to the Apple CarPlay
screen while listening to
another source
1 Press the [FNC]/ [ ] button for 1 second.
Press for 1 second
NOTE
• If sound is output using Apple CarPlay when the
Apple CarPlay screen is displayed, the source is
switched to Apple CarPlay.
!B5H-0357-03_JVC_KWV_K_En.indb 19 2020/07/09 8:19

APPS
20
Android Auto™ Operation
Android Auto enables you to use functions
of your Android smartphone convenient
for driving. You can easily access route
guidance, make calls, listen to music, and
access convenient functions on the Android
smartphone while driving.
For details about Android Auto, visit
https://www.android.com/auto/ and
https://support.google.com/androidauto.
Compatible Android smartphone
You can use Android Auto with Android
smartphone of Android version 5.0 or later.
NOTE
• Android Auto may not be available on all devices
and is not available in all countries or regions.
Ñ Preparation
1 Connect an Android smartphone via USB
terminal. (P.58)
To use the hands-free function, connect the
Android smartphone via Bluetooth.
When an Android smartphone compatible
with Android Auto is connected to the
USB terminal, the device is connected via
Bluetooth automatically, and the Bluetooth
smartphone currently connected is
disconnected.
2 Unlock your Android smartphone.
NOTE
• To use the Android Auto, It is necessary to set
[Mode]to [Android Auto]. (P.21)
Ñ Operation buttons and
available Apps on the Android
Auto screen
You can perform the operations of the Apps of
the connected Android smartphone.
The items displayed on the screen differ among
the connected Android smartphone.
To enter Android Auto mode, touch
[Android Auto]icon in the source selection
screen. (P.10)
1
1
Application/information buttons
Starts the application or displays information.
To exit the Android Auto screen
1 Press the [ ] button.
Ñ Using voice control
1 Press the [ ] button.
To cancel
1 Press the [ ] button.
Ñ Switch to the Android Auto
screen while listening to
another source
1 Press the [FNC]/ [ ] button for 1 second.
Press for 1 second
NOTE
• If sound is output using Android Auto when the
Android Auto screen is displayed, the source is
switched to Android Auto.
!B5H-0357-03_JVC_KWV_K_En.indb 20 2020/07/09 8:19
This manual suits for next models
1
Table of contents
Other JVC Car Receiver manuals