JVC DIAMOND DM65USR User manual

USER MANUAL
DIAMOND SERIES LED UHDTV
DM65USR 65” Class
DM85UXR 85” Class
Before operating your LED TV, please read this manual thoroughly.
(*Images shown in this user manual are for illustration purpose only.)


Congratulations on purchasing your new JVC LED TV. To get the most out of your JVC LED TV, read
these instructions before making any adjustments, and retain them for future reference.
For assistance, call the JVC Customer Support and Service Center 1-855-868-1928 or visit our website:
http://jvc-tv.com/support
We recommend that you register your JVC LED TV either at our website: http://jvc-tv.com/support or
ll out and mail the Product Registration Card on the back of the manual.
Retain your purchase receipt and write down the model and serial number located at the back of your
LED TV for easy reference when obtaining service support.
Serial Number:
Model Number:
THE TRADEMARKS SHOWN HEREIN ARE THE PROPERTY OF THEIR RESPECTIVE OWNERS;
IMAGES USED ARE FOR ILLUSTRATION PURPOSES ONLY. JVC, THE JVC LOGO, AND OTHER
JVC TRADEMARKS ARE THE INTELLECTUAL PROPERTY OF JVC KENWOOD Corporation.
PRODUCT SPECIFICATIONS ARE SUBJECT TO CHANGE WITHOUT NOTICE.
Copyrights © 2014 AmTRAN Video Corporation. ALL RIGHTS RESERVED.
Manufactured under license from Dolby Laboratories.
Dolby and the double-D symbol are trademarks of Dolby
Laboratories.
MHL, Mobile High-Denition Link and the MHL Logo are
trademarks or registered trademarks of the MHL, LLC.
The terms HDMI and HDMI High-Denition Multimedia Interface,
and the HDMI Logo are trademarks or
registered trademarks of HDMI Licensing LLC in the
United States and other countries.

WARNING: TO PREVENT FIRE OR SHOCK HAZARD, DO NOT EXPOSE THIS APPLIANCE TO
RAIN OR MOISTURE. TO PREVENT THE SPREAD OF FIRE, KEEP CANDLES OR OPEN FLAMES AWAY
FROM THIS PRODUCT AT TIMES.
CAUTION: TO PREVENT ELECTRIC SHOCK. DO NOT USE THIS POLARIZED PLUG WITH AN
EXTENSION CORD, RECEPTACLE OR OTHER OUTLET UNLESS THE BLADES CAN BE FULLY
INSERTED TO PREVENT BLADE EXPOSURE.
CAUTION: To Reduce The Risk Of Electric Shock, Do Not Remove Cover (Or Back). No User-Serviceable Parts
Inside. Refer Servicing To Qualied Service Personnel.
CAUTION
RISK OF ELECTRIC SHOCK
DO NOT OPEN
The lightning ash with arrowhead symbol,
within an equilateral triangle is intended to
alert the user to the presence of uninsulated
dangerous voltage within the product’s
enclosure that may be of sucient magnitude
to constitute a risk of electric shock.
The exclamation point within an equilateral
triangle is intended to alert the user to
the presence of important operating and
maintenance (servicing) instructions in the
literature accompanying the appliance.
WARNING: This device complies with Part 15 of the FCC Rules. Operation is
subject to the following two conditions: (1) this device may not cause
harmful interference, and (2) this device must accept any interference
received, including interference that may cause undesired operation.
Note: This equipment has been tested and found to comply with the
limits for a Class B digital device, pursuant to Part 15 of the FCC Rules.
These limits are designed to provide reasonable protection against
harmful interference in a residential installation. This equipment
generates, uses, and can radiate radio frequency energy and, if not
installed and used in accordance with the instructions, may cause
harmful interference to radio communications. However, there is no
guarantee that interference will not occur in a particular installation. If
this equipment does cause harmful interference to radio or television
reception, which can be determined by turning the equipment o
and on, the user is encouraged to try to correct the interference by
one of the following measures: - Reorient or relocate the receiving
antenna. - Increase the separation between the equipment and
receiver. - Connect the equipment into an outlet on a circuit dierent
from that to which the receiver is connected. - Consult the dealer or
an experienced radio/TV technician for help. FCC Caution: To assure
continued compliance, (example – use only shielded interface cables
when connecting to computer or peripheral devices). Any changes
or modications not expressly approved by the party responsible for
compliance could void the user’s authority to operate this equipment.
Responsible Party: AmTRAN Video Corporation
Address: 9 Goddard, Irvine, CA 92618 USA
Telephone No: 1-855-868-1926
CAUTION: Changes or modications not expressly approved by the party
responsible for compliance with the FCC Rules could void the user’s
authority to operate this equipment.

Important Safety Instructions
1) Read these instructions.
2) Keep these instructions.
3) Heed all warnings.
4) Follow all instructions.
5) Do not use this apparatus near water.
6) Clean only with dry cloth.
7) Do not block any ventilation openings. Install in accordance with manufacturer’s
instructions.
8) Do not install near any heat sources such as radiators, heat registers, stoves, or
other apparatus (including ampliers) that produce heat.
9) Do not defeat the safety purpose of the polarized or grounding-type plug. A
polarized plug has two blades with one wider than the other. A grounding-type
plug has two blades and a third grounding prong. The wide blade or the third
prong are provided for your safety. If the provided plug does not t into your
outlet, consult an electrician for replacement of the obsolete outlet.
10) Protect the power cord from being walked on or pinched, particularly at plugs,
convenience receptacles, and the point where they exit from the apparatus.
11) Only use attachments/accessories specied by the manufacturer.
12) Use only with the cart, stand, tripod, bracket, or table specied by the
manufacturer, or sold with the apparatus. When a cart is used, use caution when
moving the cart/apparatus combination to avoid injury from tip-over.
13) Unplug this apparatus during lightning storms or when unused for long periods of
time.
14) Refer all servicing to qualied service personnel. Servicing is required when the
apparatus has been damaged in any way, such as power-supply cord or plug is
damaged, liquid has been spilled or objects have fallen into the apparatus, the
apparatus has been exposed to rain or moisture, does not operate normally, or has
been dropped.
15) Apparatus should not be exposed to dripping or splashing, and objects lled with
liquids, such as vases, should not be placed on the apparatus.
16) An outside antenna system should not be located in the vicinity of overhead power
lines or other electric light or power circuits, or where it can fall into such power
lines or circuits. When installing an outside antenna system, extreme care should
be taken to keep from touching such power lines or circuits, as contact with them
might be fatal.
17) Do not overload wall outlets and extension cords, as this can result in a risk of re
or electric shock.
18) Do not push objects through any openings in this unit, as they may touch
dangerous voltage points or short out parts that could result in re or electric
shock. Never spill or spray any type of liquid into the unit.

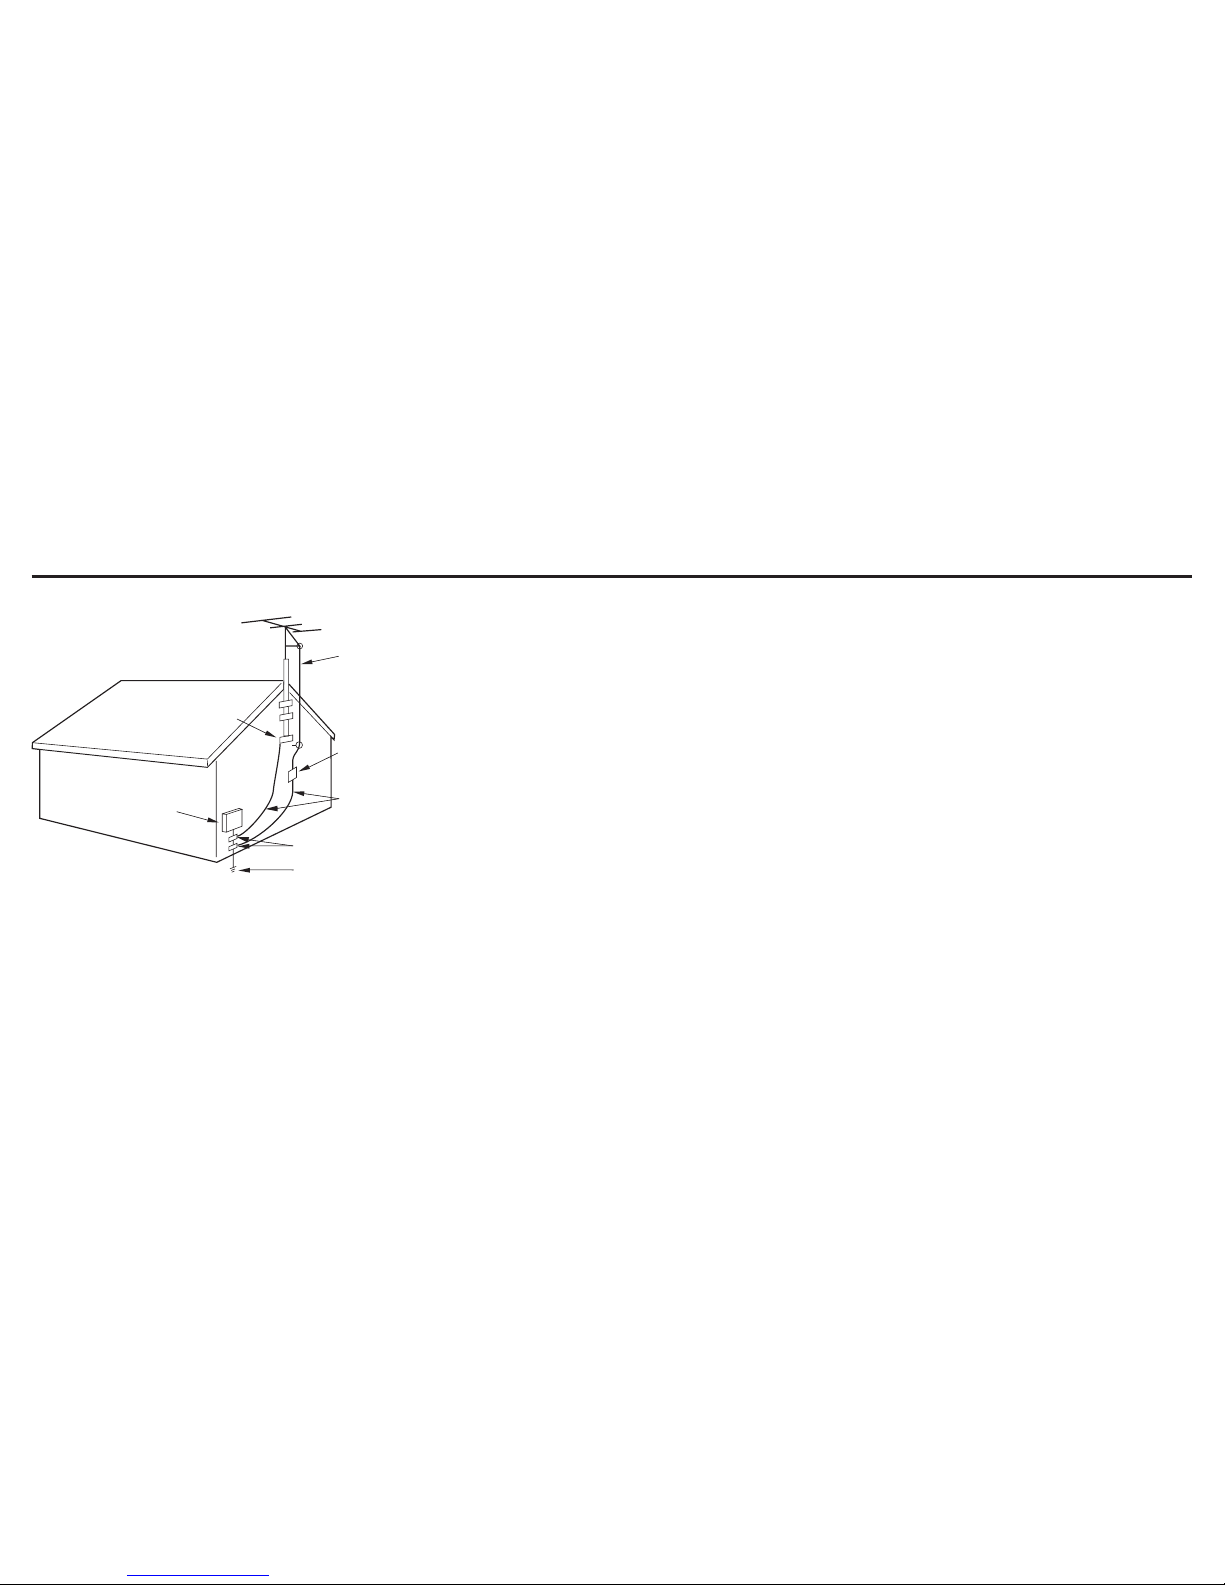
19) If an outside antenna or cable system is connected to the unit, be sure the antenna
or cable system is grounded to provide some protection against voltage surges
and built-up static charges, Section 810 of the National Electrical Code, ANSI/
NFPA 70, provides information with respect to proper grounding of the mast and
supporting structure, grounding of the lead-in wire to an antenna discharge unit,
size of grounding conductors, location of antenna discharge unit, connection to
grounding electrodes, and requirements for the grounding electrode.
20) When replacement parts are required, be sure the service technician uses
replacement parts specied by the manufacturer or those that have the same
characteristics as the original part. Unauthorized substitutions may result in re,
electric shock or other hazards.
21) Upon completion of any service or repairs to this unit, ask the service technician to
perform safety checks to determine that the unit is in proper operating condition.
22) When you connect the product to other equipment, turn o the power and
unplug all of the equipment from the wall outlet. Failure to do so may cause an
electric shock and serious personal injury. Read the owner’s manual of the other
equipment carefully and follow the instructions when making any connections.
23) Sudden high volume sound may cause hearing or speaker damage. When you use
headphones, (if the unit is equipped with a headphone jack) keep the volume at
a moderate level. If you use headphones continuously with high volume sound, it
may cause hearing damage.
24) Do not allow the product to output distorted sound for an extended period of
time. It may cause speaker overheating and re.
25) This reminder is provided to call the cable TV system installer’s attention to Article
820-40 of the NEC that provides guidelines for proper grounding and, in particular,
species that the cable ground shall be connected to the grounding system of the
building, as close to the point of cable entry as practical.
26) The socket-outlet must be installed near the unit and easily accessible.
CHILD SAFETY:
It Makes A Difference How and Where You Use TV
Congratulations on your purchase! As you enjoy your new product, please keep these safety tips in mind:
THE ISSUE
The home theater entertainment experience is a growing trend and larger TVs are popular purchases. However, TVs are
not always supported on the proper stands or installed according to the manufacturer’s recommendations.
TVs that are inappropriately situated on dressers, bookcases, shelves, desks, speakers, chests or carts may fall over and
cause injury.
THIS MANUFACTURER CARES!
The consumer electronics industry is committed to making home entertainment enjoyable and safe.
TUNE INTO SAFETY
One size does NOT t all. Follow the manufacturer’s recommendations for the safe installation and use of your TV.
Carefully read and understand all enclosed instructions for proper use of this product.
Don’t allow children to climb on or play with furniture and television sets.
Don’t place TVs on furniture that can easily be used as steps, such as a chest of drawers.
Remember that children can become excited while watching a program, especially on a “larger than life”TV. Care
should be taken to place or install the display where it cannot be pushed, pulled over, or knocked down.
Care should be taken to route all cords and cables connected to the TV so that they cannot be pulled or grabbed by
curious children.
Important Safety Instructions

CONDENSATION
Moisture will form in the operating section of the unit if the unit is brought from cool
surroundings into a warm room or if the temperature of the room rises suddenly. When
this happens, unit’s performance will be impaired. To prevent this, let the unit stand in
its new surroundings for about an hour before switching it on, or make sure that the
room temperature rises gradually. Condensation may also form during the summer
if the unit is exposed to the breeze from an air conditioner. In such cases, change the
location of the unit.
HOW TO HANDLE THE LED PANEL
•Do not press hard or jolt the LED panel. It may cause the LED panel glass to break
and injury may occur.
•If the LED panel is broken, make absolutely sure that you do not touch the liquid in
the panel. This may cause skin inammation.
•If the liquid gets in your mouth, immediately gargle and consult with your doctor.
Also if the liquid gets in your eyes or touches your skin, consult with your doctor
after rinsing for at least 15 minutes or longer with clean water.
Possible Adverse Effects on LED Panel:
If a xed (non-moving) pattern remains on the LED Panel for long periods of time,
the image can become permanently ingrained in the LED Panel and cause subtle but
permanent ghost images. This type of damage is NOT COVERED BY YOUR WARRANTY.
Never leave your TV on for long periods of time while it is displaying the following
formats or images:
•Fixed Images, such as stock tickers, video game patterns, TV station logos, and
website.
•Special Formats that do not use the entire screen. For example, viewing letterbox
style (16:9) media on a normal (4:3) display (black bars at top and bottom of screen);
or viewing normal style (4:3) media on a widescreen (16:9) display (black bars on left
and right sides of screen).
The following symptoms are not signs of malfunction but
technical limitation.
•LED Panels are manufactured using an extremely high level of precision technology,
however sometimes parts of the screen may be missing picture elements or have
luminous spots. This is not a sign of a malfunction.
•Do not install the TV near electronic equipment that produces electromagnetic
waves. Some equipment placed too near this unit may cause interference.
•Eect on infrared devices – There may be interference while using infrared devices
such as infrared cordless headphones.
Important Safety Instructions

ANTENNA LEAD IN WIRE
ANTENNA DISCHARGE UNIT
(NEC SECTION 810-20)
GROUNDING CONDUCTORS
(NEC SECTION 810-21)
GROUND CLAMPS
POWER SERVICE GROUNDING
ELECTRODE SYSTEM
(NEC ART 250, PART H)
ELECTRIC SERVICE
EQUIPMENT
GROUND CLAMP
Television Antenna Connection Protection
External Television Antenna Grounding
If an outside antenna/satellite dish or cable system is to be connected to the TV, make sure that the
antenna or cable system is electrically grounded to provide some protection against voltage surges
and static charges.
Article 810 of the National Electrical Code, ANSI/NFPSA 70, provides information with regard to
proper grounding of the mast and supporting structure, grounding of the lead-in wire to an antenna
discharge unit, size of the grounding conductors, location of antenna discharge unit, connection to
grounding electrodes, and requirements of the grounding electrode.
Lightning Protection
For added protection of the TV during a lightning storm or when it is left unattended or unused for
long periods of time, unplug the TV from the wall outlet and disconnect the antenna or cable system.
Power Lines
Do not mount the antenna near overhead light or power circuits, or where it could fall into such
power lines or circuits.
Important Safety Instructions

DTV Transition Advisory
As of June 12, 2009, all U.S. television stations have switched to digital broadcasting. As a result, owners of analog television sets
must connect a digital-to-analog converter box to the television set or subscribe to cable or satellite TV to receive over-the-air
TV. Analog-only TVs continue to work as before to receive low power, Class A or translator television stations and with cable and
satellite TV services, gaming consoles, VCRs, DVD players, and similar products.
For more information about the DTV transition, visit www.dtv.gov.
FCC’s Consumer Center
Email: dtvinfo@fcc.gov
Phone: 1-888-CALL-FCC (1-888-225-5322)
Fax: 1-866-418-0232; or writing to:
Mail: Federal Communications Commission
Consumer and Governmental Aairs Bureau
Consumer Inquiries and Complaints Division
445 12th Street, SW
Washington, DC 20554
Important Safety Instructions

Attaching the Stand
The stand installation varies depending on model. Perform the installation according to the
instructions of your TV model.
Unpacking the TV
1 Remove TV accessories and protective foam.
2 Remove TV from the box and place it on a at and clean surface with TV screen
facing down.
3 Attach the metal bracket to the stand using the provided screws. (DM65USR model only)
4 Attach the stand to TV using the provided screws.
Removing the Stand
When the TV needs to be transported, remove the stand and pack the TV back in the carton.
To remove the stand, perform the assemble steps in reverse order according to your TV model.
DM85UXR Base Assembly
DM65USR Base Assembly

Package Contents
BatteriesLED TV
DOWNLOAD FULL VERSION USER MANUAL
http://jvc-tv.com/support
Quick Start
Guide
Quick Start Guide Power Cord
Roku®Streaming
Check if the following items are included in your package.
Remote Control

Remote Control Batteries
1Push the tab, then lift to open the cover.
2Insert the batteries, making sure the [+] and [-]
polarities are correct.
3Close the battery cover.
Battery Precautions:
Be sure to follow the correct polarity. Incorrect installation may cause battery leakage
or damage the remote control.
Always replace batteries in pair. Do not combine a used battery with a new one.
Do not use dierent battery types together
(e.g. “Alkaline” and “Carbon-zinc”).
If the remote control is not to be used for a long period of time, remove the batteries
to prevent battery leakage.

Parts and Functions
Power indicator
Remote control IR receiver
Front View
DM65USR
Rear View
HDMI-1
HDMI-2
HDMI-3
HDMI-4
HDMI/MHL
USB 2.0
USB 3.0
Digital Optical Output
Ethernet Audio Out Component/
Video Input
Audio Input Antenna Input
AC Power
Power and Function
Buttons
HDMI 2.0

Parts & Functions
DM85UXR
Front View Rear View
HDMI-1
HDMI-2
HDMI-3
HDMI-4
HDMI/MHL
USB 2.0
USB 3.0
Digital Optical Output
HDMI 2.0
Power and
Function
Buttons
Ethernet Audio Out Component/
Video Input
Audio Input Antenna InputAC Power
Power and
Power and
Function
Function
Buttons
Buttons
Buttons
Buttons
On/O
Switch

1 IR Transmitter: Sends remote control signal to the TV.
2 POWER button: Turns the TV on or o.
3 INPUT button: Changes the input source.
4 Remote Control LED: LED lit on when a button is
pressed.
5 Playback controls: The buttons are used for Photo,
Music, Video, HDMI CEC enabled devices and HDMI MHL
enabled devices.
6 ROKU HOME button / INFO* button
/ RETURN button: Press to display ROKU home
screen/ to obtain more information or access special
options/ return to previous menu or screen while ROKU
streaming stick is in use.
7 Directional buttons / / / :Navigate the menu,
select options, or adjust settings value.
8 OK button: Enter a menu or conrm an option.
9 MUTE button: Turns the TV audio o or on.
10 Global return button: Returns to previous page.
11 MENU button: Displays the MENU screen.
12 VOL (Volume) buttons: Press VOL+ to increase
volume or VOL- to decrease volume.
13 JVC Home button: Press to enter JVC home screen.
14 CH (Channel) buttons: Use CH+ to increase the
channel number or CH- to decrease the channel number.
15 Number pad (0~9, –): Use the number keys to
directly change channel.
16 Instant Replay / Last button: Replays last
10 seconds of video when watching Roku. Switch back to
previous channel when watching TV.
17 Touch pad: Touch to navigate the cursor.
18 Qwerty Keyboard: Provides you the ability to enter
text quickly.
Parts & Functions – Remote
2
4
13
1
5
3
6
10
11
7
14
12
15
16
8
17
18
Notes: To obtain best results, use the remote control with
a proper distance from the TV and ensure that there are no
obstacles between them.
Aim the remote control transmitter to the remote control sensor
on the TV.
Do not expose the remote control to direct sunlight. This may
aect the performance of the remote control.
9

Making Connections
Connecting Antenna / Cable
Connect the 75 ohm coaxial cable directly to the DTV/TV Cable/Antenna jack
of the TV.
DTV / TV
CABLE / ANTENNA
75 ohm coaxial cable
Connecting HD Devices
You can connect dierent devices to the TV using HDMI, Composite, or Component connections.
Check the type of connection available on your device.

AUDIO OUT
OPTICAL
OPTICAL
Digital Audio System
Audio IN
Optical audio cable
Audio OUT
Note: The optical audio cable is not included with the TV.
Connecting External Speakers / Soundbar / AV Receivers
Digital Connection
Connect the SPDIF/Optical audio cable to the Audio OUT optical port of the
TV and the optical port of the soundbar, AV receiver, or audio system.
Analog Audio Connection
Connect the audio cable to the Audio OUT port of the TV and the analog Audio
IN port of the soundbar, AV receiver, or audio system.
A udio IN
Note: The audio cable is not included with the TV.
Making Connections

Basic Operations – Setup Wizard
The Setup Wizard will assist you with setting up your TV for
the rst time. Please follow the instructions carefully.
Note: If you would like to setup over-the-air or cable
programming, make sure the antenna or cable TV system
is connected.
1When you turn on the TV for the rst time, the Setup
Wizard screen will appear.
Select the menu language, then press OK.
2Remote pairing.
Note: Remote pairing can be performed at any time when
TV is on.
3 Select the TV Mode, then press OK.
TV Mode options:
Home Use: Select this mode for in home use.
Retail Demo: Select this mode for in store demo.
Note: Store Demo is for retailers only.

4Select the Network Setup, then press OK.
5Enter Zip Code.
6Select Time Zone.
7Select Auto Channel Scan.
Note: Scanning may take some time to complete.
Select Stop Scan to cancel the auto scan at any time.
8Finish.
Basic Operations – Setup Wizard

Press the number buttons to directly select channels.
Note: After pressing the number buttons, there will be a few seconds delay before the TV changes
channel. To change to the channel right away, press OK after pressing the number buttons.
To Browse Channel
Press the Channel +/-buttons on the remote control.
Press to scroll through the
channels manually.
To Adjust Volume
Press the Volume +/-buttons on the remote control.
Press to adjust volume level.
To Select Analog Channels
1~9 Press 1~9 as needed.
Example, to select channel 2,
press 2, then press OK.
10~99 Press the 2 digits in order.
Example, to select channel 15,
press 1, 5, then OK.
100~135: Press the 3 digits in order,
Example, to select channel 130,
press 1, 3, 0, then press OK.
Input Menu
Select the input source signal by pressing the Input button.
• TV: To watch analog or digital TV channels.
• Video: To use VCRs, camcorders, or game consoles connected via
composite connection.
• Component: To use VCRs, camcorders, or game consoles
connected via component connection.
• HDMI-1~4 : To connect HD/UHD devices via HDMI 2.0
Connection.
• HDMI/MHL: To connect HD/UHD and MHL devices via HDMI/MHL
Connection.
Basic Operations – Changing Channel/Volume
Other manuals for DIAMOND DM65USR
2
This manual suits for next models
1
Table of contents
Other JVC LED TV manuals

JVC
JVC AV-HQ657115A User manual

JVC
JVC LT-32C695 User manual

JVC
JVC LT-32C670 User manual

JVC
JVC LT-32CF600 User manual

JVC
JVC LT-40C550 User manual

JVC
JVC LT-22MAR400 User manual

JVC
JVC LT-22HG45E User manual

JVC
JVC LT-55N7125A User manual

JVC
JVC BlackCrystal JLE32BC3001 User manual

JVC
JVC LT-28HA82U User manual