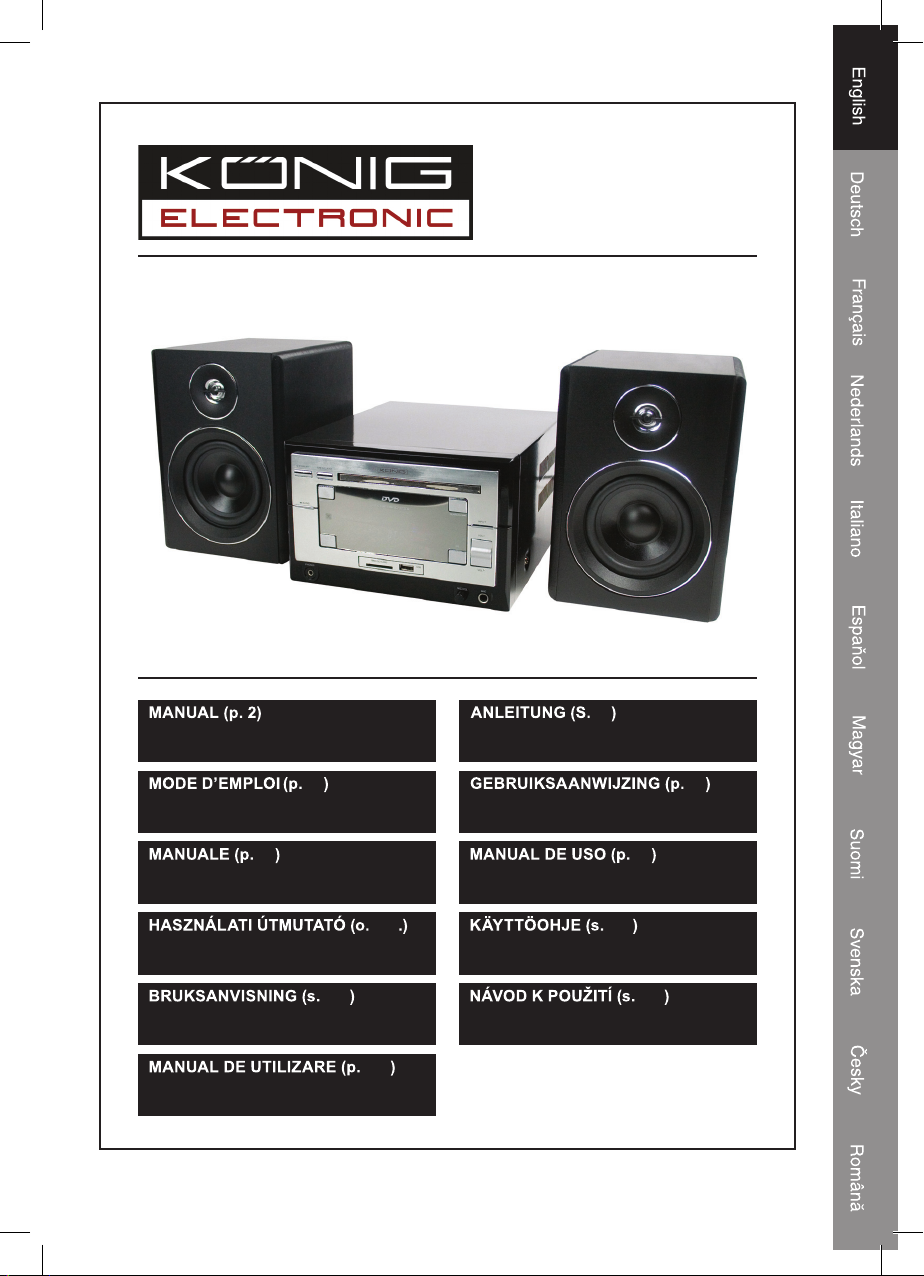
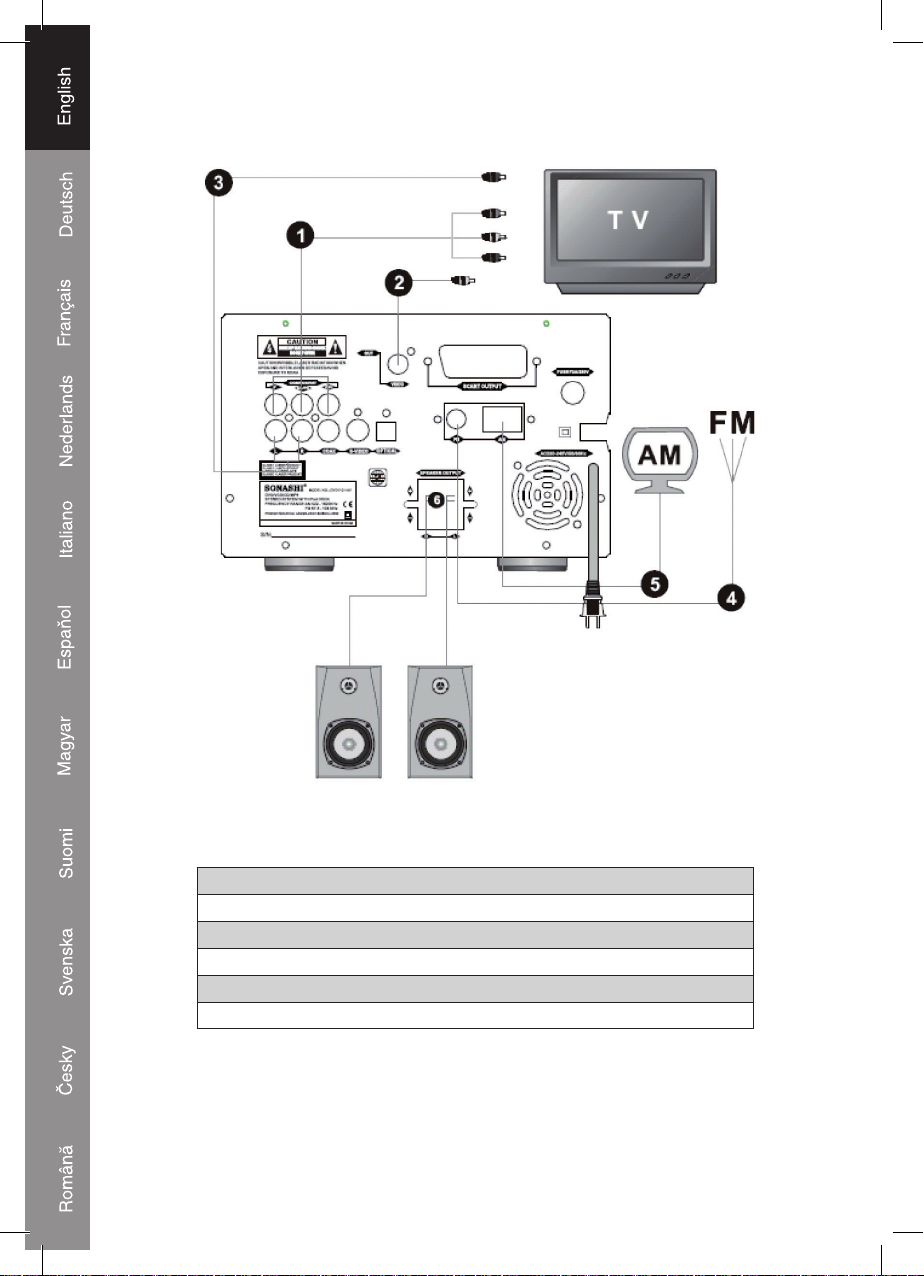
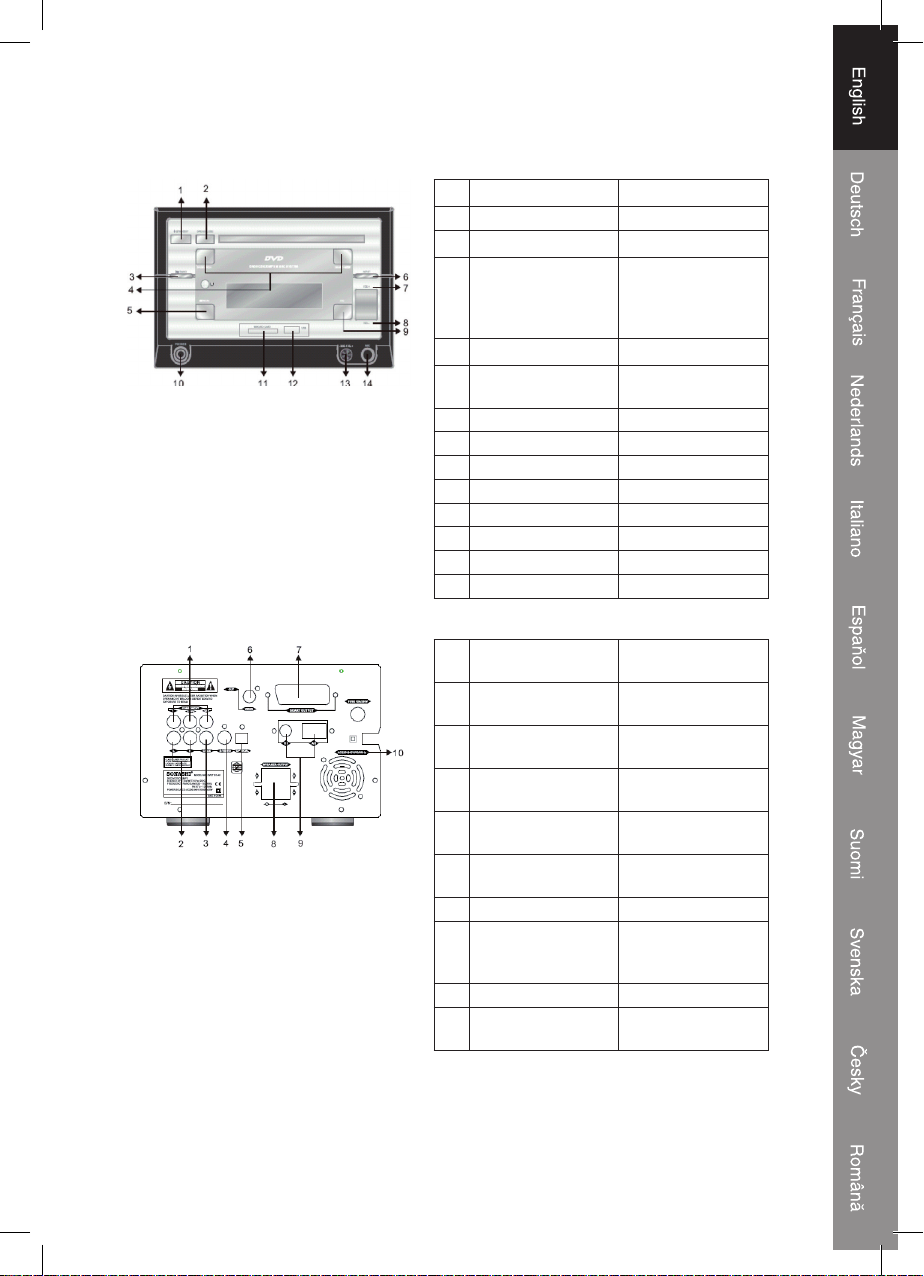
König Electronic HAV-MCS35 User manual

151
MIKRO SYSTÉM DVD
119
DVD-MIKROJÄRJESTELMÄ
85
MICROSISTEMA DVD
52
DVD-MICROSYSTEEM
18
DVD-MICROSYSTEM
168
MICROSISTEM CU DVD
135
DVD MICRO SYSTEM
102
DVD MIKRORENDSZER
68
MICROIMPIANTO DVD
35
MICRO-SYSTÈME DVD
DVD MICRO SYSTEM
HAV-MCS35

2
ENGLISH
Remote Control
Replacing battery
When the remote control is not working, replace the battery with a new one.
1. Squeeze the notched tab A while pulling the battery door latch B out to take the battery
holder out.
2. Insert a AAA 1.5V battery. Make sure the polarity (the + and – side of the battery ) is
correct.
3. Replace the battery holder back in the remote control.
Functions
1. STANDBY
2. OSD
3. PROGRAM
4. A-B REPEAT
5. REPEAT
6. GOTO
7. ST/MO L/R
8. P/N
9. MEMORY/STOP
10. FORWARD/BACKWARD SEARCH
/ QUICK FORWARD/BACKWARD
11. SLOW
12. MENU
13. ANGLE
14. DIRECTION KEYS
15. CLOCK
16. PBC
17. DVD/USB/CARD
18. MIC ON/OFF
19. MUTE
20. INPUT
21. TREB “+”/TREB “−”
22. OPEN/CLOSE
23. NUMERIC KEYS
24. AUDIO
25. SUBTITLE
26. PREVIOUS/NEXT STATION
PREVIOUS/NEXT TRACK
27. FM/AM CHANNEL AND PLAY/PAUSE
28. STEP
29. RETURN
30. SETUP
31. ENTER
32. TITLE
33. ZOOM
34. VFD
35. EQ
36. MAIN VOLUME
37. BASS EFFECT

3
1. Standby
Press to turn the device on/off.
2. OSD-Screen display
Press to see current situation, time, remaining play time and other functions.
3. Prog (Doesn’t work in USB/SD/MMC Mode)
With the [PROG] key you can program tracks or chapters in any desired order. First press
[STOP], and then press [PROG]. The screen will show the program menu and a green
cursor will blink in the display at the first position. Enter the track you want to play first
by pressing the numeric keys [0-9]. After entering the desired track use the directional
keys to move to Position 2 and repeat the steps made at position 1. If you make a mistake
or want to change the order of tracks, you can use the directional keys to move to the
position you want to edit, press the [RETURN] key to clear the position and use numeric
keys [0-9] to input new numbers. To start playback of your program press the [ENTER]
key at any time.
Note: In program mode, DVD does not have the repeat and A-B repeat function.
Note: Some disc may not support program mode.
4. A-B Repeat
The A-B Repeat function allows you to repeat your favorite scene of a DVD or VCD.
Step 1. Press the [AB-REPEAT] key at the point where you want the repeat to start.
Step 2. Press the [AB-REPEAT] key again at the end of the scene you want to repeat,
repeat will now start.
Step 3. Press the [AB-REPEAT] key again to cancel repeat and return to normal
playback
5. Repeat
Press the [REPEAT] key once to repeat the currently playing track.
Press the [REPEAT] key twice to repeat the whole disc.
6. GOTO
Press the [GOTO] button to move to any place of your choice on the disc. After pressing
the [GOTO] button you can either enter the track, title, chapter or exact hours/minutes/
seconds by using the [0-9] keys.
7. ST/MO L/R
- Radio mode: Press the [ST/MO L/R] key to choose between stereo, mono left and
mono right.
- Karaoke mode: Press the [ST/MO L/R] key to turn on/off the primary sound.
- Bilingual disc: Press the [ST/MO L/R] key to choose the output language.
8. P/N-MODE SELECT
Press the [P/N-MODE] key to select PAL, PAL60, NTSC of Auto.
9. MEMORY-STORAGE STATION/STOP
- Radio mode: Press the [MEMORY/STOP] key to save the currently playing station
under a preset key. After pressing the [MEMORY/STOP] key use the [0-9] keys to
choose under which preset number you want to save it.
- CD/DVD mode: Press the [MEMORY/STOP] key to stop playback.

4
10. FORWARD/BACKWARD SEARCH / QUICK FORWARD/BACKWARD
- Radio mode: Hold the [FOR/BACK] key for three seconds to auto-search the next radio
station.
- CD Mode: Hold the [FOR/BACK] button to fast forward/backward at X2, X4, X8 or X20.
Release the button when the desired speed is reached Press the [PLAY] key to return
to normal speed.
- CD Mode: Press the [FOR/BACK] key once to skip to the next/previous track.
11. SLOW
Press the [SLOW] key to change the playrate of a DVD/VCD to 1/2, 1/3, 1/4, 1/5, 1/6 or
1/7. After reaching the 1/7 speed press the [SLOW] key to go into slow reverse playback.
Press the [PLAY] key to return to normal playrate.
12. MENU
Press the [MENU] key during DVD playback to go to the DVD menu.
13. ANGLE
Press the [ANGLE] key while playing a multi-angle DVD to change the angle.
14. DIRECTION KEYS(UP/DOWN/LEFT/RIGHT)
Use the [DIRECTIONAL] keys to navigate through the different menus.
15. CLOCK
The clock key offers multiple functions:
15.1. Sleep
(1) While the device is turned on press the [CLOCK] key once to enter the sleep mode.
The screen shows SLP--.
(2) Press the [ENTER] key to select the mode, and use the [0-9] or [DIRECTIONAL] keys
to set a sleep time. The maximum is 120 minutes.
(3) When finished a SLEEP icon will show in the upper right corner of the screen, and the
device will automatically turn off after the set time.
15.2. 24 Hours/AM PM display
(1) Press the [CLOCK] key twice to change the way the time is displayed. Use the
[DIRECTIONAL] keys to change between 24 H or AM/PM system.
(2) Press the [CLOCK] key three times to set the time. After pressing the [CLOCK] key
three times the display will show CLK 00:00. Use the [0-9] and [DIRECTIONAL] keys
to set the time.
15.3 Alarm
Alarm on
(1) While in standby mode, press the [CLOCK] key four times. The screen shows TIME—
and it shows if the timer is on or off.
(2) Use the [DIRECTIONAL] keys to change the status of the timer to on or off.
(3) While in standby mode, press the [CLOCK] key five times. The screen will show
ON 00 00. Use the [0-9] and [DIRECTIONAL] keys to change the alarm time.
(4) To exit the alarm setting mode press the [CLOCK] key. The alarm will go off at the set
time.

5
Alarm off
(1) When the product is on, press the [CLOCK] key three times. The screen shows
TIME--.
(2) Press the [CLOCK] key again, the screen shows OFF 00 00, you can use the [0-9] and
[DIRECTIONAL] keys to set the preferred off time.
(3) To save and exit the menu press the [CLOCK] key again. The alarm will stop playing at
the set time.
16. PBC
While playing press the [PBC] key to enter the PBC menu. Use the [DIRECTIONAL] keys
to navigate the menu. Press the [PBC] key again to exit the menu.
Note: Only compatible with VCD 1.1 and higher.
17. DVD/USB/CARD
While in DVD mode, press the [DVD/USB/CARD] key to change between DVD, USB
and Card slot. After you have chosen the format of your choice it will automatically start
playing after 2 seconds.
18. Mic on/off
Press the [MIC] key to turn on or off the microphone input.
19. Mute
Press the [MUTE] key to turn the volume all the way down. Press the [MUTE] key again to
return to the original volume.
20. Input
Press the [INPUT] key to change between the different functions: Radio, DVD and iPod.
21. TREB “+” / TREB “−”
Use the [TREB] keys to increase or decrease the treble effect.
22. Open/Close
Press the [OPEN] key to open the CD tray.
23. 0-9 Keys
- The [0-9] keys can be used to input in different menus.
- The [0-9] keys are presets for favorite radio stations. See chapter 9. Memory, for
instructions on how to program them.
24. Audio
Press the [AUDIO] key to change between different languages on a bilingual disc.
25. Subtitle
Press the [SUBTITLE] key to turn on and change the subtitles.
Note: Each DVD has its own subtitles so effect may vary between discs.
26. Previous/Next
Press the [PREVIOUS] and [NEXT] key to change to the previous/next radio preset,
previous/next track, or the previous/next chapter.

6
27. Band/Play and Pause
- Radio mode: Press the [BAND] button to change between AM/FM.
- iPod mode: Hold the [PLAY/PAUSE] button for 3-5 seconds to put the iPod in standby.
- In any other mode: Press the [PLAY/PAUSE] to pause or play the audio source.
28. Step
Press the [STEP] key to view video frame by frame.
29. Return
Press the [RETURN] key to return to the title menu.
30. Setup
Press the [SETUP] key to enter the setup menu. Navigate the menu by using the
[DIRECTIONAL] keys. Use the [ENTER] key to make a selection and press the [SETUP]
key again to exit the setup menu.
31. Enter
Press the [ENTER] key to confirm a selection.
32. Title
Press the [TITLE] key to go to the title menu of a DVD.
33. Zoom
Press the [ZOOM] key to zoom in and out while playing a DVD or VCD.
34. VFD
Press the [VFD] key to adjust the VFD balance.
35. EQ
Press the [EQ] key to change the equalizer settings. There are 4 options to choose from:
hall, classic, pop and disco.
36. Main volume
Use the [MAIN VOLUME] keys to adjust the volume.
37. Bass
Use the [BASS] keys to increase or decrease the bass effect.

7
PANEL/BACK BOARD ILLUSTRATION
1. STANDBY Standby
2. OPEN/CLOSE Open/close
3. /BAND Play/Pause/Band
4. /SEARCH-
SEARCH+/
DVD: Previous/
Next track
Radio: Forward/
backward search
5. /MEM Stop/Memory
6. INPUT Channel
conversion
7. VOL+ VOL+
8. VOL- VOL-
9. EQ EQ
10. PHONES Stereo earphones
11. MMC/SD CARD SD/MMC input
12. USB USB input
13. - MIC VOL + Mic Volume
14. MIC MIC socket
1. Y Cb Cr Y, Cb, Cr video
output socket
2. ML/MR Left/right mix audio
output socket
3. COAXIAL Digital audio
coaxial output
4. S-VIDEO S-video video
output socket
5. OPTICAL Digital audio optical
output socket
6. VIDEO Video output
socket
7. SCART OUTPUT Scart output
8. SPEAKER
OUTPUT
Left and right
sound output
socket
9. FM/AM FM/AM antenna
10. AC 220-240V/
50-60 Hz Power

8
SYSTEM CONNECTION ILLUSTRATION
Power input AC 220-240V/50-60 Hz
Front
right
speaker
Front
left
speaker
1. Connect with Y, Cb, Cr video input socket
2. Connect with video signal input socket (video component)
3. Connect with Audio signal input socket (Audio component)
4. Connect with FM antenna
5. Connect with AM antenna
6. Connect with left/right front speaker socket

9
Connection with TV
1.1 If your TV has a VIDEO input socket (yellow) please connect the device with a video
cable.
1.2 If your TV has a S-VIDEO output socket, make sure you use a S-VIDEO cable to
optimize the quality. Make sure you change the video output in the setup menu to
S-VIDEO output.
1.3 If your TV has a Y, Cb, Cr input socket, please use a Y, Cb, Cr port cable to connect
the device to the TV for optimal quality. Make sure you change the video output in the
setup menu to Y, Cb, Cr output.
1.4 When the TV supports audio output, you can connect the device to your TV system
with an audio cable.
Connecting to speakers
Use speaker cables to connect the left and right speakers with the left and right audio
output sockets of this system to enjoy stereo music.
Setting up your TV system
Before you begin to setup the device, make sure you
have connected the device to your TV in a correct way.
See the illustration on page 7 for the instructions.
Turn on the device and the TV and change the
TV-channel to AV. Press the [SETUP] key on the
remote to enter the setup menu. You can choose the
desired sub-menu by using the [DIRECTIONAL] and
[ENTER] keys. There are six different sub menus:
System setup, language setup, audio setup, video
setup, speaker setup and digital setup.

10
1. System Settings menu
System setting is used to set the TV mode,
screen saver, video output, TV screen
display, code, level, rating and default.
TV system
In this sub menu you can choose the used
TV system: NTSC, PAL60, PAL or auto.
Note: If you choose the wrong mode, the
image will be shown in black and white.
Press the [P/N] key on the remote to
return to the original status.
Screen Saver
In this sub menu you can turn on/off the
screen saver. The screen saver protects
you’re screen when it has not moved for
3 minutes.
Video
In this sub menu you can select different
video options. Make sure the selected option
corresponds with the way you connected
the device to your TV. The options are:
INTERLACE-YUV, TV-RGB, P-SCAN
YPBPR, S-VIDEO.
TV Type
In this sub menu you can select different aspect ratio’s, so the image will fit your screen.
You can choose between: 4:3 PS, 4:3 LB, and 16:9.
Note: No matter what kind of TV is used, if you choose a 4:3 display the pictures will
appear with 4:3 rate.
Note: If the screen uses 4:3 to display, and the DVD is in 16:9 display format, the pictures
will be squeezed.
Note: The aspect ration can only be set while nothing is playing.

11
Password
In the password sub menu you can set a password to protect your children from watching
unsuitable content. When you select the sub menu you’ll be asked to enter your code.
After entering your code you can select which content you want to block with a
password.
1. No adult
2. Kid Safe
3. View All
Select the desired choice by using the [DIRECTIONAL] keys and confirm with the
[ENTER] key. Then choose exit setup. If you now play a DVD with content of one of the
blocked categories, you’ll be asked to give the password. If the wrong code is entered the
DVD will not play.
Note: The original code of the system is 9999. In order to determine the level of lock
function, there must be a disc in the machine.
Default setting
By selecting default settings, the whole system will restore the original factory settings.
Note: Restoring to default settings will not reset the password items.
2. Language Setting
In the language menu you can set the
different languages of the system. There are
multiple options:
- OSD language: Select the language of
the device’s menu
- Audio language: Select the audio
language of the CD/
DVD
- Subtitle language: Select the language
of the DVD subtitles
- Menu language: Select the menu
language of a DVD
Note: When setting language, the chosen language is not recorded on the DVD disc you
are playing, the machine will show the language options available on the disc.
3. Audio Setting
In this menu you select and set the different audio options.
- Audio output: In this menu you select the audio output signal.
- Key: In this menu you can adjust the pitch of the audio
4. Video Setting
In this menu you can set the different video options.
Used to set the brightness, contrast, hue and saturation of the system‘s video signal.

12
JPEG/MPEG-4/USB/CARD/FM,AM
The device can read JPEG pictures on CD discs. When playing JPEG pictures the system
has “pause” and “browse” functions.
Showing a picture
To show picture insert a disc with JPEG pictures on it. The disc will auto-play and the
main picture menu will be shown on the screen. The folders on the disc are shown in the
left table, and it’s contents in the right table. Navigate the folders and pictures using the
[DIRECTIONAL] keys. If you are navigating in the right table a small preview of the photo
will be shown in the left corner. If you want to view a picture full screen press the [ENTER]
key. When a photo is shown full screen you can use the [NEXT] or [PREVIOUS] key to
slide to the next or previous picture. Press the [STOP] key to return to the menu.
Other functions
1. When playing JPEG files, the system has “pause”, “play”, “repeat” and “browse”
functions.
2. You can enlarge a picture by pressing the [ZOOM] key. Press the key continuously to
obtain an enlargement or reduction of the image (x2 x3 x4; x 1/2, 1/3, 1/4). Press the
[ZOOM] key again to return to normal play mode. While zoomed in you can use the
[DIRECTIONAL] keys to scroll over the picture.
3. When the zoom function is not activated, use the [DIRECTIONAL] keys to rotate the
image.
MPEG-4
MPEG 4 is a new multi-media standard which can record DVD-quality data onto CDs,
whilst preserving image quality.
1. Put an MPEG-4 disc in the CD tray, press play key. The content will appear on the TV
screen.You can now select the file of your choice with the [DIRECTIONAL] keys or the
[0-9] keys.
Note: Some MPEG-4 discs may be not supported.
USB/CARD function
In DVD mode,
1) If there is no disc in the disc compartment, the USB/CARD will play automatically
when the USB/CARD is inserted. If not press the [OPEN] key, it will change to the disc
playing situation.
2) If you insert the USB stick while playing a DVD press the DVD/USB/CARD key once to
start playback from the USB source. Press it again to start playback from the SD-Card
and press it once more to start playback from the DVD again.
3) This USB port is for portable storage devices that contain MP3 files. Some USB type
portable MP3 player may not work.

13
iPod operation
The device can play music from the most popular iPods such as the Mini, iPod Photo,
iPod Video and more. Included you find 5 different adapters to make sure the iPod will
fit properly into the unit’s dock. With this dock the device will automatically charge your
iPods battery. Due to the introduction of new iPods, new dock adapters are subject to
availability.
To plug-in you iPod first select the proper adapter. Make sure you iPod fits perfect. Gently
push the adapter in to the docking station. Carefully place the iPod on the adapter.
To remove/replace a dock adapter, remove your iPod, and then grip the dock adapter and
pull gently upwards.
When the iPod is connected you can control it with the main units controls.
1. Press iPod button. The display indicates iPod.
2. Select your desired music, photos or videos, etc and play the connected iPod as
usual.
3. You can also select the desired next or previous music tracks by pressing [NEXT] or
[PREVIOUS] repeatedly, and press [PLAY] to play or pause.
4. Press [VOLUME] button to adjust to desired sound level.
Note:
For charging your iPod, please make sure you are using the correct adapter for your iPod
and that it is properly docked into the dock adapter. Failure to do so may cause damage to
your iPod. While your iPod is docked in the system, it recharges until fully charged. Note
that other non-docking iPods will not charge.
If you want to watch photos and videos from the iPod, Video out must be connected to
your home TV.
“Video out function” is not available for iPod Nano (3rd Generation), iPod Touch and iPod
Classic .

14
4G 3G mini photo 5G
Adapters
20
GB
40
GB
10
GB
15
GB
30
GB
40
GB
4
GB
6
GB
20
GB
30
GB
40
GB
60
GB
30
GB
60
GB
4G iPod iPod photo
(20GB) (20/30 GB)
3G iPod
(10/15 GB)
3G iPod 4G iPod
(30/40 GB) (40 GB)
iPod photo (40/60 GB)
iPod mini
Dust Cover “Docking Station Dust Cover. Install This Coyer In The Docking Station if
No iPod®Will Be Docked for An Extended Period of Time.”
iPod®Versions
iPod
®
Capacities

15
Power supply: 220-240 V AC/50-60Hz
Power: 28 W
AM frequency: 522-1620 KHz
FM frequency: 87.5-108 MHz
Signal mode: PAL
Frequency: 20 Hz-20 KHz +/– 2.5db
S/N: >90db (1 KHz)
Audio scope: >106db (1 KHz)
Conditions for use: Temperature: 5°C ~ 35°C
Video output: 1.0V(P-P) 75Ω
S-VIDEO: (Y) 1.0V (P-P) 75Ω
(C) 0.286V (P-P) 75Ω
Y/Cb/Cr output: (Y) 1.0V (P-P) 75Ω
(Pb)/(Pr) 0.7V (P-P) 75Ω
Digital audio output: 0.5V (P-P) 75Ω
(BISTREAM/PCM COAXAL)
Audio output: 2.0V (P-P)
Scart output: Europe video socket

16
Declaration of conformity
We,
Nedis B.V.
De Tweeling 28
5215MC ’s-Hertogenbosch
The Netherlands
Tel.: 0031 73 599 1055
Email: info@nedis.com
Declare that product:
Name: KÖNIG
Model: HAV-MCS35
Description: DVD MICRO SYSTEM
Is in conformity with the following standards
EMC: EN 55013:2001+A1:2003
EN 55020:2002+A1:2003+A2:2005
EN 61000-3-2:2000+A2:2005
EN 61000-3-3:1995+A1:2001
LVD: EN 60065:2002
Following the provisions of the 2006/95/EC (LVD) and 2004/108/EC (EMC) directive.
‘s-Hertogenbosch, 2008, June 23
Mrs. J. Gilad
Purchase Director

17
Safety precautions:
RISK OF ELECTRIC SHOCK
DO NOT OPEN
CAUTION To reduce risk of electric shock, this product should
ONLY be opened by an authorized technician when
service is required. Disconnect the product from mains
and other equipment if a problem should occur. Do not expose the product to water or
moisture.
Maintenance:
Clean only with a dry cloth. Do not use cleaning solvents or abrasives.
Warranty:
No guarantee or liability can be accepted for any changes and modifications of the
product or damage caused due to incorrect use of this product.
General:
Designs and specifications are subject to change without notice.
All logos brands and product names are trademarks or registered trademarks of their
respective holders and are hereby recognized as such.
Attention:
This product is marked with this symbol. It means that used electrical and
electronic products should not be mixed with general household waste. There
is a separate collections system for these products.
Copyright ©

18
DEUTSCH
Fernbedienung
Wechsel der Batterie
Wenn die Fernbedienung nicht mehr funktioniert, ersetzen Sie die Batterie durch eine neue.
1. Drücken Sie gekerbte Lasche A, während Sie die Batterietürlasche B herausziehen,
um den Batteriehalter herauszunehmen.
2. Legen Sie eine 1,5 V-AAA-Batterie ein. Achten Sie auf die richtige Polarität
(+ und - Pol der Batterie).
3. Bringen Sie den Batteriehalter wieder in der Fernbedienung an.
Funktionen
1. STANDBY
2. OSD
3. PROG (Programm)
4. A-B REPEAT (Wiederholen)
5. REPEAT (Wiederholen)
6. GOTO (Gehe zu)
7. ST/MO L/R
8. P/N
9. MEMORY/STOP (Speicher/Stopp)
10. FORWARD/BACKWARD SEARCH
/ QUICK FORWARD/BACKWARD
(Vorwärts/Rückwärts suchen / Schnell
vorwärts/rückwärts)
11. SLOW (Langsam)
12. MENU
13. ANGLE (Winkel)
14. RICHTUNGSTASTEN
15. CLOCK (Uhr)
16. PBC
17. DVD/USB/CARD
18. MIC ON/OFF (Mikrofon an/aus)
19. MUTE (Stummschalten)
20. INPUT (Eingang)
21. TREB “+”/TREB “−” (Höhen)
22. OPEN/CLOSE (Öffnen/Schließen)
23. ZIFFERNTASTEN
24. AUDIO
25. SUBTITLE (Untertitel)
26. PREVIOUS/NEXT STATION (Voriger/
nächster Sender)
PREVIOUS/NEXT TRACK (Voriger/
nächster Track)
27. FM/AM-KANAL UND PLAY/PAUSE
(Wiedergabe/Pause)
28. STEP (Schritt)
29. RETURN (Zurück)
30. SETUP (Einrichtung)
31. ENTER
32. TITLE (Titel)
33. ZOOM
34. VFD
35. EQ
36. MAIN VOLUME (Hauptlautstärke)
37. BASS-EFFEKT

19
1. Standby
Drücken, um das Gerät an-/auszuschalten.
2. OSD-Bildschirmanzeige
Drücken, um sich die aktuelle Situation, die Zeit, die restliche Wiedergabezeit und andere
Funktionen anzusehen.
3. PROG (Funktioniert nicht im USB/SD/MMC-Modus)
Mit der [PROG]-Taste können Sie Tracks oder Kapitel in jeder gewünschten Reihenfolge
programmieren. Drücken Sie zunächst [STOP] und dann [PROG]. Auf dem Bildschirm
wird das Programm-Menü angezeigt, und ein grüner Kursor blinkt an der ersten Stelle des
Bildschirms. Geben Sie mit den Zifferntasten [0-9] den Track ein, der als erster gespielt
werden soll. Nachdem Sie den gewünschten Track eingegeben haben, gehen Sie mit den
Richtungstasten auf die zweite Position und wiederholen die Schritte wie bei der ersten
Position. Wenn Sie einen Fehler machen oder die Reihenfolge der Tracks ändern wollen,
können Sie mit den Richtungstasten auf die Position gehen, die Sie bearbeiten möchten.
Drücken Sie dann die [RETURN]-Taste, um die Position zu löschen, und geben Sie mit
den Zifferntasten [0-9] die neuen Zahlen ein. Wenn Sie irgendwann die [ENTER]-Taste
drücken, wird mit der Wiedergabe Ihres Programms begonnen.
Anmerkung: Im Programm-Modus gibt es für DVDs keine Wiederhol- und A-B-
Wiederholfunktion.
Anmerkung: Einige Disks können den Programm-Modus nicht unterstützen.
4. A-B Repeat (A-B-Wiederholung)
Mit der A-B-Wiederholfunktion können Sie Ihre Lieblingsszene auf einer DVD oder VCD
wiederholen.
Schritt 1. Drücken Sie die [AB-REPEAT]-Taste an der Stelle, an der Sie die Wiederholung
beginnen möchten.
Schritt 2. Drücken Sie die [AB-REPEAT]-Taste noch einmal am Ende der Szene, die Sie
wiederholen möchten. Jetzt beginnt die Wiederholung.
Schritt 3. Drücken Sie die [AB-REPEAT]-Taste noch einmal, um die Wiederholung zu
beenden und zur normalen Wiedergabe zurückzukehren.
5. REPEAT (Wiederholen)
Drücken Sie die [REPEAT]-Taste einmal, um den gerade wiedergegebenen Track zu
wiederholen.
Drücken Sie die [REPEAT]-Taste zweimal, um die gesamte Disk zu wiederholen.
6. GOTO (Gehe zu)
Drücken Sie die [GOTO]-Taste, um an eine beliebige gewünschte Stelle auf der Disk
zu gehen. Nach dem Drücken der [GOTO]-Taste können Sie mit den Zifferntasten [0-9]
entweder den Track, den Titel, das Kapitel oder die genauen Stunden/Minuten/Sekunden
eingeben.
7. ST/MO L/R
- Radio-Modus: Drücken Sie die [ST/MO L/R]-Taste, um zwischen Stereo, Mono links
und Mono rechts auszuwählen.
- Karaoke-Modus: Drücken Sie die [ST/MO L/R]-Taste, um den Primärton an-/
auszuschalten.

20
- Zweisprachige Disk: Drücken Sie die [ST/MO L/R]-Taste, um die Ausgabesprache zu
wählen.
8. AUSWAHL DES P/N-MODUS
Drücken Sie die [P/N-MODE]-Taste, um zwischen PAL, PAL60, NTSC oder Auto zu
wählen.
9. SENDER SPEICHERN/STOPP
- Radio-Modus: Drücken Sie die [MEMORY/STOP]-Taste, um den gerade
wiedergegebenen Sender unter einer Preset-Taste zu speichern. Nach dem Drücken
der [MEMORY/STOP]-Taste können Sie mit den Zifferntasten [0-9] auswählen, unter
welcher Preset-Nummer Sie ihn speichern wollen.
- CD/DVD-Modus: Drücken Sie die [MEMORY/STOP]-Taste, um die Wiedergabe zu
beenden.
10. VORWÄRTS/RÜCKWÄRTS SUCHEN / SCHNELL VORWÄRTS/RÜCKWÄRTS
- Radio-Modus: Halten Sie die [FORWARD/BACK]-Taste drei Sekunden lang gedrückt,
um den nächsten Rundfunksender automatisch zu suchen.
- CD-Modus: Halten Sie die [FORWARD/BACK]-Taste gedrückt, um mit X2, X4, X8
oder X20 schnell vorwärts/rückwärts zu gehen. Lassen Sie die Taste los, wenn die
gewünschte Geschwindigkeit erreicht ist. Drücken Sie die [PLAY]-Taste, um zur
normalen Geschwindigkeit zurückzukehren.
- CD-Modus: Drücken Sie die [FORWARD/BACK]-Taste einmal, um zum nächsten/
vorigen Track zu springen.
11. SLOW (Langsam)
Drücken Sie die [SLOW]-Taste, um die Wiedergabegeschwindigkeit einer DVD/VCD
auf 1/2, 1/3, 1/4, 1/5, 1/6 oder 1/7 zu ändern. Nachdem die Geschwindigkeit 1/7 erreicht
ist, drücken Sie die [SLOW]-Taste, um in die langsame Rückwärtswiedergabe zu
gelangen. Drücken Sie die [PLAY]-Taste, um zur normalen Wiedergabegeschwindigkeit
zurückzukehren.
12. MENU
Drücken Sie während der DVD-Wiedergabe die [MENU]-Taste, um ins DVD-Menü zu
gelangen.
13. ANGLE (Winkel)
Drücken Sie während der Wiedergabe einer Mehrwinkel-DVD die [ANGLE]-Taste, um
den Winkel zu ändern.
14. RICHTUNGSTASTEN (AUF/AB/LINKS/RECHTS)
Benutzen Sie die Richtungstasten, um durch die verschiedenen Menüs zu navigieren.
15. CLOCK (Uhr)
Die Uhrentaste hat mehrere Funktionen:
15.1. Schlafen
(1) Wenn das Gerät angeschaltet ist, drücken Sie die [CLOCK]-Taste einmal, um in den
Schlaf-Modus zu gelangen. Auf dem Bildschirm wird SLP-- angezeigt.
(2) Drücken Sie die [ENTER]-Taste, und stellen Sie mit den Zifferntasten [0-9] oder den
Richtungstasten die Schlafzeit ein. Das Maximum beträgt 120 Minuten.
Table of contents
Languages:
Other König Electronic Stereo System manuals

König Electronic
König Electronic HAV-MCS42 User manual

König Electronic
König Electronic HAV-MC100 User manual

König Electronic
König Electronic HAV-PMS10 User manual

König Electronic
König Electronic IPD-SPEAKER40 User manual

König Electronic
König Electronic HAV-SDC20 User manual

König Electronic
König Electronic HAV-MCS52 User manual

König Electronic
König Electronic HAV-MCS30 User manual

König Electronic
König Electronic HAV-MCS42 User manual

König Electronic
König Electronic HAV-MCS50 User manual

König Electronic
König Electronic HAV-MCS30 User manual