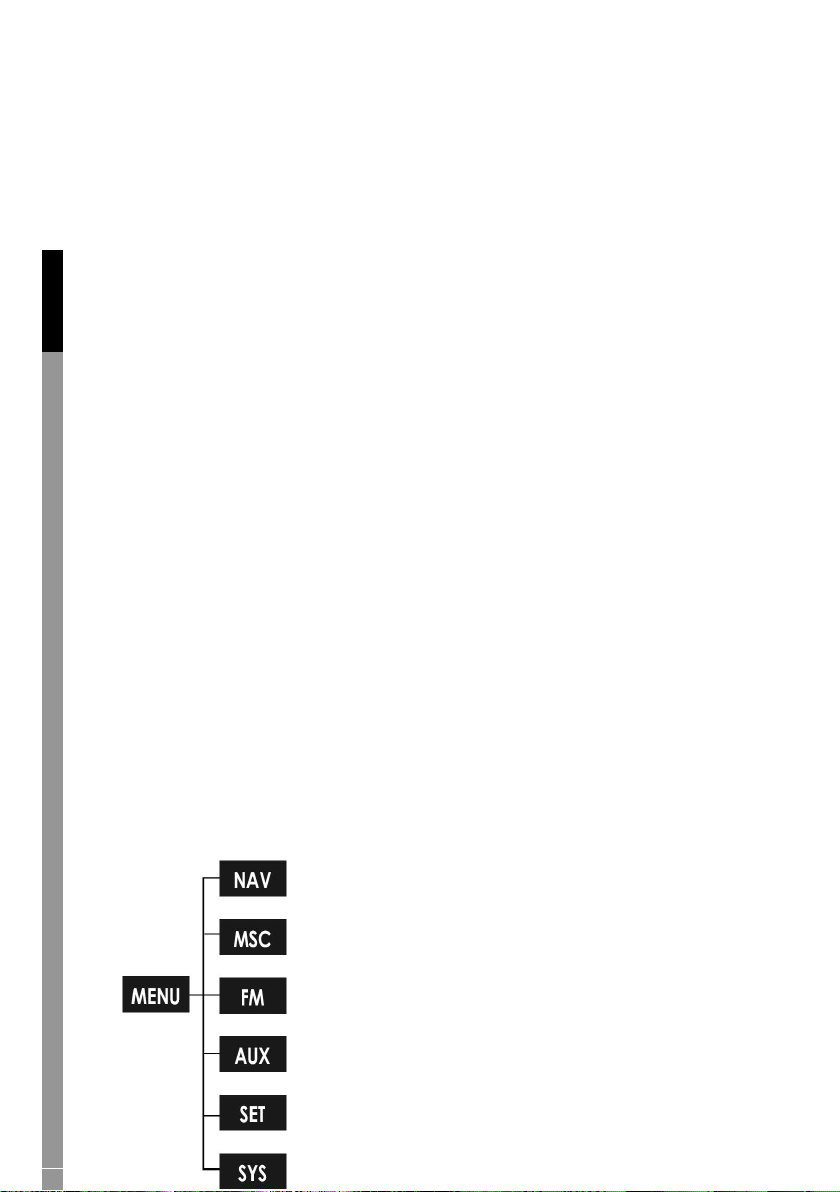
König Electronic HAV-PMS10 User manual

HAV-PMS10
Portable
Micro System
MANUAL
ANLEITUNG
MODE D’EMPLOI
GEBRUIKSAANWIJZING
MANUALE
MANUAL DE USO
HASZNÁLATI ÚTMUTATÓ
KÄYTTÖOHJE
BRUKSANVISNING
NÁVOD K POUŽITÍ

1
Packaging contents
1x HAV-PMS10 Portable Micro System
1x SC/DC adapter
1x USB cable
1x 3.5mm audio cable
1x Stereo earphone
1x USB Driver CD for Windows® 98SE
1x Manual
Location of controls
English Deutsch Français Nederlands
Italiano Español Magyar Suomi Svenska Česky

2
LCD display
Battery operation
Open the battery compartment according below figures. Insert 4x C
batteries as shown in the diagram inside the battery compartment.
AC/DC adapter operation
Open the connections panel on
the rear of the system in the
direction of the arrow. Connect
the mini plug to the 6V
connection and the power plug
to a 220~230V wall outlet.
EnglishDeutschFrançaisNederlands
ItalianoEspañolMagyarSuomiSvenskaČesky

3
Note: When the AC/DC adapter is connected the LCD backlight will turn
on and remain lit until the AC adapter is unplugged.
When the system is running on batteries, the LCD backlight will light
up briefly each time a button is pressed and then turn off. You can
adjust the time the LCD backlight will remain on for through the SYS
menu (see the SYSTEM MODE (SYS) section for details).
SD/MMC card installation
The integrated SD/MMC card slot lets you upgrade the player’s memory
capacity easily with additional SD/MMC cards.
To install an SD/MMC card:
1. Open the connections panel on the rear of the system in the direction
of the arrow.
2. Press the card in until a click is heard.
3. To remove the SD/MMC card, press the card in and it will jump out.
Important notice: Press the card in the slot exactly conforms below
figure. Trying in another way will damage the slot.
Connect to a computer
USB Driver Installation
It is not necessary to install the USB driver if your computer is running
Microsoft Windows ME/2000/XP or newer, or Macintosh OS X.
Computers running these operating systems will recognize
English Deutsch Français Nederlands
Italiano Español Magyar Suomi Svenska Česky

4
The system automatically when connected.
Microsoft Windows 98 SE
For Windows 98 SE it’s necessary to install the USB driver.
1. Navigate to MY COMPUTER and double-click on the CD/DVD drive
icon.
2. Double-click on the folder “Win98 USB Drivers” and then on the folder
“english”.
3. Double-click on the SETUP icon (SETUP.EXE) to start the USB driver
installation program.
4. Follow the on-screen instructions to complete the installation and then
restart the computer.
Connecting the USB cable to a computer
Turn the system in Standby mode. Open the connections panel and
connect the USB cable to the system and a computer. The computer will
recognize the system as a Removable Disk.
If a SD/MMC card is installed in the system. The computer will recognize
the card as a second Removable Disk.
Disconnecting from a computer
Microsoft Windows
1. Double-click the green arrow icon in the taskbar of the computer
screen (Safely Remove Hardware).
2. Select “USB Mass Storage Device” from the list that appears and then
click on “Stop”.
EnglishDeutschFrançaisNederlands
ItalianoEspañolMagyarSuomiSvenskaČesky

5
3. Select “USB Mass Storage Device” from the list that appears and then
click on “OK”.
4. Disconnect the USB cable from the system and the computer.
Macintosh OS X
1. Identify the appropriate Removable Disk icon, on the left side of the
Finder window.
2. Click on the “Eject” arrow on the right of the Removable Disk icon.
3. Disconnect the USB cable from the player and your computer.
Transferring files
The USB connection makes it easy to transfer music files (MP3/WMA)
between the system and a computer. Operate the system on AC/DC
power during transmission of files. Do not disconnect or interrupt the
system.
Transferring files with Microsoft Windows
1. Locate the files or folders you would like to transfer from the computer.
2. Select the files or folders with the mouse and press CTRL-C (copy) on
the keyboard.
3. Navigate to MY COMPUTER and double-click on the Removable Disk
icon. The computer will display all files and folders currently stored in the
player.
4. Press CTRL-V (paste) on the keyboard to transfer the files you
selected to the system.
Transferring files with Macintosh OS X
1. Open a Finder window. Locate the files you would like to transfer from
your computer.
2. Select the files/folders with the mouse and press APPLE-C (copy) on
the keyboard.
3. Click on the Removable Disk icon located on the left side of the finder
window.
4. The computer will display all files and folders currently stored in the
system.
5. Press APPLE-V (paste) on the keyboard to transfer the files you
selected to the system.
English Deutsch Français Nederlands
Italiano Español Magyar Suomi Svenska Česky

6
Note: It’s also possible to use the mouse to drag-and-drop files between
the system and the computer.
Basic operations
Standby mode
The system will enter Standby mode automatically when it is connected
to a power source. The LCD will display the time.
Power On/Off
To turn the system on, press play/pause while in Standby mode.
To turn the system off, press and hold play/pause.
Note: To display the time while the system is on, press and hold
TIME/ALARM. The LCD will return to a normal display after a few
seconds.
Menu navigation
Use following buttons to control the menus.
Press MENU to access the main menu.
Press </> for left/right
Press +/-for up/down
Press play/pause to confirm a selection.
Press MENU to cancel or return to the previous menu.
BASIC OPERATIONS
Main menu overview
NAV - NAVIGATION
Music, Voice, Play List (M3U), SD/MMC Card
MSC – MUSIC mode
FM - FM Radio
AUX -External Audio Input
EnglishDeutschFrançaisNederlands
ItalianoEspañolMagyarSuomiSvenska

7
SET-Clock Set, Alarm Set
SYS - SYSTEM: EQ, Repeat Mode, Display, Auto Off, Sleep Time, Recording, Resume,
Delete File, Format, Reset, Information, Alarm Mode
NAV
Music
Select and confirm MUSIC to find audio files (e.g. MP3, WMA) in the
“Root” folder of the system.
Voice
Select to find recorded audio files in the “Record” folder of the system.
The system will save all recorded files in this folder.
Play list (M3U)
Select to find playlist (M3U) files stored in the “Playlist” folder of the
system.
SD/MMC card
If an optional SD/MMC card is installed, select and confirm SD/MMC
CARD to find any files or folders stored on the card.
MSC
Enter Music mode to start music playback. To enter MSC mode, select
and confirm MSC in the Main menu (Playing an audio file in NAV mode
will place the system in MSC mode as well).
Operation
Press play/pause to play a track.
Press play/pause again to pause playback.
Press < or > while playback is paused to stop playback completely.
Press > to skip to the next track
Press and hold > to fast forward through the current track.
Press < to skip to the previous track
Press and hold < to reverse through the current track.
Press + /- to adjust the volume level.
Press REC/EQ for equalizer settings.
(Normal, Classical, Live, Pop or Rock).
English Deutsch Français Nederlands
Italiano Español Magyar Suomi Svenska Č
esky

8
Repeat play
Repeat Play options can be changed in the SYSTEM menu.
Options are Normal, One, All, Intro and Random.
(See the SYSTEM MODE (SYS) section for details)
Repeat A-B function
The A-B function allows to set a segment of a track to be played
repeatedly.
1. Press A-B to set the start point (A) of the track segment to be
repeated. The Play Mode Indicator will display A.
2. Press A-B again to set the end point (B) of the track segment.
3. The segment will now play in a loop and the Play Mode Indicator will
display A/B.
4. Press A-B again to resume normal playback.
FM
Select and confirm FM in the main menu. There are two methods of
tuning into stations: MANUAL and PRESET. When the system is in
PRESET mode, the current preset station number will be displayed in
the upper-left corner of the screen. Press play/pause to change between
these two modes.
Manual tuning
Press < or > to search for a radio station frequency.
Preset tuning
Press < or > to select the previous or next preset radio station.
Store Preset Stations
The system can store up to 20 radio station.
1. Place the system in MANUAL tuning mode
2. Tune to the radio station you want to store as a preset (e.g. 91.5).
3. Press A-B. The preset station indicator on the screen will start blinking.
4. Press < or > to select the desired Preset number (e.g. 01).
5. Press play/pause to confirm and store the station.
Store presets automatically
EnglishDeutschFrançaisNederlands
ItalianoEspañolMagyarSuomiSvenska

9
1. Place the system in PRESET or MANUAL tuning mode.
2. Press and hold MENU.
3. The system will automatically seek and store the first 20 frequencies.
Note: this will overwrite previously stored preset stations.
Delete a Preset Station
1. Place the player in PRESET tuning mode.
2. Press < or > to select the preset station to delete.
3. Press A-B to delete the preset station.
AUX
To connect an external audio source to the system.
1. Open the connections panel on the rear of the system in the direction
of the arrow.
2. Connect the 3.5mm audio cable to the AUX Line-in connection.
3. Connect the other end of the cable to the line-out of headphones
connection of the external audio source
4. Select and confirm AUX in the Main menu.
Recording
The system can record from 3 types of sources:
1. Microphone
2. Line-In
3. FM radio
English Deutsch Français Nederlands
Italiano Español Magyar Suomi Svenska

10
Note: see the SYS section for details about changing the recording
options
Voice Recording
1. Set the REC Input to “MIC”
2. Place the system in MSC mode.
3. Press REC to start recording through the built-in microphone.
4. Press play/pause to interrupt recording and press again to resume.
5. Press REC to stop and save the recording.
Note: the file will be saved to the “Record” folder. The file will be named
MICXXX.MP3 (XXX corresponds to the numerical sequence in which the
recording was made, numbering starts from 001).
If the VAD option is set to “On”, the system will automatically interrupt
recording when no signal is detected through the microphone.
Line-In Recording
1. Set the REC Input to “LINE-IN”
2. Place the player in AUX mode.
3. Press REC to start recording through the Line-In jack.
4. Press play/pause to interrupt recording and press again to resume.
5. Press REC to stop and save the recording.
Note: the file will be saved to the “Record” folder. The file will be named
LINEXXX.MP3 (XXX corresponds to the numerical sequence in which
the recording was made, numbering starts from 001).
If the VAD option is set to “On”, the system will automatically interrupt
recording when no signal is detected through the “LINE-IN”.
FM recording
1. Place the player in FM radio mode.
3. Press REC to start recording.
4. Press play/pause to interrupt recording and press again to resume.
5. Press REC to stop and save the recording.
Note: the file will be saved to the “Record” folder. The file will be named
FMXXX.MP3 (XXX corresponds to the numerical sequence in which the
recording was made, numbering starts from 001).
EnglishDeutschFrançaisNederlands
ItalianoEspañolMagyarSuomi

11
SET
The options are: Clock Set and Alarm Set.
Clock set
1. Enter SET mode and confirm.
2. Press < or > to select AM/PM, hour and minute.
3. Press + or - to adjust.
4. Press play/pause to confirm (or press MENU to cancel the setting).
Alarm set
1. Enter SET mode and confirm.
2. Press < or > to select AM/PM, hour and minute.
3. Press + or - to adjust.
4. Press play/pause to confirm (or press MENU to cancel the setting).
Activating alarm clock
The system can be set to turn on and play at a predefined time.
Note: See the SYS section for details about changing the alarm clock
options.
1. To turn the alarm clock on (or off); press TIME/ALARM while the
player is on.
2. The “Alarm On” indicator will appear on the screen.
3. Place the player in standby mode.
Note: If you are using an alarm mode other than “Buzz”, make sure to
set the desired volume before placing the system in standby mode.
When the alarm turns on;
1. Press SNOOZE to delay the alarm for 9 minutes.
1. Press TIME/ALARM to turn the alarm off.
SYS
The SYS options are: EQ, Repeat Mode, Display, Auto Off, Sleep Time,
Recording, Resume, Delete File, Format, Reset, Information, and Alarm
Mode.
English Deutsch Français Nederlands
Italiano Español Magyar Suomi

12
EQ (equalizer)
Adjust the EQ settings to optimize the sound. The EQ options are:
Normal, Classic, Live, Pop, and Rock.
1. Select and confirm EQ.
2. Press < or > to select an EQ option.
3. Press play/pause to confirm the change.
(Or press MENU to cancel the setting)
Repeat Mode
The repeat functions are:
Normal: Play tracks once in sequential order.
One: Play the current track repeatedly.
All: Play all tracks repeatedly.
Intro: Play the first 10 seconds of each track.
Random: Play tracks in random order.
1. Select and confirm Repeat Mode.
2. Press < or > to select a Repeat option.
3. Press play/pause to confirm the change.
(Or press MENU to cancel the setting)
Display
The Display options are: ID3 Tag, Lyric, Contrast, B-Light Time
(Backlight) and Language.
1. Select and confirm Display.
2. Press < or > to select a Display option.
3. Press play/pause to confirm the option.
(Or press MENU to cancel the setting)
ID3 Tag
Turn ID3 Tag display on or off.
(Only displayed if MP3 track contains ID3 Tag)
Lyric
Turn LYRIC display on or off.
EnglishDeutschFrançaisNederlands
ItalianoEspañolMagyarSuomi

13
(Only displayed if MP3 track contains Lyric information)
Contrast
Adjust the contrast of the display. The contrast setting ranges from 00 to
15 (00 = lowest contrast; 15 = highest contrast).
B-Light Time (Backlight)
Adjust the amount of time the backlight remains on after a button is
pressed.
Language
Adjust the language of the menu.
1. Select and confirm Display.
2. Press < or > to select an option.
3. Press play/pause to confirm.
4. Choose an setting and confirm.
(Or press MENU to cancel the setting)
Auto Off
Adjust the amount of time the player remains on after a button is
pressed.
1. Select and confirm Auto Off.
2. Press < or > to select an Auto Off option.
3. Press play/pause to confirm the change.
(Or press MENU to cancel the setting)
Sleep Time
Set the amount of time the player will play music for before turning off
automatically.
1. Select and confirm Sleep Time.
2. Press < or > to select an Auto Off option.
3. Press play/pause to confirm the change.
(Or press MENU to cancel the setting)
Recording
The Recording options are: REC Mode, VAD and REC Input.
English Deutsch Français Nederlands
Italiano Español Magyar
Suomi

14
1. Select and confirm Recording.
2. Press < or > to select a recording option.
3. Press play/pause to confirm the option.
(Or press MENU to cancel the setting)
REC Mode (Recording Mode)
Adjust the quality that the player records in.
VAD (Voice Activated Detection)
The system will record automatically when an audio signal is detected;
recording will be paused automatically when no audio signal is detected.
REC Input (Recording Input)
The REC Input options are: MIC and Line.
1. Select and confirm Rec Input.
2. Press < or > to select an option.
3. Press play/pause to confirm.
4. Choose an setting and confirm.
(Or press MENU to cancel the setting)
Resume
Adjust how the player resumes playing tracks after it has been turned off.
The Resume options are: Track and Time Line.
When Track is set to “On”, the player will remember the last track played
before it is turned off.
When Time Line is set to “On”, the player will remember the exact time-
point of the last track played before it is turned off.
1. Select and confirm Resume.
2. Press + or - to set Track.
3. Press play/pause to confirm the option.
4. Press + or - to set Time line.
5. Press play/pause to confirm the option.
(Or press MENU to cancel the setting)
Delete File
Delete Music or Voice files from the system.
EnglishDeutschFrançaisNederlands
ItalianoEspañolMagyar
Suomi

15
1. Select and confirm DELETE FILE
2. Select and confirm MUSIC or VOICE files to delete from the “Record”
folder. The system will display files one by one (If VOICE was selected,
the system will only display files in the “Record” folder.
3. Press < or > to select “Yes” or “No” and then press play/pause to
confirm.
4. If “Yes” was selected in step 3, the system will delete the file and then
display the next file in the folder. If “No” was selected, the system will
display next file.
5. Repeat step 3 until deleting files is finished and then press MENU to
exit.
Format
Prepare a disk (internal memory or installed SD/MMC card) for use with
the system when necessary. Always use the format function of the
system when it is necessary to format a disk.
Formatting removes all data on a disk. Make a back up of the data
before formatting the disk.
1. Select and confirm FORMAT.
2. Select and confirm INTERNAL M. or select and confirm SD/MMC
CARD.
3. Press < or > to select “Yes” or “No”
4. Press play/pause to confirm.
Note: Do not format disks for the system with the computer’s operating
system.
Reset
Reset the factory-default setting.
1. Select and confirm RESET.
2. Press < or > to select “Yes” or “No”.
3. Press play/pause to confirm.
Information
Displays system information.
English Deutsch Français Nederlands
Italiano Español Magyar
Suomi

16
1. Select and confirm INFORMATION.
2. Select and confirm F/W VERSION to display the firmware version.
3. Select and confirm INTERNAL M. to display the memory usage of the
internal memory disk;
4. Select and confirm SD/MMC CARD to display the memory usage of
the SD/MMC card.
5. Press MENU to exit.
Alarm Mode
Use the system as alarm clock. The options are: Music, FM, Buzz or
Record.
1. Select and confirm ALARM MODE.
2. Press < or > to select an option.
3. Press play/pause to confirm.
Note: The “Record” option will play files in the “Record” folder when the
alarm turns on.
Specifications:
Power Supply: AC: 100-240V
DC: 6V (4 x “C” Batteries)
Interface Port: USB 1.1
Supported Audio MP3: 96-320kbps, Variable Bit Rate
Formats: WMA: 32-192kbps
Recording Format: IMA-ADPCM encoding
DRM Support: Microsoft DRM 9 with Windows XP
SP1 and Windows Media Player
FM Frequency Range: 87.5 -108.0 MHz
Audio Input: 3.5mm Stereo
Audio Output: 3.5mm Stereo
Signal-to-Noise Ratio: ≥ 90dB
Frequency Response: 20-20,000Hz
Safety precautions:
To reduce risk of electric shock, this product should ONLY be opened by
an authorized technician when service is required. Disconnect the
product from mains and other equipment if a problem should occur.
EnglishDeutschFrançaisNederlands
ItalianoEspañolMagyar

17
Warranty:
No guarantee or liability can be accepted for any changes and
modifications of the product or damage caused due to incorrect use of
this product.
General:
Designs and specifications are subject to change without notice.
All logos brands and product names are trademarks or registered
trademarks of their respective holders and are hereby recognized as
such.
Copyright ©
Table of contents
Other König Electronic Stereo System manuals

König Electronic
König Electronic HAV-MCS50 User manual

König Electronic
König Electronic HAV-MCS42 User manual

König Electronic
König Electronic HAV-MCS30 User manual

König Electronic
König Electronic HAV-SDC20 User manual

König Electronic
König Electronic HAV-MCS35 User manual

König Electronic
König Electronic HAV-MCS42 User manual

König Electronic
König Electronic IPD-SPEAKER40 User manual

König Electronic
König Electronic HAV-MC100 User manual

König Electronic
König Electronic HAV-MCS52 User manual

König Electronic
König Electronic HAV-MCS30 User manual