König Electronic HAV-MCS42 User manual

156
AUDIO SYSTÉM
122
AUDIOJÄRJESTELMÄ
88
SISTEMA DE AUDIO
54
AUDIOSYSTEEM
19
AUDIOSYSTEM
173
SISTEM AUDIO
139
LJUDSYSTEM
105
AUDIORENDSZER
71
IMPIANTO AUDIO
37
SYSTÈME AUDIO
AUDIO SYSTEM
HAV-MCS42
190
АУДИО СИСТЕМА

2
ENGLISH
Main unit
1. iPod®Socket
2. CD Door
3. STEREO-MONO (ST-MP)/
CD-Mode Button
4. TIMER/SLEEP Button
5. STANDBY Button
6. STOP Button
7. TUNER Button
8. CD Button
9. iPod®Button
10. M-UP/ FOLDER UP Button
(MEMORY-UP/ FOLDER UP
11. –VOLUME+ Button
12. PLAY/PAUSE/BAND Button
13. Display
14. Remote sensor
15. MEM. /CLK.ADJ/PROG. Button
(MEMORY/CLOCK /PROGRAM)
16. /or /Buttons
(TUNE/SKIP UP/DOWN)
17. M-DN/FOLDER-DN Button
(MEMORY DOWN/FOLDER
DOWN)
18. CD OPEN/CLOSE Button
19. EQ Button
20. PHONES
21. AUX IN Socket
22. Right audio & left audio sockets
23. FM Antenna
24. VIDEO Sockets
25. SUBWOOFER
26. Speaker Connectors
27. RESET
28. AC Cord

3
Remote control
29. STANDBY Button
30. iPod®Button
31. PLAY MODE/ST-MO Button
32. STOP Button
33. VOLUME+ Button
34. Button
35. SLEEP TIMER Button
36. M-UP/FOLDER+ Button
37. M-DN/FOLDER- Button
38. PROG/CLK ADJ Button
39. CD OPEN/CLOSE Button
40. ID3 Button
41. MUTE Button
42. AUX Button
43. TUNER Button
44. CD Button
45. PLAY/PAUSE/BAND Button
46. Button
47. VOLUME- Button
48. Numeric keys
49. EQ Button

4
SETTING UP AND CONNECTING
Replacing the remote control’s battery
The remote control’s battery is already installed at
the factory. If the remote control stops operating,
replace the battery with a new one.
1. Squeeze the notched tab A while pulling the
battery door latch B out to take the battery holder
out.
2. Insert a “CR2025” 3V lithium battery. Make sure
the polarity (the + and – side of the battery) are
correct.
3. Place the battery holder back in the remote control.
BATTERY PRECAUTIONS
Follow these precautions when using a battery in this device.
1. Use only the size and type of battery specified in this manual.
2. Make sure you install the battery according to the polarity indicated in the battery
compartment. Reversed polarity may cause damage to the device.
3. If the device is not going to be used for a long period of time, remove the battery
to prevent damage or injury caused by possible battery leakage.
4. Do not try to recharge the battery, it’s not intended to be recharged and doing so
may cause the battery to rupture or leak.
Connecting speakers
1. To insert the speaker cable in to the connector,
push down the terminal lever of the connector and
put in the cable. Release the lever and the cable
will be clamped in the connector.
2. Make sure the cables are connected correct.
Connect the left speaker to the left terminal, and
the right speaker to the right terminal.
RED RED
BLACK
Connecting headphones
You can use headphones (not included) to listen in privacy. Insert the headphones’
3.5mm plug into the phones socket. Use corresponding adapters if you have different
plugs. The speakers will cut off automatically when the headphones are being connected
to the 3.5mm socket.
WARNING:
Excessive sound pressure from earphones and headphones can cause hearing loss.

5
AUX connection
1. Connect a 3.5mm stereo jack lead (not included)
to the AUX Socket and the other end to your
device such as a MP3 player.
2. Press the STANDBY Button to turn on the unit.
3. Press the AUX button on the remote control to
enter AUX mode.
4. Play the connected device.
Connecting subwoofer
An external subwoofer can be connected to the socket marked “Subwoofer” on the
rear of the main unit.
VIDEO OUTPUT connection
The video output from certain iPod®s can be watched on a TV using the VIDEO
OUT socket. The accompanying audio signal can be transferred via the AUDIO OUT
sockets.
A standard AV lead with yellow, red and white coloured plugs (not included) can be
used for this purpose. Please note that the sockets on your TV must be configured to
accept input rather than output signals to enable this feature to work correctly.
Mains connection
1. Unwind the AC power cord fully.
2. Insert the plug into any convenient AC outlet.
3. As soon as the unit has been connected to a wall
socket, the device will go in standby mode.
4. If you want to disconnect the AC plug, make sure
the unit is switched off. AC Plug
AC Outlet
BASIC OPERATION
Turn on the unit
Press the STANDBY button to turn the device “ON” or “OFF”. When the unit is in
standby mode, the clock shows in the display.
TUNER button Press to select TUNER mode.
CD button Press to select CD mode.
iPod button Press to select iPod®mode.
BAND/button Press to select AM/FM radio mode.
Press to play and pause playback in CD mode.
VOLUME +/- button Press repeatedly to adjust the volume. While you are
adjusting the volume, the level will be displayed in the
screen.
MUTE button (Remote only) Press once to mute the sound. Press again to return to
the original volume. While in mute, the display shows
MUTE
EQ button Press repeatedly to select your favourite equalizer
setting. There are different presets: Flat, Rock,
Classic, Jazz, Pop. The chosen setting will appear in
the display.

6
CLOCK AND TIMER
Setting the clock
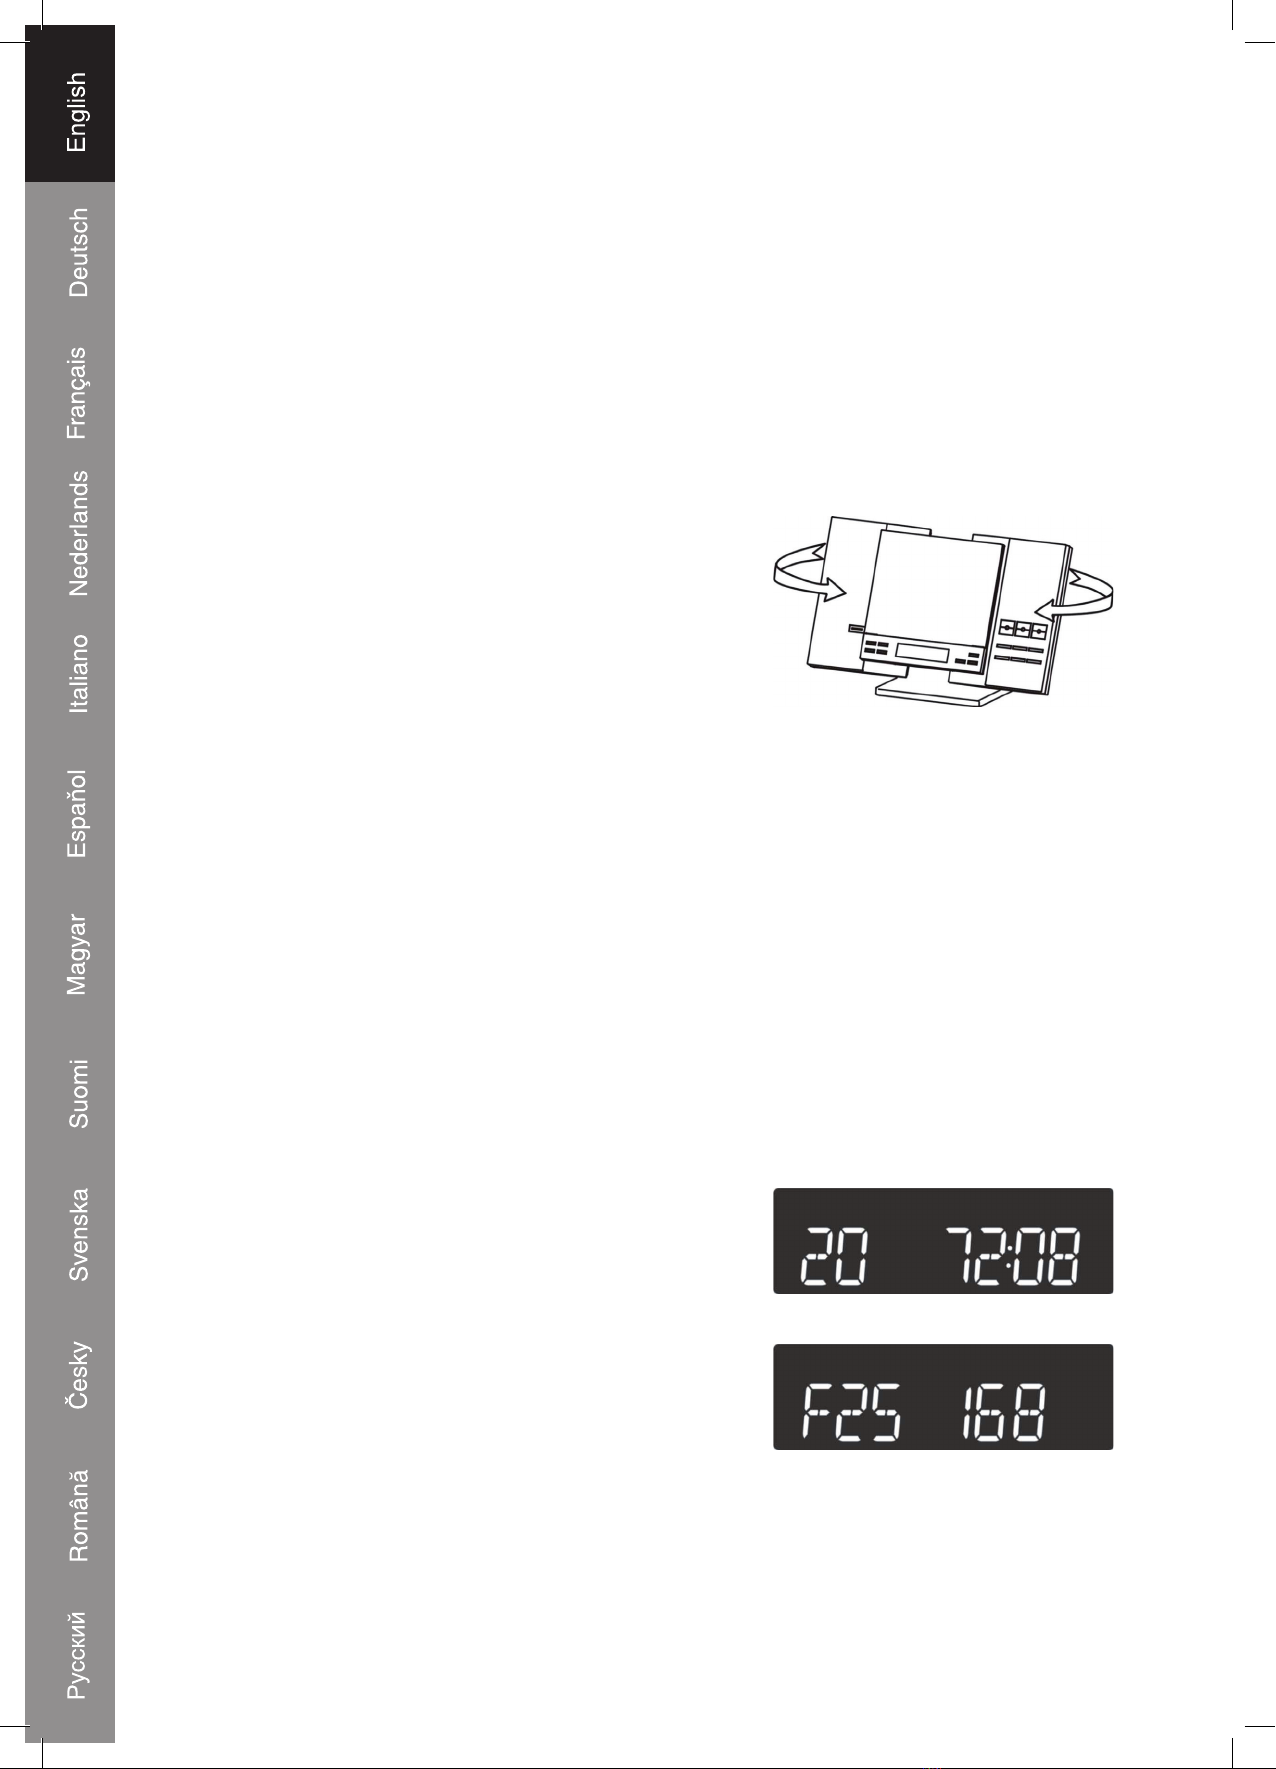
After disconnecting the device from the main socket, or after a power failure (if the
backup batteries are not inserted or empty), the display indicates 24:00. To set the
correct time, the radio needs to be in standby mode.
1. Press the MEMORY/CLK.ADJ button, 24H or
12H indicates the current setting and blinks in the
display.
2. Press /or /repeatedly to change
between 12 or 24 hour format.
3. Press the MEMORY/CLK.ADJ button again, the
hour digits blink.
4. Press /or /repeatedly until the
correct hour is selected.
5. Press the MEMORY/CLK.ADJ button again, the
minute digits blink.
6. Press /or /repeatedly until the
correct minute is selected.
7. Press the MEMORY/CLK.ADJ button again to save the set time.
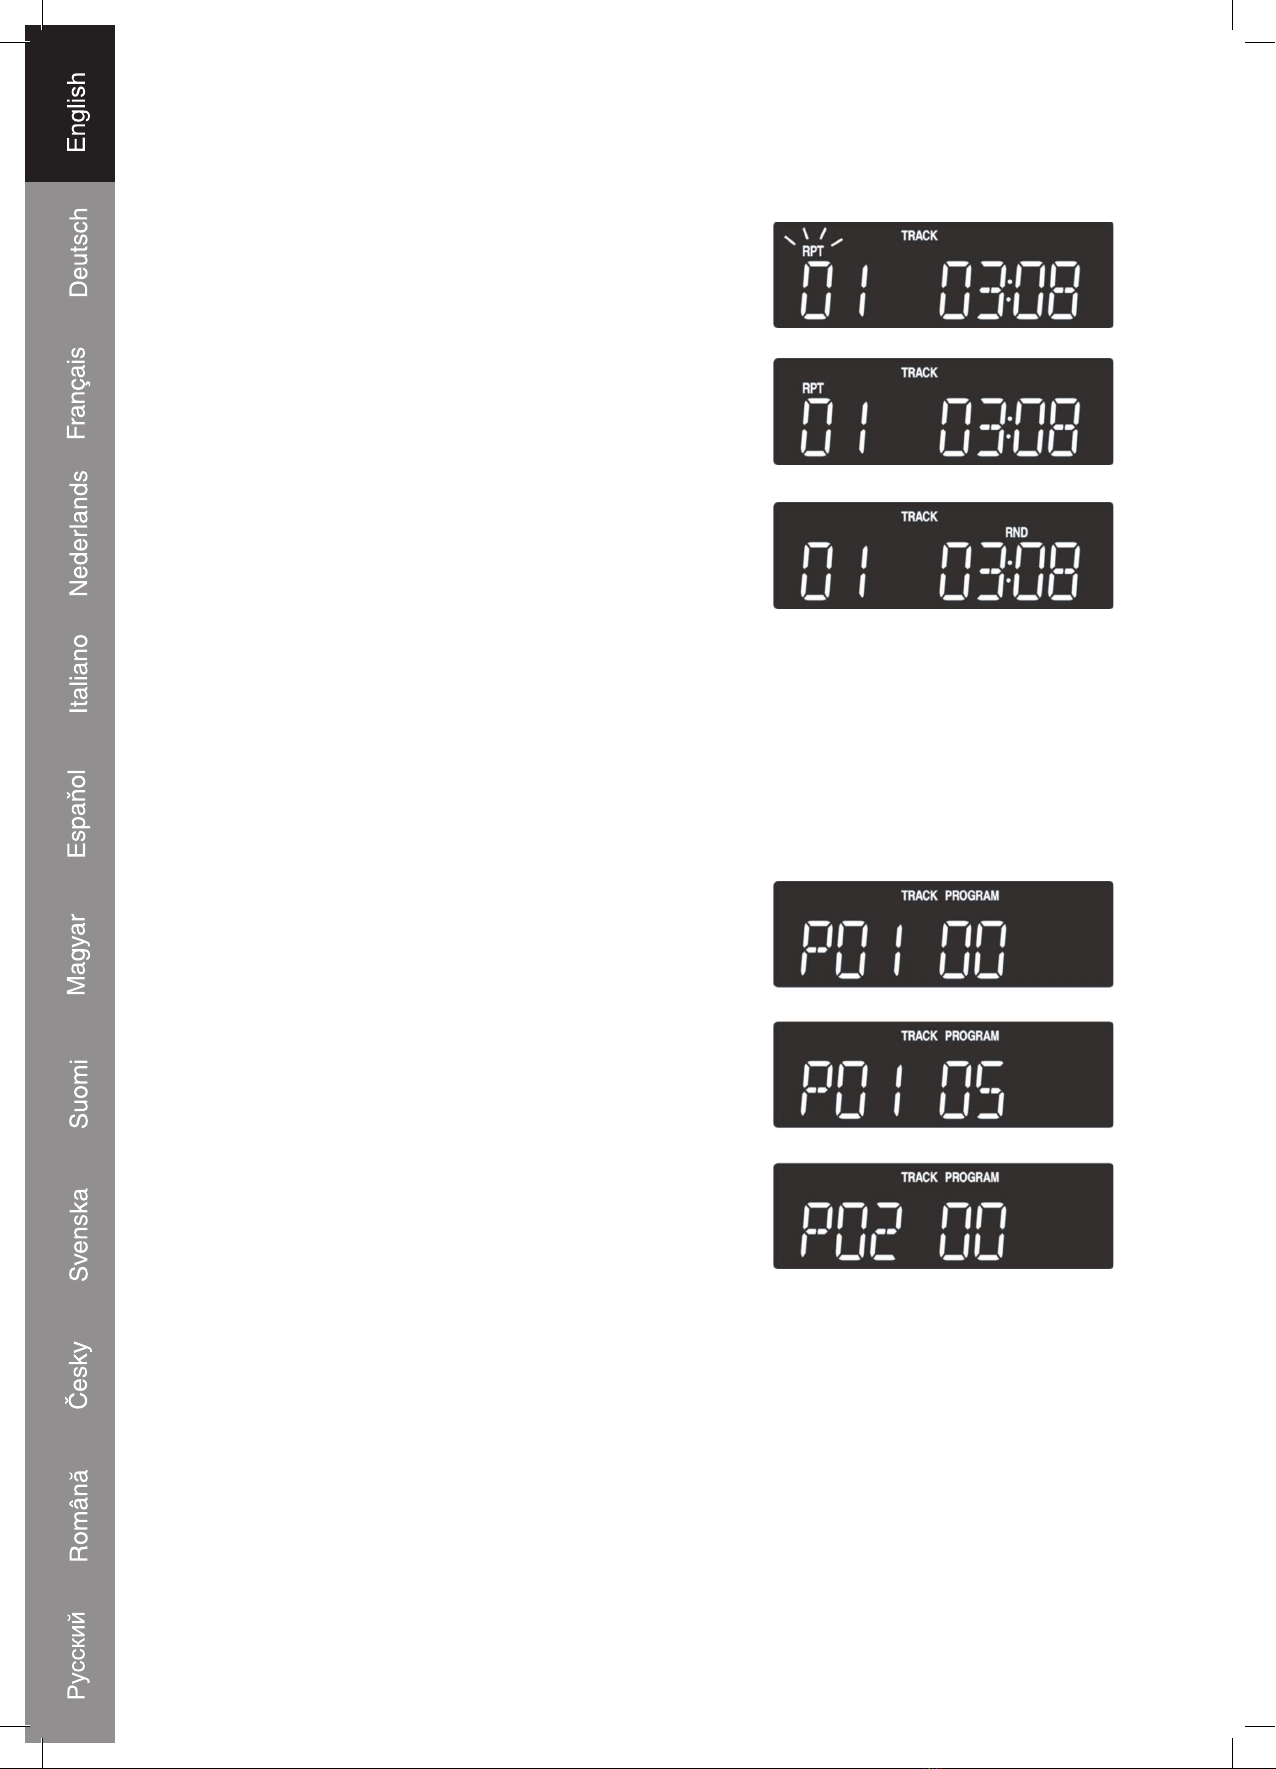
Setting the timer
To set the timer, the device needs to be in standby mode.
1. Press the TIMER/SLEEP button, the hour digits
blink.
2. Press /or /repeatedly until the
correct hour is selected.
3. Press the TIMER/SLEEP button, the minute digits
blink.
4. Press /or /repeatedly until the
correct minute is selected.
5. Press the TIMER/SLEEP button, CD, TUNER or
iPod blinks in the display.
6. Press /or /repeatedly to select
the desired music source. (CD, Tuner or iPod).
7. Press the TIMER/SLEEP button, the volume level
number blinks.
8. Press /or /repeatedly to adjust
the sound level.
9. Press the TIMER/SLEEP button again to complete
and save the timer. The timer icon in the display
indicates the timer has been successfully set.
If the unit is left in standby, it will automatically turn on at the set time.
Note: If you choose CD or iPod as a source, do not forget to place a CD or connect
the iPod. Otherwise playback will not be able to start.

7
To deactivate the timer, press and hold the TIMER/SLEEP button until disappears
from the display.
Setting the sleep function
While the unit is on, press the TIMER/SLEEP button
to activate sleep mode. Press /or /
repeatedly to set the desired sleep time. You can
choose between 120, 90, 60, 30 or 15 minutes. If
you set the desired time to 0, the sleep mode is
disabled.
Note: If the CD/iPod playing time is shorter than your selected sleep time, the music
will stop at the end of the disc. Sleep mode will not force the CD in to repeat mode.
TUNER OPERATION
1. Press the STANDBY button to turn on the unit.
2. Press the TUNER button to select TUNER mode.
3. Press BAND repeatedly to select your desired band.
Manual searching
Briefly tap the /or /button step by step to alter the reception frequency
downward or upward until you receive the desired station.
Automatic searching
1. Press and hold /or /approx 1 second to start automatic search in
the desired direction. The automatic search operation only detects strong stations.
You need to tune in manually to weaker signals.
Note: During automatic searching the volume will be automatically muted.
Saving stations in tuner memory
1. Tune in to the desired radio station.
2. Press the MEMORY/CLK.ADJ. button. A memory
number blinks in the display Press M-DN/
FOLDER- or M-UP/FOLDER+ until the desired
memory position appears in the display.
3. Press MEMORY/CLK.ADJ. again to store the
station at the selected position.
4. In order to store remaining stations repeat above
steps 1 to 3 until the memory is full.
Note: You can store up to 20 stations for both FM and AM frequencies. If you want to
overwrite an existing preset, you can just follow steps 1 to 3 and select the desired
number. The new station will overwrite the old one.

8
ST-MO/CD-MODE button
Press to switch between stereo and mono reception.
• When the unit is tuned into a stereo broadcast with a good signal, “ST” will show in
the display.
• If a stereo broadcast is received, but with interference, it is recommended to switch
to mono mode.
Selecting a preset station
Press M-DN/FOLDER- or M-UP/FOLDER+ button to go to the next or previous preset
station.
Tips for better reception
FM: Make sure you extend the FM lead wire antenna
fully. You can also try to vary the direction of the
antenna for a better signal reception.
AM: The unit has a built-in AM ferrite bar antenna.
Try to vary the position of the device for a better
AM reception.
IMPORTANT NOTES ON PLAYING CDS
Safety notes for operating the CD player
• Press the OPEN/CLOSE button to open the CD door. Make sure that no objects
obstruct the door. The disc loader can ONLY be opened or closed by pressing the
OPEN/CLOSE button. Take care no objects can fall into the unit when the CD door
is opened.
• Never touch the laser pick up lens. Never look at the laser beam directly.
• To remove a disc, hold it by the edges and remove it from the holder.
Loading discs
1. Press STANDBY to turn “ON” the unit.
2. Press the CD button to select CD mode, then press OPEN/CLOSE to open
the CD door.
3. Insert the discs with the unlabelled side facing down. Press the center of the disc
onto the black holder until locked.
4. Press the OPEN/CLOSE button to close the CD
door. After the CD door is closed, the player will
scan the disc and automatically start playback
from the first track.
5. Press the STOP button to stop playing. The
display shows the total amount of tracks on the
disc and the total playback time. If a MP3 or WMA
disc is in the compartment, the display shows the
total amount of folders on the disc and the current
track number.
6. If there is no disc in the compartment, the display
will show NO DISC.
Track No. Playback time
Folder No. Total track No.

9
Note: on MP3, WMA, CD-R / RW discs
• Because of non-standardized format definition / production of MP3, WMA, CD-R/
RW playback quality & performance are not guaranteed.
• Playback of MP3, WMA, CD-R / CD-RW may depend on recording conditions.
• Do not attach a seal or label to either side (the recordable side or the labeled side)
of a CD-R / RW disc. It may cause unbalanced CD’s and can result in malfunction.
• Do not load an un-recorded CD-R/RW disc. It will take over 30 seconds to read the
disc. The disc may be damaged if you try to open the CD door while reading the
disc.
COMPACT DISC PLAYER OPERATION
Normal Playback
After loading a disc the unit will automatically start playback from the first track.
Pause control
To pause temporarily during CD playback press
the BAND/button. Playback stops and the
current track time flashes in the display. Press the
BAND/button once more to cancel pause mode
and resume playback at the same point.
Skip track and high-speed music search
During playback, repeatedly press /or /to skip to the next or previous
track. During playback, press and hold /or /to search within a track at
high speed. Release /or /to return to normal playback.

10
CD mode
1. One track repeat
Select the track to be repeated and begin
playback. Press the ST-MO/CD-MODE button
once. The RPT indicator blinks in the display and
the selected track will be repeated continuously.
2. All track repeat
During playback, press the ST-MO/CD-MODE
button twice. The RPT indicator shows in the
display and all the tracks on the disc will be
repeated continuously.
3. Random playback
The random playback feature allows you to play
all the tracks on a disc in random order. Playback
stops when all tracks are played once. You can
select random playback while in stop mode or
while listening to the disc. Press the ST-MO/
CD-MODE button three times to start random playback mode, the RND indicator
appears in the display. If necessary, press the BAND/button to begin playback.
The player will randomly select a track to start playback from.
To cancel random playback, press the STOP button or press the ST-MO/CD-
MODE button. The RND indicator disappears and normal playback will resume from
that point.
Programmed playback
The CD player enables you to program a total of
20 tracks in any order. Any track can be programmed
as many times as you like.
1. Load a CD into the CD compartment.
2. Press the PROG button while in stop mode.
PROGRAM and P01 00 appears in the display.
3. Press /or /repeatedly to select
the desired track.
4. Press the PROG button to confirm the first track of
the program. P02 appears in the display and the
device is ready for the next input.
5. In order to program the remaining tracks repeat
above steps 3 and 4 until the memory is full.
6. When you have completed programming, press
BAND/to start playback of the programmed
track list. PROGRAM appears in the display.
Clear Program (Resume Normal Playback)
Press the STOP button twice while in the program mode, open the CD Door, or
change to another function mode.

11
MP3 or WMA DISC OPERATION
Normal Playback
After loading a MP3/WMA disc, the unit automatically
starts playback from the first track. If the track format
is MP3 or WMA, MP3 or WMA shows in the display
and the track number and folder number alternately
show in the display.
Pause control
To pause temporarily during playback press the
BAND/button. Playback pauses, and the
current playing time flashes in the display. Press
the BAND/button again to return to normal
playback.
Skip track and high-speed music search
During playback, repeatedly press /or /to skip to the next or previous
track. During playback, press and hold /or /to search within a track at
high speed. Release /or /to return to normal playback.
Select desired folder
While in stop mode, press the FOLDER-DN or FOLDER -UP button repeatedly to
select the desired folder. Press the BAND/button to start playback from the first
track in the folder.

12
CD mode
1. One track repeat
Select the track to be repeated and begin
playback. Press the ST-MO/CD-MODE button
once. The RPT indicator blinks in the display and
the selected track will be repeated continuously.
2. One folder repeat
Select the folder to be repeated and begin
playback. Press the ST-MO/CD-MODE button
twice. The RPT FOLDER indicator blinks in the
display and the selected folder will be repeated
continuously.
3. All track repeat
During playback, press the ST-MO/CD-MODE
button three times. The RPT indicator shows in
the display and all the tracks on the disc will be
repeated continuously.
4. Random playback
The random playback feature allows you to play
all the tracks on a disc in random order. Playback
stops when all tracks are played once. You can
select random playback while in stop mode or
while listening to the disc. Press the ST-MO/
CD-MODE button three times to start random playback mode, the RND indicator
appears in the display. If necessary, press the BAND/button to begin playback.
The player will randomly select a track to start playback from.
To cancel random playback, press the STOP button or press the ST-MO/CD-
MODE button. The RND indicator disappears and normal playback will resume from
that point.
Programmed Playback
The CD player enables you to program a total of 20
tracks in any order. Any track can be programmed
as many times as you like. Load a compact disc into
CD compartment.
1. Press the PROG button while in stop mode.
PROGRAM and P01 F-00 appears in the display.
2. Press /or /repeatedly to select
the desired folder.
3. Press the PROG button to confirm the folder of
the first track.
4. Press /or /repeatedly to select
the desired track number.
5. Press the PROG button to confirm the track
number for the first position in the program. P02
appears in the display and the device will be
waiting for your next input.
6. In order to store the remaining program repeat
above steps 3 and 5 until the memory is full.
7. When you have completed programming, press
BAND/to start playback of the programmed
track list. PROGRAM appears in the display.

13
Clear Program (Resume Normal Playback)
Press the STOP button twice while in the program mode, open the CD Door, or
change to another function mode.
iPod OPERATION WITH THE MAIN UNIT
This unit is equipped with an original Made For iPod®dock connector. This dock allows
you to connect, control and charge your iPod®via this audio system. The dock system
is able to fit most types of currently available iPod®s with the 5 included adapters.
Note: With new models becoming available, compatibility with the dock adapter are
subject to changes. It may be required to buy a new adapter.
To fit a dock adapter
Select the appropriate dock adaptor for your iPod®. Make sure that you use the correct
one as this will ensure a proper and secure placement of your iPod®.
1. Gently press the iPod®dock adapter into the dock at the top of the unit.
2. Carefully place your iPod®into the dock. (The iPod®can not be in a case or
“Skin”)
To remove/replace a dock adapter, first remove your iPod®, and then grip the dock
adapter and pull gently upwards.
Operating iPod®via main unit
1. Press the iPod®button. The display indicates
iPod®.
2. Select your desired music, photos or videos, etc
and play the connected iPod®as usual.
3. Press the BAND/button to play or pause.
4. Press and hold /or /to search within a track at high speed.
5. The numerical buttons 2,4,5,6 and 8 on the remote control can be used to operate
the menu and other functions of the iPod®. Press MENU/6 button to show the menu
of the iPod®, then use /2 or /8 button to highlight the item you want to select.
Press ENTER/5 to confirm. Press /4 buttons once to repeat one track, press
twice to repeat all. (Available in iPod®play only)
6. Press VOL+/- button to adjust to the desired volume.

14
Note:
•If you want to watch photos and videos from the iPod®, please connect the VIDEO
and AUDIO sockets on the rear of the unit as described in the “Setting up and
connecting” section of this user guide.
•This unit uses an iPod®Authentication Coprocessor to authenticate the 5G iPod®.
After connecting your iPod®to the dock, "iPod" blinks in the display while the iPod®
is being authorized. Your iPod®is authorized when iPod stops blinking in the display.
If iPod blinks continuously it is recommended to re-connect it.
Charging your iPod®
Please make sure you are using the correct dock adaptor for your iPod®and that
it is properly connected into the iPod®dock on the top of the unit. Failure to do so
may cause damage to your iPod®. While your iPod®is docked it recharges until fully
charged. Note that other non-docking types of iPod®will NOT charge.
iPod®Adapter Information
This system includes 5 different adapters designed to securely connect any “dock
able” iPod®model to the docking station. Refer to the chart below to select the proper
adapter for your particular iPod®model and insert that adapter into the docking station
before connecting your iPod®.
* No adapters are provided for the 5G (fifth generation) 30GB and 60GB iPod®s with
video capability. Please use the adapters that were included with these iPod®s at time
of purchase. They will fit properly into the docking station of this system.
We have also included one flat adapter with no opening at all. This serves, as a dust
cover that can be inserted in the docking station, if no iPod®is connected to the system
for an extended period of time.
iPod®Version
Adapters
iPod
®
Capacities
Docking Station Dust Cover. Install this cover in the Docking Station if no iPod will be
docked for an extended period of time
4G iPod iPod photo
(20 GB) (20/30 GB)
3G iPod
(10/15 GB)
3G iPod 4G iPod
(30/40 GB) (40 GB)
iPod photo
(40/60 GB)
iPod mini
iPod nano
Dust Cover
iPod® is a registered trademark of Apple Computer Corporation.

15
CARE AND MAINTENANCE
COMPACT DISCS
• Treat the disc carefully. Handle the disc only by its edges. Never allow your fingers
to contact with the shiny, unprinted side of the disc.
• Do not attach adhesive tape, stickers etc., to the disc label.
• Clean the disc periodically with a soft, lint-free, dry cloth. Never use detergents or
adhesive cleaners to clean the disc. If necessary, use a CD cleaning kit.
• If a disc skips or gets stuck on a section of the disc, it is probably dirty or damaged
(scratched).
• When cleaning the disc, wipe in straight lines from the center of the disc to the edge
of the disc. Never wipe in circular motions.
• To remove a disc from its storage case, press down on the center of the case and
lift the disc out, holding it carefully by the edges.
• Fingerprints and dust should be carefully wiped off the disc’s recorded surface with
a soft cloth. Unlike conventional records, compact discs have no groove to collect
dust and microscopic debris, so gently wiping with a piece of soft cloth should
remove most particles.
RESET THE UNIT
• If the unit exhibits abnormal operation, or fails to respond to button presses, use a
pointed non-metallic object such as a pencil tip to press the RESET button located
on the underside of the unit (see below).
• Disconnect the AC power from AC outlet and wait a few seconds for the built-in
microcomputer to reset.

16
SPECIFICATIONS
GENERAL
Power source AC ~230-240V 50Hz
DC 3V - 1 pc of “CR2025” lithium battery (included)
or equivalent for remote handset
Power Consumption 33 Watts
Dimension Main Unit: 368(W) x 243(H) x 168(D) mm
Speaker Box: 150(W) x 243(H) x 168(D) mm
TUNER SECTION
Frequency range FM: 87.5 – 108 MHz
MW: 522 – 1620 kHz
CD / MP3 /WMA SECTION
Playback System Vertical type CD mechanism
AUDIO SECTION
Power Output 2 x 5 Watts RMS @ 10% THD
Speaker impedance 4 ohms
Headphone Impedance 8 – 32 ohms
AUX input sensitivity 300 mV

17
Declaration of conformity
We,
Nedis B.V.
De Tweeling 28
5215MC ’s-Hertogenbosch
The Netherlands
Tel.: 0031 73 599 1055
Email: info@nedis.com
Declare that product:
Brand: KÖNIG Electronic
Model: HAV-MCS42
Description: Audio system
Is in conformity with the following standards
EMC: EN55013:2001+A1+A2
EN61000-3-2:2006
EN61000-3-3:1995+A1+A2
EN55020:2007
LVD: IEC 60065: 2001+A1:2005
And complies with the requirements of the European Union Directives.
2004/108/EC and 2006/95/EC
‘s-Hertogenbosch, 2nd October, 2008
Mrs. J. Gilad
Purchase Director

18
Safety precautions:
RISK OF ELECTRIC SHOCK
DO NOT OPEN
CAUTION To reduce risk of electric shock, this product should
ONLY be opened by an authorized technician when
service is required. Disconnect the product from
mains and other equipment if a problem should occur. Do not expose the product to
water or moisture.
Maintenance:
Clean only with a dry cloth. Do not use cleaning solvents or abrasives.
Warranty:
No guarantee or liability can be accepted for any changes and modifications of the
product or damage caused due to incorrect use of this product.
General:
Designs and specifications are subject to change without notice.
All logos brands and product names are trademarks or registered trademarks of their
respective holders and are hereby recognized as such.
Attention:
This product is marked with this symbol. It means that used electrical and
electronic products should not be mixed with general household waste.
There is a separate collections system for these products.
Copyright ©

19
DEUTSCH
Hauptgerät
1. iPod®-Buchse
2. CD-Tür
3. Taste für STEREO-MONO
(ST-MP)/CD-Modus
4. TIMER/SLEEP-Taste
5. STANDBY-Taste
6. STOP-Taste
7. TUNER-Taste
8. CD-Taste
9. iPod®-Taste
10. M-UP/FOLDER UP-Taste
(SPEICHER/ORDNER
AUFWÄRTS)
11. –VOLUME+ Taste
12. PLAY/PAUSE/BAND-Taste
13. Display
14. Fernbedienungsempfänger
15. MEM. /CLK.ADJ/PROG.- Taste
(SPEICHER/UHR/PROGRAMM)
16. /oder /Tasten
(SENDER EINSTELLEN/AUF-
/ABWÄRTS SPRINGEN)
17. M-DN/FOLDER-DN-Taste
(SPEICHER/ORDNER
ABWÄRTS)
18. CD OPEN/CLOSE-Taste
19. EQ-Taste
20. KOPFHÖRER-Buchse
21. AUX IN-Buchse
22. Buchsen für RECHTEN
& LINKEN AUDIO-Anschluss
23 FM-Antenne
24. VIDEO-Buchsen
25. SUBWOOFER-Buchse
26. Lautsprecheranschlüsse
27. RESET-Taste
28. Netzkabel

20
Fernbedienung:
29. STANDBY-Taste
30. iPod®-Taste
31. PLAY MODE/ST-MO-Taste
32. STOP-Taste
33. VOLUME+ Taste
34. -Taste
35. SLEEP/TIMER-Taste
36. M-UP/FOLDER+ Taste
37. M-DN/FOLDER- Taste
38. PROG/CLK ADJ-Taste
39. CD OPEN/CLOSE-Taste
40. ID3-Taste
41. MUTE-Taste
42. AUX-Taste
43. TUNER-Taste
44. CD-Taste
45. PLAY/PAUSE/BAND-Taste
46. -Taste
47. VOLUME-Taste
48. Zifferntasten
49. EQ-Taste
Other manuals for HAV-MCS42
1
This manual suits for next models
1
Table of contents
Languages:
Other König Electronic Stereo System manuals

König Electronic
König Electronic HAV-PMS10 User manual

König Electronic
König Electronic HAV-MCS50 User manual

König Electronic
König Electronic HAV-MCS35 User manual

König Electronic
König Electronic HAV-MCS42 User manual

König Electronic
König Electronic HAV-MCS52 User manual

König Electronic
König Electronic IPD-SPEAKER40 User manual

König Electronic
König Electronic HAV-MCS30 User manual

König Electronic
König Electronic HAV-MC100 User manual

König Electronic
König Electronic HAV-MCS30 User manual

König Electronic
König Electronic HAV-SDC20 User manual