K-Tech ET401 User manual

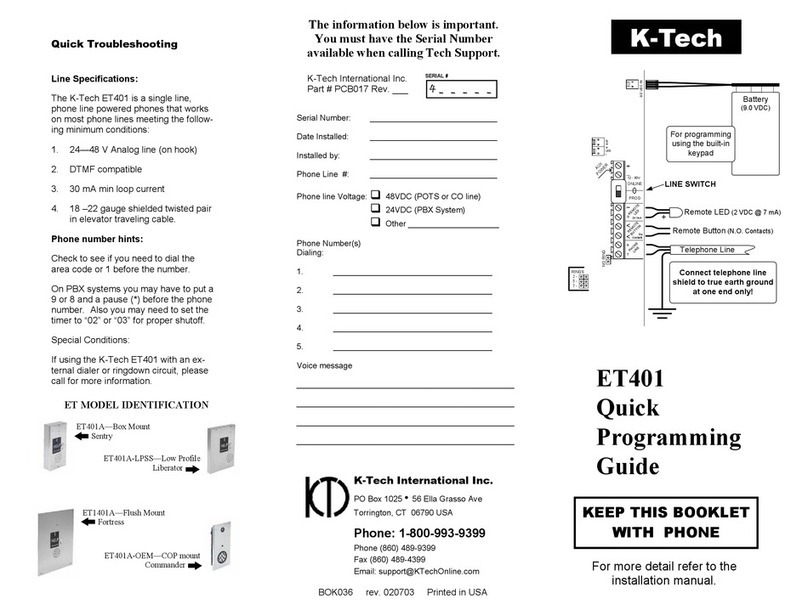
Line Specifications:
The K-Tech ET401 is a single line,
phone line powered phones that works
on most phone lines meeting the follow-
ing minimum conditions:
1. 24—48 V Analog line (on hook)
2. DTMF compatible
3. 30 mA min loop current
4. 18 –22 gauge shielded twisted pair
in elevator traveling cable.
Phone number hints:
Check to see if you need to dial the
area code or 1 before the number.
On PBX systems you may have to put a
9 or 8 and a pause (*) before the phone
number. Also you may need to set the
timer to “02” or “03” for proper shutoff.
Special Conditions:
If using the K-Tech ET401 with an ex-
ternal dialer or ringdown circuit, please
call for more information.
Quick Troubleshooting K-Tech
ET401
Quick
Programming
Guide
Serial Number: ____________________________
Date Installed: ____________________________
Installed by: ____________________________
Phone Line #: ____________________________
Phone line Voltage: 48VDC (POTS or CO line)
24VDC (PBX System)
Other ____________________
Phone Number(s)
Dialing:
1. ___________________________________
2. ___________________________________
3. ___________________________________
4. ___________________________________
5. ___________________________________
Voice message
________________________________________________
________________________________________________
________________________________________________
________________________________________________
The information below is important.
You must have the Serial Number
available when calling Tech Support.
KEEP THIS BOOKLET
WITH PHONE
BOK036 rev. 020703 Printed in USA
For more detail refer to the
installation manual.
ET MODEL IDENTIFICATION
ET1401A—Flush Mount
Fortress
ET401A-LPSS—Low Profile
Liberator
ET401A—Box Mount
Sentry
ET401A-OEM—COP mount
Commander
SERIAL #
K-Tech International Inc.
Part # PCB017 Rev. ___ 4 _ _ _ _ _
BUT
LED
+
-
9.0 VDC IN
REMOTE
LED
2V 7mA
PHONE
LINE
R
T
REMOTE
BUTTON
Dry
Contacts
12 - 30V
ONLINE
PROG
AUX
POWER
RINGS
2 -
5 -
7 -
NO RING
Remote Button
(N.O. Contacts)
+Remote LED
(2 VDC @ 7 mA)
Connect telephone line
shield to true earth ground
at one end only!
Telephone Line
Battery
(9.0 VDC)
For programming
using the built-in
keypad
LINE SWITCH
PO Box 1025 • 56 Ella Grasso Ave
Torrington, CT 06790 USA
Phone: 1-800-993-9399
Phone (860) 489-9399
Fax (860) 489-4399
K-Tech International Inc.

Phone can be programmed through keypad or
remotely. If using Keypad, battery must be
hooked up. (disconnect when transporting or
storing – you will not lose memory)
Option 1: Keypad:
1. Hook up battery
2. Move Line Switch to PROGRAM
3. Wait 15 seconds or till program says
“Program Complete”
4. Press *7
5. Enter security code [factory 1234]
6. Press *, then (Feature) 1,
7. Press # to start recording (you have 10
seconds), wait for confirmation.
8. Press * then # to exit programming mode
9. Press *, then 1 to test
10. When done move Line Switch to ONLINE
11. Disconnect Battery (see Note 1)
Option 2: Remote:
1. Call into phone
2. Wait 10 seconds after phone answers
3. Press *7 (phone should prompt for security
code)
4. Enter security code [factory 1234]
5. Press *, then (Feature) 1,
6. Press # to start recording (you have 10
seconds - see note 3), wait for
confirmation.
7. Press * then # to exit programming mode
8. Press *, then 1 to test
Hang up and have someone at location test
phone.
To delete voice message:
Follow steps up to (6) “Press # to start
recording” and don’t press #. Wait for the unit
to say “Stop”, then exit programming mode.
Phone can be programmed through keypad or
remotely. If using Keypad, battery must be
hooked up. (disconnect when transporting or
storing – you will not lose memory)
Option 1: Keypad:
1. Hook up Battery
2. Move Line Switch to PROGRAM
3. Wait 15 seconds or till program says
“Program Complete”
4. Press *7
5. Enter security code [factory 1234]
6. Press *, then (Feature) 3, then press
location number (start with 1)
7. Enter phone number, then press # (Listen
for confirmation – repeat if necessary)
8. Press * then # to exit programming mode
9. Press *, then 3, then 1 to test
10. When done move Line Switch to ONLINE
11. Disconnect Battery (see Note 1)
Option 2: Remote:
1. Call into phone
2. Wait 10 seconds after phone answers
3. Press *7 (phone should prompt for security
code)
4. Enter security code [factory 1234]
5. Press *, then (Feature) 3, then press
location number (start with 1)
6. Enter phone number, then press # (Listen
for confirmation – repeat if necessary)
7. Press * then # to exit programming mode
8. Press *, then 3, then 1 to test
9. Hang up and have someone at location test
phone.
Quick Number Programming Feature List
(Program Feature Number)
1 - Voice Message #1
2 - Voice Message #2
3 – Phone Directory -
Locations 1,2,3,4,5
4 – Timer minutes
5 – Outgoing number of
rings
6 – Not used
7 – Enter programming mode
8 – ID number
9 – Security code (see Note 2)
Voice Location Programming
Note 1: Reduced volume can indicate a
weak line or interference on the line. To
maximize volume, set Program/Online
switch to Program, wait for prompt, and
then press * 0 9. Leave battery plugged
in and be sure back cover is attached.
Note 2: If security code is changed and
code is lost or forgotten, phone will
have to be returned to K-Tech for
reprogramming.
Note 3: for longer time—instead of
pressing #, press from 1—8 for
additional seconds (pressing 2 = 12
seconds—10 + 2)

Phone can be programmed through keypad or
remotely. If using Keypad, battery must be
hooked up. (disconnect when transporting or
storing – you will not lose memory)
Option 1: Keypad:
1. Hook up battery
2. Move Line Switch to PROGRAM
3. Wait 15 seconds or till program says
“Program Complete”
4. Press *7
5. Enter security code [factory 1234]
6. Press *, then (Feature) 1,
7. Press # to start recording (you have 10
seconds), wait for confirmation.
8. Press * then # to exit programming mode
9. Press *, then 1 to test
10. When done move Line Switch to ONLINE
11. Disconnect Battery (see Note 1)
Option 2: Remote:
1. Call into phone
2. Wait 10 seconds after phone answers
3. Press *7 (phone should prompt for security
code)
4. Enter security code [factory 1234]
5. Press *, then (Feature) 1,
6. Press # to start recording (you have 10
seconds - see note 3), wait for
confirmation.
7. Press * then # to exit programming mode
8. Press *, then 1 to test
Hang up and have someone at location test
phone.
To delete voice message:
Follow steps up to (6) “Press # to start
recording” and don’t press #. Wait for the unit
to say “Stop”, then exit programming mode.
Phone can be programmed through keypad or
remotely. If using Keypad, battery must be
hooked up. (disconnect when transporting or
storing – you will not lose memory)
Option 1: Keypad:
1. Hook up Battery
2. Move Line Switch to PROGRAM
3. Wait 15 seconds or till program says
“Program Complete”
4. Press *7
5. Enter security code [factory 1234]
6. Press *, then (Feature) 3, then press
location number (start with 1)
7. Enter phone number, then press # (Listen
for confirmation – repeat if necessary)
8. Press * then # to exit programming mode
9. Press *, then 3, then 1 to test
10. When done move Line Switch to ONLINE
11. Disconnect Battery (see Note 1)
Option 2: Remote:
1. Call into phone
2. Wait 10 seconds after phone answers
3. Press *7 (phone should prompt for security
code)
4. Enter security code [factory 1234]
5. Press *, then (Feature) 3, then press
location number (start with 1)
6. Enter phone number, then press # (Listen
for confirmation – repeat if necessary)
7. Press * then # to exit programming mode
8. Press *, then 3, then 1 to test
9. Hang up and have someone at location test
phone.
Quick Number Programming Feature List
(Program Feature Number)
1 - Voice Message #1
2 - Voice Message #2
3 – Phone Directory -
Locations 1,2,3,4,5
4 – Timer minutes
5 – Outgoing number of
rings
6 – Not used
7 – Enter programming mode
8 – ID number
9 – Security code (see Note 2)
Voice Location Programming
Note 1: Reduced volume can indicate a
weak line or interference on the line. To
maximize volume, set Program/Online
switch to Program, wait for prompt, and
then press * 0 9. Leave battery plugged
in and be sure back cover is attached.
Note 2: If security code is changed and
code is lost or forgotten, phone will
have to be returned to K-Tech for
reprogramming.
Note 3: for longer time—instead of
pressing #, press from 1—8 for
additional seconds (pressing 2 = 12
seconds—10 + 2)

Phone can be programmed through keypad or
remotely. If using Keypad, battery must be
hooked up. (disconnect when transporting or
storing – you will not lose memory)
Option 1: Keypad:
1. Hook up battery
2. Move Line Switch to PROGRAM
3. Wait 15 seconds or till program says
“Program Complete”
4. Press *7
5. Enter security code [factory 1234]
6. Press *, then (Feature) 1,
7. Press # to start recording (you have 10
seconds), wait for confirmation.
8. Press * then # to exit programming mode
9. Press *, then 1 to test
10. When done move Line Switch to ONLINE
11. Disconnect Battery (see Note 1)
Option 2: Remote:
1. Call into phone
2. Wait 10 seconds after phone answers
3. Press *7 (phone should prompt for security
code)
4. Enter security code [factory 1234]
5. Press *, then (Feature) 1,
6. Press # to start recording (you have 10
seconds - see note 3), wait for
confirmation.
7. Press * then # to exit programming mode
8. Press *, then 1 to test
Hang up and have someone at location test
phone.
To delete voice message:
Follow steps up to (6) “Press # to start
recording” and don’t press #. Wait for the unit
to say “Stop”, then exit programming mode.
Phone can be programmed through keypad or
remotely. If using Keypad, battery must be
hooked up. (disconnect when transporting or
storing – you will not lose memory)
Option 1: Keypad:
1. Hook up Battery
2. Move Line Switch to PROGRAM
3. Wait 15 seconds or till program says
“Program Complete”
4. Press *7
5. Enter security code [factory 1234]
6. Press *, then (Feature) 3, then press
location number (start with 1)
7. Enter phone number, then press # (Listen
for confirmation – repeat if necessary)
8. Press * then # to exit programming mode
9. Press *, then 3, then 1 to test
10. When done move Line Switch to ONLINE
11. Disconnect Battery (see Note 1)
Option 2: Remote:
1. Call into phone
2. Wait 10 seconds after phone answers
3. Press *7 (phone should prompt for security
code)
4. Enter security code [factory 1234]
5. Press *, then (Feature) 3, then press
location number (start with 1)
6. Enter phone number, then press # (Listen
for confirmation – repeat if necessary)
7. Press * then # to exit programming mode
8. Press *, then 3, then 1 to test
9. Hang up and have someone at location test
phone.
Quick Number Programming Feature List
(Program Feature Number)
1 - Voice Message #1
2 - Voice Message #2
3 – Phone Directory -
Locations 1,2,3,4,5
4 – Timer minutes
5 – Outgoing number of
rings
6 – Not used
7 – Enter programming mode
8 – ID number
9 – Security code (see Note 2)
Voice Location Programming
Note 1: Reduced volume can indicate a
weak line or interference on the line. To
maximize volume, set Program/Online
switch to Program, wait for prompt, and
then press * 0 9. Leave battery plugged
in and be sure back cover is attached.
Note 2: If security code is changed and
code is lost or forgotten, phone will
have to be returned to K-Tech for
reprogramming.
Note 3: for longer time—instead of
pressing #, press from 1—8 for
additional seconds (pressing 2 = 12
seconds—10 + 2)

Line Specifications:
The K-Tech ET401 is a single line,
phone line powered phones that works
on most phone lines meeting the follow-
ing minimum conditions:
1. 24—48 V Analog line (on hook)
2. DTMF compatible
3. 30 mA min loop current
4. 18 –22 gauge shielded twisted pair
in elevator traveling cable.
Phone number hints:
Check to see if you need to dial the
area code or 1 before the number.
On PBX systems you may have to put a
9 or 8 and a pause (*) before the phone
number. Also you may need to set the
timer to “02” or “03” for proper shutoff.
Special Conditions:
If using the K-Tech ET401 with an ex-
ternal dialer or ringdown circuit, please
call for more information.
Quick Troubleshooting K-Tech
ET401
Quick
Programming
Guide
Serial Number: ____________________________
Date Installed: ____________________________
Installed by: ____________________________
Phone Line #: ____________________________
Phone line Voltage: 48VDC (POTS or CO line)
24VDC (PBX System)
Other ____________________
Phone Number(s)
Dialing:
1. ___________________________________
2. ___________________________________
3. ___________________________________
4. ___________________________________
5. ___________________________________
Voice message
________________________________________________
________________________________________________
________________________________________________
________________________________________________
The information below is important.
You must have the Serial Number
available when calling Tech Support.
KEEP THIS BOOKLET
WITH PHONE
BOK036 rev. 020703 Printed in USA
For more detail refer to the
installation manual.
ET MODEL IDENTIFICATION
ET1401A—Flush Mount
Fortress
ET401A-LPSS—Low Profile
Liberator
ET401A—Box Mount
Sentry
ET401A-OEM—COP mount
Commander
SERIAL #
K-Tech International Inc.
Part # PCB017 Rev. ___ 4 _ _ _ _ _
BUT
LED
+
-
9.0 VDC IN
REMOTE
LED
2V 7mA
PHONE
LINE
R
T
REMOTE
BUTTON
Dry
Contacts
12 - 30V
ONLINE
PROG
AUX
POWER
RINGS
2 -
5 -
7 -
NO RING
Remote Button
(N.O. Contacts)
+Remote LED
(2 VDC @ 7 mA)
Connect telephone line
shield to true earth ground
at one end only!
Telephone Line
Battery
(9.0 VDC)
For programming
using the built-in
keypad
LINE SWITCH
PO Box 1025 • 56 Ella Grasso Ave
Torrington, CT 06790 USA
Phone: 1-800-993-9399
Phone (860) 489-9399
Fax (860) 489-4399
Email: support@KTechOnline.com
K-Tech International Inc.

Line Specifications:
The K-Tech ET401 is a single line,
phone line powered phones that works
on most phone lines meeting the follow-
ing minimum conditions:
1. 24—48 V Analog line (on hook)
2. DTMF compatible
3. 30 mA min loop current
4. 18 –22 gauge shielded twisted pair
in elevator traveling cable.
Phone number hints:
Check to see if you need to dial the
area code or 1 before the number.
On PBX systems you may have to put a
9 or 8 and a pause (*) before the phone
number. Also you may need to set the
timer to “02” or “03” for proper shutoff.
Special Conditions:
If using the K-Tech ET401 with an ex-
ternal dialer or ringdown circuit, please
call for more information.
Quick Troubleshooting K-Tech
ET401
Quick
Programming
Guide
Serial Number: ____________________________
Date Installed: ____________________________
Installed by: ____________________________
Phone Line #: ____________________________
Phone line Voltage: 48VDC (POTS or CO line)
24VDC (PBX System)
Other ____________________
Phone Number(s)
Dialing:
1. ___________________________________
2. ___________________________________
3. ___________________________________
4. ___________________________________
5. ___________________________________
Voice message
________________________________________________
________________________________________________
________________________________________________
________________________________________________
The information below is important.
You must have the Serial Number
available when calling Tech Support.
KEEP THIS BOOKLET
WITH PHONE
BOK036 rev. 020703 Printed in USA
For more detail refer to the
installation manual.
ET MODEL IDENTIFICATION
ET1401A—Flush Mount
Fortress
ET401A-LPSS—Low Profile
Liberator
ET401A—Box Mount
Sentry
ET401A-OEM—COP mount
Commander
SERIAL #
K-Tech International Inc.
Part # PCB017 Rev. ___ 4 _ _ _ _ _
BUT
LED
+
-
9.0 VDC IN
REMOTE
LED
2V 7mA
PHONE
LINE
R
T
REMOTE
BUTTON
Dry
Contacts
12 - 30V
ONLINE
PROG
AUX
POWER
RINGS
2 -
5 -
7 -
NO RING
Remote Button
(N.O. Contacts)
+Remote LED
(2 VDC @ 7 mA)
Connect telephone line
shield to true earth ground
at one end only!
Telephone Line
Battery
(9.0 VDC)
For programming
using the built-in
keypad
LINE SWITCH
PO Box 1025 • 56 Ella Grasso Ave
Torrington, CT 06790 USA
Phone: 1-800-993-9399
Phone (860) 489-9399
Fax (860) 489-4399
K-Tech International Inc.
Other manuals for ET401
3
Table of contents
Other K-Tech Conference System manuals
Popular Conference System manuals by other brands

Yealink
Yealink CP920 quick start guide

Audibax
Audibax Sidney Conference 1000 user manual

Prentke Romich Company
Prentke Romich Company Accent 800 Hardware manual

Grandstream Networks
Grandstream Networks GVC3200 Administration guide

Beyerdynamic
Beyerdynamic Orbis quick start guide

Berkeley Varitronics Systems
Berkeley Varitronics Systems OCTOPUS quick start guide

Lenovo
Lenovo ThinkSmart Hub 500 User guide and hardware maintenance manual

Univox
Univox PLS-700 installation guide

Crestron
Crestron UC-MX70-Z quick start

RADVision
RADVision Scopia XT1000 user guide

Clear One
Clear One ClearOne RAV 600 quick start guide

Clear One
Clear One COLLABORATE VERSA 50 quick start guide