Kaadas L8 User manual

www.kaadasgroup.com
Shenzhen Kaadas Intelligent Technology Co.,Ltd reserves all rights
for the final interpretation to this user manual
All design and specifications are subject to change without notice.
L8 User Manual

Cautions
This section contains important information to ensure the user's safety and prevent potential damage to property.
Please, read this section carefully and use the product accordingly.
Content
1 How to install
Package Content
Explosive View
Before Installation
Installation Steps
2 Product Overview
Front Escutcheon
Back Escutcheon
3 How to set
Before set
First time access into master mode
User setting
Access into master mode by master fingerprint
4 How to use
Open door from outdoor
Open door by mechanical key override
Close door from outdoor/Close door from indoor
5 Other Features
Restore to Factory Setting
Emergency Power Supply
Reboot
Replace Battery
Extension Function
1 How to install
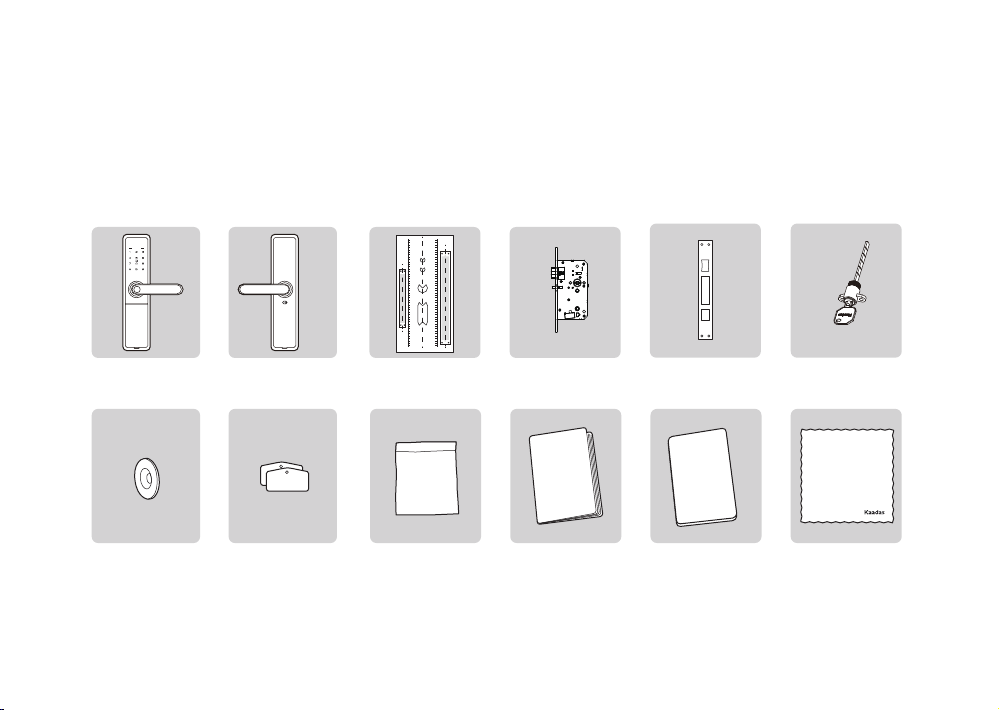
Package Content
This described package content is for reference only, All package contents are subject to the final real packing.
If some components lost, please check with the sellers.
Outside escutcheon
with rubber gasket
Mounting Plate RFID Card
Inside escutcheon
with rubber gasket
Installation
Template
Mortise Strike Plate
Assembly
Mechanical Key and
Cylinder
Screw
pack
User
Manual
User Manual Warranty Card
Warranty
card
Screw Pack Micro-fiber Wiper

1110
1 2 3 4 5 6 7 8 9
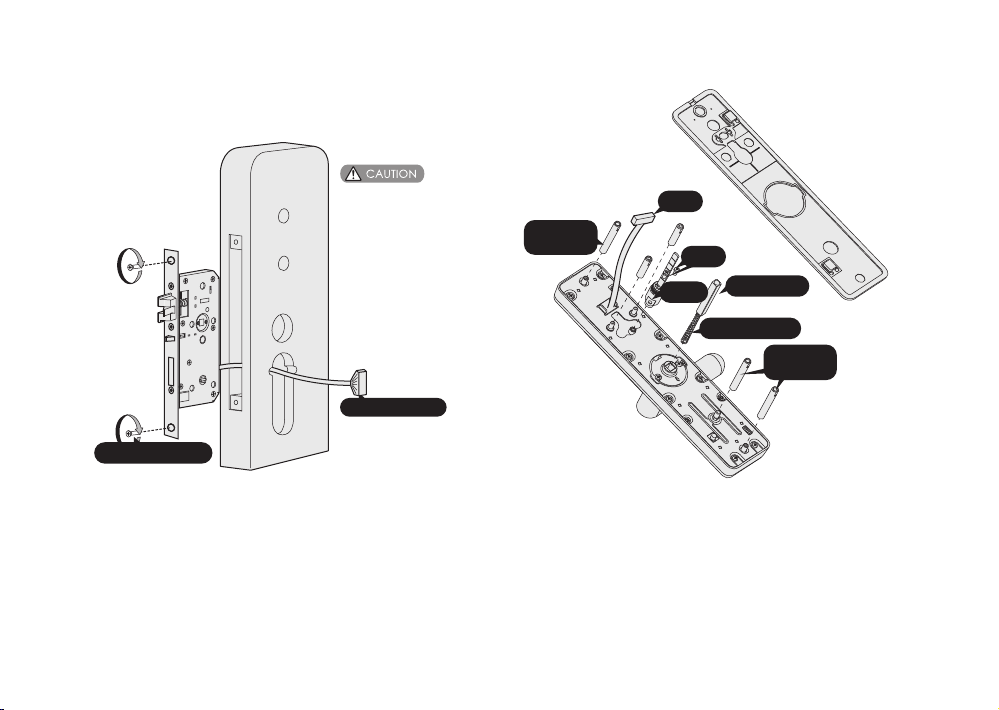
Explosive View
1.Inside escutcheon cover
2.Mounting screw(3pcs)
3.Inside escutcheon assembly
4.Pressure spring (2pcs)
5.Square shaft (2pcs)
6.Mounting plate (1pcs)
7.Mortise (1pcs)
8.Connecting screw bolt(M6)(3pcs)
9.Outside escutcheon assembly
10.Screw for mortise (2pcs)
11.Connecting screw bolt(M5) (2pcs)
Notice: the pressure spring have to screw in the square shaft.

Before Installation
Check Door Open Direction Change latch bolt direction
Right-out Right-in
Left-out Left-in
1. Move the latch bolt
switcher to the other
end as the arrow shows.
2. Push the latch
bolt inside the
mortise.
3. Turn around
180 degree.
4. Let the
latch bolt
eject.
Notice:
Make sure the position of 2 directional screws is faced to the indoor direction,
then fasten them properly.
Directional
screws

Screws
Cable
Change Handle Direction
Change Outside escutcheon Handle Direction
Taking out screws, positional
component and shield sleeve
in proper order.
Put the cable into the right end,
then place shield sleeve and
positional component on proper
order, and fasten the screws at
last.
Rotating the handle to the other end.
Positional
Component Positional
Component
Screws
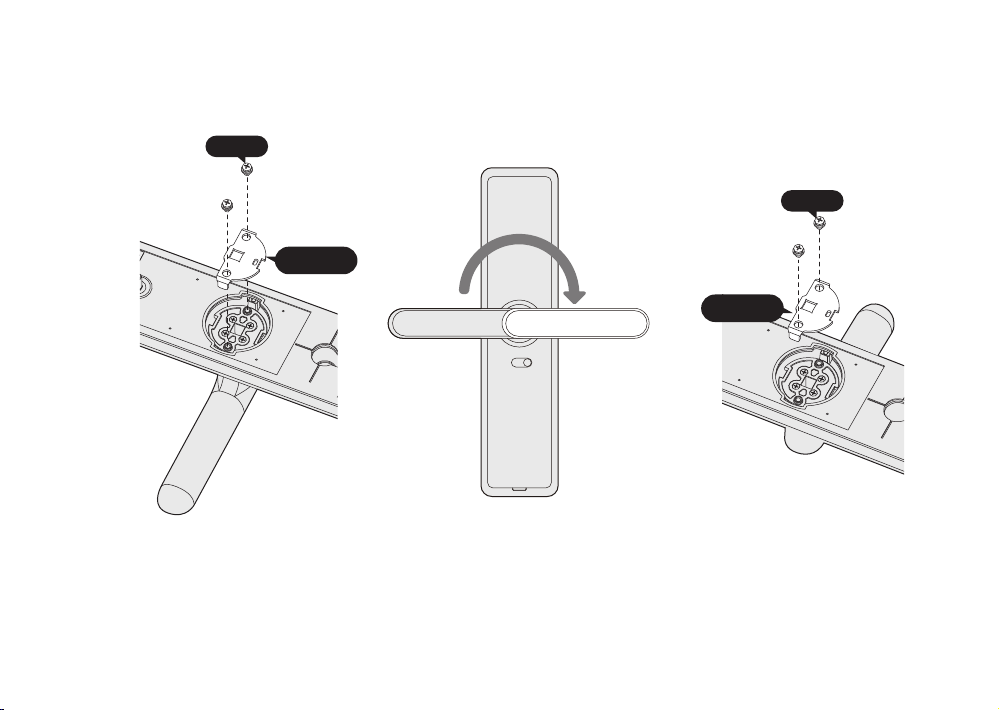
Taking out screws and positional
component in proper order.
Rotating the handle to the other end. Place positional component and
fasten the screws.
Positional
Component
Positional
Component
Screws
Screws
Notice:
Default screw pack for door is thickness 38-60mm, please contact our dealer if other screw pack required.
Installation Steps
Drill holes according to the installation
template, and put the mortise lock inside
the door, Fix mortise screws.
Notice: Make sure the mortise cable through
the hole as the picture shows.
Mortise cable
Do not make the
mortise deadbolt
come out.
Mortise screws
Cable
Pressure spring
Square shaft
Screw
Connecting
screw bolt
(Notice: the pressure
spring have to screw
in the square shaft)
Fix the connecting screw bolts on the outside
escutcheon, place the square shaft and pressure
spring into the bore.
Notice: Choose the square shaft and connecting
screw bolt in correct length according to your
door thickness.
Cylinder
Connecting
screw bolt

Pass the connection cable through the top bore. Then
align and insert square shaft into mortise hole to make
the front escutcheon against the door closely.
Notice:According to the door thickness, cut the night
latch key pick in proper length and insert the key pick
into the right mortise hole.
Install the mounting plate with fixing screws tightly
against the door.Install the square shaft and pressure
spring on the back inside escutcheon , and connect
the mortise cable and outside escutcheon cable with
inside escutcheon, then align and insert square shaft
and night latch key pick into mortise hole to make the
inside escutcheon against the door closely, then tight
the mounting screw to fix the inside escutcheon.
Mounting screw
Mounting screw
Connecting cable
Mortise cable
Pressure spring Square shaft
Notice: the switch of tamper alarming have to tight against
the door, otherwise the tamper alarming will be triggered
once power on.
Mortise cable
Cable

Notice: Make sure the Inside escutcheon cover
installed well, avoid it fall off when close the door.
Install 4pcs batteries and Inside escutcheon
cover. Check if all functions are working well,
then installation is finished.
Inside escutcheon cover
Batteries
Table of contents
Other Kaadas Lock manuals


