Kadeka KA24WR User manual

1
Kadeka Wine Chiller
INSTRUCTION MANUAL
Model Number: KA24WR
BEFORE USE, PLEASE READ AND FOLLOW ALL SAFETY RULES AND
OPERATING INSTRUCTIONS.
Thank you for choosing wine Chiller Kadeka!
WE HOPE THIS PRODUCT WILL SATISFY YOUR REQUIREMENTS IN LONG TIME!

2
PARTS & FEATURES
1. HUMIDOR
2. DOOR
3. HANDLE
4. SHELVES
5. LEVELING LEGS
6. CABINET
WARNING
To prevent damaging the door gasket, make sure to have the door all the way
opened when pulling shelves out of the rail compartment.
The appliance must be positioned so that the plug is accessible. Release the electric
cord. Move your cabinet to its final location. Do not move your Cabinet while loaded
with wines. You might distort the body. The Wine Chiller should be installed in a
suitable place in order to avoid Touching the compressor with your hands.
If the supply cord is damaged, it must be replaced by manufacturer or its Service
agent.
Upon receiving the wine Chiller appliance, it must rest for 3 hours to let the compressor gas to
settle down. Switching on the appliance immediately will choke the refrigerant system.

3
IMPORTANT SAFETY INSTRUCTIONS
WARNING
To reduce the risk of fire, electrical shock, or injury
when using your appliance, follow these basic
precautions:
Read all instructions before using the Wine Chiller.
DANGER or WARNING: Risk of child entrapment.
Child entrapment and suffocation are not problems of the past. Junked or abandoned appliances
are still dangerous . . . even if they will “just sit in the garage a few days”.
Before you throw away your old Wine Chiller: Take off the door. Leave the shelves in place
so that children may not easily climb inside.
Never allow children to operate, play with, or crawl inside the appliance.
Never clean appliance parts with flammable fluids. The fumes can create a fire hazard or
explosion.
Do not store or use gasoline or any other flammable vapors and liquids in the vicinity of this or
any other appliance. The fumes can create a fire hazard or explosion.
-Save these instructions-
INSTALLATION INSTRUCTIONS
Before Using Your Wine Chiller
Remove the exterior and interior packing.
Before connecting the Wine Chiller to the power source, let it stand upright for approximately 2
hours. This will reduce the possibility of a malfunction in the cooling system from handling
during transportation.
Clean the interior surface with lukewarm water using a soft cloth.
Install the handle on the left side of the door.
When replace the illuminating lamp, please select the lamp which comply with the rated power
input of lamp according to the rating label. Shut off the power supply before replacing the lamp.
When disposing your appliance, please choose an authorized disposal site.
Installation of Your Wine Chiller
This appliance is designed to be for free standing installation only.
Place your Wine Chiller on a floor that is strong enough to support it when it is fully loaded. To
level your Wine Chiller, adjust the front leveling leg at the bottom of the Wine Chiller.
Locate the Wine Chiller away from direct sunlight and sources of heat (stove, heater, radiator,
etc.). Direct sunlight may affect the acrylic coating and heat sources may increase electrical
consumption. Extreme cold ambient temperatures may also cause the unit not to perform properly.
Avoid locating the unit in moist areas.
Plug the Wine Chiller into an exclusive, properly installed-grounded wall outlet. Do not under any
circumstances cut or remove the third (ground) prong from the power cord. Any questions
concerning power and/or grounding should be directed toward a certified electrician or an
authorized service center.

4
OPERATING YOUR WINE Chiller
Please use the cabinet under 5-35 ℃ambient temperature, if the ambient temperature is higher than or
lower than this temperature, it will cause the temperature fluctuation in the cabinet, maybe can't reach 5-
18 ℃.
Recommended Temperatures for Chilling Wine.
Red Wines: 15-18℃(59-64 F)
Dry/White Wines 9-14℃(48-57 F)
Sparkling Wines 5- 8℃(41-46 F)
The controls of your Wine Chilller
“ RUN ”
Indicator light illuminates to signify the cooling mode is currently in operation.
“ LIGHT ”
To control the inner light turn on/off.
“ ON/OFF ”
To control this appliance turn on/off ( press and hold this buttons for approximately
3 seconds).
“ UP ”
Used to raise(warm) the temperature in 1℃.
“ DOWN ” Button
Used to lower(cool) the temperature in 1℃.
ON/OFF Power and memory function
To turn the Wine Chiller ON or OFF, press and hold the power button for 2 seconds. The LED
readout will show the last set temperature.
Setting The Temperature Controls
Set the desired cooling temperature by pressing the buttons adjacent to the “UP/DOWN" program.
Each depression of the buttons will scroll through the available temperature setting in increments of 1
degree. The temperature selected will flash in the LED display for approximately 5 seconds, then
revert back to display the temperature of the internal cabinet.
The temperature setting can be adjusted from 5°C ~18°C.
To view the "set" temperature, (anytime) press and hold the corresponding button for approximately 5
seconds, the "set" temperature will temporarily "flash" in the LED display for 5 seconds
Flashing LED = Set Temperature
Steady LED = Cabinet Temperature

5
Shelves
To prevent damaging the door gasket, make sure to have the door all the way open when pulling
shelves out of the rail compartment.
For easy access to the storage content, you must pull the shelves approximately 1/3 out of the rail
compartment, however, this unit is designed with a notch on each sides of the shelf tracks to prevent
bottles from falling.
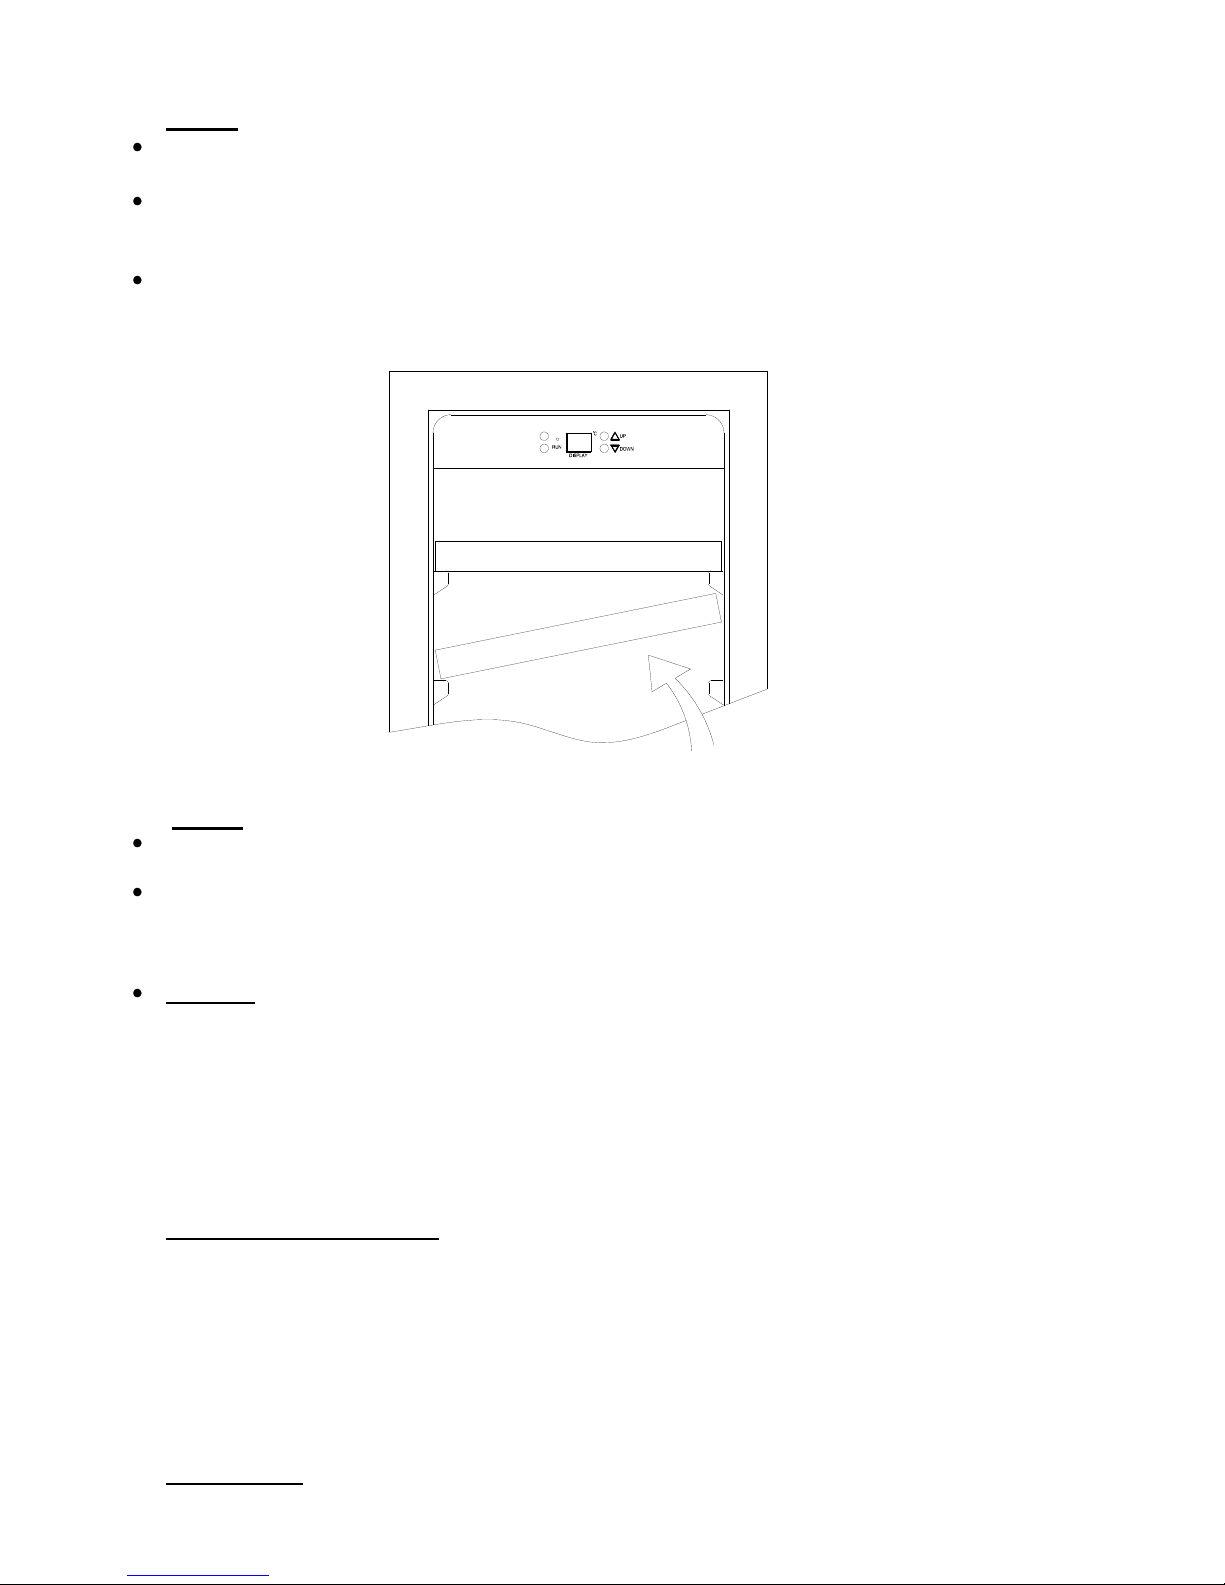
When removing any of these shelves out of the rail compartment, To fit or remove the shelf, tilt the
shelf as per the diagram and simply pull out, or push in the shelf until it sits on the support brackets
securely.
NOTE:
If the unit is unplugged, power lost, or turned off, you must wait 3 to 5 minutes before restarting the
unit. If you attempt to restart before this time delay, the Wine Chiller will not start.
When you use the Wine Chiller for the first time or restart the Wine Chiller after having been shut
off for a long time, there could be a few degrees variance between the temperature you select and the
one indicated on the LED readout. This is normal and it is due to the length of the activation time.
Once the Wine Chiller is running for a few hours everything will be back to normal.
Humidor
If humidity conditions are low, it will be necessary to use the humidor. Fill the humidor about 3/4 full
with fresh water, and place one humidor on the top rack. Check the water level occasionally and refill
as necessary.
NOTE: The use of humidior will reduce the storage capacity of the shelves on which they are placed
on by one bottle.
CARE AND MAINTENANCE
Cleaning Your Wine Chiller
Turn off the power, unplug the appliance, and remove all items including shelves and rack.
Wash the inside surfaces with a warm water and baking soda solution. The solution should be
about 2 tablespoons of baking soda to a quart of water.
Wash the shelves with a mild detergent solution.
Wring excess water out of the sponge or cloth when cleaning area of the controls, or any electrical
parts.
Wash the outside cabinet with warm water and mild liquid detergent. Rinse well and wipe dry
with a clean soft cloth.
Power Failure

6
Most power failures are corrected within a few hours and should not affect the temperature of your
appliance if you minimize the number of times the door is opened. If the power is going to be off for a
longer period of time, you need to take the proper steps to protect your contents.
Vacation Time
Short vacations: Leave the Wine Chiller operating during vacations of less than three weeks.
Long vacations: If the appliance will not be used for several months, remove all items and turn off
the appliance. Clean and dry the interior thoroughly. To prevent odor and mold growth, leave the
door open slightly: blocking it open if necessary.
Moving Your Wine Chiller
Remove all items.
Securely tape down all loose items (shelves) inside your appliance.
Turn the adjustable leg up to the base to avoid damage.
Tape the door shut.
Be sure the appliance stays secure in the upright position during transportation. Also protect
outside of appliance with a blanket, or similar item.
Energy Saving Tips
The Wine Chiller should be located in the coolest area of the room, away from heat producing
appliances, and out of the direct sunlight.

7
PROBLEMS WITH YOUR WINE Chiller?
You can solve many common Wine Chiller problems easily, saving you the cost of a possible service call.
Try the suggestions below to see if you can solve the problem before calling the Service Centre.
TROUBLESHOOTING GUIDE
PROBLEM
POSSIBLE CAUSE
Wine Chiller does not operate.
Not plugged in.
The appliance is turned off.
The circuit breaker tripped or a blown fuse.
Wine Chiller is not cold enough.
Check the temperature control setting.
External environment may require a higher setting.
The door is open too often.
The door is not closed completely.
The door gasket does not seal properly.
Turns on and off frequently.
The room temperature is hotter than normal.
A large amount of contents has been added to the Wine
Chiller.
The door is opened too often.
The door is not closed completely.
The temperature control is not set correctly.
The door gasket does not seal properly.
The light does not work.
Not plugged in.
The circuit breaker tripped or a blown fuse.
The bulb has burned out.
The light button is “OFF”.
Vibrations.
Check to assure that the Wine Chiller is level.
The Wine Chiller seems to make too much
noise.
The rattling noise may come from the flow of the
refrigerant, which is normal.
As each cycle ends, you may hear gurgling sounds
caused by the flow of refrigerant in your Wine Chiller.
Contraction and expansion of the inside walls may cause
popping and crackling noises.
The Wine Chiller is not level.
The door will not close properly.
The Wine Chiller is not level.
The door was reversed and not properly installed.
The gasket is dirty.
The shelves are out of position.
Water condensation may form on the glass
door.
A natural occurrence due to high humidity ambient . Just
wipe it off.
Other manuals for KA24WR
1
Table of contents
Other Kadeka Wine Cooler manuals